In this article, we are going to learn about asynchronous programming with the async and await keywords in the ASP.NET Core projects. We are going to dive deep inside these keywords and explain their advantages and how they help us scale our application. Additionally, we are going to explain the complete process of converting the synchronous project to the asynchronous one by using the async and await keywords. Even though we are going to use the ASP.NET Core Web API project as our example project, the knowledge you will get from this article is applicable to any .NET application.
So, let’s start.
VIDEO: Asynchronous Programming With Async and Await in .NET.
Asynchronous Programming and its Advantage
By using asynchronous programming, we avoid performance bottlenecks and enhance the responsiveness of our applications. It is a programming technique that allows us to execute our flows without blocking our application or causing the thread pool starvation.
The often misconception is that by using the async and await keywords we gain better performance in terms of the speed of our application. But that’s not the case. For example, if we have synchronous code that fetches the data from the database and it takes three seconds to complete, our asynchronous code won’t be any faster than that. But we do get an indirect performance improvement regarding how many concurrent requests our server can handle. In other words, we increase the scalability of our application by using the async and await keywords.
So, let’s talk a bit about scaling and learn why is it so important.
When we deploy our API to the server, that server can handle only a certain amount of requests. If our API receives more requests than our server can handle, the overall performance of our application will suffer. So, what we can do is to add an additional server to handle those additional requests, and we call it horizontal scaling. The other thing we can do is to improve the allocated resources on that single server by increasing the memory or CPU power, and we call this vertical scaling. So in other words, if we create an application in such a way that the resource utilization is improved, we improve the scalability of our application. That’s exactly why async code is important. By its proper usage, we can increase the vertical scalability at the server level of our API.
Now, let’s see how the synchronous and asynchronous requests work in ASP.NET Core.
How Synchronous and Asynchronous Requests Work in ASP.NET Core
Let’s start with the synchronous request first.
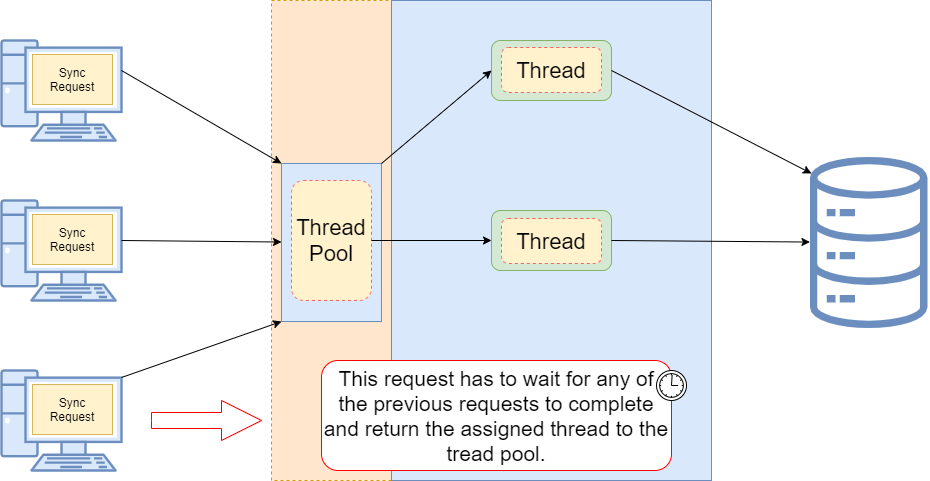
When a client sends a request to our API to fetch the list of companies from the database, the ASP.NET Core assigns the thread from a thread pool to handle that request. Just for the sake of simplicity, let’s imagine that our thread pool has two threads. So, we have used one thread. Now, the second request arrives and we have to use the second thread from a thread pool. As you can see, our thread pool is out of threads. If a third request arrives now, it has to wait for any of the first two requests to complete and return assigned threads to a thread pool. Only then the thread pool can assign that returned thread to a new request:
As a result of a request waiting for an available thread, our client experiences a slow down for sure. Additionally, if the client has to wait too long, they will receive an error response, usually, the service is unavailable (503). But this is not the only problem. Since the client expects the list of companies from the database, we know that it is an I/O operation. So, if we have a lot of companies in the database and it takes three seconds for the database to return a result to the API, our thread is doing nothing except waiting for the task to complete. So basically, we are blocking that thread and making it three seconds unavailable for any additional requests that arrive at our API.
Asynchronous Requests
With asynchronous requests, the situation is completely different.
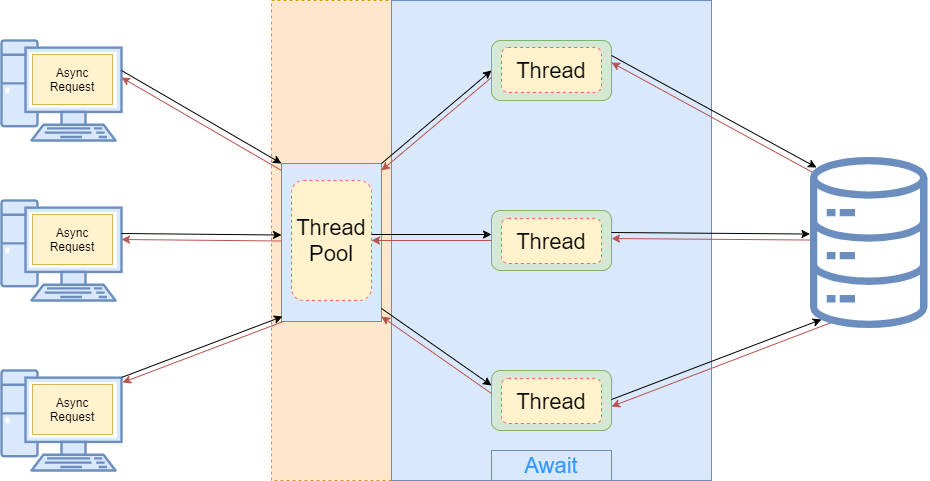
When a request arrives at our API, we still need a thread from a thread pool. So, that leaves us with only one thread left. But because this action is now asynchronous, as soon as our request reaches the I/O point where the database has to process the result for three seconds, the thread is returned to a thread pool. Now we again have two available threads and we can use them for any additional request. After the three seconds when the database returns the result to the API, the thread pool assigns the thread again to handle that response:
This means that we can handle a lot more requests, we are not blocking our threads, and we are not forcing threads to wait (and do nothing) for three seconds until the database finishes its work. All of these leads to improved scalability of our application.
Using the Async and Await Keywords in our ASP.NET Core Application
These two keywords – async and await – play a key role in asynchronous programming in ASP.NET Core. We use the async keyword in the method declaration and its purpose is to enable the await keyword within that method. So yes, you can’t use the await keyword without previously adding the async keyword in the method declaration. Also, using only the async keyword doesn’t make your method asynchronous, just the opposite, that method is still synchronous.
The await keyword performs an asynchronous wait on its argument. It does that in several steps. The first thing it does is to check whether the operation is already complete. If it is, it will continue the method execution synchronously. Otherwise, the await keyword is going to pause the async method execution and return an incomplete task. Once the operation completes, a few seconds later, the async method can continue with the execution.
Let’s see this with a simple example:
public async Task<IEnumerable<Company>> GetCompanies()
{
    _logger.LogInfo("Inside the GetCompanies method.");

    var companies = await _repoContext.Companies.ToListAsync();

    return companies;
}
So, even though our method is marked with the async keyword, it will start its execution synchronously. Once we log the required information in a synchronous manner, we continue to the next code line. There, we extract all the companies from the database. As you can see, we use the await keyword here. If our database requires some time to process the result and return it back, the await keyword is going to pause the GetCompanies method execution and return an incomplete task. During that time, the thread will be returned to a thread pool making itself available for another request. After the database operation completes, the async method will resume executing and will return the list of companies.
From this example, we see the async method execution flow. But the question is, how does the await keyword know if the operation is completed or not? Well, this is where the Task comes into play.
Return Types of the Asynchronous Methods
In asynchronous programming we have three return types:
- Task<TResult>, for an async method that returns a value
- Task, to use it for an async method that does not return a value
- void, which we can use for an event handler
Let’s explain this.
When our method returns Task<TResult>, as in our previous example, it will return a result of type TResult in an asynchronous manner. So, if we want to return int we are going to use Task<int> as the return type. Of course, as you saw in a previous example, if we want to return IEnumerable<Company>, we are going to use Task<IEnumerable<Company>>.
When we don’t want to return a value from our async method, we usually return Task. This means that we can use the await keyword inside that method but without the return keyword.
We should use void only for the asynchronous event handlers which require a void return type. Like the button click handler in GUI applications. Other than that, we should always return a Task. Using void with the asynchronous method is not recommended because such methods are hard to test, catching errors is hard as well, and finally, there is no easy way to provide the caller with the status of the asynchronous operation. So, as you can read in many articles or books, we should avoid using the void keyword with asynchronous methods.
From C# 7.0 onward, we can specify any other return type, if it includes the GetAwaiter method.
Now, it is very important to understand that the Task represents an execution of the asynchronous method and not the result. The Task has several properties that indicate whether the operation completed successfully or not (Status, IsCompleted, IsCanceled, IsFaulted). With these properties, we can track the flow of our async operations. So, this is the answer to our question. With Task, we can track whether the operation is completed or not. This is also called TAP (Task-based Asynchronous Pattern).
Implementing Asynchronous Programming with Async and Await Keywords in ASP.NET Core
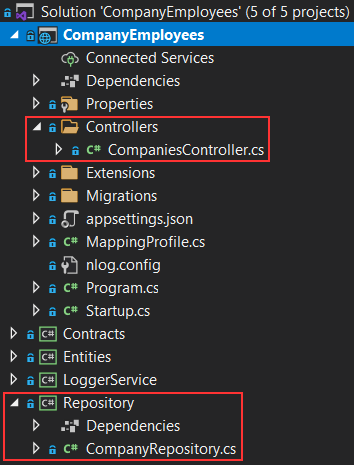
So, it’s time to rewrite our synchronous project into the asynchronous one. In our GitHub repository, you can find a start folder with the starting project. Feel free to use it to follow along with the coding examples. You will find several projects inside the solution but the two most important classes for our examples are the CompaniesController class inside the CompanyEmployees project, and the CompanyRepository class inside the Repository project:
To seed the data, just modify the connection string inside the appsettings.json file (if you have to) and run the Update-Database command from PMC.
So, let’s open the CompanyRepository.cs file and inspect the GetAllCompanies method:
public IEnumerable<Company> GetAllCompanies() =>
    _repoContext.Companies
        .OrderBy(c => c.Name)
        .ToList();
Just a simple method that retrieves all the companies from the database ordering them by name.
To implement the asynchronous programming inside this method, we can follow what we have learned so far from this article:
public async Task<IEnumerable<Company>> GetAllCompanies()
{
    var companies = await _repoContext.Companies
        .OrderBy(c => c.Name)
        .ToListAsync();

    return companies;
}
We add the async keyword to the method signature and also we wrap the return type with Task. To use Task in our code, we have to add the System.Threading.Tasks using directive. Then, inside the method, we use the await keyword – we’ve already explained why we need it – and we convert the ToList method to the ToListAsync method. The ToListAsync method comes from the Microsoft.EntityFrameworkCore namespace and it serves the purpose to execute our query in an asynchronous manner. Finally, as a result, we return the list of companies.
Common Pitfalls
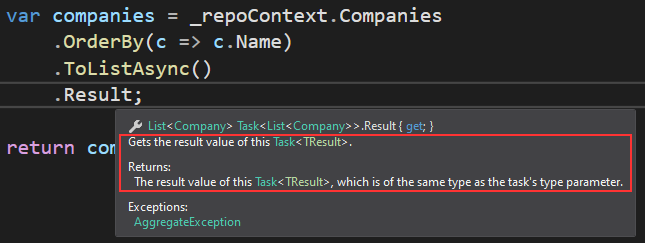
If we didn’t know better, we could’ve been tempted to execute our asynchronous operation with the Result property:
var companies = _repoContext.Companies
    .OrderBy(c => c.Name)
    .ToListAsync()
    .Result;
We can see that the Result property returns the result we require:
Don’t do this.
With this code, we are going to block the thread and potentially cause a deadlock in the application, which is the exact thing we are trying to avoid using the async and await keywords. It applies the same to the Wait method that we can call on a Task.
With this out of the way, we can continue.
Since our CompanyRepository inherits from the ICompanyRepository interface, we have to add some modifications there as well:
public interface ICompanyRepository
{
    Task<IEnumerable<Company>> GetAllCompanies();
    Company GetCompany(Guid companyId);
    void CreateCompany(Company company);
}
That’s it.
Of course, if you want, you can use a lambda expression body for our GetAllCompanies method:
public async Task<IEnumerable<Company>> GetAllCompanies() =>
    await _repoContext.Companies
        .OrderBy(c => c.Name)
        .ToListAsync();
It is up to you whether you want to do it this way.
Modifying Controller
When we use asynchronous programming in our code, we have to implement it through the entire flow. Since our GetCompanies action inside the CompaniesController calls this async method from the repository class, we have to modify the action inside the controller as well:
[HttpGet]
public async Task<IActionResult> GetCompanies()
{
    var companies = await _repository.GetAllCompanies();

    var companiesDto = _mapper.Map<IEnumerable<CompanyDto>>(companies);

    _logger.LogInfo("All companies fetched from the database");

    return Ok(companiesDto);
}
As you can see, we do three things here. We add an async keyword to the method signature, modify the return type by using Task, and we use the await keyword when we call the GetAllCompanies awaitable method.
The rest of the code – the mapping part, the logging part, and the return of the result – will be executed after the awaitable operation completes. This represents continuation.
Continuation in Asynchronous Programming
The await keyword does three things:
- It helps us extract the result from the async operation – we already learned about that
- Validates the success of the operation
- Provides the Continuation for executing the rest of the code in the async method
So, in our GetCompanies action, all the code after awaiting an async operation is executed inside the continuation if the async operation was successful.
When we talk about continuation, it can be confusing because you can read a lot of articles about SynchronizationContext and capture the current context to enable this continuation. Basically, when we await a task, a request context is captured when await decides to pause the method execution. Once the method is ready to resume its execution, the application takes a thread from a thread pool, assigns it to the context (SynchonizationContext), and resumes the execution. But this is the case for ASP.NET applications.
We don’t have SynchronizationContext in ASP.NET Core applications. ASP.NET Core avoids capturing and queuing the context, all it does is take the thread from a thread pool and assign it to the request. So, a lot less background work for the application to do.
One more thing. We are not limited to a single continuation. This means that in a single method, we can have multiple await keywords, like for example when we send an HTTP request using the HttpClient:
private async Task GetCompaniesWithHttpClientFactory()
{
    var httpClient = _httpClientFactory.CreateClient();
    using (var response = await httpClient.GetAsync("https://localhost:5001/api/companies", HttpCompletionOption.ResponseHeadersRead))
    {
        response.EnsureSuccessStatusCode();
        var stream = await response.Content.ReadAsStreamAsync();
        var companies = await JsonSerializer.DeserializeAsync<List<CompanyDto>>(stream, _options);
    }
}
Here you can see several continuations in action.
Converting Additional Synchronous Methods
Based on our previous knowledge, we are pretty sure you can convert the GetCompany method and action from synchronous to asynchronous. The process is the same since both methods return Task<T>.
That said, let’s modify the interface first:
public interface ICompanyRepository
{
    Task<IEnumerable<Company>> GetAllCompanies();
    Task<Company> GetCompany(Guid companyId);
    void CreateCompany(Company company);
}
Then, we have to modify the method itself:
public async Task<Company> GetCompany(Guid companyId) =>
    await _repoContext.Companies
        .SingleOrDefaultAsync(c => c.Id.Equals(companyId));
And finally the action:
[HttpGet("{id}", Name = "CompanyById")]
public async Task<IActionResult> GetCompany(Guid id)
{
    var company = await _repository.GetCompany(id);
    if (company == null)
    {
        _logger.LogInfo($"Company with id: {id} doesn't exist in the database.");
        return NotFound();
    }
    else
    {
        var companyDto = _mapper.Map<CompanyDto>(company);
        return Ok(companyDto);
    }
}
And that’s it. Both the GetCompany and GetCompanies methods return Task<T> and we can use the same principle to convert them.
But, what about the CreateCompany method? Currently, it returns void. Well, as we said, if our async method doesn’t return any result, we are going to use just a Task for the return type.
So, let’s start with the interface modification:
public interface ICompanyRepository
{
    Task<IEnumerable<Company>> GetAllCompanies();
    Task<Company> GetCompany(Guid companyId);
    Task CreateCompany(Company company);
}
As you can see, instead of the void keyword, we use just a Task.
Now, we can modify the method implementation:
public async Task CreateCompany(Company company)
{
    _repoContext.Add(company);
    await _repoContext.SaveChangesAsync();
}
And the action:
[HttpPost]
public async Task<IActionResult> CreateCompany([FromBody] CompanyForCreationDto company)
{
    if (company == null)
    {
        _logger.LogError("CompanyForCreationDto object sent from client is null.");
        return BadRequest("CompanyForCreationDto object is null");
    }

    var companyEntity = _mapper.Map<Company>(company);

    await _repository.CreateCompany(companyEntity);

    var companyToReturn = _mapper.Map<CompanyDto>(companyEntity);

    return CreatedAtRoute("CompanyById", new { id = companyToReturn.Id }, companyToReturn);
}
Excellent.
But what if our asynchronous operation fails?
Let’s see how we can handle that.
Exception Handling with Asynchronous Operations
As we mentioned in the continuation section of this article, the await keyword validates the success of the asynchronous operation. So, all we have to do is to wrap the code inside the try/catch block to catch those exceptions if they occur.
Just for testing purposes, let’s modify the GetAllCompanies method by throwing a simple exception:
public async Task<IEnumerable<Company>> GetAllCompanies()
{
    throw new Exception("Custom exception for testing purposes");
    return await _repoContext.Companies
        .OrderBy(c => c.Name)
        .ToListAsync();
}
Now, we can wrap our code from the GetCompanies action inside the try/catch block:
[HttpGet]
public async Task<IActionResult> GetCompanies()
{
    try
    {
        var companies = _repository.GetAllCompanies();

        var companiesDto = _mapper.Map<IEnumerable<CompanyDto>>(companies);

        _logger.LogInfo("All companies fetched from the database");

        return Ok(companiesDto);
    }
    catch (Exception ex)
    {
        _logger.LogError($"Exception occurred with a message: {ex.Message}");
        return StatusCode(500, ex.Message);
    }
}
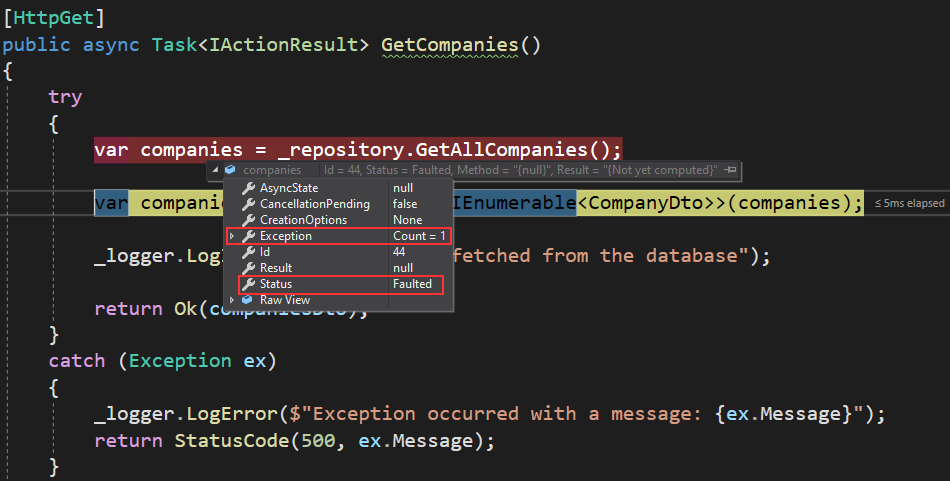
Pay attention that we removed the await keyword just to show you what the faulted async operation returns and how our code behaves without it.
So, if we place a breakpoint in this action and send the get request from Postman, we are going to see that the async operation returns a faulted task:
This task has a single exception and a Status property set to Faulted. But, as you can see, we didn’t enter the catch block, our code just continues with the execution. That’s because, without the await keyword, the task swallows the exception. Furthermore, there is no more continuation and the operation is not validated. If you continue the execution of this action, you will get an exception, but it will be the mapping exception and not the exception that we throw from our async method.
So, let’s return the await keyword where it belongs:
var companies = await _repository.GetAllCompanies();
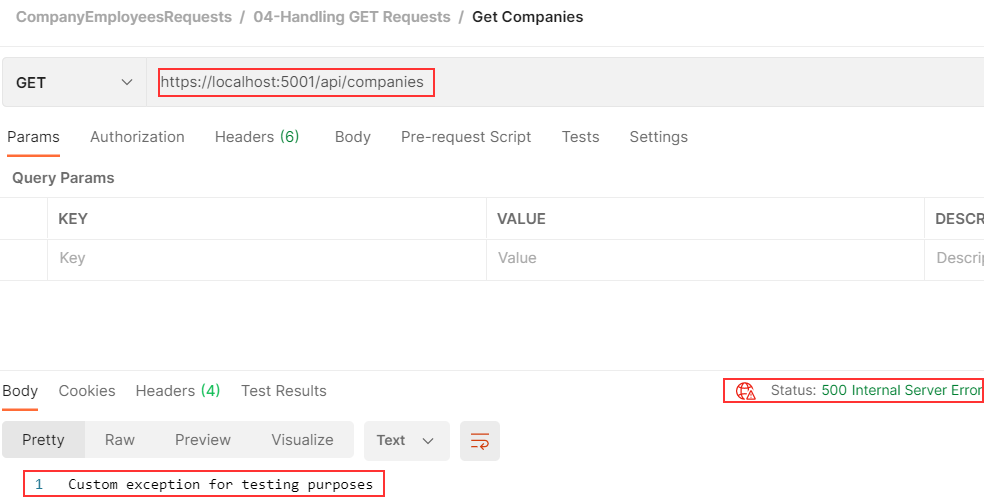
Now, if we run our code, the await keyword will validate the operation, and as soon as it notices that the task has a faulted state, the code will continue execution inside the catch block. This means that we are going to get a valid error message in Postman and a valid log in the file:
There we go.
Of course, if you don’t want to write try/catch blocks in every action in your project, you can use the Global Exception Handling technique, to catch exceptions in a single place.
Conclusion
We’ve covered a lot of areas in this article, and learned a lot about using the async and await keywords in ASP.NET Core applications. Of course, we can always extract some key points that we must pay attention to:
- We always have to use the async and await keywords together. By using just the async keyword, our methods will not be asynchronous
- When we don’t want to return a result from our async method, we should always return a Task
- To validate our asynchronous operations, we have to use the await keyword while calling that operation
- When we convert our synchronous code to asynchronous, we have to use the async and await keywords all the way up the chain
- We should avoid using the
voidkeyword in asynchronous methods unless we are working with event handlers (Windows, WPF apps) - To get the result from an async operation, we should use the await keyword and not the Result property or the Wait method. These can cause a deadlock in our app
So, that’s it. We hope you learned a lot from this article.
Until the next one.
Best regards.


