

In the previous post, we created our modal components. Now it’s time to use them in our project.
Creating a new owner entity and also validating a form is our goal in this article
For the complete navigation and all the basic instructions of the Angular series, check out: Introduction of the Angular series.
Let’s start.
Preparation For the Create Owner Component
Let’s start by creating our component inside the owner folder. To do this, execute the Angular CLI command:
ng g component owner/owner-create --skip-tests
Then, we are going to modify the owner routing module by adding a new route:
{ path: 'create', component: OwnerCreateComponent }
When we click on the “create” link inside the owner-list.component.html file, we want the application to direct us to the creation page.
So, let’s modify the <a> tag inside the owner-list.component.html file:
<a [routerLink]="['/owner/create']">Create owner</a>
About Form Validation and ReactiveFormsModule
Now, we can start writing code to create our entity and validate the form. There are two types of validation in Angular: template-driven validation and reactive form validation. In our project, we are going to use reactive form validation because an HTML file is easier to read. Furthermore, it doesn’t make HTML files so much “dirty” with too many code lines and all validation is in the component which makes it easier for maintenance.
Just before we modify our component, we need to modify the owner.module.ts file. Let’s import the ReactiveFormsModule because this is a module that supports the reactive form validation:
import { ReactiveFormsModule } from '@angular/forms';

...

@NgModule({
...
  imports: [
    CommonModule,
    OwnerRoutingModule,
    SharedModule,
    ReactiveFormsModule
  ]
Additionally, we have to create a new interface:
export interface OwnerForCreation{
  name: string;
  dateOfBirth: string;
  address: string;
}
Angular Form Validation HTML Part
Let’s continue by modifying the owner-create.component.html file:
<div class="container-fluid">
  <form [formGroup]="ownerForm" autocomplete="off" novalidate (ngSubmit)="createOwner(ownerForm.value)">
    <div class="card card-body bg-light mb-2 mt-2">

      <div class="row mb-3">
        <label for="name" class="col-form-label col-md-2">Name of the owner: </label>
        <div class="col-md-5">
          <input type="text" formControlName="name" id="name" class="form-control" />
        </div>
        <div class="col-md-5">
          <em *ngIf="validateControl('name')
          && hasError('name', 'required')">Name is required</em>
          <em *ngIf="validateControl('name')
          && hasError('name', 'maxlength')">Maximum allowed length is 60 characters.</em>
        </div>
      </div>

      <div class="mb-3 row">
        <label for="dateOfBirth" class="col-form-label col-md-2">Date of birth: </label>
        <div class="col-md-5">
          <input type="text" formControlName="dateOfBirth" id="dateOfBirth"
          class="form-control" readonly bsDatepicker/>
        </div>
        <div class="col-md-5">
          <em *ngIf="validateControl('dateOfBirth')
          && hasError('dateOfBirth', 'required')">Date of birth is required</em>
        </div>
      </div>

      <div class="mb-3 row">
        <label for="address" class="col-form-label col-md-2">Address: </label>
        <div class="col-md-5">
          <input type="text" formControlName="address" id="address" class="form-control" />
        </div>
        <div class="col-md-5">
          <em *ngIf="validateControl('address')
          && hasError('address', 'required')">Address is required</em>
          <em *ngIf="validateControl('address')
          && hasError('address', 'maxlength')">Maximum allowed length is 100 characters.</em>
        </div>
      </div>

      <br><br>

      <div class="mb-3 row">
          <div class="offset-5 col-md-1">
              <button type="submit" class="btn btn-info" [disabled]="!ownerForm.valid">Save</button>
          </div>
          <div class="col-md-1">
              <button type="button" class="btn btn-danger" (click)="redirectToOwnerList()">Cancel</button>
          </div>
      </div>

    </div>
  </form>
</div>
Now let’s explain this code. In the form element, we create the formGroup with the ownerForm name. This form group contains all the controls we need to validate in our form. Moreover, with the (ngSubmit) we call a function when a user presses the submit button. As a parameter for that function, we send the ownerForm’s value which contains all the controls with the data we need for the validation.
There is a formControlName attribute inside every control. That attribute represents the control name which we are going to validate inside the ownerForm and it is a mandatory attribute. Furthermore, in the <em> tags we display error messages if there are any.
One thing to pay attention to is the DateOfBirth input element. Here we use the bsDatepicker directive from ngx-bootstrap, to attach the datepicker to this input component. For this to work, we have to add the BsDatepickerModule module inside the owner.module.ts file:
...
import { BsDatepickerModule } from 'ngx-bootstrap/datepicker';
...

@NgModule({
...
  imports: [
    CommonModule,
    OwnerRoutingModule,
    SharedModule,
    ReactiveFormsModule,
    BsDatepickerModule.forRoot()
  ]
There are a lot more functionalities that we can use with ngx-bootstrap’s date picker, and to learn about them, you can read this documentation.
About the Errors and Buttons on the Form
Errors will be written on the page only if the functions validateControl() and hasError() return true as a result.
The validateControl() function is going to check if the control is invalid and the hasError() function is going to check which validation rules we are validating against (required, max length…). Both validateControl and hasError functions are the custom functions that we are going to implement in the component (.ts) file. There is also a submit button that is going to be disabled until the form becomes valid and a cancel button that is going to redirect the user away from the creation form.
Angular Form Validation Component (.ts) Part
Now, we have to implement the logic for all those functions called in the template file. We are going to add a lot of logic to the owner-create.component.ts file, so we are going to try to break the explanation into multiple parts. Let’s start with the imports:
import { SuccessModalComponent } from './../../shared/modals/success-modal/success-modal.component';
import { DatePipe } from '@angular/common';
import { Router } from '@angular/router';
import { ErrorHandlerService } from './../../shared/services/error-handler.service';
import { OwnerRepositoryService } from './../../shared/services/owner-repository.service';
import { Component, OnInit } from '@angular/core';
import { FormControl, FormGroup, Validators } from '@angular/forms';
import { Owner } from 'src/app/_interfaces/owner.model';
import { HttpErrorResponse } from '@angular/common/http';
import { OwnerForCreation } from 'src/app/_interfaces/ownerForCreation.model';
import { ModalOptions, BsModalRef, BsModalService } from 'ngx-bootstrap/modal';
A lot of import statements, and we will see throughout the code why we use each of those.
Now, let’s inspect another part of the file:
export class OwnerCreateComponent implements OnInit {
  errorMessage: string = '';
  ownerForm: FormGroup;
  bsModalRef?: BsModalRef;

  constructor(private repository: OwnerRepositoryService, private errorHandler: ErrorHandlerService,
    private router: Router, private datePipe: DatePipe, private modal: BsModalService) { }

  ngOnInit(): void {
    this.ownerForm = new FormGroup({
      name: new FormControl('', [Validators.required, Validators.maxLength(60)]),
      dateOfBirth: new FormControl('', [Validators.required]),
      address: new FormControl('', [Validators.required, Validators.maxLength(100)])
    });
  }
}
As soon as a component mounts we are initializing our FormGroup variable named ownerForm with all the FormControls. Pay attention that the keys in the ownerForm object are the same as the names in the formControlName attribute for all input fields in a .html file, which is mandatory. Moreover, they have the same name as the properties inside the owner object (address, dateOfBirth, and name).
When instantiating a new form control as a first parameter we are providing the value of control and as a second parameter the Validators array, which holds all the validation rules for our controls.
Handling Errors
Now, we are going to add those two functions that we call in our template file to handle validation errors:
validateControl = (controlName: string) => {
  if (this.ownerForm.get(controlName).invalid && this.ownerForm.get(controlName).touched)
    return true;

  return false;
}

hasError = (controlName: string, errorName: string) => {
  if (this.ownerForm.get(controlName).hasError(errorName))
    return true;

  return false;
}
In the validateControl() method, we are checking if the current control is invalid and touched (we don’t want to show an error if the user didn’t place the cursor inside the control at all). Furthermore, the hasError() function will check which validation rule the current control has violated.
Creation Process, DatePipe, and Modal Invocation
To continue, we are going to add the createOwner function that we call in the (ngSubmit) event:
createOwner = (ownerFormValue) => {
  if (this.ownerForm.valid)
    this.executeOwnerCreation(ownerFormValue);
}
It accepts the form value, checks if the form is valid, and if it is calls another private function passing the form value as a parameter.
That said, let’s create that private function:
private executeOwnerCreation = (ownerFormValue) => {
  const owner: OwnerForCreation = {
    name: ownerFormValue.name,
    dateOfBirth: this.datePipe.transform(ownerFormValue.dateOfBirth, 'yyyy-MM-dd'),
    address: ownerFormValue.address
  }
  const apiUrl = 'api/owner';
  this.repository.createOwner(apiUrl, owner)
  .subscribe({
    next: (own: Owner) => {
      const config: ModalOptions = {
        initialState: {
          modalHeaderText: 'Success Message',
          modalBodyText: `Owner: ${own.name} created successfully`,
          okButtonText: 'OK'
        }
      };

      this.bsModalRef = this.modal.show(SuccessModalComponent, config);
      this.bsModalRef.content.redirectOnOk.subscribe(_ => this.redirectToOwnerList());
    },
    error: (err: HttpErrorResponse) => {
        this.errorHandler.handleError(err);
        this.errorMessage = this.errorHandler.errorMessage;
    }
  })

}
Here we create a new OwnerForCreation object that we are going to send to the API with our POST request. Notice that in this example using the date pipe is not restricted only to HTML files. Of course, to make it work inside a component file, we need to import the DatePipe inside the app.module.ts file and to place it inside the “providers“ array:
import { DatePipe } from '@angular/common';

@NgModule({
  declarations: [
...
  ],
  imports: [
...
  ],
  providers: [DatePipe],
  bootstrap: [AppComponent]
Once we create the ownerForCreation object, we create the apiUrl, and call the createOwner repository function. Now, since we are using the OwnerForCreation type, and not the Owner type, we have to modify the type inside the repository function:
public createOwner = (route: string, owner: OwnerForCreation) =>
Good. Let’s get back to our logic.
Inside the subscribe function – with the next property – we accept the success response from the API, create the initial state object for our success modal, and then show the modal by providing the SuccessModalComponent and the config object as parameters. Additionally, we use the bsModalRef object to subscribe to the redirectOnOk event that we emit from the SucessModalComponent once we click the Ok button.
Redirection
With this subscription, we are calling the redirectToOwnerList function. We call the same function by clicking on the Cancel button in our form. So, let’s add that function:
redirectToOwnerList = () => {
  this.router.navigate(['/owner/list']);
}
This is the familiar code for navigating back to the previous component. There is another way of doing this by importing the Locationfrom the @angular/common and injecting it inside the constructor and then just calling the back() function on that injected property (location.back()). What you decide to use is totally up to you.
Now just modify our root CSS file (styles.css), to show <em> messages with the red color and the bold style and to wrap the inputs in the red color if they are invalid:
em{
  color: #e71515;
  font-weight: bold;
}
.ng-invalid.ng-touched{
 border-color: red;
}
Inspecting Results
Now, if we navigate to the CreateOwner component, once we click inside each input element but leave it empty, we are going to see our error messages:
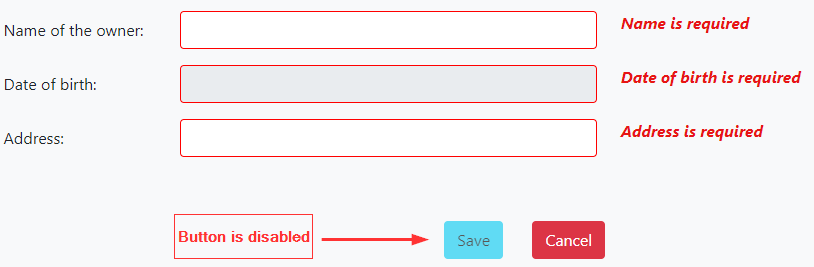
Of course, we can test the max length validation as well.
Once we populate all the fields and click the Save button, we are going to see the success modal message:
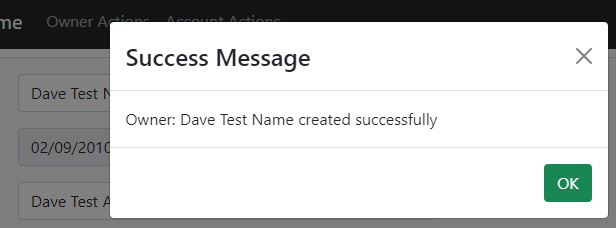
When we click the OK button, we will be redirected to the owner-list page and the new owner is going to be on the list.
The source code for the server project that you can use for this article is here.
Showing Error Modal Component
In the ErrorHandler service, we are going to modify the handleOtherError function:
private handleOtherError = (error: HttpErrorResponse) => {
    this.createErrorMessage(error);

    const config: ModalOptions = {
      initialState: {
        modalHeaderText: 'Error Message',
        modalBodyText: this.errorMessage,
        okButtonText: 'OK'
      }
    };
    this.modal.show(ErrorModalComponent, config);
  }
Of course, we have to add imports in the same file:
import { ErrorModalComponent } from './../modals/error-modal/error-modal.component';
import { BsModalService, ModalOptions } from 'ngx-bootstrap/modal';
Now if an error other than 500 or 404 appears, we are going to show a modal message to the user. We can force an error, to test this behavior, by modifying the CreateOwner action in the Web API project:
[HttpPost]
public IActionResult CreateOwner([FromBody] OwnerForCreationDto owner)
{
    return BadRequest("Bad request from the server while creating owner");
...
Conclusion
By reading this post you have learned:
- About different validation types in the Angular
- How to use reactive form validation in the HTML file
- How to use reactive form validation in the component file
- The way to create a new entity on the client-side
Thank you for reading the post, hopefully, it was helpful to you.
In the next part of the series, we are going to write the update part of the project, by sending the PUT request to our server.

