

A Checkbox List is an important feature to encourage multiple selections of inputs in forms.
We will start with a brief overview of the existing checkbox functionality in ASP.NET Core and later on move to the implementation of a checkbox list.
Let’s begin.
Overview of Checkbox in ASP.NET Core
To understand how the existing Checkbox functionality works in ASP.NET Core, let’s create a new MVC application using the Visual Studio Project wizard or the dotnet new mvc command.
Let’s create an InitialModel class which contains a boolean IsChecked property:
public class InitialModel
{
    public bool IsChecked { get; set; }
}
Now, let’s create a method to return our InitialModel:
public IActionResult Index()
{
    var model = new InitialModel();
    return View(model);
}
Here, we create an Index() action method and instantiate a new InitialModel, which we then pass as a parameter to our View.
Next, we use the existing Index view to create our checkbox:
<form method="post">
    <input asp-for="@Model.IsChecked" />
    <label>Checkbox</label>

    <div>
        <button class="btn btn-primary" type="submit">Submit</button>
    </div>
</form>
Here, we create a checkbox, bind it to the IsChecked property of the InitialModel class, and also create a submit button.
To understand the internals of what goes behind the scenes, let’s take a look at the generated markup using the browser dev tools (press Ctrl+Shift+I on Chrome for Windows).

The generated markup shows that a hidden field with the name as IsChecked and a value of false is also present. By default, the form renders the hidden field at the end.
Now, when we submit the form, there are 2 possibilities. If we check the input checkbox, both true and false values get submitted. On the other hand, if we do not check the input checkbox, only the false value gets submitted
The ASP.NET Core model binder picks up only the first value on submission, which is true for a checked checkbox and false for an unchecked checkbox.
Now that we understand how a checkbox works in ASP.NET Core, let’s move on to the implementation of a checkbox list.
Populate a Checkbox List
To populate a checkbox list, let’s start by creating a CheckboxViewModel with three properties Id, LabelName and IsChecked:
public class CheckboxViewModel
{
    public int Id { get; set; }
    public string LabelName { get; set; }
    public bool IsChecked { get; set; }
}
Now, we create a static GetCourses() method in a static Repository class to return a few courses:
public static IReadOnlyList<CheckboxViewModel> GetCourses()
{
    return new List<CheckboxViewModel>
    {
        new CheckboxViewModel
        {
            Id = 1,
            LabelName = "Physics",
            IsChecked = true
        },
        new CheckboxViewModel
        {
            Id = 2,
            LabelName = "Chemistry",
            IsChecked = false
        },
        new CheckboxViewModel
        {
            Id = 3,
            LabelName = "Mathematics",
            IsChecked = true
        },
        new CheckboxViewModel
        {
            Id = 4,
            LabelName = "Biology",
            IsChecked = false
        },
    };
}
Then, we implement an HTTP GET action in the HomeController to return the list of courses to the CourseSelection view:
public IActionResult CourseSelection()
{
    var model = Repository.GetCourses();
    return View(model);
}
Finally, we implement the checkbox list in the CourseSelection view:
<div class="border border-primary">
    <form method="post" class="m-5">
        <h4>Select Multiple Courses</h4>
        <div>
            @for (var index = 0; index < @Model.Count(); index++)
            {
                <input type="checkbox" asp-for="@Model[index].IsChecked" class="form-check-input" />
                <label class="form-check-label" asp-for="@Model[index].IsChecked">
                    @Model[index].LabelName
                </label>
                <input type="hidden" asp-for="@Model[index].Id" />
                <input type="hidden" asp-for="@Model[index].LabelName" />
                <br />
            }
        </div>
        <div>
            <input class="btn btn-primary mt-3" type="submit" value="Submit" />
        </div>
    </form>
</div>
We have 3 major key takeaways. First, we use a for loop to bind the input and label elements along with their separate indexes. Next, we leverage the asp-for tag helper with the checkbox element to have the id and name attributes populated correctly. Finally, we create an additional hidden field to post back Id and LabelName properties.
We run our application and navigate to the /Home/CourseSelection route to view the checkbox list:
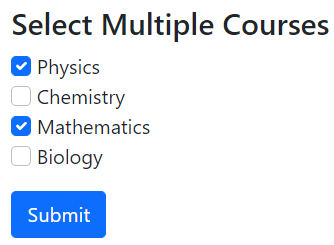
Physics and Mathematics are checked by default because we have the boolean property IsChecked = true for them in the GetCourses() method.
Get the Selected Checkboxes Values
To retrieve the selected checkbox items in our controller, let’s create a POST action method:
[HttpPost]
[ValidateAntiForgeryToken]
public IActionResult CourseSelection(List<CheckboxViewModel> courses)
{
    var selectedCourses = courses.Where(x => x.IsChecked).ToList();
    return RedirectToAction("CourseSelection");
}
First, we use a List<CheckboxViewModel> as a method parameter to grab the form contents. As we use an input type="submit" button in the form we previously created, it will submit the whole form to the POST action method.
Let’s run the app, check/uncheck a few checkboxes and submit the form.

We can confirm that the correct model values propagate from the UI to the controller.
Usage of jQuery Ajax to Post the Checkbox List Form
At times, we do not have the luxury of using a submit type button, to post the form to the server side. In such cases, we can leverage jQuery AJAX to perform the form submission.
Let’s use the same Index view to add another form which we will submit via jQuery AJAX:
<div class="border border-secondary mt-3">
    <form method="post" class="m-5" id="CoursesForm">
        <h4>Select Multiple Courses - jQuery Submit</h4>
        <div>
            @for (var index = 0; index < @Model.Count(); index++)
            {
                <input type="checkbox" asp-for="@Model[index].IsChecked" class="form-check-input" />
                <label class="form-check-label" asp-for="@Model[index].IsChecked">
                    @Model[index].LabelName
                </label>
                <input type="hidden" asp-for="@Model[index].Id" />
                <input type="hidden" asp-for="@Model[index].LabelName" />
                <br />
            }
        </div>
        <div>
            <input id="btnSubmit" class="btn btn-info mt-3" type="button" value="Submit" />
        </div>
    </form>
</div>
Here, we populate the checkbox list using the for loop and use the input type = "button" to submit the form.
Next, let’s create a method for the button’s click event in the site.js file:
$(document).ready(function () {
    $('#btnSubmit').on('click', function () {
        $.ajax({
            url: '/Home/CourseSelection',
            type: 'POST',
            data: $('#CoursesForm').serialize(),
            success: function (response) {
                console.log('Success');
            },
            error: function (xhr) {
                console.log(xhr);
            }
        })
    });
});
Here, we use the POST URL as /Home/CourseSelection and equate the data attribute to the $('#CoursesForm').serialize() method.
The form.serialize() method encodes the form elements in string format, which is then submitted to the server side.
Let’s run the application again, browse to the /Home/CourseSelection view, check all the checkboxes in the second form, and click on Submit button.
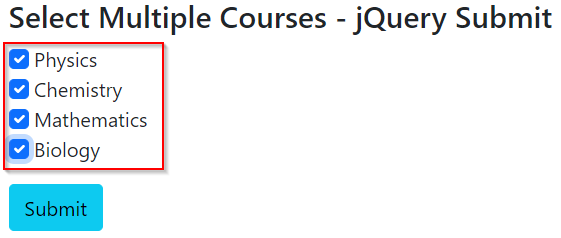
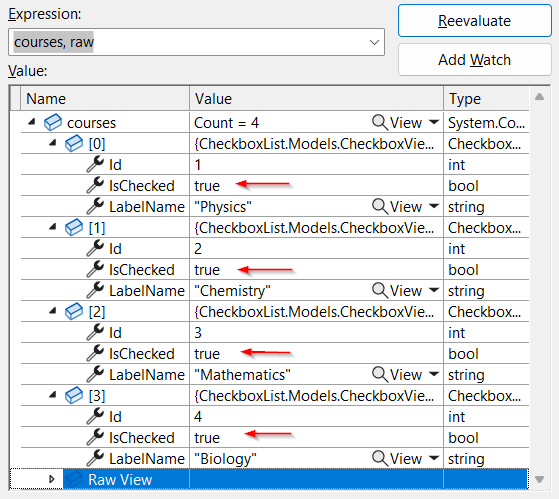
We see that all the checkbox values pass correctly from the UI to the controller.
Conclusion
In this article, we have learned about the internals of a checkbox in ASP.NET Core and the proper way to implement a checkbox list. If you’d like to learn more about ASP.NET Core MVC, check out our great ASP.NET Core MVC Series.
