

The ability to gather metrics for our .NET applications is very important, as it allows us to gain insight into the health and performance, as well as any issues our applications may be experiencing. Metrics are one of the 3 fundamental pillars of OpenTelemetry, and they are an aggregation of numeric data over time, providing measurements for our applications.
In this article, we are going to look at how we create and collect these metric measurements in .NET by using some of the OpenTelemetry libraries on offer, as well as how we can visualize them.
This article makes use of docker to run Prometheus locally.
With that, let’s start with an understanding of metrics.
VIDEO: Tracking App's Health With OpenTelemetry Metrics.
What are Metrics?
A metric is a measurement of a service or application that we capture at runtime, and aggregate over a given time period. These metrics provide insight into the availability, health, and performance of our applications. They allow us to compare values over time, to determine if our application is performing worse than before.
Continuously gathering these measurements allow us to quickly respond to issues with our application. We can set up alerts for metrics such as high CPU or memory usage, slow request/response times, and many other measurements.
There are different ways we collect metrics, which we call instruments. OpenTelemetry defines three basic instruments, the counter, histogram, and observer. Throughout this article, we’ll see how we use these different instruments to capture different forms of metrics, and how we may wish to visualize them.
Auto Instrumentation of Metrics in .NET
The OpenTelemetry project provides a set of client libraries for .NET that allows us to collect metrics on measurements such as HTTP requests/responses, and memory allocation. To start, let’s create a new ASP.NET Core Web API, using the Visual Studio Project wizard, or the dotnet new webapi command.
We need to add a couple of NuGet packages to configure our metrics, so let’s add OpenTelemetry, OpenTelemetry.Extensions.Hosting and OpenTelemetry.Exporter.Console. This will allow us to export metrics to a console window to get us started.
Gather Incoming HTTP Requests Metrics
Let’s start by adding a new NuGet package, OpenTelemetry.Instrumentation.AspNetCore and configuring our application to gather metrics for HTTP requests in the Program class:
builder.Services.AddOpenTelemetry()
    .WithMetrics(builder => builder
        .AddConsoleExporter()
        .AddAspNetCoreInstrumentation());
Here, we start by calling the AddOpenTelemetry() method, which we use to configure the metrics for our application. Next, we use the AddConsoleExporter() extension method so we can see our metrics in the console window. Then, we add the AddAspNetCoreInstrumentation() method, which is the specific configuration that will collect metrics for our incoming HTTP requests.
Next, let’s create a new controller to handle incoming HTTP requests:
[Route("api/[controller]")]
[ApiController]
public class MetricsController : ControllerBase
{
    [HttpGet("incoming")]
    public IActionResult IncomingHttpRequest()
    {
        return Ok("Incoming HTTP request");
    }
}
Here, we create a straightforward API controller with a single HTTP GET method.
Now, let’s run our application and make a request to /api/metrics/incoming and check our console to see what metrics have been gathered:
Resource associated with Metric:
    service.name: unknown_service:Metrics.NET

Export http.server.duration, measures the duration of the inbound HTTP request, Unit: ms,
    Meter: OpenTelemetry.Instrumentation.AspNetCore/1.0.0.0
    (2023-01-14T09:43:21.0095250Z, 2023-01-14T09:43:30.9343758Z] http.flavor: 2.0 http.method: GET
    http.route: api/Metrics/incoming http.scheme: https
    http.status_code: 200 net.host.name: localhost net.host.port: 7029 Histogram
Value: Sum: 426.0783 Count: 4 Min: 10.4452 Max: 257.4103
(-Infinity,0]:0
(0,5]:0
(0,10]:0
(0,25]:1
(0,50]:1
(0,75]:0
(0,100]:0
(0,250]:1
(0,500]:1
(0,750]:0
(0,1000]:0
(0,2500]:0
(0,5000]:0
(0,7500]:0
(0,10000]:0
(0,+Infinity]:0
This can be quite hard to understand if we’re not used to reading metrics. A console window isn’t the ideal place to gather and analyze these values either. But for now, we can interpret enough data to make sense of it.
Fortunately, we get some helpful tips as to what we’re looking at. This is a measurement of the incoming HTTP requests, which we know as it is exporting http.server.duration metrics. Also, we see the unit of measurement, ms, as well as some information about the request itself, such as the HTTP method, route, and URL. This information is useful as it allows us to group our metrics by specific endpoints or HTTP methods.
The most important part to observe is the type of instrument we are using, which is a histogram. This instrument type groups our measurement into buckets, which allows us to track the distribution of requests for the given measurement unit.
Outgoing HTTP Requests
In .NET, we can collect metrics for outgoing HTTP requests through the HttpClient class. To achieve this, we need to add a new NuGet package to our project, OpenTelemetry.Instrumentation.Http.
With this package added, let’s configure our application to collect these metrics in the Program class:
builder.Services.AddOpenTelemetry()
    .WithMetrics(builder => builder
        .AddConsoleExporter()
        .AddAspNetCoreInstrumentation()
        .AddHttpClientInstrumentation());
Here, we add the AddHttpClientInstrumentation() method which collects our outgoing HTTP request metrics.
Next, let’s create a new endpoint to make an outgoing HTTP request:
[HttpGet("outgoing")]
public async Task OutgoingHttpRequest()
{
    var httpClient = new HttpClient();
    var response = await httpClient.GetAsync("https://code-maze.com");
    response.EnsureSuccessStatusCode();
}
We create a very simple method, OutgoingHttpRequest()that instantiates a new HttpClient and makes a GET request to https://code-maze.com. This is enough to gather metrics.
Let’s run our application and make a request to /api/metrics/outgoing, where we will see metrics collected in our console window:
Resource associated with Metric:
    service.name: unknown_service:Metrics.NET

Export http.client.duration, measures the duration of the outbound HTTP request, Unit: ms,
    Meter: OpenTelemetry.Instrumentation.Http/1.0.0.0
    (2023-01-14T10:25:04.4057538Z, 2023-01-14T10:25:14.3509832Z] http.flavor: 1.1 http.method: GET http.scheme: https
    http.status_code: 200 net.peer.name: code-maze.com Histogram
Value: Sum: 247.3024 Count: 1 Min: 247.3024 Max: 247.3024
(-Infinity,0]:0
(0,5]:0
(0,10]:0
(0,25]:0
(0,50]:0
(0,75]:0
(0,100]:0
(0,250]:1
(0,500]:0
(0,750]:0
(0,1000]:0
(0,2500]:0
(0,5000]:0
(0,7500]:0
(0,10000]:0
(0,+Infinity]:0
This is very similar to our incoming HTTP request metrics. We know this is for outgoing requests as it’s measuring the http.client.duration. Almost everything else is the same. This time, we get the URL of the request labeled as net.peer.name. Again, this is useful later on when we want to group by request URLs and measure differences for a specific request to a third-party service.
Now that we have instrumented out HTTP requests with metrics, let’s look at runtime metrics for our .NET application.
.NET Runtime Metrics
Runtime metrics give us some interesting measurements, such as the count of exceptions that have been thrown, or the number of thread pools that currently exist.
To gather these metrics with OpenTelemetry, we need to add the OpenTelemetry.Instrumentation.Runtime NuGet package to our application. With that added, let’s configure our application in the Program class:
builder.Services.AddOpenTelemetry()
    .WithMetrics(builder => builder
        .AddConsoleExporter()
        .AddAspNetCoreInstrumentation()
        .AddHttpClientInstrumentation()
        .AddRuntimeInstrumentation());
This time, we don’t need to make any HTTP requests. Simply running our application will produce our runtime metrics:
Resource associated with Metric:
    service.name: unknown_service:Metrics.NET

Export process.runtime.dotnet.gc.collections.count,
Number of garbage collections that have occurred since process start.,
Meter: OpenTelemetry.Instrumentation.Runtime/1.1.0.3
(2023-01-15T08:17:35.0636693Z, 2023-01-15T08:17:45.0616274Z] generation: gen2 LongSum
Value: 0
(2023-01-15T08:17:35.0636693Z, 2023-01-15T08:17:45.0616274Z] generation: gen1 LongSum
Value: 0
(2023-01-15T08:17:35.0636693Z, 2023-01-15T08:17:45.0616274Z] generation: gen0 LongSum
Value: 0

Export process.runtime.dotnet.thread_pool.threads.count, The number of thread pool threads that currently exist.,
Meter: OpenTelemetry.Instrumentation.Runtime/1.1.0.3
(2023-01-15T08:17:35.0638235Z, 2023-01-15T08:17:45.0616306Z] LongSumNonMonotonic
Value: 6

Export process.runtime.dotnet.thread_pool.completed_items.count,
The number of work items that have been processed by the thread pool since the process start.,
Meter: OpenTelemetry.Instrumentation.Runtime/1.1.0.3
(2023-01-15T08:17:35.0638322Z, 2023-01-15T08:17:45.0616309Z] LongSum
Value: 415

Export process.runtime.dotnet.thread_pool.queue.length,
The number of work items that are currently queued to be processed by the thread pool.,
Meter: OpenTelemetry.Instrumentation.Runtime/1.1.0.3
(2023-01-15T08:17:35.0638459Z, 2023-01-15T08:17:45.0616310Z] LongSumNonMonotonic
Value: 0

Export process.runtime.dotnet.assemblies.count, The number of .NET assemblies that are currently loaded.,
Meter: OpenTelemetry.Instrumentation.Runtime/1.1.0.3
(2023-01-15T08:17:35.0649827Z, 2023-01-15T08:17:45.0616314Z] LongSumNonMonotonic
Value: 140
This is not an exhaustive list of the measurements the library provides for us but gives us a good idea of what to expect when we look at visualizing our metrics, which we’ll look at next.
Setup Prometheus for Visualization
There are various metrics monitoring tools, but the most well-known is the open-source tool Prometheus. This allows us to import our OpenTelemetry metrics and query and visualize our data, giving us a lot more power over the console exporter we’ve been using until now.
To start, we need to create a configuration file that Prometheus uses to retrieve metrics from our .NET application. Prometheus uses a scraping mechanism to retrieve these metrics, so we need to provide the correct endpoint for it to scrape.
Configure Prometheus
Let’s create a prometheus-config.yaml file:
global:
  scrape_interval: 15s
  evaluation_interval: 15s

scrape_configs:
  - job_name: "Metrics.NET"

    static_configs:
      - targets: ["host.docker.internal:5169"]
First, we define the intervals at which Prometheus will scrape our application for metrics.
Then, we configure the host address that Prometheus needs to scrape. By default, our application will provide metrics for Prometheus to scrape on the /metrics endpoint. We use host.docker.internal to access our host machine from the docker container, and configure the HTTP port 5169.
Now, we can simply use docker to run Prometheus:
docker run -d -p 9090:9090 -v {PATH}/prometheus-config.yaml:/etc/prometheus/prometheus.yml --name prometheus prom/prometheus
We open a single port, 9090 which will allow us to browse to the Prometheus interface locally from our browser. Also, we set up a volume mount, which allows Prometheus to access our configuration file.
Next, we need to add the OpenTelemetry.Exporter.Prometheus.AspNetCore NuGet package and configure our Program class:
builder.Services.AddOpenTelemetry()
    .WithMetrics(builder => builder
        .AddConsoleExporter()
        .AddAspNetCoreInstrumentation()
        .AddHttpClientInstrumentation()
        .AddRuntimeInstrumentation()
        .AddPrometheusExporter());

// code removed for brevity
var app = builder.Build();

app.UseOpenTelemetryPrometheusScrapingEndpoint();
First, we add the Prometheus exporter using the AddPrometheusExporter() method. Then, we call the UseOpenTelemetryPrometheusScrapingEndpoint() method to set up the /metrics endpoint that Prometheus uses to retrieve metrics.
.NET Metrics in Prometheus
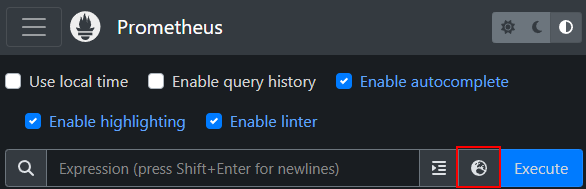
Now we can run our application, make a request to /api/metrics/incoming and /api/metrics/outgoing, then navigate to http://localhost:9090 to access Prometheus. From here, we can view all the metrics Prometheus has retrieved by using the Metrics explorer:
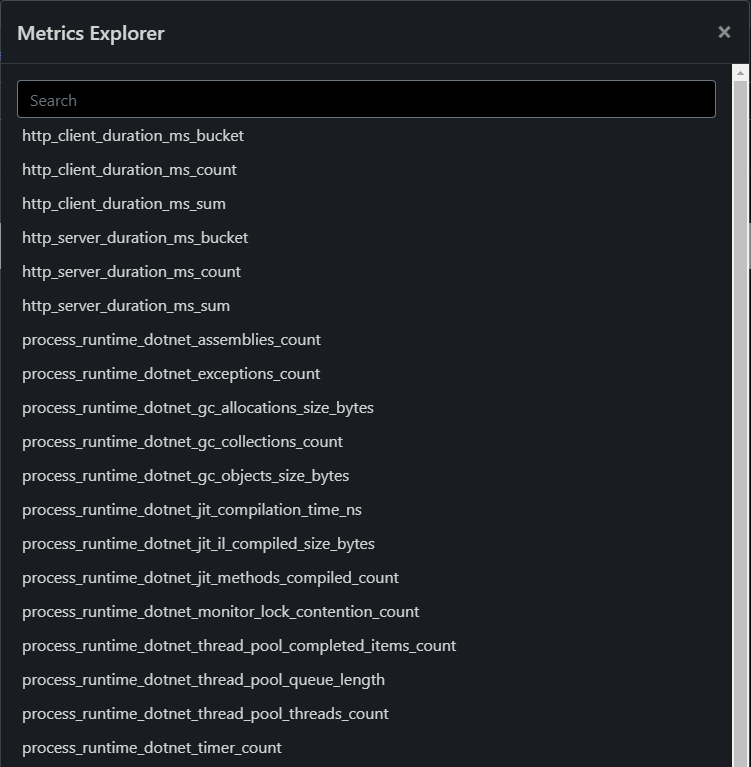
Here, we see all the metrics we are given by the OpenTelemetry client libraries:
Let’s select http_server_duration_ms_count and see what metrics we have available:
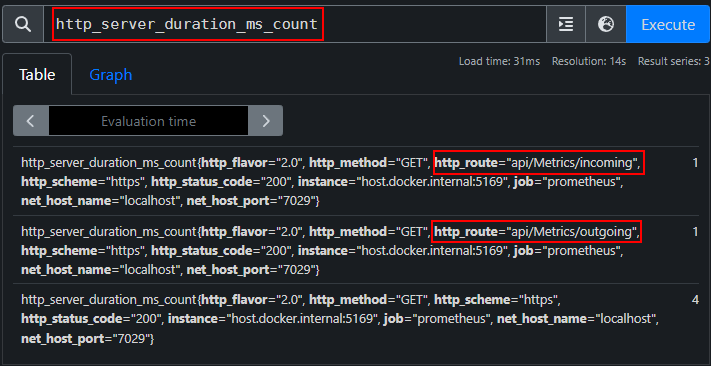
We see the requests to our two endpoints. This is much easier to work with than the console window, as we can now create queries and basic visualizations for our metrics. The graph functions in Prometheus are quite basic, so usually, we pair it with the open-source observability visualization tool Grafana, which allows us to import our Prometheus metrics and create much richer and more powerful graphs and dashboards.
Manual Instrumentation of .NET Metrics
Now that we’ve covered the auto-instrumentation of .NET metrics for OpenTelemetry, let’s look at how we can manually create our own specific metrics and export them to Prometheus.
For this, let’s start by creating a ComputerComponent class:
public class ComputerComponent
{
    public int Id { get; set; }

    public string Name { get; set; }

    public decimal Price { get; set; }
}
Then, we’ll create an Order class:
public class Order
{
    public int Id { get; set; }

    public decimal TotalPrice { get => Items.Sum(i => i.Price); }

    public List<ComputerComponent> Items { get; set; } = new();
}
Our Order class contains a List<ComputerComponents> property to keep track of the components added to an order, along with a TotalPrice property which keeps track of the running total for the computer components.
Now that we have our core classes defined, let’s create an API controller to interact with them:
[ApiController]
public class OrdersController : ControllerBase
{
    private static readonly List<Order> _orders = new();
    private static readonly List<ComputerComponent> _computerComponents = new();

    [HttpPost("create-component")]
    public IActionResult CreateComputerComponent(string name, decimal price)
    {
        var component = new ComputerComponent
        {
            Id = _computerComponents.Count + 1,
            Name = name,
            Price = price
        };

        _computerComponents.Add(component);
        return Ok(component);
    }

    [HttpPost("create-order")]
    public IActionResult CreateOrder([FromBody]List<int> componentIds)
    {
        var order = new Order
        {
            Id = _orders.Count + 1,
            Items = _computerComponents.Where(c => componentIds.Contains(c.Id)).ToList()
        };

        _orders.Add(order);
        return Ok(order);
    }

    [HttpPost("cancel-order/{orderId:int}")]
    public IActionResult CancelOrder(int orderId)
    {
       var order = _orders.FirstOrDefault(o => o.Id == orderId);
       if (order == null)
       {
           return NotFound($"OrderId {orderId} not found");
       }

       _orders.Remove(order);
       return Ok("Order removed");
    }

    [HttpPost("checkout/{orderId:int}")]
    public IActionResult Checkout(int orderId)
    {
        var order = _orders.FirstOrDefault(o => o.Id == orderId);
        if (order == null)
        {
            return NotFound($"OrderId {orderId} not found");
        }
        return Ok("Order checked out");
    }
}
Here, we create an OrdersController with some simple API methods. Our first two methods, CreateComputerComponent() and CreateOrder() allow us to create new components and orders from a list of componentIds. We’ll use these methods when working with some of the instrument types. Our third method, CancelOrder() allows us to remove existing, in progress orders.
Finally, we create a Checkout() method that simulates an order checkout. Again, we’ll use this shortly when looking at the metric instruments.
Counter
The first metric instrument we’ll look at is the counter. This is the most straightforward instrument to grasp. As the name implies, it is a simple value that is summed over time. We only ever add to this value, never subtract from it.
Let’s implement a simple counter to track the number of computer components:
public class OrdersController
{
    private static readonly Meter _meter = new("Metrics.NET");
    private readonly Counter<int> _computerComponentsCounter;

    public OrdersController()
    {
        _computerComponentsCounter = _meter.CreateCounter<int>("total-computer-components",
            "ComputerComponents", "Total number of computer components");
    }

    [HttpPost("create-component")]
    public IActionResult CreateComputerComponent(string name, decimal price)
    {
        var component = new ComputerComponent
        {
            Id = _computerComponents.Count + 1,
            Name = name,
            Price = price
        };

        _computerComponents.Add(component);
        _computerComponentsCounter.Add(1);

        return Ok(component);
    }
}
First, we create a static instance of the Meter class, with the name of Metrics.NET. Next, we define a private generic Counter<int>, and use the CreateCounter() method in the class constructor to create a new counter instance, providing a name total-computer-components, a unit of measurement, ComputerComponents and a description, Total number of computer components.
Finally, whenever we receive a request to create a new component, we call the Add() method, to increment our _computerComponentsCounter value.
Before we can test this, we need to tell OpenTelemetry to subscribe to our meter and send the metrics to Prometheus in our Program class:
builder.Services.AddOpenTelemetry()
    .WithMetrics(builder => builder
        .AddConsoleExporter()
        .AddAspNetCoreInstrumentation()
        .AddHttpClientInstrumentation()
        .AddRuntimeInstrumentation()
        .AddPrometheusExporter()
        .AddMeter("Metrics.NET"))
    .StartWithHost();
We call the AddMeter() method, providing the name of the meter we previously created.
Now, let’s run our application and create a couple of new computer components using the /api/orders/create-component method. With these components created, we can navigate to Prometheus and search for our counter:
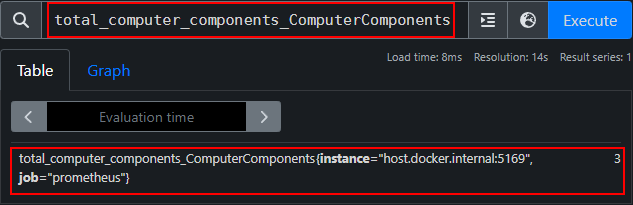
We replace any hyphens in our counter name with underscores when searching in Prometheus, and also include the unit. Here, we see 3 components created.
Let’s see how we can enhance these measurements with some contextual information.
Add Tags to .NET Metrics Measurements
In .NET, we have the ability to add metadata in the form of tags, to enhance our metric measurements.
Sometimes it may be beneficial to see the breakdown of components by their price, so let’s add a tag to our counter to track this:
public IActionResult CreateComputerComponent(string name, decimal price)
{
   var component = new ComputerComponent
   {
        Id = _computerComponents.Count + 1,
        Name = name,
        Price = price
    };

    _computerComponents.Add(component);
    _computerComponentsCounter.Add(1,
        KeyValuePair.Create<string, object?>("ComponentPrice", price));

    return Ok(component);
}
An optional parameter we can pass to the Add() method allows us to add contextual metadata for a given increment. Here, we add the price of the component that is being added.
This time, when we run our application and add some components, we see the price in Prometheus:
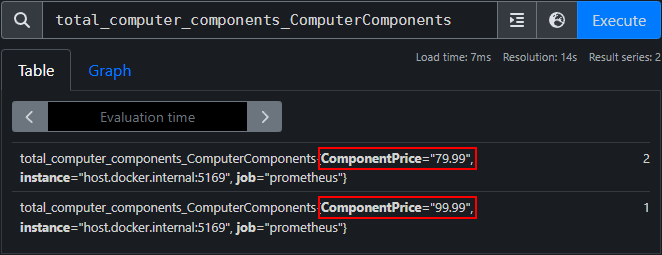
Now, we see one component that costs 99.99, and 2 at the price of 79.99. Tags allow us to group our counters by meaningful measurements.
Observers
Next up, we have the observer instrument type. Observers capture the current values at a particular point in time and allow the caller to provide a callback to control this value. In .NET, we have access to a couple of different observers, such as ObservableGauge and ObservableCounter.
Let’s use the ObservableGauge instrument to track the total number of orders we currently have:
public class OrdersController
{
    private static readonly Meter _meter = new("Metrics.NET");
    private readonly Counter<int> _computerComponentsCounter;
    private readonly ObservableGauge<int> _totalOrdersGauge;

    public OrdersController()
    {
        // code removed for brevity
        _totalOrdersGauge = _meter.CreateObservableGauge("total-orders", () =>
            new Measurement<int>(_orders.Count), "orders", "Current value of orders in progress");
    }
}
Here, we call the CreateObservableGauge() method on the Meter class to instantiate our _totalOrdersGauge. This instrument observes the _orders.Count property. Notice that we don’t need to explicitly increment/decrement the value in our CancelOrder() method. That’s all we need for our observer.
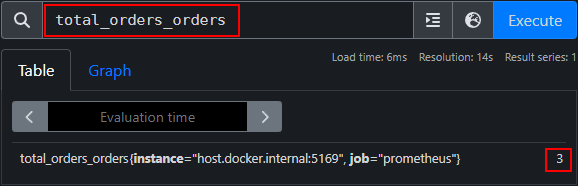
Let’s run our application, and start by creating a couple of computer components using the /api/orders/create-component endpoint. Next, we’ll create a couple of orders, using one or more of our computer component Ids, and send a request to the /api/orders/create-order endpoint. If we look in Prometheus at our observer, we see the count incrementing to reflect our orders:
Now, if we send a request to /api/orders/cancel-order/{orderId} providing an orderId, and check back in Prometheus shortly after, we see the value decrementing:

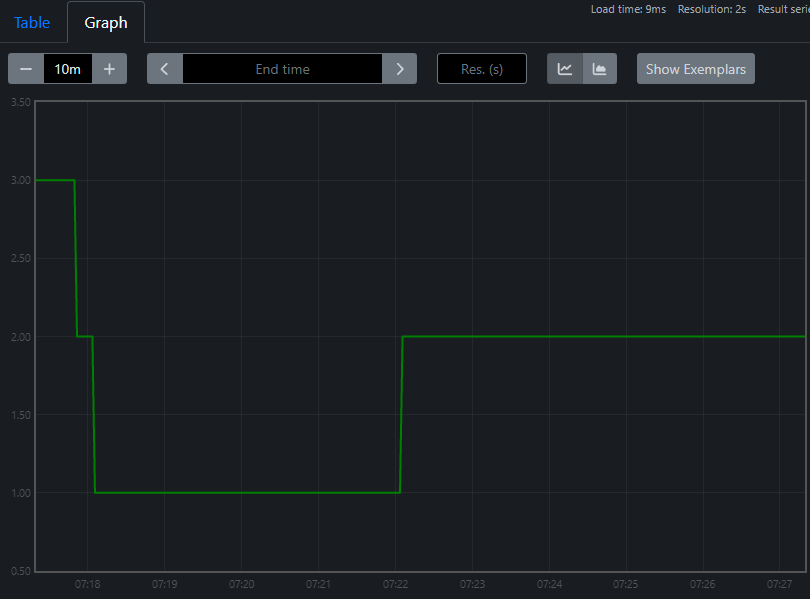
Also, we can use the graph functionality in Prometheus to see this value change over time:
Histograms
The final instrument we’ll look at is the histogram. Unlike the counter and gauge, histograms track the entire value distribution of a given metric. Using histograms gives us the flexibility to view our metrics in different ways, such as percentiles, standard deviation, min/max, etc.
Let’s create a histogram in our OrdersController that will track the distribution of the total computer components added to our orders:
public class OrdersController
{
    private static readonly Meter _meter = new("Metrics.NET");
    private readonly Counter<int> _computerComponentsCounter;
    private readonly ObservableGauge<int> _totalOrdersGauge;
    private readonly Histogram<int> _componentsPerOrderHistogram;

    public OrdersController()
    {
        // code removed for brevity
        _componentsPerOrderHistogram = _meter.CreateHistogram<int>("components-per-order",
            "ComputerComponents", "Distribution of components per order");
    }

    [HttpPost("checkout/{orderId:int}")]
    public IActionResult Checkout(int orderId)
    {
        var order = _orders.FirstOrDefault(o => o.Id == orderId);
        if (order == null)
        {
            return NotFound($"OrderId {orderId} not found");
        }

        _componentsPerOrderHistogram.Record(order.Items.Count);
        return Ok("Order checked out");
    }
}
First, we create a generic Histogram<int> property, and initialize it in our constructor, providing a name, unit, and description like we did for our counter and observer instruments.
Next, in our Checkout() method, we use the Record() method to record the total count of components added to the completed order.
This is it for the histogram, now we can test it. Let’s run our application, create a couple of components using the /api/orders/create-component endpoint, then create some orders with these components using the /api/orders/create-order endpoint. Finally, we call the /api/orders/checkout/{orderId} endpoint, passing our orderId, which will record the total count of components for the order.
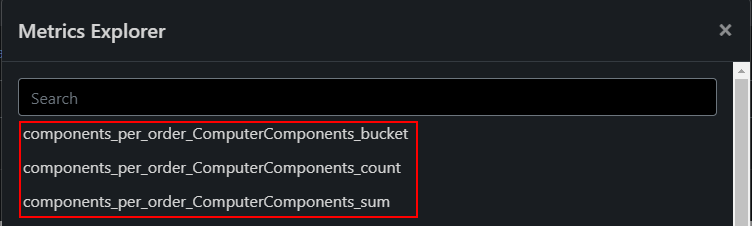
Then, we can view the metrics the histogram provides for us in Prometheus:
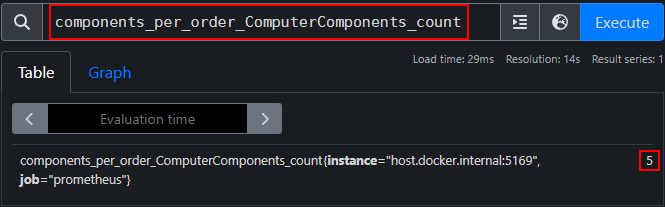
Looking at the count metric, we get a total count of the orders completed:
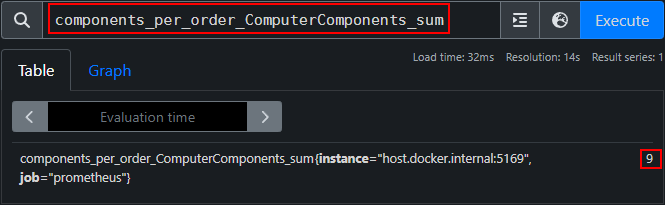
Similarly, if we look at the sum metric, we get a count of all the components that were added to the completed orders:
If we look at the bucket metric, we notice it’s not providing us with a lot of useful information:
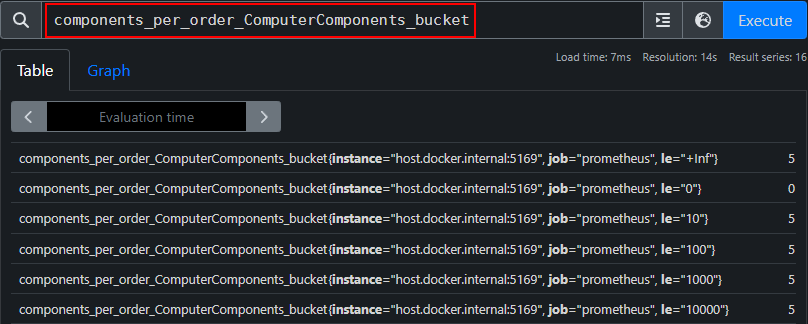
By default, the histogram will create buckets of 0,5,10,25,50, and so on. As we’re tracking the total computer components of an order, it’s very unlikely we’ll make use of these larger buckets.
Custom Bucket Sizes
Fortunately, we can provide our own buckets, by configuring the histogram view in the Program class:
builder.Services.AddOpenTelemetry()
    .WithMetrics(builder => builder
        .AddConsoleExporter()
        .AddAspNetCoreInstrumentation()
        .AddHttpClientInstrumentation()
        .AddRuntimeInstrumentation()
        .AddPrometheusExporter()
        .AddMeter("Metrics.NET")
        .AddView(
            instrumentName: "components-per-order",
            new ExplicitBucketHistogramConfiguration { Boundaries = new double[] { 1, 2, 5, 10 } })
    ).StartWithHost();
Here, we use the AddView() method to configure the histogram buckets, providing the name of the histogram instrument, components-per-order and our custom buckets.
Now, when we run our application and complete some orders, we’ll see much more useful metrics for our bucket measurement:
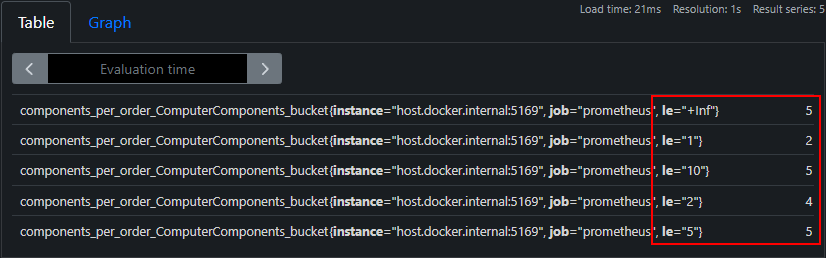
This time, we see our custom bucket sizes, which more accurately represent the measurements we see when gathering metrics on total components per order.
Conclusion
In this article, we covered a lot of the benefits of using metrics to monitor the health and performance of our .NET applications. We started with the auto-instrumented libraries, which gave us useful insight into our application’s request/response rates, along with some more advanced measurements. The real power of metrics comes with manual instrumentation and creating our own measurements, which is what we finished up with.
