

In this article, we will learn what Windows Registry is, how we can work with it in .NET Core, and how we can read and write Windows Registry in C#. After that, we will explore some advanced use cases of the Windows Registry.
Let’s start.
What Is the Windows Registry and How We Can Use It
The Windows Registry is a hierarchical database for the Microsoft Windows operating system that stores different information for the Windows operating system and installed software and hardware. This information can be settings, options, or any other value we want to persist.
Before the introduction of the Windows Registry, we used simple .INI files to store that information in a text or binary format. The Windows Registry provides many improvements over .INI files:
- name/value interface
- user-specific settings in multi-user environment
- different data types, not only strings
- security
- safe access from multiple threads
- remote management
Windows Registry Structure
The Windows Registry utilizes a tree structure for its data. A node in a tree is called a key. The key can contain subkeys or data entries in the name/value format. Furthermore, we can consider Windows Registry a name/value database. An additional view of the Windows Registry is a directory view. Basically, the key represents the directory, and the directory’s content is subdirectories/subkeys or files/name-value pairs.
The Windows Registry comes with a set of predefined keys. An application can use handles to access those keys. The predefined keys are always open and serve as entry points to the registry. The different versions of Windows can have a different set of predefined keys. We also call those keys root elements, root keys, or base keys. Here are some of the most common:
| Handle to the base key | Description |
|---|---|
| HKEY_CLASSES_ROOT | It contains file name extension associations and COM class registration data. |
| HKEY_CURRENT_CONFIG | It contains information about the current and standard hardware configuration differences. |
| HKEY_CURRENT_USER | It contains data related to the current user (settings, data about applications, environment variables, etc.). |
| HKEY_CURRENT_USER_LOCAL_SETTINGS | It contains the current user's data that are local to the machine. |
| HKEY_LOCAL_MACHINE | It contains the data about the physical state of the computer. |
To learn more about the predefined keys, please read about predefined keys.
Windows Registry Key Values
The values of the Windows registry keys can be of different types:
| Data type | Description |
|---|---|
| REG_BINARY | Any data in binary form. |
| REG_DWORD | A 32-bit number. |
| REG_DWORD_LITTLE_ENDIAN | A 32-bit number in little-endian format. |
| REG_DWORD_BIG_ENDIAN | A 32-bit number in big-endian format. |
| REG_EXPAND_SZ | Null-terminated string with unexpanded references to the environment variables (for example, "%PATH%"). |
| REG_LINK | Unicode symbolic link. |
| REG_MULTI_SZ | Array of null-terminated strings. |
| REG_NONE | Value type is not defined. |
| REG_RESOURCE_LIST | Resource list for device driver. |
| REG_SZ | Null-terminated string. |
When the operating system starts or a new user logs in, the new set of registry keys is loaded into memory. This set depends on the user profile, configuration, and settings. The first key in this set is called a hive or a base key. Users can’t create, edit, or delete hives.
Open the Windows Registry
DISCLAIMER! We’ll demonstrate how to open and look at the Windows Registry. Later on, we’ll also make some programmatic changes to the Windows Registry. The reader accepts sole responsibility for all inadvertent changes made to their system and possible problems caused by modifying or deleting registry keys manually or running the demo application. It is strongly recommended to create a Windows Registry backup before making any changes.
We can open the Windows Registry in two ways:
- Type regedit in the search box on the taskbar, and select the Registry Editor application.
- Right-click the Windows Start button, select Run, type regedit in the box, and press OK.
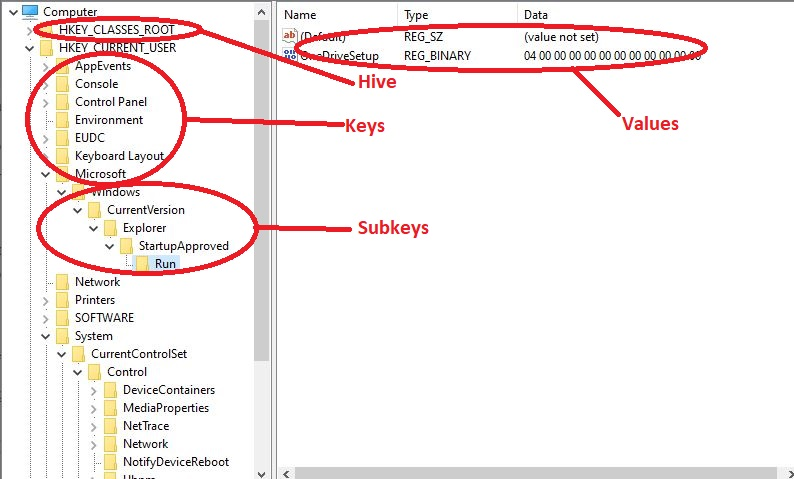
The Windows Registry on the user’s computer may look slightly different, but the following picture shows its basic structure:
Working With Windows Registry in .NET Core
In .NET, we can access the Windows Registry by using the Microsoft.Win32 namespace:
using Microsoft.Win32;
The Registry and RegistryKey classes are the main classes for interacting with the Windows Registry.
The Registry Class
The Registry class provides access to the root keys. Besides that, it implements static methods to read or write key/value pairs. For example, we can print the name of the HKEY_CURRENT_USER:
public static string GetCurrentUserRootKeyName()
{
    var registryKey = Registry.CurrentUser;
    return registryKey.Name;
}
In the above method, we notice compiler warnings:
This call site is reachable on all platforms. 'RegistryKey.Name' is only supported on: 'windows'.
This call site is reachable on all platforms. 'Registry.CurrentUser' is only supported on: 'windows'.
The Windows Registry is a Windows-specific feature that doesn’t exist on other operating systems.
However, .NET Core is a cross-platform framework. Because of this, the compiler warns us that this code won’t execute outside of a Windows environment. It is a good practice to check the environment in which the application is running and execute this part of the code accordingly:
public static string GetCurrentUserRootKeyNameWithPlatformCheck()
{
    if (!OperatingSystem.IsWindows())
    {
        return "Unsupported platform";
    }

    return Registry.CurrentUser.Name;
}
The RegistryKey Class
The RegistryKey class encapsulates the key-level node in the Windows Registry. It provides the methods for working with the key and its name/value pairs, inspecting certain properties of the registry key, and getting or setting access control over it. For example, we can count the number of subkeys in the specific key:
public static int GetCurrentUserRootKeySubkeyCount()
{
    if (!OperatingSystem.IsWindows())
    {
        return -1;
    }

    return Registry.CurrentUser.SubKeyCount;
}
We’ll explore other methods and properties of the RegistryKey class in the following sections.
The Windows Registry’s Typical Use Cases
The most common use cases of the Windows Registry include the following:
- System settings – configuration and behavior of Windows itself
- Hardware configuration – device drivers and hardware settings
- Software configuration – preferences, license information, window size and position, and other application-specific data
- User profiles – user-specific configurations and settings that allow users to have personalized interfaces
- Security settings – security and group policies, user account settings
- File associations – file type-specific settings that allow applications to open files with particular extensions
- Startup configuration – information about programs that should start automatically with Windows
Read and Write Windows Registry in C#
The Registry class implements only simple reading and writing of values from the Windows Registry. Besides access to base keys, it implements only two methods to work with Windows Registry.
The RegistryKey class represents the registry’s key node. It implements all supported methods and properties of the Windows Registry keys.
In the following code snippets, we’ll use a few constants:
private const string CodeMazeRegistryDemoSubKey = "CodeMazeRegistryDemoSubKey";
private const string CodeMazeRegistryDemoName = "CodeMazeRegistryDemoName";
public const string CodeMazeRegistryDemoValue = "CodeMazeRegistryDemoValue";
The CodeMazeRegistryDemoSubKey is the name of the subkey we’ll work with and the CodeMazeRegistryDemoName is the name of the value in the key. Finally, the CodeMazeRegistryDemoValue is the value we’ll write to the name/value pair. As an illustration, we will use Registry.CurrentUser (HKEY_CURRENT_USER) base key.
Read and Write Windows Registry Using Registry Class
The Registry class implements GetValue() and SetValue() static methods. Let’s see how we can use them:
public static string ReadAndWriteRegistryValueUsingRegistryClass()
{
    if (!OperatingSystem.IsWindows())
    {
        return string.Empty;
    }

    var subKeyToWrite = Path.Combine(Registry.CurrentUser.Name, CodeMazeRegistryDemoSubKey);

    Registry.SetValue(subKeyToWrite, CodeMazeRegistryDemoName, CodeMazeRegistryDemoValue);
    var writtenValue = Registry.GetValue(subKeyToWrite, CodeMazeRegistryDemoName, string.Empty);

    Registry.CurrentUser.DeleteSubKey(CodeMazeRegistryDemoSubKey);

    return writtenValue?.ToString() ?? string.Empty;
}
The SetValue() method has three parameters: the full path to the subkey, the name, and the value it will write to the registry. If the subkey doesn’t exist, it will be created. If the key doesn’t exist, it will be created. Otherwise, the method writes the name and value to the specified key.
The SetValue() method has one additional overload, allowing to specify the value’s data type. The method opens and closes the key automatically when writing the value to it.
Identically to the SetValue()method, the GetValue() also has three parameters: the full path to the subkey, the name, and the default value that will be returned if the name doesn’t exist. The method will return null if it can’t find the subkey and return the default value if the name doesn’t exist. The return value is of the object type, and we must cast it or convert it to the appropriate type.
Each registry key contains one default, unnamed value, which the GetValue() method returns if the name doesn’t exist in this key. We can use null or string.Empty in the SetValue() method for a name argument if we want to set the value to the default name.

Finally, we call the RegistryKey class’s DeleteSubKey() method to delete our created key:
Registry.CurrentUser.DeleteSubKey(CodeMazeRegistryDemoSubKey);
Read and Write Windows Registry Using RegistryKey Class
As mentioned previously, the RegistryKey class represents a node in the Windows Registry. It implements various methods for working with the registry keys:
public static string ReadAndWriteRegistryValueUsingRegistryKeyClass()
{
    if (!OperatingSystem.IsWindows())
    {
        return string.Empty;
    }

    var baseKey = Registry.CurrentUser;

    using var subKey = baseKey.OpenSubKey(CodeMazeRegistryDemoSubKey, true) ??
                       baseKey.CreateSubKey(CodeMazeRegistryDemoSubKey);

    subKey?.SetValue(CodeMazeRegistryDemoName, CodeMazeRegistryDemoValue);
    var writtenValue = subKey?.GetValue(CodeMazeRegistryDemoName);
    subKey?.DeleteValue(CodeMazeRegistryDemoName);

    baseKey.DeleteSubKey(CodeMazeRegistryDemoSubKey);

    return writtenValue?.ToString() ?? string.Empty;
}
We open the subkey with the OpenSubKey() method. This method has five overloads, dealing with access control in different ways. For our example, we use the overload OpenSubKey(string, bool), with which we can open the subkey with write access. If we omit this parameter, the key opens only with read access, and the SetValue() method throws an exception. If the specified key doesn’t exist, the method returns null.
In our case, the key will always be null, as a result of deleting it with the DeleteSubKey() method at the end of the ReadAndWriteRegistryValueUsingRegistryKeyClass() method. On the other hand, if we comment out the call to the DeleteSubKey() method and rerun the application, the key will exist.
In the following line, we create the key with the call to the CreateSubKey() method. This method will open the key with write access. It has seven overloads that allow us to create the key with different access controls and options.
With the call to the RegistryKey class’s SetValue() method, we write the name/value pair to the key. If the name already exists, the value is updated. The method’s parameters are the name and the values, as the registry key path is already encapsulated in the subKey variable.
The GetValue() method reads the value under the specified name. In addition to that, we call the DeleteValue() method next. It deletes the value with the specified name. However, this step is technically unnecessary, as we later delete the entire subkey by calling the DeleteSubKey() method.
Finally, we return the value as a string. It is worth noting that the RegistryKey class also has a ToString() method that will return the name of the key as a string.
Disposing of the RegistryKey class
The RegistryKey class implements the IDisposable interface. Here, we wrap it in the using statement, implying that the Dispose() method will be called automatically.
Alternatively, if we don’t use the using statement, we can call the Dispose() method directly, which consequently closes the key, the same as a direct call to the Close() method. The call to the Close() method will write the key to the disk, and no further writes are possible.
Similarly, we can call the Flush() method if we want to be sure that key changes are written on the disk, but in typical cases, this is unnecessary, as the registry changes are stored automatically.
Advanced Use of Windows Registry
The RegistryKey class implements methods for more advanced work with the Windows Registry. Let’s look at some of them.
Enumerating Keys and Values
We can get an array of all subkeys for the particular key by calling the GetSubKeyNames() method:
public static string[] GetSubKeyNames()
{
    if (!OperatingSystem.IsWindows())
    {
        return Array.Empty<string>();
    }

    using var subKey = Registry.CurrentUser.CreateSubKey(CodeMazeRegistryDemoSubKey);
    subKey?.CreateSubKey("SubKey1");
    subKey?.CreateSubKey("SubKey2");

    var subKeyNames = subKey?.GetSubKeyNames();
    Registry.CurrentUser.DeleteSubKeyTree(CodeMazeRegistryDemoSubKey);

    return subKeyNames ?? Array.Empty<string>();
}
Apart from this, we can get an array of all value names by calling the GetValueNames() method:
public static string[] GetValueNames()
{
    if (!OperatingSystem.IsWindows())
    {
        return Array.Empty<string>();
    }

    using var subKey = Registry.CurrentUser.CreateSubKey(CodeMazeRegistryDemoSubKey);
    using var subKey1 = subKey?.CreateSubKey("SubKey1");
    subKey1?.SetValue("Name1", "Value1");
    subKey1?.SetValue("Name2", "Value2");

    var subKeyNames = subKey1?.GetValueNames();
    Registry.CurrentUser.DeleteSubKeyTree(CodeMazeRegistryDemoSubKey);

    return subKeyNames ?? Array.Empty<string>();
}
Get the Data Type of the Registry Key Value
The RegistryKey class implements the GetValueKind() method. It returns the data type of the specified value name:
public static string GetValueKind()
{
    if (!OperatingSystem.IsWindows())
    {
        return string.Empty;
    }

    using var subKey = Registry.CurrentUser.CreateSubKey(CodeMazeRegistryDemoSubKey);
    using var subKey1 = subKey?.CreateSubKey("SubKey1");
    subKey1?.SetValue("Name1", "Value1");

    var valueKind = subKey1?.GetValueKind("Name1");
    Registry.CurrentUser.DeleteSubKeyTree(CodeMazeRegistryDemoSubKey);

    return valueKind.ToString() ?? string.Empty;
}
The GetValueKind() method will return the member of the RegistryValueKind enumeration defined in the Microsoft.Win32 namespace.
The Registry Key Access Permissions
The CreateSubKey() and OpenSubKey() methods implement various overloads that accept parameters to finely control the access rights to the registry key.
With the RegistryKeyPermissionCheck enumeration, we can enforce the security checks when opening the key and accessing its values. Furthermore, with the RegistryRights enumeration, we can achieve fine-grained access control of the registry key:
public static bool SetRegistryKeyAccessPermissions()
{
    if (!OperatingSystem.IsWindows())
    {
        return false;
    }

    var user = Path.Combine(Environment.UserDomainName, Environment.UserName);
    var registrySecurity = new RegistrySecurity();

    var accessRule = new RegistryAccessRule(user,
        RegistryRights.ReadKey | RegistryRights.WriteKey,
        InheritanceFlags.None,
        PropagationFlags.None,
        AccessControlType.Allow);

    registrySecurity.AddAccessRule(accessRule);

    using var subKey = Registry.CurrentUser.CreateSubKey(CodeMazeRegistryDemoSubKey,
        RegistryKeyPermissionCheck.Default, registrySecurity);

    if (subKey == null)
    {
        return false;
    }

    var isAdded = false;
    var accessControl = subKey.GetAccessControl();
    var accessRules = accessControl.GetAccessRules(true, true, typeof(NTAccount));
    foreach (RegistryAccessRule rule in accessRules)
    {
        if (rule.IdentityReference.Value == user)
        {
            isAdded = true;
            break;
        }
    }
    Registry.CurrentUser.DeleteSubKeyTree(CodeMazeRegistryDemoSubKey);

    return isAdded;
}
In our example, we create the subkey by supplying the permission check and the registry security arguments. The permission check has a default value, meaning the security check is inherited from the parent. Besides the permission check, the RegistrySecurity class allows us to add registry access rules. As an illustration, we define that the user can read and write the key by specifying the desired RegistryRights with the bitwise OR operator (|).
The GetAccesControl() method returns the registry security definition of the key, and through it, we can enumerate all defined rules. After that, we check if our rule is applied to the key.
Using the related SetAccessControl() method, we can set and/or modify the security definition of the key (assuming we have the appropriate security access to change security rights).
Read and Write a Remote Windows Registry
The RegistryKey class implements the static OpenRemoteBaseKey() method. With it, we open the base key on a machine to which we have a remote network connection:
public static bool OpenRemoteBaseKey(string machineName)
{
    if (!OperatingSystem.IsWindows())
    {
        return false;
    }

    try
    {
        var remoteBaseKey = RegistryKey.OpenRemoteBaseKey(RegistryHive.CurrentUser, machineName);
        return true;
    }
    catch
    {
        return false;
    }
}
The Remote Registry Windows Service on the remote machine must be enabled to access the remote registry, and, of course, we must have administrative rights on the remote machine.
Conclusion
The Windows Registry is a central, structured place for applications, the operating system, and hardware to store different types of values necessary for their proper functioning. As a result, it represents the very welcome evolution of .INI files and enables much richer capabilities and features.
The Windows Registry is specific to the Windows operating system, and therefore we should verify in our code that it exists and we can access it.
The Registry and RegistryClass classes provide code-level access which allows us to read and write Windows Registry entries. They also provide a means for more advanced operations such as fine-control of access rights, along with accessing the registry on remote machines.
