

Log4net appenders are the components that determine where we need to keep the logs. Using appenders, we can send log4net logs to different destinations such as the console, files, databases, etc.
In this article, we are going to discuss a few of the most common and useful log4net appenders in detail with examples.
For an introduction to using log4net in ASP.NET Core, check out our Structured Logging in ASP.NET Core With log4net article.
So let’s get going.
Log4net Appenders to Write Logs Into the Console
To write log4net logs to the application’s console, the simplest choice is to use the ConsoleAppender.
So let’s add the console appender in the log4net.config file:
<log4net>
    <appender name="ConsoleAppender" type="log4net.Appender.ConsoleAppender">
        <layout type="log4net.Layout.PatternLayout">
            <conversionPattern value="%date{dd MMM yyyy HH:mm:ss} %-5level - %message%newline" />
        </layout>
    </appender>
    <root>
        <level value="ALL" />
        <appender-ref ref="ConsoleAppender" />
    </root>
</log4net>
After that, let’s add different types of logs such as Debug, Info, Warn, and Error in the controller action method:
public class LogTestController : ControllerBase
{
    private readonly ILog _logger;

    public LogTestController(ILog logger)
    {
        _logger = logger ?? throw new ArgumentNullException(nameof(logger));
    }

    [HttpGet]
    public IActionResult Get()
    {
        _logger.Debug("This is a debug log.");
        _logger.Info("This is an informational log.");
        _logger.Warn("This is a warning log.");
        _logger.Error("This is an error log.");

        return Ok("Test success!");
    }
}
Here, we create a new controller and inject the ILog interface into the constructor. Then, in our Get() method, we write a set of logs.
Now let’s run the application and navigate to the /logtest endpoint.
We notice that the application now writes logs into the console window:
26 May 2023 18:51:03 DEBUG - This is a debug log.
26 May 2023 18:51:03 INFO  - This is an informational log.
26 May 2023 18:51:03 WARN  - This is a warning log.
26 May 2023 18:51:03 ERROR - This is an error log.
Notice that the logging is based on the layout format that we specified in the log4net configuration file.
It is possible to configure text and background colors for different log levels in the console using the ManagedColoredConsoleAppender. So let’s replace the ConsoleAppender with it:
<appender name="ManagedColoredConsoleAppender" type="log4net.Appender.ManagedColoredConsoleAppender">
    <mapping>
        <level value="ERROR" />
        <foreColor value="DarkRed" />
        <backColor value="White" />
    </mapping>
    <mapping>
        <level value="WARN" />
        <foreColor value="Yellow" />
    </mapping>
    <mapping>
        <level value="INFO" />
        <foreColor value="White" />
    </mapping>
    <mapping>
        <level value="DEBUG" />
        <foreColor value="Blue" />
    </mapping>

    <layout type="log4net.Layout.PatternLayout">
        <conversionPattern value="%date{dd MMM yyyy HH:mm:ss} %-5level - %message%newline"/>
    </layout>
</appender>
<root>
    <level value="ALL" />
    <appender-ref ref="ManagedColoredConsoleAppender" />
</root>
Here we add mappings for each log level and configured errors in red color with white background. Similarly, we have configured warnings in yellow, informational logs in white, and debug logs in blue color.
Now let’s run the application once again and navigate to the /logtest endpoint. We can see that the application still writes logs into the console, but it formats the log messages with the different colors that we configured:

This way we can produce a customized colored console output that will help us to easily distinguish between different types of logs.
Write Debug Logs With log4net Appenders
If we want to write log4net logs into the debug system, we can use DebugAppender.
So let’s configure the debug appender in the log4net.config file:
<appender name="DebugAppender" type="log4net.Appender.DebugAppender">
    <layout type="log4net.Layout.PatternLayout">
        <conversionPattern value="%date{dd MMM yyyy HH:mm:ss} %-5level - %message%newline" />
    </layout>
</appender>
<root>
    <level value="ALL" />
    <appender-ref ref="DebugAppender" />
</root>
Here, we replace the console appender with a debug appender. This will send the log4net logs to the debug output instead of the console.
Now if we run the application in debug mode and navigate to the /logtest endpoint, it will write logs into the application’s debug information. While debugging in Visual Studio, we can view this in the output window by filtering on the debug output:
Log4netAppenders.Program: 31 May 2023 15:56:38 DEBUG - This is a debug log.
Log4netAppenders.Program: 31 May 2023 15:56:38 INFO  - This is an informational log.
Log4netAppenders.Program: 31 May 2023 15:56:38 WARN  - This is a warning log.
Log4netAppenders.Program: 31 May 2023 15:56:38 ERROR - This is an error log.
Similarly, it is possible to write logs into a trace system by using the TraceAppender. For that, we need to replace the debug appender with the trace appender in the log4net.config file:
<appender name="TraceAppender" type="log4net.Appender.TraceAppender">
    <layout type="log4net.Layout.PatternLayout">
        <conversionPattern value="%date{dd MMM yyyy HH:mm:ss} %-5level - %message%newline" />
    </layout>
</appender>
<root>
    <level value="ALL" />
    <appender-ref ref="TraceAppender" />
</root>
Once we configure the trace appender, the application will convert logs into traces and write them into the trace listeners. We have the option to configure different trace listeners for our application and the logs will go into the trace system that we configure.
While debugging the application in Visual Studio, we can find the traces as part of the debug output in the output window:
Log4netAppenders.Program: 31 May 2023 16:18:07 DEBUG - This is a debug log.
Log4netAppenders.Program: 31 May 2023 16:18:07 INFO  - This is an informational log.
Log4netAppenders.Program: 31 May 2023 16:18:07 WARN  - This is a warning log.
Log4netAppenders.Program: 31 May 2023 16:18:07 ERROR - This is an error log.
While we use debug systems mostly to investigate any issues in the application, a trace listener usually tracks all the application events step by step. Using appropriate log4net appenders, it is possible to write logs into both a debug system and a trace listener.
In-Memory Logging With log4net
The MemoryAppender stores the log4net logs as an array in memory. This is an excellent choice when we want to write tests for verifying the logging functionality. For testing the log4net logging functionality, we just need to create a MemoryAppender instance and initialize the log4net system using it. After that, once we execute the method under test, we can verify the log entries in the appender events.
Since MemoryAppender is mostly used for writing tests, we usually configure it through code even though it is possible to configure it with the log4net configuration file as well.
Let’s write a test method for testing our endpoint that writes logs:
public class Log4netAppendersTests : IClassFixture<WebApplicationFactory<Program>>
{
    private readonly WebApplicationFactory<Program> _factory;

    public Log4netAppendersTests(WebApplicationFactory<Program> factory)
    {
        _factory = factory;
    }

    [Fact]
    public async Task GivenLog4NetConfigured_WhenLogTestIsInvoked_ThenAllEventsAreLogged()
    {
        // arrange
        var client = _factory.CreateClient();

        var appender = new log4net.Appender.MemoryAppender();
        BasicConfigurator.Configure(appender);

        // act
        var response = await client.GetAsync("api/logtest");

        //assert
        Assert.Equal(HttpStatusCode.OK, response.StatusCode);

        var logEntries = appender.GetEvents();
        Assert.Equal(4, logEntries.Length);
    }
}
First, we create a HttpClient instance and configure a MemoryAppender for the log4net. After that, we send an HTTP GET request to the endpoint that we want to test. Along with verifying the HTTP status code, we can get the log events from the appender and verify those as well.
WebApplicationFactory class, please refer to our great article Integration Testing in ASP.NET Core.Next up, let’s see how we can use a log4net appender to write logs to files.
Log4net Appenders to Write Logs Into Files
It is possible to write log4net logs into a file in the file system as well. For that, the most simple way is to use the FileAppender. So let’s replace the TraceAppender with FileAppender in the log4net.config file:
<appender name="FileAppender" type="log4net.Appender.FileAppender">
    <file value="logfile.txt" />
    <appendToFile value="true" />
    <layout type="log4net.Layout.PatternLayout">
        <conversionPattern value="%date{dd MMM yyyy HH:mm:ss} %-5level - %message%newline" />
    </layout>
</appender>
<root>
    <level value="ALL" />
    <appender-ref ref="FileAppender" />
</root>
Here we specify the path and name for the log file in the file node. We configure it to create the log file named logfile.txt in the application’s root path. The appendToFile value determines if we need to append to the specified file every time or overwrite it, which we have set to true.
Now if we run the application once again and navigate to the /logtest endpoint, it will write logs into the log file with the name logfile.txt in the application’s root directory:
31 May 2023 18:32:26 DEBUG - This is a debug log.
31 May 2023 18:32:26 INFO  - This is an informational log.
31 May 2023 18:32:26 WARN  - This is a warning log.
31 May 2023 18:32:26 ERROR - This is an error log.
Note that the application will continue to append logs into the same file if we run the endpoint multiple times as we have configured it to append logs to the file.
Writing log4net logs into a file is a very nice option, but what if the log file keeps on growing infinitely? Of course, we don’t want that to happen and need a mechanism to split log files based on size, date, etc. The RollingFileAppender will help us to achieve this functionality.
Split Log Files With RollingFileAppender
By using a RollingFileAppender, we can split log files based on size, date, or both. So let’s replace the FileAppender with RollingFileAppender and explore the various configuration options:
<appender name="RollingFileAppender" type="log4net.Appender.RollingFileAppender">
    <file value="log-" />
    <appendToFile value="true" />
    <rollingStyle value="Date" />
    <datePattern value="yyyyMMdd-HHmm'.txt'" />
    <layout type="log4net.Layout.PatternLayout">
        <conversionPattern value="%date [%thread] %-5level %logger [%property{NDC}] - %message%newline" />
    </layout>
</appender>
We have already discussed the purpose of the file and appendToFile property with the FileAppender.
The RollingStyle property determines how we need to split the log files. If we want to split the log files based on size, we can set its value to size and specify the maximum file size in the maximumFileSize property. On the other hand, if we want to split the log files based on date, we can set its value to date and specify the date boundary in the datePattern property. By setting its value to Composite, we can still split log files based on the date boundary we specify in the datePattern property. However, within a date boundary, the file will be split once it exceeds the size limit specified in the maximumFileSize property as well.
Here, we configure the application to split log files based on date and time by setting the datePattern format to yyyyMMdd-HHmm which will create new log files every minute. However, if we want to change that and create just one log file per day, we can change its format to yyyyMMdd and so on.
Notice that we have suffixed the date pattern with the file extension and made its value yyyyMMdd-HHmm'.txt'. This is to preserve the file extension while it generates the log file names dynamically. The appender will name the log file by joining the file value and the datePattern value. So this will produce log files with the name format log-yyyyMMdd-HHmm.txt.
Now let’s run the application once again and navigate to the /logtest endpoint. This time it will create a separate log file for each minute that the application writes logs. Also note that it names the log file by appending the values of file and datePattern , For eg, log-20230531-1920.txt, log-20230531-1921.txt, etc.
Write log4net Logs Into a Database
Log4net provides a default AdoNetAppender for writing logs to the database. But it doesn’t officially support .NET Core as of date. However, there is a third-party Log4NetAdoNetAppender NuGet package that extends AdoNetAppender and works pretty well with the latest .NET Core versions. We are going to use that to write logs to a SQL database.
For that, first, let’s create a database table to store the logs:
CREATE TABLE [dbo].[Log] (
  [ID] [int] IDENTITY (1, 1) NOT NULL ,
  [Date] [datetime] NOT NULL ,
  [Thread] [varchar] (255) NOT NULL ,
  [Level] [varchar] (20) NOT NULL ,
  [Logger] [varchar] (255) NOT NULL ,
  [Message] [varchar] (4000) NOT NULL
) ON [PRIMARY]
The next step is to add the NuGet reference to our project:
dotnet add package MicroKnights.Log4NetAdoNetAppender
Then let’s replace the RollingFileAppender with the Log4NetAdoNetAppender in the log4net.config file:
<appender name="AdoNetAppender" type="MicroKnights.Logging.AdoNetAppender, MicroKnights.Log4NetAdoNetAppender">
    <connectionType value="Microsoft.Data.SqlClient.SqlConnection, Microsoft.Data.SqlClient,
                Version=1.0.0.0,Culture=neutral,PublicKeyToken=23ec7fc2d6eaa4a5" />
    <connectionString value="{Provide the DB connection string here}" />
    <commandText value="INSERT INTO Log ([Date],[Thread],[Level],[Logger],[Message])
                VALUES (@log_date, @thread, @log_level, @logger, @message)" />
    <parameter>
        <parameterName value="@log_date" />
        <dbType value="DateTime" />
        <layout type="log4net.Layout.PatternLayout" value="%date{yyyy'-'MM'-'dd HH':'mm':'ss'.'fff}" />
    </parameter>
    <parameter>
        <parameterName value="@thread" />
        <dbType value="String" />
        <size value="255" />
        <layout type="log4net.Layout.PatternLayout" value="%thread" />
    </parameter>
    <parameter>
        <parameterName value="@log_level" />
        <dbType value="String" />
        <size value="50" />
        <layout type="log4net.Layout.PatternLayout" value="%level" />
    </parameter>
    <parameter>
        <parameterName value="@logger" />
        <dbType value="String" />
        <size value="255" />
        <layout type="log4net.Layout.PatternLayout" value="%logger" />
    </parameter>
    <parameter>
        <parameterName value="@message" />
        <dbType value="String" />
        <size value="4000" />
        <layout type="log4net.Layout.PatternLayout" value="%message" />
    </parameter>
</appender>
<root>
    <level value="ALL" />
    <appender-ref ref="AdoNetAppender" />
</root>
For the connectionType property, we need to specify the type and library details of the SqlConnection class. In the connectionString property, we provide our DB connection string. Similarly, in the commandText, we provide the SQL statement to insert the log data into the database table.
After that, we provide the list of parameters by specifying the parameter name, type, and size. Also, note that we use the layout property to format the parameter values before inserting them into the table.
That’s all the changes needed. Our application will now write log4net logs into the database table:
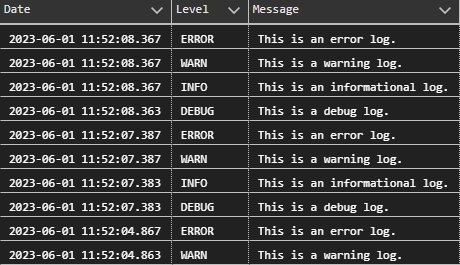
We can see the logs in the database table now.
Send log4net Logs to Azure Application Insights
Azure Application Insights is an excellent tool that can monitor live applications and capture logs, telemetry data, etc. Application Insights Log4Net Appender is a custom appender that allows us to send log4net logs to Azure Application Insights. Let’s see how to use it in our application.
First, let’s create an Azure Application Insights resource from the Azure Portal. After creating the Application Insights, we need to copy the connection string and keep it aside. We’ll need to add the connection string to our application later so that it can connect with this resource and send data to it.
The next step is adding the NuGet packages to our application:
dotnet add package Microsoft.ApplicationInsights.Log4NetAppender
dotnet add package Microsoft.ApplicationInsights.AspNetCore
While the Microsoft.ApplicationInsights.Log4NetAppender NuGet package allows us to send log4net logs to Azure Application Insights, Microsoft.ApplicationInsights.AspNetCore NuGet package is needed for enabling code-based monitoring for Azure Application Insights in an ASP.NET Core application.
After that, let’s add the Application Insights connection string in the appsettings.json file:
{
  "Logging": {
    "LogLevel": {
...
    }
  },
  "AllowedHosts": "*",
  "ApplicationInsights": {
    "ConnectionString": "{Provide the Application Insights connection string here}"
  }
}
Next, let’s add the Application Insights services to the service collection in the Program class:
builder.Services.AddApplicationInsightsTelemetry(new ApplicationInsightsServiceOptions
{
    ConnectionString = builder.Configuration["ApplicationInsights:ConnectionString"],
    EnableActiveTelemetryConfigurationSetup = true
});
Now, let’s replace the Log4NetAdoNetAppender with the ApplicationInsightsAppender in the log4net.config file:
<appender name="AiAppender" type="Microsoft.ApplicationInsights.Log4NetAppender.ApplicationInsightsAppender,
            Microsoft.ApplicationInsights.Log4NetAppender">
    <layout type="log4net.Layout.PatternLayout">
        <conversionPattern value="%message%newline"/>
    </layout>
</appender>
<root>
    <level value="ALL" />
    <appender-ref ref="AiAppender" />
</root>
Our application is now ready to send log4net logs to Azure Application Insights.
Let’s run the application once again and navigate to the /logtest endpoint. Notice that the ApplicationInsightsAppender will convert the logs into traces and send them to Application Insights. That means the logs will be available in the traces section of the Azure Application Insights from where we can query and analyze the results:
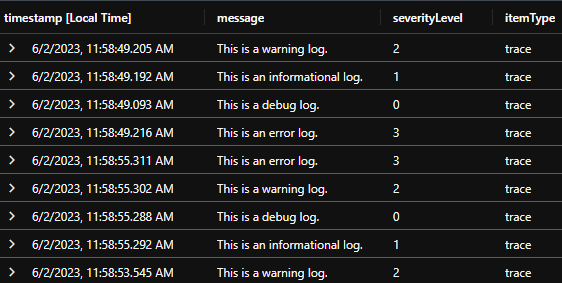
We can now see the logs in the traces section of the Azure Application Insights.
Log4net Appender for Seq
Seq is a centralized structured logging system that provides powerful searching, filtering, and analyzing capabilities. It provides a log4net appender that can write events to Seq via HTTP.
So, let’s see how to configure the Seq appender in our application. But before that, let’s download and install Seq on our local machine. Once the Seq service is installed and configured, we can access the Seq UI using the configured port. The default URL will be http://localhost:5341.
After that, we need to install the Seq.Client.Log4Net NuGet package in our application:
dotnet add package Seq.Client.Log4Net
The next step is to replace the ApplicationInsightsAppender with the SeqAppender in the log4net.config file:
<appender name="SeqAppender" type="Seq.Client.Log4Net.SeqAppender, Seq.Client.Log4Net" >
    <bufferSize value="1" />
    <serverUrl value="http://localhost:5341" />
</appender>
<root>
    <level value="ALL" />
    <appender-ref ref="SeqAppender" />
</root>
We need to provide the address of the Seq server in the serverURL property.
That’s it. Our application will now start sending log4net logs into Seq.
We can verify it by opening the Seq UI:
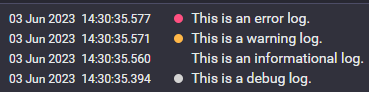
We can now see the logs in Seq.
Use Multiple log4net Appenders Simultaneously
So far we have learned how to configure any one of the log4net appenders in our application. What if we want to write logs into multiple appenders at the same time?
Fortunately, log4net supports writing logs into multiple appenders simultaneously. We just need to define multiple appenders and add them to the root element in the log4net.config. For instance, if we want to write logs into both the console and a log file, we can add both the console appender and the file appender to the log4net.config file:
<appender name="ConsoleAppender" type="log4net.Appender.ConsoleAppender">
    <layout type="log4net.Layout.PatternLayout">
        <conversionPattern value="%date{dd MMM yyyy HH:mm:ss} %-5level - %message%newline" />
    </layout>
</appender>
<appender name="FileAppender" type="log4net.Appender.FileAppender">
    <file value="logfile.txt" />
    <appendToFile value="true" />
    <layout type="log4net.Layout.PatternLayout">
        <conversionPattern value="%date{dd MMM yyyy HH:mm:ss} %-5level - %message%newline" />
    </layout>
</appender>
<root>
    <level value="ALL" />
    <appender-ref ref="ConsoleAppender" />
    <appender-ref ref="FileAppender" />
</root>
This will write all logs to both the console and the log file. But what’s more interesting is that we can configure log4net to write different types of logs to different appenders.
For instance, if we want to log messages with lower log levels such as DEBUG and INFO into the console and higher log levels such as WARN, ERROR, FATAL, etc. into the log file, we can configure it that way using level range filters:
<appender name="ConsoleAppender" type="log4net.Appender.ConsoleAppender">
    <layout type="log4net.Layout.PatternLayout">
        <conversionPattern value="%date{dd MMM yyyy HH:mm:ss} %-5level - %message%newline" />
    </layout>
    <filter type="log4net.Filter.LevelRangeFilter">
        <levelMin value="DEBUG" />
        <levelMax value="INFO" />
    </filter>
</appender>
<appender name="FileAppender" type="log4net.Appender.FileAppender">
    <file value="logfile.txt" />
    <appendToFile value="true" />
    <layout type="log4net.Layout.PatternLayout">
        <conversionPattern value="%date{dd MMM yyyy HH:mm:ss} %-5level - %message%newline" />
    </layout>
    <filter type="log4net.Filter.LevelRangeFilter">
        <levelMin value="WARN" />
        <levelMax value="FATAL" />
    </filter>
</appender>
<root>
    <level value="ALL" />
    <appender-ref ref="ConsoleAppender" />
    <appender-ref ref="FileAppender" />
</root>
Here we add a level range filter for the console appender by specifying the minimum level as DEBUG and the maximum level as INFO. Similarly, for the file appender, we have added a level range filter with the minimum level as WARN and the maximum level as FATAL.
Now our application will send logs with DEBUG and INFO levels to the console and higher levels such as WARN, ERROR, and FATAL to the log file.
Conclusion
In this article, we learned about some of the most common and useful log4net appenders that can write logs into debug, trace, memory, console, file, database, etc. Additionally, we learned how to send log4net logs into Azure Application Insights and Seq. Finally, we touched upon how to use multiple appenders simultaneously and use level range filters as well.
