
Updated on
In the previous article, we have finished creating mutations in the GraphQL application, thus finishing the GraphQL integration in ASP.NET Core Web API. In this article, we are going to consume GraphQL API by creating an ASP.NET Core app.
To consume GraphQL API with the ASP.NET Core app, we are going to use the GraphQL.Client library which will help us in the process.
We won’t dive deep into the ASP.NET Core logic, just as much as we need to create our consuming application. But if you want to read in great detail about ASP.NET Core project development you can do that by reading ASP.NET Core Tutorial.
To download the source code, visit the Consuming a GraphQL API with ASP.NET Core Source Code.
For the complete navigation of this tutorial visit GraphQL ASP.NET Core Tutorial.
Preparing the ASP.NET Core Client Project
Let’s start, by creating a new ASP.NET Core Web API project. As soon as the project is created, we are going to modify the launchsettings.json file, by setting the launchBrowser property to false and applicationUrl property to https://localhost:5003;http://localhost:5004.
To learn more about ASP.NET Core project configuration, you can read the ASP.NET Core Project Configuration article.
To continue on, let’s modify the appsettings.json file, by adding an address towards the GraphQL application:
{
  "Logging": {
    "LogLevel": {
      "Default": "Information",
      "Microsoft": "Warning",
      "Microsoft.Hosting.Lifetime": "Information"
    }
  },
  "GraphQLURI": "https://localhost:5001/graphql",
  "AllowedHosts": "*"
}
Excellent. Now, we can install the required library:

Or by using the Package Manager Console: PM> Install-Package GraphQL.Client -Version 3.2.0
Additionally, we require one more library for the GraphQL serialization:

PM> Install-Package GraphQL.Client.Serializer.Newtonsoft -Version 3.2.0
After the installation, we are going to register it in the Startup class:
public void ConfigureServices(IServiceCollection services)
{
    services.AddScoped<IGraphQLClient>(s => new GraphQLHttpClient(Configuration["GraphQLURI"], new NewtonsoftJsonSerializer()));

    services.AddControllers();
}
The next step is creating the OwnerConsumer class, which will store all the queries and mutations:
public class OwnerConsumer
{
    private readonly IGraphQLClient _client;

    public OwnerConsumer(IGraphQLClient client)
    {
        _client = client;
    }
}
Now let’s register this class:
public void ConfigureServices(IServiceCollection services)
{
    services.AddScoped<IGraphQLClient>(s => new GraphQLHttpClient(Configuration["GraphQLURI"], new NewtonsoftJsonSerializer()));
    services.AddScoped<OwnerConsumer>();

    services.AddControllers();
}
That is it regarding configuration.
Creating Model Classes
In the first article of this tutorial, Getting Started with GraphQL in ASP.NET Core, you can see that we have the model classes in the starting project. Those classes are also required for the client application, so let’s create them:
public enum TypeOfAccount
{
    Cash,
    Savings,
    Expense,
    Income
}
public class Account
{
    public Guid Id { get; set; }
    public TypeOfAccount Type { get; set; }
    public string Description { get; set; }
}
public class Owner
{
    public Guid Id { get; set; }
    public string Name { get; set; }
    public string Address { get; set; }

    public ICollection<Account> Accounts { get; set; }
}
We are not done yet. In the third part of this tutorial, GraphQL Mutations, we have created the Input type class for the mutation actions. This class is required as well, so let’s create it:
public class OwnerInput
{
    public string Name { get; set; }
    public string Address { get; set; }
}
Awesome.
Now we have everything prepared and are ready to start creating queries and mutations.
Creating Queries and Mutations to Consume GraphQL API
Let’s open the OwnerConsumer class and add the GetAllOwners method:
public async Task<List<Owner>> GetAllOwners()
{
    var query = new GraphQLRequest
    {
        Query = @"
                query ownersQuery{
                  owners {
                    id
                    name
                    address
                    accounts {
                      id
                      type
                      description
                    }
                  }
                }"
    };

    var response = await _client.SendQueryAsync<ResponseOwnerCollectionType>(query);
    return response.Data.Owners;
}
As you can see, we are creating a new GraphQLRequest object which contains a Query property for the query we want to send to the GraphQL API. This query is the same as the one we used with the UI.Playground tool in previous articles.
To execute the query, we call the SenQueryAsync method that accepts a response type (as a generic parameter) and the query. Finally, we return the list of owners from this response.
We don’t have the ResponseOwnerCollectionType class, so let’s create a new ResponseTypes folder and inside two new classes:
public class ResponseOwnerCollectionType
{
    public List<Owner> Owners { get; set; }
}
public class ResponseOwnerType
{
    public Owner Owner { get; set; }
}
Here are all the other queries and mutations from the same class:
Get Query:
public async Task<Owner> GetOwner(Guid id)
{
    var query = new GraphQLRequest
    {
        Query = @"
                query ownerQuery($ownerID: ID!) {
                  owner(ownerId: $ownerID) {
                    id
                    name
                    address
                    accounts {
                      id
                      type
                      description
                    }
                  }
                }",
        Variables = new { ownerID = id }
    };

    var response = await _client.SendQueryAsync<ResponseOwnerType>(query);
    return response.Data.Owner;
}
Create Mutation:
public async Task<Owner> CreateOwner(OwnerInput ownerToCreate)
{
    var query = new GraphQLRequest
    {
        Query = @"
                mutation($owner: ownerInput!){
                  createOwner(owner: $owner){
                    id,
                    name,
                    address
                  }
                }",
        Variables = new {owner = ownerToCreate}
    };

   var response = await _client.SendMutationAsync<ResponseOwnerType>(query);
   return response.Data.Owner;
}
Update Mutation:
public async Task<Owner> UpdateOwner(Guid id, OwnerInput ownerToUpdate)
{
    var query = new GraphQLRequest
    {
        Query = @"
                mutation($owner: ownerInput!, $ownerId: ID!){
                  updateOwner(owner: $owner, ownerId: $ownerId){
                    id,
                    name,
                    address
                  }
               }",
        Variables = new { owner = ownerToUpdate, ownerId = id }
    };

    var response = await _client.PostAsync(query);
    return response.GetDataFieldAs<Owner>("updateOwner");
 }
Delete Mutation:
public async Task<string> DeleteOwner(Guid id)
{
    var query = new GraphQLRequest
    {
        Query = @"
               mutation($ownerId: ID!){
                  deleteOwner(ownerId: $ownerId)
                }",
        Variables = new { ownerId = id }
    };

    var response = await _client.SendMutationAsync<ResponseOwnerType>(query);
    return response.Data.Owner;
}
Implementing a Controller
We are going to use the default ValuesController for the testing purpose:
[Route("api/[controller]")]
[ApiController]
public class ValuesController : ControllerBase
{
    private readonly OwnerConsumer _consumer;

    public ValuesController(OwnerConsumer consumer)
    {
        _consumer = consumer;
    }

    [HttpGet]
    public async Task<IActionResult> Get()
    {
        var owners = await _consumer.GetAllOwners();
        return Ok(owners);
    }
    … other actions
}
Now we can test this via Postman:
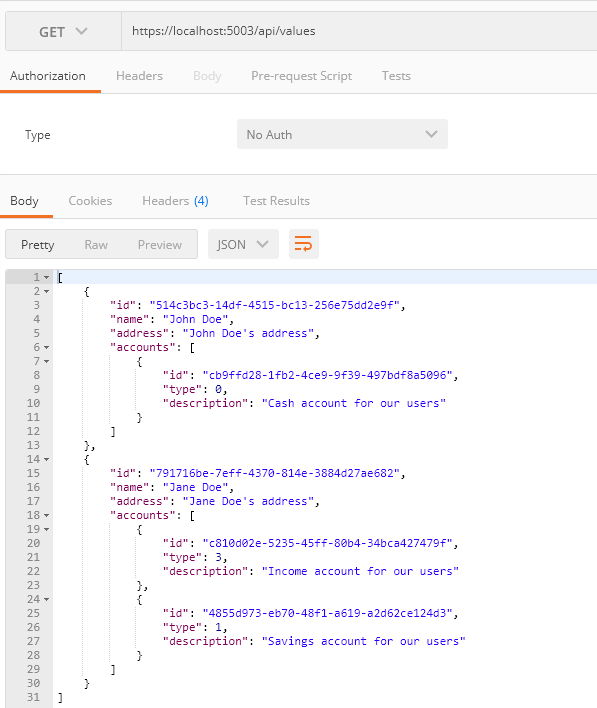
Excellent, it works like a charm. Of course, you can test all the other queries and mutations by using Postman as well.
Conclusion
In this article we have learned:
- How to prepare ASP.NET Core Client application to consume the GraphQL app
- What library do we need to help us with the consumption process
- How to create queries and mutations from a consuming application
In the next article, we are going to create an Angular application to consume the GraphQL API, by using the Apollo library.

I am exactly calling the Denodo GraphQl service API for get method in the same way as mentioned in .NET6 VS2022. It is throwing 202 error. Is there any other way to connect to Denodo API?
*422 error
In the update mutation, PostAsync() is not present. what is the alternative to it?
Am getting below error when calling through postman
It can sound silly, but are you sure that all the projects are run? The GraphQL and the API.
Hi,
I am trying to consume the api with the same code but i am getting a socket error as
can you please suggest any solution for this
TBH I am not sure why is that. This article is a bit older, as you can see by the library version, so maybe in a new version, they added something different. Again, I am not sure, since I didn’t work with GraphQL for a while now.
Thank you for a reply
The best GraphQL educational material I read so far. An excellent sample of the concept presentation and practicality to use in the real projects.
I would only mention one issue I run implementing async mutations – but probably due that I was using the latest GraphQL package v4.01
On the backend side – I implemented mutation like this:
 FieldAsync<LeadType>(
                "createLead",
                arguments: new QueryArguments(new QueryArgument<NonNullGraphType<LeadInputType>> { Name = "leadForm" }),
                resolve: async (context) =>
                {
                    var form = context.GetArgument<LeadCreateForm>("leadForm");
                    var entity = await leadService.CreateLead(form);

                    return entity.ToModel();
                }
            );
Client consuming it is (excluding request body for shortness):
Where ResponseLeadType is the same type I use to get in graph query:
    public class ResponseLeadType : IValidatableResponse
    {
        public Lead Lead { get; set; }

        public bool IsSucceeded => Lead != null;
    }
And I expected that mutation will return me the same result as the query does – but to my surprise – it always returns null.
Since testing the mutation in the playground worked just fine – obviously – GraphQL client wasn’t able to deserialize it into a “Lead” object I had in ResponseLeadType. So I came up with the following modification of ResponseLeadType:
    public class CreateLeadResponse : IValidatableResponse
    {
        public Lead CreateLead { get; set; }

        public bool IsSucceeded => CreateLead != null;
    }
Notice – now the property name is the same as the mutation name. So I ended up using two classes for query and mutation – not so sure if this is an elegant solution – but just want to share my discovery here – anyone with a deep knowledge of GraphQL,might shed some light into the problem and suggest a better approach.
Thank You for the excellent article.
Thank you for sharing this with us. It’s been a while since we worked with GraphQL, so this can help for sure.
Great work ! Thanks a lot bro
You are very welcome.
Have you done with xunit test case for this?
Hi Prakash. No, I did not test it.
How do you send a jwt token alongside your request with IGraphQLClient
Hello, do i need this configuration if i only want to consume my API with Angular? 🙂