
In the previous post, we’ve discussed why continuous integration is important, what makes a good CI tool and after that, we’ve set up a basic TeamCity project to build our application using Docker.
But continuous integration is much more than that, so in this article, we are going to learn a bit about more advanced features of TeamCity. We are also going to write an integration test to make sure our application is communicating with the database every time we build it.
The starting point for this part is the docker-series-prepare-ci-end branch of the docker-series repo on our GitHub.
Important note: This time around, if you haven’t worked like that already, you need to fork the repo to follow along since we’ll be using it in TeamCity builds. This is really important if you want to follow along with the steps of the article and get the most out of it since we will be doing incremental changes to the branch.
Here’s what we are going to learn this time:
- How to Add an Integration Test to the Asp.Net Core App
- Running Integration Tests Locally
- Running Tests with TeamCity
- Connecting Build Configurations
- Removing Hardcoded Tags from Images
- How to Make Test Results Visible
Let’s get down to it.
How to Add an Integration Test to the Asp.Net Core App
First things first. We are going to add some integration tests to our application.
We already have a unit test, but since we are using TeamCity now, this is a great opportunity to introduce integration tests. This is something every production-grade application should have because integration tests ensure that all of your application parts communicate properly.
In our case, we are going to make sure that our app communicates with the database.
For that purpose, we are going to create a new project for integration tests, and add some simple tests.
Adding an Integration Tests Project
Like we did with our unit tests project in part 1 of the series, we are going to add a new one for integration tests.
With a little twist.
So we start with navigating to the project root and adding a new xUnit project:
dotnet new xunit -o Integration
After that we need to add the newly created project to our solution:
dotnet sln AccountOwnerServer.sln add .\Integration\Integration.csproj
And like the previous time add and restore the required packages:
cd Integration
dotnet add package Microsoft.AspNetCore.TestHost --version 3.1.0
dotnet restore
As you can see instead of using the Moq library, we’ve added the
Microsoft.AspNetCore.TestHost package because it provides a nice interface for writing integration tests in ASP.NET Core projects.
We don’t mock stuff in integration tests.
This time around, we need to reference our main project AccountOwnerServer instead of just the Contracts project:
dotnet add reference ..\AccountOwnerServer\AccountOwnerServer.csproj
We need it because we have to use the real server and configuration.
That’s all we need to set up the project. You can quickly run the dotnet build to check if it compiles.
Great! Let’s proceed to the integration test.
First, we should rename the UnitTests1.cs file to something more appropriate like IntegrationTests.cs.
Then we can add our test:
public class IntegrationTests
{
	[Fact]
	public async Task GetAllOwners_ReturnsAListOfOwners()
	{
		// Arrange
		var server = new TestServer(new WebHostBuilder()
			.UseConfiguration(new ConfigurationBuilder()
				.AddJsonFile("appsettings.json")
				.Build())
			.UseStartup<Startup>());
		var client = server.CreateClient();

		// Act
		var response = await client.GetAsync("/api/owner");
		response.EnsureSuccessStatusCode();

		// Assert
		Assert.Equal(HttpStatusCode.OK, response.StatusCode);
	}
}
Ok, so here we have the simplest test possible. The Microsoft.AspNetCore.TestHost library helps us create the test server and client.
Then, we simply hit the /api/owner endpoint and assert if the HTTP response status was 200 OK, which it should be if we’ve set up our database correctly.
Important note: If you get an error that states that appsettings.json or nlog.config while running the test, you can solve it by going to properties of those files and setting the Content property to Copy always or Copy if newer.
Essentially your AccountServerOwner.csproj should contain:
<ItemGroup>
	<Content Update="appsettings.json">
	  <CopyToOutputDirectory>PreserveNewest</CopyToOutputDirectory>
	</Content>
	<Content Update="nlog.config">
	  <CopyToOutputDirectory>PreserveNewest</CopyToOutputDirectory>
	</Content>
</ItemGroup>
Separating the Test Initialization
Easy and simple as it is, this way of writing tests is plain wrong.
Why?
Because we would need to set up the test server and test client in every test.
So let’s make a helper class TestContext.cs, and extract the initialization logic to that class.:
public class TestContext: IDisposable
{
	private TestServer _server;
	public HttpClient Client { get; private set; }

	public TestContext()
	{
		SetUpClient();
	}

	private void SetUpClient()
	{
		_server = new TestServer(new WebHostBuilder()
			.UseConfiguration(new ConfigurationBuilder()
				.AddJsonFile("appsettings.json")
				.Build())
			.UseStartup<Startup>());

		Client = _server.CreateClient();
	}

	public void Dispose()
	{
		_server?.Dispose();
		Client?.Dispose();
	}
}
Now, this looks much better. We’ve implemented the logic, made the server part private, and the client part public. This makes more sense.
We also implemented the IDisposable interface to make sure context is cleaned up after we’ve finished testing.
Let’s have a look how our IntegrationTests.cs class looks now:
public class IntegrationTests
{
	private readonly TestContext _context;

	public IntegrationTests()
	{
		_context = new TestContext();
	}

	[Fact]
	public async Task GetAllOwners_ReturnsOkResponse()
	{
		// Act
		var response = await _context.Client.GetAsync("/api/owner");
		response.EnsureSuccessStatusCode();

		// Assert
		Assert.Equal(HttpStatusCode.OK, response.StatusCode);
	}

	[Fact]
	public async Task GetAllOwners_ReturnsAListOfOwners()
	{
		// Act
		var response = await _context.Client.GetAsync("/api/owner");
		response.EnsureSuccessStatusCode();
		var responseString = await response.Content.ReadAsStringAsync();
		var owners = JsonConvert.DeserializeObject<List<Owner>>(responseString);

		// Assert
		Assert.NotEmpty(owners);
	}
}
So, as you can see, we’ve initialized the context in the constructor. This helped us clean our methods (Facts) to the extent we don’t even need the Arrange part in them.
We’ve also separated our test logic into two different methods. The first one checks if the status code is 200 OK, and the second one is for testing if that particular endpoint returns the list of owners.
So clean, much wow.
For extensive testing, there are even better ways to do this, but for our purposes, this will do.
Let’s go on.
Running Integration Tests Locally
Now let’s try out our integration tests by navigating to the Integration folder and running the dotnet test command.
Both of our tests fail!

Can you guess why?
The reason is simple. We don’t have a MySQL database locally, so the requests to the endpoint in the tests fail with the HTTP response 500 Internal Server Error.
Up until now, we’ve run our application using the docker-compose up command like we’ve learned in part 4 of the series.
And since Docker Compose creates both the containers and the network in which they reside, we need to include our integration tests into docker-compose.yml somehow.
But, we don’t want the integration tests to run with each build since they are much slower than unit tests. That being the case, we need to make a new Dockerfile and a new docker.compose.yml specifically for the integration tests.
So let’s start with that.
Let’s create a Dockerfile for the Integration project in the solution root and name it Dockerfile.Integration. This file will just be the modified version of our existing Dockerfile:
FROM mcr.microsoft.com/dotnet/core/sdk:3.1

WORKDIR /home/app

COPY ./*.sln ./
COPY ./*/*.csproj ./
RUN for file in $(ls *.csproj); do mkdir -p ./${file%.*}/ && mv $file ./${file%.*}/; done

RUN dotnet restore

COPY . .

WORKDIR /home/app/Integration/

ENTRYPOINT ["dotnet", "test"]
So we use
mcr.microsoft.com/dotnet/core/sdk:3.1 as a base image to be able to run dotnet test, set the working directory to the Integration folder and made this image executable by setting the entry point to the dotnet test command.
If any of these concepts are unfamiliar to you, go back to part 3 of the series where we go into detail on how to configure a Dockerfile.
Next, we want to create a new and slightly modified docker compose file docker-compose.integration.yml in the solution root:
version: '3.1'

services:
  db:
    image: mysql:5.7
    environment:
      MYSQL_RANDOM_ROOT_PASSWORD: 1
      MYSQL_DATABASE: accountowner
      MYSQL_USER: dbuser
      MYSQL_PASSWORD: dbuserpassword
    volumes:
      - dbdata:/var/lib/mysql
      - ./_MySQL_Init_Script:/docker-entrypoint-initdb.d
    restart: always
  accountownerapp:
    depends_on:
      - db
    image: my-registry:50000/codemazeblog/accountownerapp:build-2
  integration:
    depends_on:
      - accountownerapp
    image: my-registry:50000/codemazeblog/accountownerapp:test
    build:
      context: .
      dockerfile: Dockerfile.Integration

volumes:
    dbdata:
This file is pretty similar to the
docker-compose.yml we already used to build our project. We made a few important changes though. First one being the usage of the pre-built image for our ASP.NET Core app instead of building it, and the second one being the addition of the integration service which will actually be responsible for running the integration workflow defined in Dockerfile.Integration file.
We’ve also made the integration service dependant on the accountownerapp service, to make sure the database and application are up and running before we start testing them.
For now, we are going to use the fixed tag for our application image (build-2), but we’ll learn how to change that to depend on the latest TeamCity build.
To run the integration tests we simply need to run:
docker-compose -f docker-compose.integration.yml up
Since we want to run a non-default docker compose file, we can use the -f option to specify which file to run.
After a while, you should see your integration service starting, and the tests should pass.

Cool, ha?
Both of our integration tests run locally, but let’s see if that’s the case with TeamCity too.
Running Tests with TeamCity
Let’s modify our existing configuration to something more suitable for running docker tasks.
Changing the Docker Build Step
Before we add our Integration Build Configuration, let’s change the existing Command Line step we prepared it the previous part to something more intuitive.
TeamCity offers a Docker build step, which helps a lot while building Docker images.
Let’s select it instead of the command line and add our stuff:
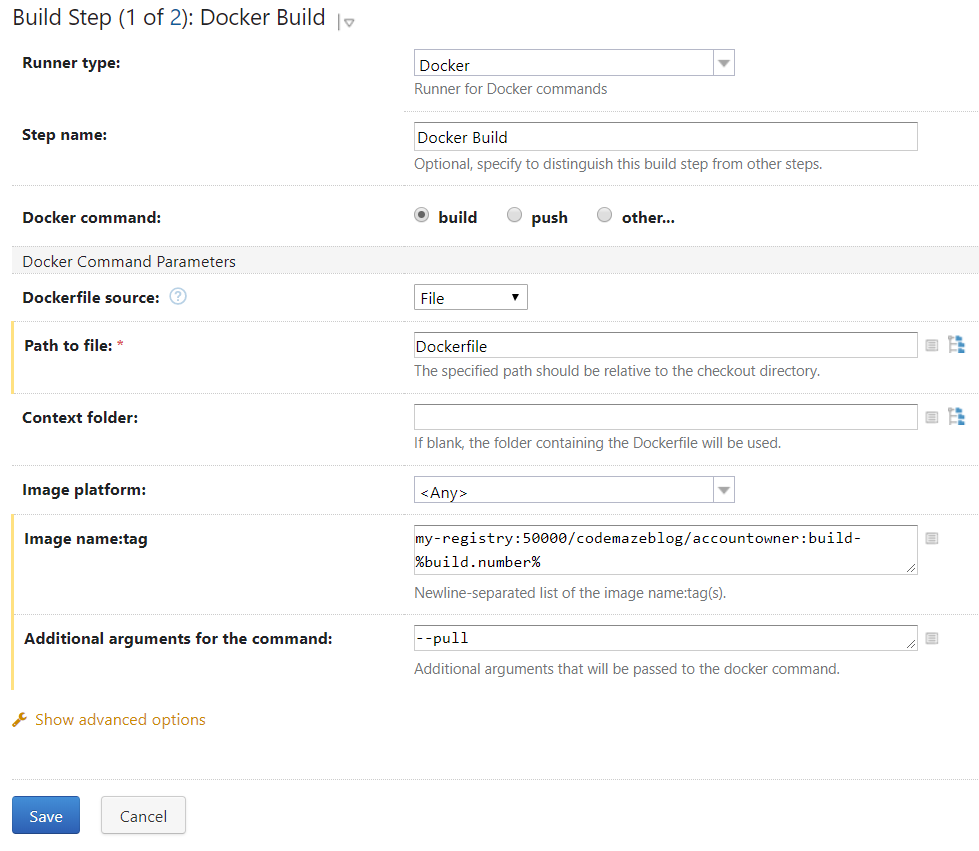
We’ve chosen the file we want to build and the image we want to produce.
Now, let’s add a Command-Line build step next to push our image to the local registry we created.
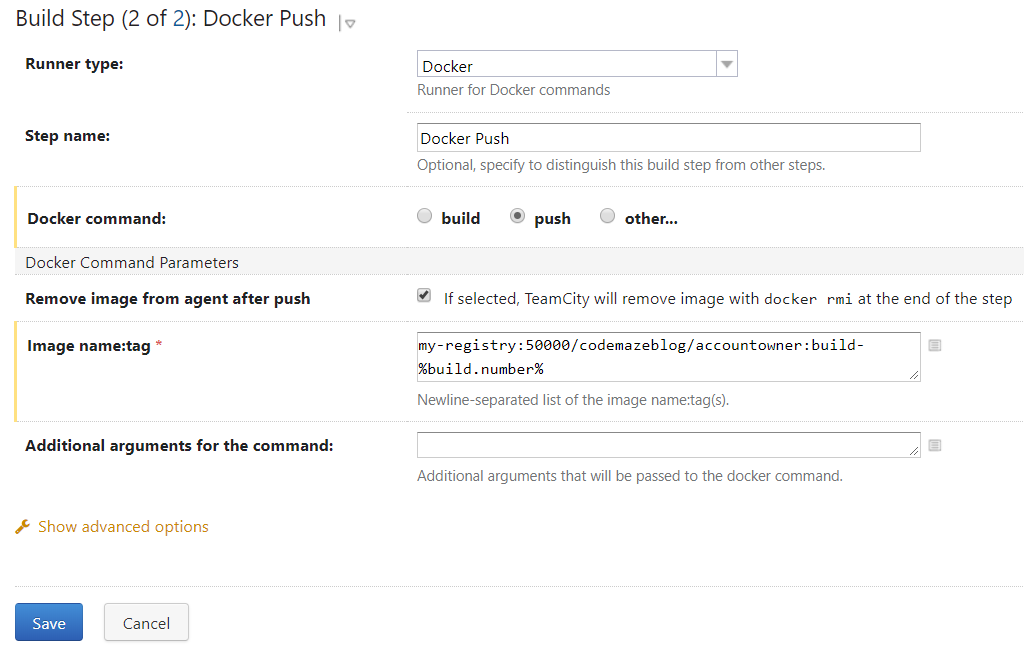
It’s a pretty simple build step that pushes the image we made in the previous step to the local registry.
You can use this opportunity to change the VCS branch to your own in the Version Control Settings. (If you are not sure how to do it, refer to the previous part)
Now, run the build once to check if everything works still.
Thanks to the Docker caching, we should have a new image in a matter of seconds, and our registry should look like this:
// 20191219190346
// http://localhost:50000/v2/codemazeblog/accountowner/tags/list

{
  "name": "codemazeblog/accountowner",
  "tags": [
    "build-4",
    "build-3",
    "runtime"
  ]
}
Awesome!
Now that we got that out of the way, let’s proceed to the main event.
Adding the Integration Build Configuration
Like with the build configuration for our docker images, we need to make a build configuration for our Integration Tests:
Make sure to use the forked repo branch in this build configuration too.
And this time, we’ll type the exact command we did while we tested our build locally, followed by the docker-compose down to dispose of our containers:
docker-compose -f docker-compose.integration.yml up
docker-compose down
Now, let’s boldly go where no man has gone before and run these tests.
And would you believe it, our build fails and we get the two failed tests!


And on top of that, the build is still hanging! Outrageous! 😀
Can you guess why this is happening?
Well, it seems that volumes don’t work the same way they do when we run the images locally, and our init.sql script fails to mount on MySQL image initialization (docker-entrypoint-initdb.d folder).
So let’s make some modifications to our command line build step.
Fixing the MySQL Volumes Problem
Part of the problem lies in our TeamCity agent configuration. We need to add two more volumes to make Docker daemon available inside our builds.
So let’s stop TeamCity for a moment again with docker-compose stop and add two more lines to docker-compose.yml in /Integration/TeamCity directory.
teamcity-agent:
    image: codemazeblog/teamcity-agent-docker-compose:latest
    build: ./agent
    environment:
      SERVER_URL: http://teamcity:8111
    volumes:
      - teamcity-agent-conf:/data/teamcity_agent/conf
      - /opt/buildagent/work:/opt/buildagent/work
      - /opt/buildagent/temp:/opt/buildagent/temp
      - /var/run/docker.sock:/var/run/docker.sock
After that just spin up TeamCity again with
docker-compose up -d.
Another part of the problem or rather an incorrect usage of commands is the docker-compose down. To release the resources properly, we need to stop the right services (containers) and add the -v option to make sure that even named volumes are removed after the build finishes. In our case, that’s mainly because of the MySQL’s dbdata volume.
docker-compose -f docker-compose.integration.yml up
docker-compose -f docker-compose.integration.yml down -v
This should take care of our database initialization.
Fixing the Hanging Build Problem
To fix this problem and to ensure that our Integration Tests build from scratch each time, we are going to add a few flags to our docker-compose up command:
docker-compose -f docker-compose.integration.yml up --force-recreate --abort-on-container-exit --build
docker-compose -f docker-compose.integration.yml down -v
What these flags do:
--force-recreate: Forces the recreation of the containers, even if their configuration hasn’t changed--abort-on-container-exit: Stops all containers if any container stops. Useful in our case, because once we finish the tests, we don’t need other containers to run anymore--build: Forces the build of images before the container starts
These flags fix the hanging build problem.
Running the Integration Tests Again
Now let’s run the tests again and see if they build this time.:

And what do you know, they do! Hurray!
You might need to run the build twice because the build hanged the first time and it needs to be shut down.
Connecting Build Configurations
So what is our endgame here?
We want to build our main project, AccountOwner ASP.NET Core application, on every commit, and then use the newly built image to run integration tests.
In order to do this, we need to connect our build configurations somehow.
Currently, we have two build configurations:
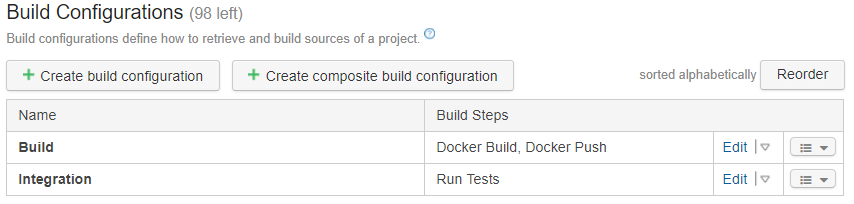
Let’s connect them.
Navigate to the Integration build configuration settings and in the Dependencies section add the dependency to the Build build configuration:
Now, this dependency means that our Build build configuration will trigger everytime we trigger the Integration build configuration. TeamCity is even smart enough to resolve triggers, so we can safely remove a VCS trigger from our Build build configuration and when we commit our changes, TeamCity will actually figure out if it needs to trigger it or not depending on the changes we made to the project.
How awesome is that?
Now that our builds are connected let’s figure out how to remove the hardcoded tags, we’ve been using so far.
Removing Hardcoded Tags from Images
The last but not the least important step is removing the hardcoded tags from our docker-compose.integration.yml file.
We have already used TeamCity’s %build.number% parameter to create a new image on every build. Now that our builds are connected, we can use that value and put it right into our docker-compose.integration.yml file so we can run integration tests on the newest image possible.
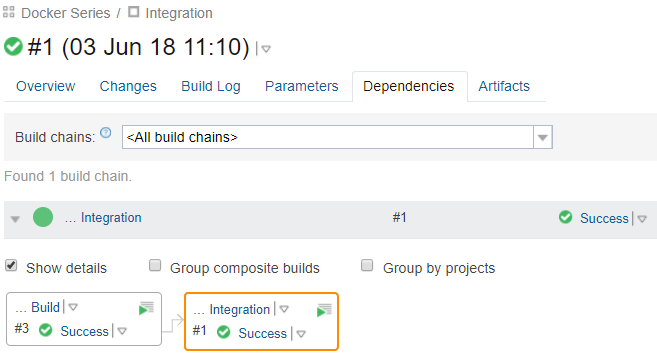
Now if we run the Integration build, we can see how the builds are connected in the Dependencies tab:
So far, we’ve used my-registry:50000/codemazeblog/accountownerapp:build-2 as a base image. Let’s change it so it dynamically adds the right tag using something called “Environment Variable Substitution”.
First, we need to find out how TeamCity resolves the build numbers of dependent projects. Since we connected the builds, we can find all sorts of useful information in the Parameters section of our Integration build.
For example, we are particularly interested in the build number of the dependent build.
So if we scroll down a bit to the Parameters from the Dependencies section within the Parameters tab we can see that information:

We are interested in build.number here, not the build.counter which is the increment.
But to make it available to the current build, the Integration build, we need to promote it to the environment variable.
We can do this in the in the Parameters section of our Integration build configuration:
Now we can substitute the hardcoded value in the docker-compose.integration.yml file:
accountownerapp:
    depends_on:
      - db
    image: my-registry:50000/codemazeblog/accountownerapp:build-${BUILD_NUMBER_ACCOUNTOWNER}
    build:
      context: .
To test this out you can set the environment variable in PowerShell with:
$env:BUILD_NUMBER_ACCOUNTOWNER = 10
And check the configuration with:
docker-compose -f docker-compose.integration.yml config
The result should look like this:
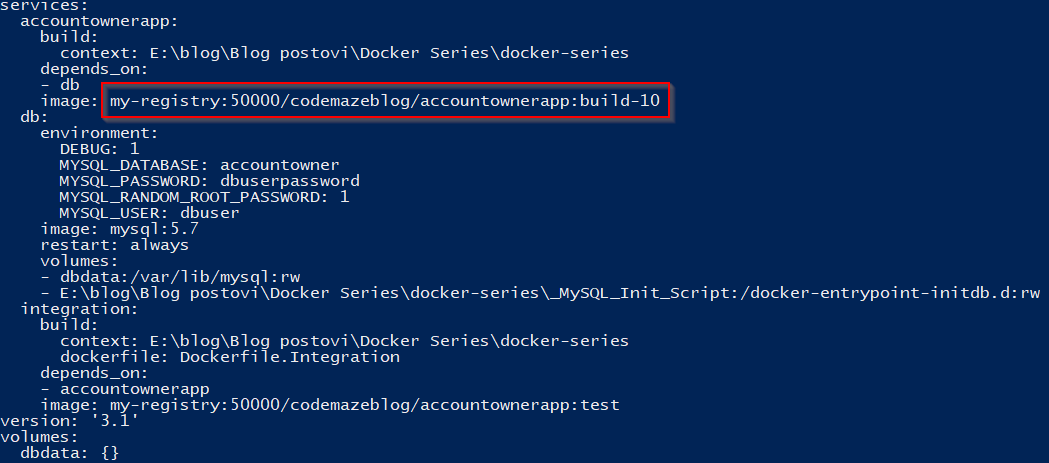
As our configuration seems to work, let’s commit it, and see how TeamCity resolves everything now.
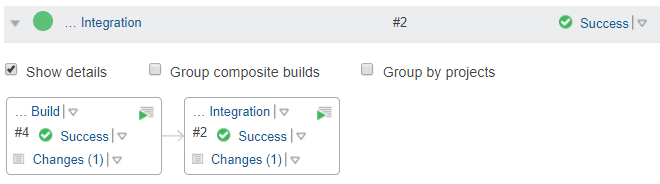
And the build finished successfully!
To make sure this is not a mistake let’s make one of our integration tests fail by changing the Assert.NotEmpty to Assert.Empty.
[Fact]
public async Task GetAllOwners_ReturnsAListOfOwners()
{
	// Act
	var response = await _context.Client.GetAsync("/api/owner");
	response.EnsureSuccessStatusCode();
	var responseString = await response.Content.ReadAsStringAsync();
	var owners = JsonConvert.DeserializeObject<List<Owner>>(responseString);

	// Assert
	Assert.Empty(owners);
}
And run it again:
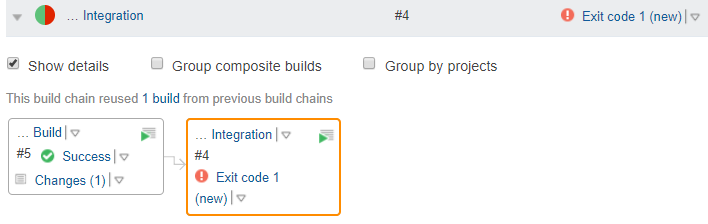
And our test failed as expected. You can navigate to the build log to see the reason.
But now that we made our tests pass, we don’t want to open the build log to look for the test results. We want them to be clearly visible at the project overview screen.
Here’s a little trick that can help us with that.
How to Make Test Results Visible
TeamCity has a cool way of helping us display the test results when using xUnit.
xUnit runner detects the presence of TeamCity by looking for the TEAMCITY_PROJECT_NAME environment variable. So, let’s add it to our integration service in the docker-compose.integration.yml file.
integration:
    depends_on:
      - accountownerapp
    image: my-registry:50000/codemazeblog/accountownerapp:test
    build:
      context: .
      dockerfile: Dockerfile.Integration
    environment:
      - TEAMCITY_PROJECT_NAME
If you are wondering what this means, this is just short for
TEAMCITY_PROJECT_NAME = ${TEAMCITY_PROJECT_NAME }.
And there is one more thing we need to do to make it work. By default xUnit verbosity in TeamCity is set to minimal.
We need to ramp it up by changing the entrypoint in our Dockerfie.Integration a bit:
ENTRYPOINT ["dotnet", "test", "--verbosity=normal"]
That’s it, let’s commit and wait for the build to finish.
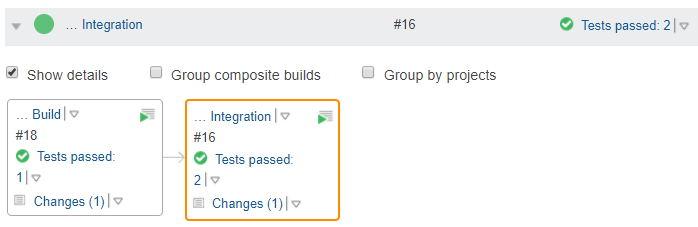
Once it finishes, we can check the build results either on the project page or the Dependencies tab of our Integration build configuration:

Now we can clearly see that tests have failed instead of generic Success/Error message. And we can click on that message to go to the stack trace and see exactly why the tests failed.
Isn’t that just great?
There is one thing remaining, and that’s to configure our Unit Tests results to show up in a similar manner.
In order to do that, we need to tweak the Dockerfile a bit.
FROM microsoft/aspnetcore-build as build-image

WORKDIR /home/app

COPY ./*.sln ./
COPY ./*/*.csproj ./
RUN for file in $(ls *.csproj); do mkdir -p ./${file%.*}/ && mv $file ./${file%.*}/; done

RUN dotnet restore

COPY . .

RUN dotnet test --verbosity=normal ./Tests/Tests.csproj

RUN dotnet publish ./AccountOwnerServer/AccountOwnerServer.csproj -o /publish/

FROM microsoft/aspnetcore

WORKDIR /publish

COPY --from=build-image /publish .

ENV TEAMCITY_PROJECT_NAME = ${TEAMCITY_PROJECT_NAME}

ENTRYPOINT ["dotnet", "AccountOwnerServer.dll"]
We ramped up the verbosity level to normal, and in a similar manner as before, added the environment variable that helps xUnit recognize that it is running inside TeamCity.
Now our results look like this:
Great stuff!
Conclusion
In this lengthy part, we’ve gone through a lot of concepts and tweaks. TeamCity is a powerful tool and becomes even more powerful when combined with Docker. Although we used it for a simple pipeline, TeamCity is flexible to support even the most complex projects. Add to that the cross-platform nature of Docker, and you get monster-like tooling for anything you might need. Ever.
Although we used the ASP.NET Core application as our base app, these concepts and configurations are applicable to any other project type or language. Now that you can integrate Docker with TeamCity, there are no boundaries to what you can do with it.
Although TeamCity is an on-premises tool, using these methods, you can make it cloud-like by hosting it on a remote machine, no matter which platform you choose.
Full source code with the modifications we made throughout this article can be found on the docker-series-continuous-integration-end branch of our docker-series repo.
Hopefully, you found this article useful. There are a lot of puzzle pieces in it, so don’t hesitate to leave a comment or ask for help.
