

In this article, we are going to learn about Azure Table Storage in depth.
We’ll start by discussing the basic Azure Table Storage concepts and then see how to create an Azure Storage Account from the portal. After that, we’ll learn how to create an ASP.NET Core Web API for performing CRUD operations on NoSQL data with the Table Storage in the back-end.
So, let’s start.
Azure Table Storage – Intro
Azure Table storage is a cloud-based NoSQL datastore. We can use it to store large amounts of structured, non-relational data. Azure Table offers a schemaless design, which provides us with a convenient way to store a collection of entities. An entity can contain a set of properties, and each property can contain a name-value pair. Azure Table is a lightweight, easy to manage service which makes it a good choice for people who are just getting started with NoSQL data and want to leverage cloud data services.
For integrating Azure Table Storage into our applications, we can use the Azure Tables client library for .NET NuGet package. This library can seamlessly work with either Azure Table Storage or Azure Cosmos DB Table Service endpoints without any code changes.
Azure Table Storage vs Azure Cosmos DB Table API
Both the Azure Table Storage and Azure Cosmos DB Table API share the same table data model and even provide the same CRUD operations through their SDKs. That means we can use either service for achieving the same functionality, but the major difference is performance and scalability.
Table Storage is a lightweight and much cheaper option which makes it a good choice when we’re just starting with small storage requirements. On the other hand, the Azure Cosmos DB Table API is a premium service that provides two-level indexes, global distribution, throughput-optimized tables, etc, and of course much more expensive.
Since these services use the same data model and client libraries, it is possible to migrate from Table Storage to Cosmos DB Table Service with minimal changes, which offers greater flexibility for developers and architects.
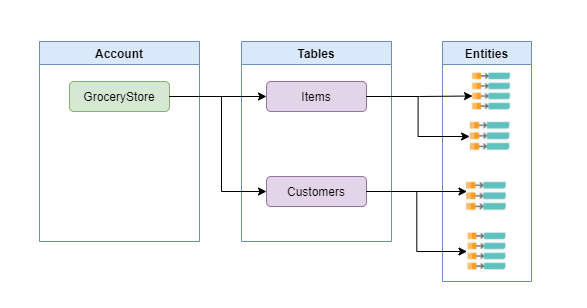
Structure of an Azure Table Storage
An Azure Table Storage is organized into Storage Accounts, Tables, Entities, and Properties:
Accounts: All access to Azure Storage is done through a storage account. The storage account’s name acts as a namespace for accessing all storage types like Blobs, Queues, Tables, etc.
Table: A Storage account can have multiple tables. A Table consists of a collection of entities, but it doesn’t enforce a schema on the entities, which means a single table can contain entities that have different sets of properties. This gives us a flexible way of storing schemaless data.
Entity: An entity is a set of properties and can be compared to a row in a database. There is a size limit of 1 MB for an entity in Table Storage.
Properties: A property is a name-value pair and each entity can have up to 252 properties. There is a size limit of 64 KB for a property.
System Properties
Apart from the user-defined properties, an entity will always have three system properties – PartitionKey, RowKey, and Timestamp. While we are responsible for managing the values of PartitionKey and RowKey, the storage manages the value of Timestamp and there is no option to modify it.
Within a table, entities are organized by partitions. A partition is a consecutive range of entities having the same PartitionKey value. The PartitionKey denotes the first part of an entity’s primary key and every operation on the entity needs to provide this value.
The RowKey property denotes the second part of the Table’s primary key. This helps to uniquely identify an entity within a partition. So we need to provide the RowKey property as well as the PartitionKey for performing any operation on an entity.
A combination of PartitionKey and RowKey uniquely identifies an entity within a table.
We can represent the structure of a Tables Storage this way:
Knowing the Storage Account name and table name, we can access the Azure Table Storage by the URL format: http://<storage account>.table.core.windows.net/<table>
Creating an Azure Table Storage
We have already explained the process of creating an Azure Storage Account in the Creating Azure Storage section of the Upload Files to Azure with .NET Core Web API and Blazor WebAssembly article. Following similar steps, we can create and configure a storage account:
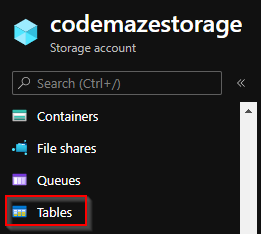
For accessing the Tables section, we can use the Tables menu:
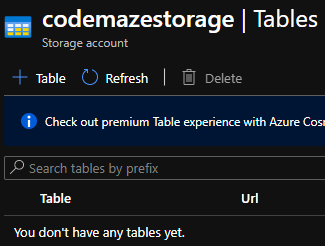
Initially, the storage account will not have any tables in it, but we are going to create an API that will create a table and insert entities into it. Make sure to note the connection string as mentioned in the linked article as we are going to need that later for connecting to the storage account from the app.
Building an API that Connects with Azure Table Storage
Now let’s build an ASP.NET Core Web API that connects with Azure Table Storage and performs read and write operations. We are going to build an API to work with grocery store items. For that, we can create an ASP.NET Core Web API project.
As discussed in the previous section, we’ll be using the Azure Tables client library for .NET for working with Azure Tables.
So let’s add the Azure.Data.Tables NuGet package to our project:
Install-Package Azure.Data.Tables
This library supports working with both Azure Table Storage and Azure Cosmos DB Table API. Cosmos DB provides several advanced features over Azure Table Storage but shares the same data model and operations.
Next, let’s make sure to configure the connection string in the appsettings file:
{
...
  },
  "StorageConnectionString": "DefaultEndpointsProtocol=https;AccountName=codemazestorage;AccountKey=UjBmo....;EndpointSuffix=core.windows.net",
  "AllowedHosts": "*"
}
Cool!
Defining the Entity
Now we need to create an Entity for storing data in the Azure Table Storage. Let’s define an entity for representing a grocery item. Note that If we need to store an entity in Azure Table Storage, we need to implement the ITableEntity interface:
public class GroceryItemEntity : ITableEntity
{
    public string Id { get; set; }
    public string Name { get; set; }
    public string Category { get; set; }
    public int Price { get; set; }
    public string PartitionKey { get; set; }
    public string RowKey { get; set; }
    public DateTimeOffset? Timestamp { get; set; }
    public ETag ETag { get; set; }
}
While implementing the ITableEntity interface, we have to define the default properties PartitionKey, RowKey, Timestamp, and ETag in addition to our entity’s attributes.
As discussed earlier, while working with Azure Tables, we need to specify a partition key and a row key for our entity. For this example, let’s choose Category as the partition key and Id as the row key. Always choose these values in such a way that the partition key can partition our data into groups and the row key can identify an entity uniquely within a partition.
Building the Service
Now it’s time to build the storage service.
For that, first let’s create an ITableStorageService interface:
public interface ITableStorageService
{
    Task<GroceryItemEntity> GetEntityAsync(string category, string id);
    Task<GroceryItemEntity> UpsertEntityAsync(GroceryItemEntity entity);
    Task DeleteEntityAsync(string category, string id);
}
After that, let’s create a TableStorageService class implementing the interface:
public class TableStorageService : ITableStorageService
{
    private const string TableName = "Item";
    private readonly IConfiguration _configuration;

    public TableStorageService(IConfiguration configuration)
    {
        _configuration = configuration;
    }
}
In the service, first, let’s create a GetTableClient() method to connect to Azure Storage and access the table inside it. This will create a table if it does not exist and return the reference to the TableClient object:
private async Task<TableClient> GetTableClient()
{
    var serviceClient = new TableServiceClient(_configuration["StorageConnectionString"]);

    var tableClient = serviceClient.GetTableClient(TableName);
    await tableClient.CreateIfNotExistsAsync();
    return tableClient;
}
After that, let’s create the methods for reading, updating, and deleting entities:
public async Task<GroceryItemEntity> GetEntityAsync(string category, string id)
{
    var tableClient = await GetTableClient();
    return await tableClient.GetEntityAsync<GroceryItemEntity>(category, id);
}

public async Task<GroceryItemEntity> UpsertEntityAsync(GroceryItemEntity entity)
{
    var tableClient = await GetTableClient();
    await tableClient.UpsertEntityAsync(entity);
    return entity;
}

public async Task DeleteEntityAsync(string category, string id)
{
    var tableClient = await GetTableClient();
    await tableClient.DeleteEntityAsync(category, id);
}
In the GetEntityAsync() method, we retrieve an entity by passing its category and Id which are the partition key and row key respectively.
Similarly, the UpsertEntityAsync() method will perform the Upsert operation. This is a special operation that inserts the given entity into a table if it does not exist and replaces the contents in case the entity already exists.
Finally, we have the DeleteEntityAsync() method that will perform a delete operation on the entity. We have to specify the partition key and row key for deleting an entity as well.
With that, our service is ready. Next, let’s create an API Controller and consume this service.
Creating the Controller
Now let’s define an ItemsController class:
public class ItemsController : ControllerBase
{
    private readonly ITableStorageService _storageService;

    public ItemsController(ITableStorageService storageService)
    {
        _storageService = storageService ?? throw new ArgumentNullException(nameof(storageService));
    }
}
Notice that we have injected the TableStorageService service into the controller. Next, let’s create the GET, POST, PUT and DELETE endpoints:
[HttpGet]
[ActionName(nameof(GetAsync))]
public async Task<IActionResult> GetAsync([FromQuery] string category, string id)
{
    return Ok(await _storageService.GetEntityAsync(category, id));
}

[HttpPost]
public async Task<IActionResult> PostAsync([FromBody] GroceryItemEntity entity)
{
    entity.PartitionKey = entity.Category;

    string Id = Guid.NewGuid().ToString();
    entity.Id = Id;
    entity.RowKey = Id;

    var createdEntity = await _storageService.UpsertEntityAsync(entity);
    return CreatedAtAction(nameof(GetAsync), createdEntity);
}

[HttpPut]
public async Task<IActionResult> PutAsync([FromBody] GroceryItemEntity entity)
{
    entity.PartitionKey = entity.Category;
    entity.RowKey = entity.Id;

    await _storageService.UpsertEntityAsync(entity);
    return NoContent();
}

[HttpDelete]
public async Task<IActionResult> DeleteAsync([FromQuery] string category, string id)
{
    await _storageService.DeleteEntityAsync(category, id);
    return NoContent();
}
The GetAsync() endpoint is pretty straightforward and just calls the GetEntityAsync() method of the service by passing the category and Id.
Both the PostAsync() and PutAsync() endpoints first set the PartitionKey and RowKey property on the Entity and then call the UpsertEntityAsync() method.
The DeleteAsync() endpoint calls the DeleteEntityAsync() method by passing the category and Id.
Finally, let’s configure the dependency injection for the service in the Startup class:
public void ConfigureServices(IServiceCollection services)
{
...
    services.AddScoped<ITableStorageService, TableStorageService>();
}
With this, the Web API project is ready. The next step is deploying it to an Azure API App.
Deploying the API to Azure
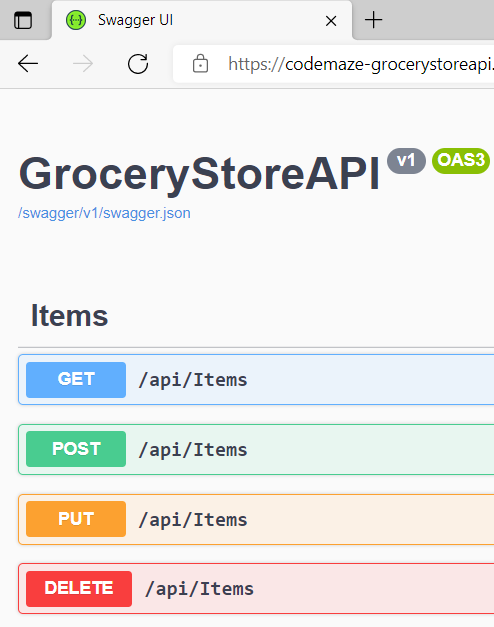
For the ease of testing the API endpoints, let’s modify the Configure() method of the Startup class to enable swagger for the hosted version:
public void Configure(IApplicationBuilder app, IWebHostEnvironment env)
{
    if (env.IsDevelopment())
    {
        app.UseDeveloperExceptionPage();
    }

    app.UseSwagger();
    app.UseSwaggerUI(c => c.SwaggerEndpoint("/swagger/v1/swagger.json", "GroceryStoreAPI v1"));
    app.UseHttpsRedirection();

...
}
We have explained the process of publishing an ASP.NET Core Web API into Azure in the Deploying ASP.NET Core Web API to Azure API Apps article. By following the steps mentioned in that article, we can create an Azure API app and deploy our API into it:
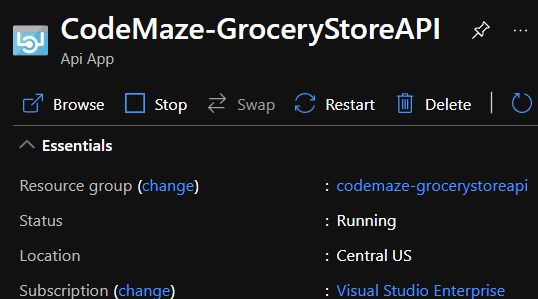
Excellent!
Our API app is now ready in Azure:
Now let’s proceed to test the endpoints.
Testing the API
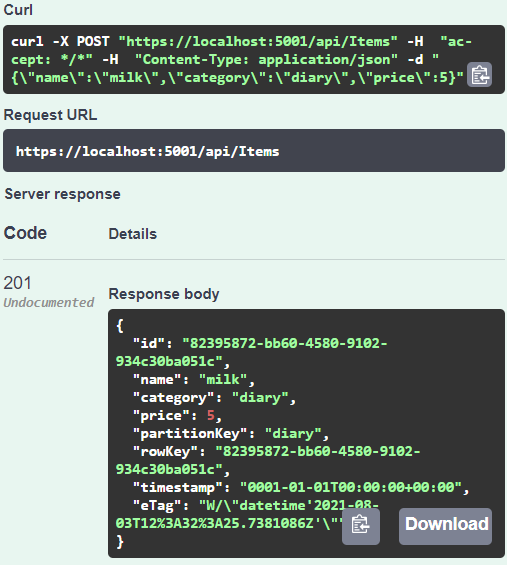
We’ll start by inserting a new grocery item using the POST endpoint:
Cool!
The operation is successful and we have inserted a new grocery item into the Azure Table Storage.
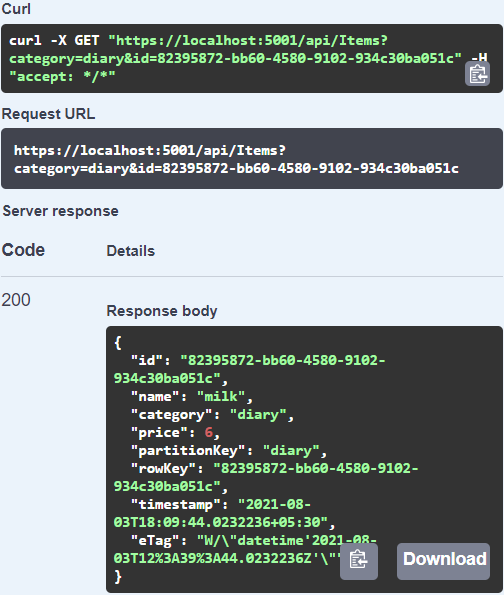
Next, let’s try to fetch the entity using the GET endpoint. Remember that we need to provide the Partition Key and Row Key for that, which is the category and Id properties respectively for this example:
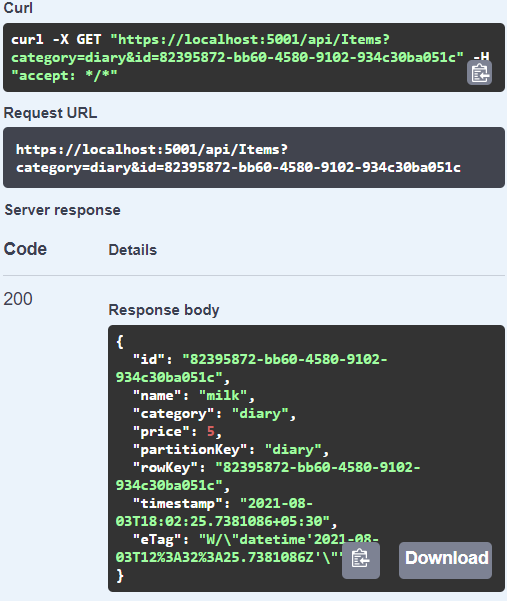
This will return the entity from Azure Table Storage.
Excellent!
Now, let’s try to update the price property of the entity using the PUT endpoint:
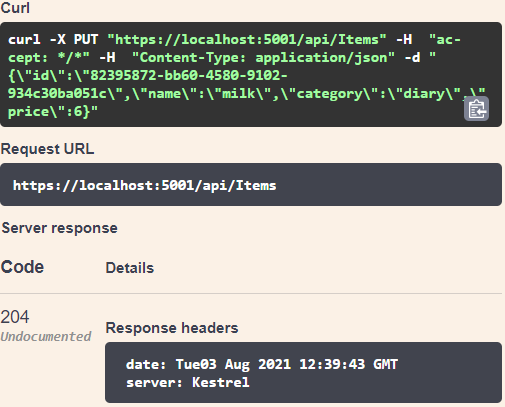
Once the update operation is completed, let’s fetch the entity once again using the GET endpoint to verify the changes:
Great!
We can see that the price is updated.
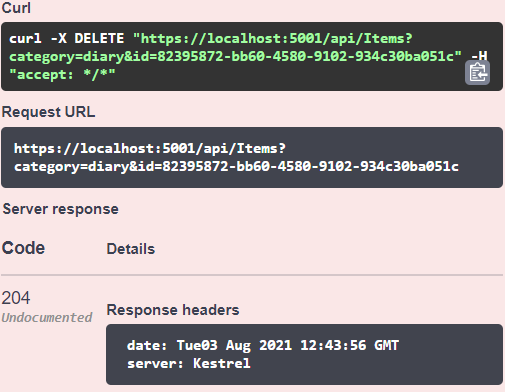
Finally, let’s delete the entity using the DELETE endpoint:
We can verify that the entity is deleted by performing the GET operation once again:
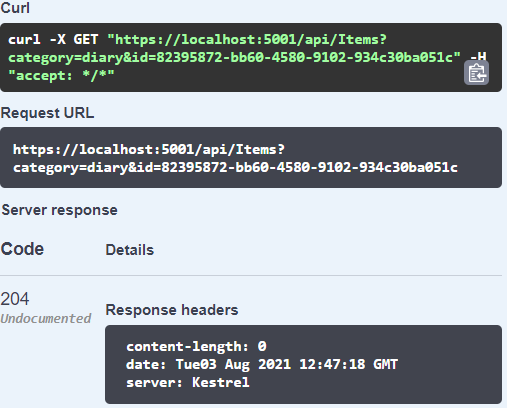
This time we receive a 204 No Content response with an empty body which indicates that the entity is not found in the Azure Table Storage.
Conclusion
We can represent the architecture of this example with a simple diagram:
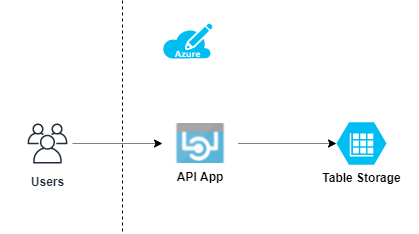
Users can access the Azure API App and work with NoSQL data. The API App connects with the Azure Table Storage in the back-end for storing the data.
We have discussed the following topics in this article:
- An introduction to Azure Table Storage, its structure, and how it compares with the Azure Cosmos DB Table API
- Creating an Azure Table Storage from Azure Portal.
- Building an ASP.NET Core Web API to connect with Azure Table Storage and work with NoSQL data
Until the next article,
All the best.

Can we query for multiple table entities? Either return all entities in a table, or specific entities that match column criteria?
Nice article, very detailed.
Thanks for posting, good work!
Thank you!
Glad to know that you liked it.
How can we get all items of a category(diary in this case)?
Hi Madhu,
We can implement custom filters using TableQuery.GenerateFilterCondition() method.
So, in this case, we can try something like this:
TableQuery.GenerateFilterCondition(“PartitionKey”, QueryComparisons.Equal, “diary”);
Here is an example of combining multiple filters and querying data. Hope this helps.
Hi Saleem,
TableQuery.GenerateFilterCondition is not found in Azure.Data.Tables.
it is for Microsoft.Azure.Cosmos.Table.dll,. Any such methods for Azure.Data.Tables.
Hi, it seems to me that the service should be singleton to avoid unnecessary overhead for each request which interacts with the DB
Hello Simon,
In this example, the table storage service is depending on external services and I’m not sure if all those are thread safe. Also, since this service is performing a database operation, I believe it would be safe to create it per scope.
So while I agree that this would avoid some overhead, we will need to verify all scenarios with concurrent users and data access before making this change.
Nice article! I would recommend upgrading to the Azure.Data.Tables package: https://github.com/Azure/azure-sdk-for-net/tree/main/sdk/tables/Azure.Data.Tables#azure-tables-client-library-for-net
Hi Loic,
Thanks for your comment.
In the article, I have mentioned that we can use both packages for interacting with Azure Tables. In fact, I did consider the Azure.Data.Tables package initially for this example. But, as it was fairly new at the time of writing this, I felt that it was missing some nice features which was available in the Cosmos DB Table Client Library.
For instance, the Cosmos DB Table Client Library provided an elegant way to build a CloudStorageAccount by parsing the connection string and then creating the Table service client from it and I couldn’t find an equivalent way in Azure.Data.Tables.
That said, I’m pretty sure Microsoft will improve Azure.Data.Tables by adding more features and integrations and it might be a good choice in future.
Hi Muhammed,
The new Azure.Data.Tables client SDK doesn’t have a CloudStorageAccount type, but you can construct a client instance using just the raw connection string from the portal (API docs).
In addition, the new client allows AAD auth for Storage endpoints, which is not available in the older client SDK. Here is a sample.
There is also a migration guide that demonstrates how the most common methods work in the old vs the new clients.
If you find anything missing, please let us know by filing an issue in the repo and we’d be happy to address it.
Hi Chris,
Thanks for the reply.
I’ll definitely take a look at those.
This article needs updating. The Microsoft.Azure.Cosmos.Table is not offically deprecated.
Sorry, I meant to say now, not not:
This article needs updating. The Microsoft.Azure.Cosmos.Table is NOW offically deprecated.
Hi Scott,
Thanks for pointing this out. We’re going to update the article asap
We have updated the article and replaced the Microsoft.Azure.Cosmos.Table with Azure.Data.Tables.
For anyone who has visited this article before, please do a CTRL+F5 in case you see the old version.
Thanks so much for your inputs Loic, Chris and Scott!
Which Swagger-library are you using? I guess we need to get one NuGet Package for this?
I get an error on the app.UseSwagger() and app.UseSwaggerUI
“Error CS1061 ‘IApplicationBuilder’ does not contain a definition for ‘UseSwagger’ and no accessible extension method ‘UseSwagger’ accepting a first argument of type ‘IApplicationBuilder’ could be found (are you missing a using directive or an assembly reference?)”
I found it:
The NuGet Package is named: “Swashbuckle.AspNetCore”
Hi,
Right, That’s the package.
With ASP.NET Core 5.0 and above, the web API template comes pre-configured with Swagger support and that’s the reason I didn’t explicitly mention it. But glad that you got it working.