


Updated on
Angular project preparation can vary from project to project and from version to version, and this article is dedicated to that topic.
Creating the server part (.NET Core Web API part) is just half of the job we want to accomplish. From this point onwards, we are going to dive into the client side of the application to consume the Web API part and show the results to the user by using angular components and many other features.
This part picks up where POST, PUT, and DELETE in ASP.NET Core Web API left off. The API is finished, and from here on we build the client that consumes it.
For complete navigation and all the basic instructions of the Angular series, check out: Introduction of the Angular series.
So, let’s start.
Installation of the Angular CLI and Starting a New Project
First, we are going to install the Angular CLI (Angular Command Line Interface) which will help us a lot with the Angular project preparation and Angular project development overall.
To install Angular CLI, we need to open the command prompt (the best option is to open it as administrator) and use the install command:
npm install -g @angular/cli
If you already have the Angular CLI installed, you can check if you have the latest version:
ng --version
If you don’t have the latest version (22 at the time of writing), you can uninstall it:
npm uninstall -g @angular/cli
npm cache clean --force
And after that, we can use the install command (mentioned above) to reinstall it.
After the installation completes, we are going to create a new project in the same command window:
ng new AccountOwnerClient
Two questions will appear. The first one asks which stylesheet system we want, and we answer CSS (just hit enter). The second one asks whether we want Server-Side Rendering, and we answer No. Routing is not one of the questions any more, because the CLI adds it to every new project.
It will take some time to create the project.
An application generated on Angular 22 runs without zone.js, and its components use the OnPush change detection strategy unless they say otherwise. This series keeps both defaults. The one thing to know about them now is that data which arrives after a request is held in a signal, which we come to when we build the owner list in part 10.
After the creation process is over, we are going to open the project folder inside our editor. We will use Visual Studio Code.
Third-Party Libraries as Part Of Angular Project Preparation
We are going to use the ngx-bootstrap library (angular bootstrap) for styling, so let’s install it using the terminal window in the VS Code:
ng add ngx-bootstrap
After we start the installation, it will tell us which ngx-bootstrap version it is about to install and whether we like to proceed. We are going to confirm that and finish the installation.
With this installation, we are installing both bootstrap and ngx-bootstrap, and also our package.json and angular.json files will be updated:
    ✅️ Added "bootstrap
    ✅️ Added "ngx-bootstrap
UPDATE package.json (855 bytes)
UPDATE angular.json (2082 bytes)
At this point, we can try to run our app:
ng serve -o
With this command, we are going to run our app and also open it in a browser automatically (-o flag).
After a few seconds, we are going to see the initial page:
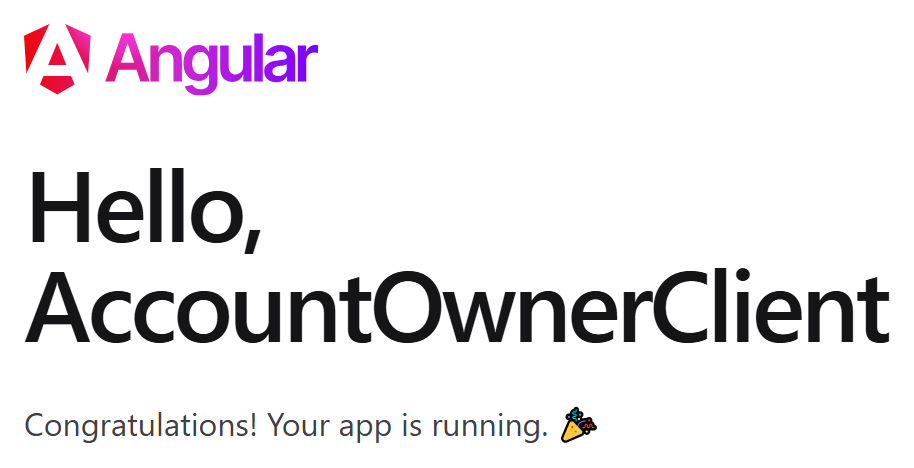
The next step is adding our components to the project.
What Is an Angular Component?
An Angular component is a TypeScript class with a @Component decorator, and it owns three things: a selector, a template, and styles.
The selector is the tag we write in another template. selector: 'app-home' means that wherever <app-home></app-home> appears, this component renders.
The template is the markup. templateUrl points at a separate file, template holds the markup inline, and styles work the same way through styleUrl and styles.
The class holds the data and the methods the template binds to. A property named homeText is readable in that component’s template as {{ homeText }}, and nowhere else.
An application is a tree of these. Bootstrapping starts one root component, that component’s template names its children, and each child names its own, all the way down.
Since Angular 19, a component is standalone unless it says otherwise. It declares what its template needs in its own imports array rather than being registered in a module somewhere else in the project.
That said, let’s take a look inside the src/app/app.ts file:
import { Component, signal } from '@angular/core';
import { RouterOutlet } from '@angular/router';

@Component({
  imports: [RouterOutlet],
  selector: 'app-root',
  styleUrl: './app.css',
  templateUrl: './app.html',
})
export class App {
  protected readonly title = signal('AccountOwnerClient');
}
Every component must import Component from the @angular/core package. We will import more things when we need them. Also, we can notice the @Component decorator inside the code.
This is the place where we create our selector (it is the same as the app-root tag in the index.html file, the single page everything else renders into). Additionally, we are binding the HTML template for this component with the templateUrl and its stylesheet with styleUrl.
The imports array is where a standalone component lists what its own template uses. The Angular components guide puts it this way: “By default, Angular components are standalone, meaning that you can directly add them to the imports array of other components”. The generated root component imports RouterOutlet because the template the CLI writes contains a <router-outlet> element.
Lastly, we have the exported class for the component.
How Do We Create a New Angular Component With the CLI?
ng generate component home creates the component and its files. ng g component home is the short form, and both do the same work.
The command writes four files into src/app/home: the class, the template, the stylesheet, and a spec file for tests. Adding --skip-tests drops the spec, which is what this series does to keep the folders small.
File names follow whatever convention the installed CLI uses. The current CLI drops the .component infix from generated names, so a component generated today lands in home.ts rather than home.component.ts. Existing projects keep the names they already have. The CLI only changes what it writes next.
Nothing else needs editing afterwards. A standalone component becomes usable by importing its class into the imports array of whichever component’s template uses it, and the CLI leaves that step alone because it cannot know where the component belongs.
Passing a path works too. ng g component error-pages/not-found nests the four files, which is how this series groups its error screens.
ng g component home --skip-tests
With this command, we create the Home component with three files (.ts, .html, .css):
CREATE src/app/home/home.ts (187 bytes)
CREATE src/app/home/home.css (0 bytes)
CREATE src/app/home/home.html (20 bytes)
Also, by adding the --skip-tests flag, we prevent creating the test file.
After the creation, we can inspect the Home component:
import { Component } from '@angular/core';

@Component({
  selector: 'app-home',
  styleUrl: './home.css',
  templateUrl: './home.html',
})
export class Home {}
The class the CLI writes has nothing in it: no constructor and no lifecycle hooks. Later parts of this series add an ngOnInit method to the components that have to fetch something once they are on screen, and Angular calls that method right after it creates the component. Dependencies do not arrive through a constructor either, because the services we build from part 9 onwards ask for them with the inject function.
Where Did app.module.ts Go in a New Angular Project?
ng new no longer creates an app.module.ts. A project generated today bootstraps a single standalone component instead, and there is no root module to open.
main.ts calls bootstrapApplication(App, appConfig). app.config.ts holds the providers that used to be application-wide, which is where the router and the HTTP client get configured in later parts of this series. app.routes.ts holds the route array.
The module’s three arrays each went somewhere different. declarations is gone outright, because a standalone component declares itself. imports moved onto each component and lists only what that component’s own template uses. providers moved into app.config.ts, or onto the service itself.
NgModule still exists and applications built on it still run. A component written before Angular 19 carries standalone: false and stays inside its module, and nothing forces an upgrade.
For new code the module is simply not part of the picture, and the rest of this series is written that way.
| File | What it holds | What it replaced |
|---|---|---|
src/main.ts | bootstrapApplication(App, appConfig) | platformBrowserDynamic() and bootstrapModule(AppModule) |
src/app/app.ts | The root component class, App | app.component.ts, class AppComponent |
src/app/app.html | The root template | app.component.html |
src/app/app.css | The root component's styles | app.component.css |
src/app/app.spec.ts | The root component's test | app.component.spec.ts |
src/app/app.config.ts | Application-wide providers | the providers and imports arrays of AppModule |
src/app/app.routes.ts | The Routes array | app-routing.module.ts |
| not generated | - | src/app/app.module.ts |
| not generated | - | src/environments/ (run ng generate environments) |
The whole startup chain runs from one file to one component, and there is no module anywhere in it.
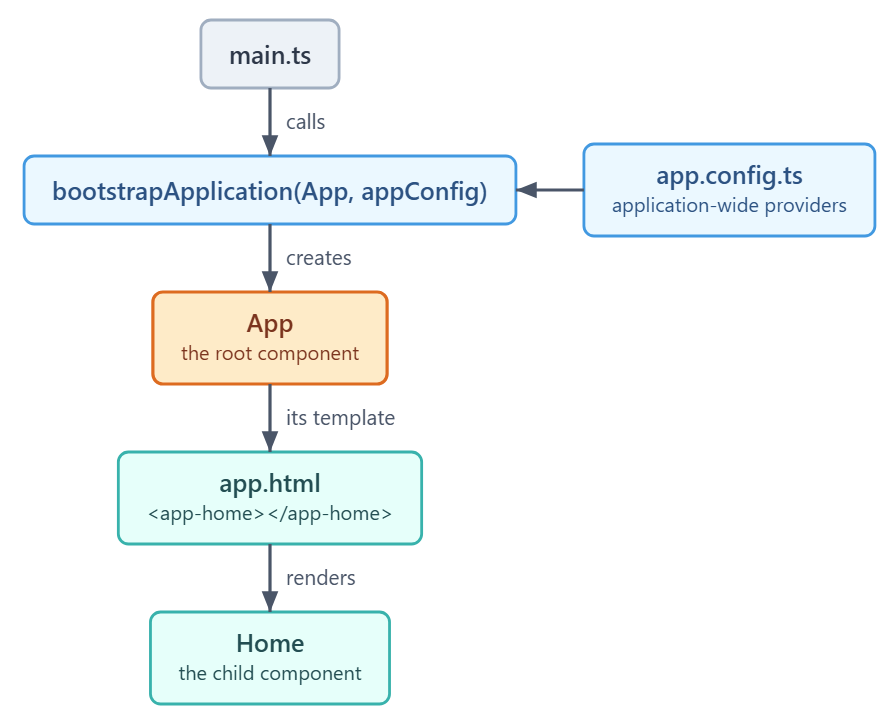
So the only wiring a new component needs is one entry in the root component’s imports array, which is what the next section does.
Additional Content in the Home Component
Let’s modify the home.ts file:
export class Home {
  public homeText = 'WELCOME TO ACCOUNT-OWNER APPLICATION';
}
Then, let’s add a new class to the home.css file:
.homeText {
  font-size: 35px;
  color: red;
  text-align: center;
  position: relative;
  top: 30px;
  text-shadow: 2px 2px 2px gray;
}
To continue, we are going to change the home.html file:
<p class="homeText">{{homeText}}</p>
Finally, let’s modify the app.html file, by removing all the content and adding a new one, just to test if this works:
<div class="container">
  <div class="row">
    <div class="col">
      <app-home></app-home>
    </div>
  </div>
</div>
A standalone component renders only what its own imports array names, so App has to import Home before <app-home> resolves to anything. The template no longer holds a <router-outlet> element either, so RouterOutlet comes out in the same edit:
import { Component, signal } from '@angular/core';

import { Home } from './home/home';

@Component({
  imports: [Home],
  selector: 'app-root',
  styleUrl: './app.css',
  templateUrl: './app.html',
})
export class App {
  protected readonly title = signal('AccountOwnerClient');
}
Now in the terminal, let’s type again ng serve -o and wait for the application to compile and run. We should see the welcome message on the screen from the Home component.
Conclusion
Right now we have a working component and an Angular application that we can run in our browser. But it is just the beginning. We have a long way ahead of us because there are still a lot of important Angular features to introduce to the project.
For a wider view of how to keep an Angular codebase in shape as it grows, we have a separate guide on Angular development best practices.
In the next part of the series, Angular Routing and Navigation Menu, we are going to create the navigation menu and configure the routing.
Tested with Angular 22.1.5, Angular CLI 22.1.7, ngx-bootstrap 22.0.0, Bootstrap 5.3.8, TypeScript 6.0.3 and Node 24.

Hi Marko.
In new Angular 17 there is no app.module.ts file.
When you want to have this file then need to create project with: ng new old-todo –no-standalone
https://www.linkedin.com/pulse/how-fix-missing-appmodulets-file-latest-version-angular-sofia-nayak-er0df/
Thank you Piotr. As you can see, these are a bit older articles, I don’t even remember what version I used for them. I haven’t worked with Angular for so long, therefore haven’t updated the existing ones. I will see what to do with the series.
Awesome tutorials for beginners.
Thank you Rasel. When you finish reading all the articles from this series, you can find a bit more advanced articles that covers Angular and Web API like: Upload, Download, SignalR, Security with JWT, Security with Identity…
Thanks for replay i am waiting your SignalR tutorials.
Hello Marinko, thank you for this tutorial series, I have completed it and now I can tell that I have learned a lot from it.
Question. Is there any way to have a printable version of it ? I would like to print it and keep it for future references.
Thank you again.
Hi Alex. Thanks for the kind words. All our sources are in form of articles (as these series are) or in a form of books. We have ASP.NET Core Web API book package https://code-maze.com/ultimate-aspnet-core-3-web-api?source=nav which you can find in a more suitable form or you can just use the content from our articles, place them in a word file and print them.
HI Marinko,
Thanks for this amazing post. I just tried building and am getting this error. I’m not familiar w/ how these libraries work. Is there a conflict w/ my bootstrap and jquery libraries?
Error: node_modules/@types/bootstrap/index.d.ts:28:9 – error TS2717: Subsequent property declarations must have the same type. Property ‘button’ must be of type ‘{ (): JQuery; (methodName: “destroy”): void; (methodName: “disable”): void; (methodName: “enable”): void; (methodName: “refresh”): void; (methodName: “widget”): JQuery; (methodName: string): JQuery; (options: ButtonOptions): JQuery; (optionLiteral: string, optionName: string): any; (optio…’, but here has type ‘jQueryInterface’.
28 button: Button.jQueryInterface;
~~~~~~
node_modules/@types/jqueryui/index.d.ts:1152:5
1152 button(): JQuery;
~~~~~~~~~~~~~~~~~
‘button’ was also declared here.
Error: node_modules/@types/bootstrap/index.d.ts:37:9 – error TS2718: Duplicate property ‘tooltip’.
37 [Tooltip.NAME]: Tooltip.jQueryInterface;
After installing
@types/*declarations, you have to update thetsconfig.app.jsonandtsconfig.spec.jsonfiles to add the newly installed declarations to the list oftypes. If the declarations are only meant for testing, then only thetsconfig.spec.jsonfile should be updated.this will also not work only when i remove jqueryui from types then it works normal
In file tsconfig.app.json, you should rem “jqueryui” and run command ng serve again.
todo:
“types”: [
“jquery”,
“bootstrap”,
//”jqueryui”
]
I am also using typescript & getting same error while using @types/jqueryui & @types/bootstrap together. I tried removing “jQueryUI” from types. But it started giving error on places where I am using Typescript.
Hi Marinko. Just wanted to say what a great tutorial you have put together. I see you were at Angular 4, 6 at the time you created this. Today we are at Angular 9. I remember seeing a recent technique to build a schema based on anticipated models then generating components to initially build out the Angular app structure. Much better I think then adjusting up from 4,6, 7, 8, 9 as is the recommendation for upgrades. I’m going to set out to derive a schema based on our account, owner .NET Core service. Create an Angular 9 app then generate components based on the derived schema. I know the Angular versions change like the weather. Just comes with the territory. Its a good exercise in understanding schema abstraction and using it to leap frog Angular generations.
Thank you Brian. Yes, Angular versions keep comming out very fast and I am going to update these articles to v9. I already did that with Angular Material series. Regarding schematics, it is a great stuff, just it would be too much to start the series with 🙂 And I must admit, I am not that familiar with the creation process, even though I know what you are talking about.
I actually thought twice of suggesting a trip down the rabbit hole on the tutorial blog here. The only reason i did add it was as a way to avoid the versioning issue. Glad you are planning on updating the tutorial in the near future You put a lot of work into this. I applaud your effort.
My bad. I realized I was talking about ‘[email protected]’ which can be used to generate a component based on a model of the data along with the API reference. Hope I didn’t confuse anyone. Disregard Schematics.
Hi Marinko,
Thanks very much for response.
The file tsconfig.app.json in my project were generated outside the src folder.
Yes I have installed all the type definitions and have checked node_modules/@types/index.d.ts too.
I just create a dummy project using VS code with command line ng new dummy, the project were created with tsconfig.app.json file outside the src folder. Do you see this issue before?
Regards,
Tam
Hi Marinko,
Thanks very much to your amazing constribution React tutorial. I complete this tutorial and it works like a dream.
Now I move to Angular tutorial. I have a few issue.
My set up is as follows:
Node: 10.16.0
OS: win32 x64
Angular: 8.0.3
… animations, common, compiler, compiler-cli, core, forms
… language-service, platform-browser, platform-browser-dynamic
… router
Package Version
———————————————————–
@angular-devkit/architect 0.800.6
@angular-devkit/build-angular 0.800.6
@angular-devkit/build-optimizer 0.800.6
@angular-devkit/build-webpack 0.800.6
@angular-devkit/core 8.0.6
@angular-devkit/schematics 8.0.6
@angular/cli 8.0.6
@ngtools/webpack 8.0.6
@schematics/angular 8.0.6
@schematics/update 0.800.6
rxjs 6.4.0
typescript 3.4.5
webpack 4.30.0
When I generate the new project, I have angular.json instead of angular-cli.json. Any help please?
When I compile the project, it complains ERROR in error TS2688: Cannot find type definition file for ‘boostrap’.
I go back to tsconfig.app.json file and comment out boostrap from types array. It works.
It works fine upto part13 (Form Validation) then I get the following error:
$(‘#successModal’).modal(); caused error:
src/app/owner/owner-create/owner-create.component.ts(67,28): error TS2339: Property ‘modal’ does not exist on type ‘JQuery’
I don’t think the issue due to the code but this may be related to my setup???
If you have a spare time, please guide me to fix this issue.
Regards,
Tam
Hello Tam, thank you very much for reading our series and commenting as well. Be sure that code is working, I just rerun it a two weeks ago and there were no problems at all. But let me try to answer your question:
If you look closer at this article, you will see that I wrote that from the Angular ver 6 you don’t have anymore angular.cli.json but angular.json file, so this is quite normal for your project setup.
When I read your other errors it looks to me that your project can’t see the type definitions for the bootstrap and jquery libraries for sure. Are you sure that you used tsconfig.app.json file which is in the src folder, and not the tsconfig.json file which is in the root of the project? This is quite common mistake. And of course, have you installed all the type definitions?
Best regards, and I hope you will solve those issues.
I’m following this tutorial, learning quite a lot too. I’ve noticed that you made this part with Angular 4, and later updated some parts for Angular 6 (as its used in creating new projects with latest angular-cli).
I found a little typo you might have not noticed. (It’s my first time using Angular, or any front-end framework rly)
“It will install the library but we also need to import its path into the angular-cli.json file.”
In Angular 6 I think its now just “angular.json”
Really interesting series!
Hello irrelevant. First of all, thank you very much for reading and for your suggestion. It is quite a joy when we have readers like yourself. You are totally right, I haven’t noticed that in Angular 6 there is no more the angular-cli.json file but now it is just angular.json. I am going to update that in this article.
Angular made a lot of “small” changes in its new version and I have to update article to make easier reading for our readers, so it is great to have someone who gives you suggestion when we miss something.
If you like these articles, feel free to subscribe to receive notification about new articles, which are published every week.
One more time, thank you very much.
Hi Marinko, awesome work with the server and client series.
I was having trouble with referencing the jquery library. Apparently the Angular team made some changes on how you reference scripts and styles (Angular 6).
After some Googling I made the following change:
From:
“../node_modules/jquery/dist/jquery.js”,
“../node_modules/bootstrap/dist/js/bootstrap.js”
to
“./node_modules/jquery/dist/jquery.js”,
“./node_modules/bootstrap/dist/js/bootstrap.js”
Now it is working for me.
Cheers!
Hi Caio Castro. First of all, thank you very much for reading our posts and I am really glad that you find it awesome. We are investing a lot of work in all our posts and it is always a pleasure to read a nice words from our readers.
Now about the issue: OMG 😀 😀
You are totally right. If I try to create Angular 6 project and try to reference with ../node_modules, the project doesn’t build as soon as I change to ./node_modules, it builds like a charm. But pay attention to this, if I use this old project and try to reference with ./node_modules, the build brakes in the same way 😀 😀 so in earlier projects we need to use ../node_modules. It is so weird and I must admit a little bit of frustrating.
Thank you very very much for your comment, I haven’t noticed that this could be the problem, and you helped us a lot. You helped the readers as well, if some of them stumble upon the same problem.
I am going to update the article.
One more time, thank you very much. All the best.
Awesome series, thank you Marinko.
One thing I noticed from the steps above, you need to remove the space before “bootstrap”
npm install –save @types/ bootstrap
Hi Matt. Thank you very much for reading the series and for your comment as well. I hope this series is helpful to you. If you like it you may always subscribe to receive notifications when a new article is published.
Thank you very much for the suggestion, it was my bad (typo). Now it is fixed.
All the best.
Grate post and great blog.
In the angular app, modify the app.component.html file to include the home componente
I’m waiting for all this post in the future