

We are going to divide this article into two major parts. The first part will consist of creating environment files, HTTP repository service, and creating a new Owner module with the lazy loading feature. As you can see, everything is Angular specific, so we won’t dive too deep into these sections. We already have Angular Series in which we have talked about these topics in great detail. So if you are not familiar with these topics, we strongly recommend reading the mentioned series.
In our source code, we can find the OwnerAccountServer folder which contains the entire .NET Core project, which we have created in .NET Core Series. In the same folder, we can find the _MySQL_Init_Script folder which contains a script to create a MySQL database with its tables. Just run that script in the MySQL database and you are ready to go.
The second part will consist of creating a material table and populating that table with data from our server. Furthermore, we are going to create the filter, sorting, and paging functionalities for that table.
So, it’s time to start our job.
For the complete navigation and all the basic instructions of the Angular Material series, check out: Introduction of the Angular Material series.
The source code is available at GitHub Angular Material Table – Source Code
We are going to divide this post into several sections:
- Environment, HTTP and Owner Module
- Using Material Table to Display Data
- Sorting Data in Material Table
- Filter Functionality in Material Table
- Paging Functionality
- Conclusion
Environment, HTTP and Owner Module
Let’s start with the environment file modifications.
We are going to modify the environment.prod.ts file first:
export const environment = {
  production: true,
  urlAddress: 'http://www.ang-material-account-owner.com'
};
After that, let’s modify the
environment.ts file:export const environment = {
production: false,
urlAddress: 'http://localhost:5000'
};
Having these environment files modified, it is time to create a service for sending the HTTP requests towards our server.
To do that, we are going to create a service file first:
ng g service shared/repository --skipTests
After creation, we have to modify that file:
import { Injectable } from '@angular/core';
import { HttpClient, HttpHeaders } from '@angular/common/http';
import { environment } from './../../environments/environment';

@Injectable({
  providedIn: 'root'
})
export class RepositoryService {

  constructor(private http: HttpClient) { }

  public getData = (route: string) => {
    return this.http.get(this.createCompleteRoute(route, environment.urlAddress));
  }

  public create = (route: string, body) => {
    return this.http.post(this.createCompleteRoute(route, environment.urlAddress), body, this.generateHeaders());
  }

  public update = (route: string, body) => {
    return this.http.put(this.createCompleteRoute(route, environment.urlAddress), body, this.generateHeaders());
  }

  public delete = (route: string) => {
    return this.http.delete(this.createCompleteRoute(route, environment.urlAddress));
  }

  private createCompleteRoute = (route: string, envAddress: string) => {
    return `${envAddress}/${route}`;
  }

  private generateHeaders = () => {
    return {
      headers: new HttpHeaders({'Content-Type': 'application/json'})
    }
  }
}
Excellent. We have prepared our service file. If you want to learn more about environment files, services, and HTTP, you can read that in the Angular Series Article which covers all of these topics.
One more thing that we need to do is to register HttpClientModule in the app.module.ts file:
import { HttpClientModule } from '@angular/common/http';imports: [
…
HttpClientModule
],
Creating a New Owner Module
Let’s create a new Owner module, and the routes for that module as well:
ng g module owner --module app
We are going to register this module into the main routing module but in such a way to support the lazy loading feature:
const routes: Routes = [
  { path: 'home', component: HomeComponent},
  { path: 'owner', loadChildren: () => import('./owner/owner.module').then(m => m.OwnerModule) },
  { path: '', redirectTo: '/home', pathMatch: 'full' }
];
To read more about multiple modules and lazy loading in Angular, you can visit an article on the following link Lazy Loading in Angular.
Right now, we have to create a new component to show the list of all the owners from the database:
ng g component owner/owner-list --skipTests

We need to have routing for the components inside this module, so let’s create a new routing module for the Owner module components:
ng g module owner/owner-routing --module owner
And let’s modify that module file:
import { NgModule } from '@angular/core';
import { CommonModule } from '@angular/common';
import { Routes, RouterModule } from '@angular/router';
import { OwnerListComponent } from '../owner-list/owner-list.component';

const routes: Routes = [
  { path: 'owners', component: OwnerListComponent }
];

@NgModule({
  imports: [
    CommonModule,
    RouterModule.forChild(routes)
  ],
  exports: [
    RouterModule
  ],
  declarations: []
})
export class OwnerRoutingModule { }
Finally, to make all this to work, we need to modify our routes in the
sidenav-list.component.html file:<a mat-list-item routerLink="/owner/owners" (click)="onSidenavClose()"> <mat-icon>assignment_ind</mat-icon> <span class="nav-caption">Owner Actions</span> </a>
And the
header.component.html file:<li>
<a routerLink="/owner/owners">Owner Actions</a>
</li>
That is it. We can confirm now that our routing settings work as it supposed to:
Excellent. Right now, we can dedicate our work to fetch some data from the database and show them in the material table component.
Using Material Table to Display Data
Because we have created another module in our Angular app, we need to import the Material module file inside the owner.module.ts file:
import { MaterialModule } from './../material/material.module';imports: [
…
MaterialModule
],
Once we create the Shared module, we will fix this code repetition (MaterialModule inside the App module and Owner module).
For now, let’s continue by creating the _interface folder and inside it the owner.model.ts file:
export interface Owner{
    id: string;
    name: string;
    dateOfBirth: Date;
    address: string;
}
Because we want to use the material table component, we need to register its own module in the
material.module.ts file:import { MatTableModule } from '@angular/material/table';imports: [
MatTableModule,
exports: [
    MatTableModule,
Then, let’s modify the
owner-list.component file:<table mat-table [dataSource]="dataSource">
<ng-container matColumnDef="name">
<th mat-header-cell *matHeaderCellDef> Name </th>
<td mat-cell *matCellDef="let element"> {{element.name}} </td>
</ng-container>
<ng-container matColumnDef="dateOfBirth">
<th mat-header-cell *matHeaderCellDef> Date of Birth </th>
<td mat-cell *matCellDef="let element"> {{element.dateOfBirth | date}} </td>
</ng-container>
<ng-container matColumnDef="address">
<th mat-header-cell *matHeaderCellDef> Address </th>
<td mat-cell *matCellDef="let element"> {{element.address}} </td>
</ng-container>
<ng-container matColumnDef="details">
<th mat-header-cell *matHeaderCellDef> Details </th>
<td mat-cell *matCellDef="let element">
<button mat-icon-button color="primary" (click)="redirectToDetails(element.id)">
<mat-icon class="mat-18">reorder</mat-icon>
</button>
</td>
</ng-container>
<ng-container matColumnDef="update">
<th mat-header-cell *matHeaderCellDef> Update </th>
<td mat-cell *matCellDef="let element">
<button mat-icon-button color="accent" (click)="redirectToUpdate(element.id)">
<mat-icon class="mat-18">system_update</mat-icon>
</button>
</td>
</ng-container>
<ng-container matColumnDef="delete">
<th mat-header-cell *matHeaderCellDef> Delete </th>
<td mat-cell *matCellDef="let element">
<button mat-icon-button color="warn" (click)="redirectToDelete(element.id)">
<mat-icon class="mat-18">delete</mat-icon>
</button>
</td>
</ng-container>
<tr mat-header-row *matHeaderRowDef="displayedColumns"></tr>
<tr mat-row *matRowDef="let row; columns: displayedColumns;"></tr>
</table>
The
mat-table element transforms this table into a material one. With the dataSource attribute, we provide a data source for our table. Inside every ng-container tag, we define the column definition and the value to be displayed. It is very important to match the matColumnDef value with the property name of our Owner interface.
Finally, in the last two tr tags, we define an order for our header columns and the row definitions. So, what we need to do right now is to create our datasource and displayedColumns properties in the ownerlist.component.ts file:
import { RepositoryService } from './../../shared/repository.service';
import { Component, OnInit } from '@angular/core';
import { MatTableDataSource } from '@angular/material/table';
import { Owner } from '../../_interface/owner.model';

@Component({
  selector: 'app-owner-list',
  templateUrl: './owner-list.component.html',
  styleUrls: ['./owner-list.component.css']
})
export class OwnerListComponent implements OnInit {

  public displayedColumns = ['name', 'dateOfBirth', 'address', 'details', 'update', 'delete'
];
  public dataSource = new MatTableDataSource<Owner>();

  constructor(private repoService: RepositoryService) { }

  ngOnInit() {
    this.getAllOwners();
  }

  public getAllOwners = () => {
    this.repoService.getData('api/owner')
    .subscribe(res => {
      this.dataSource.data = res as Owner[];
    })
  }

  public redirectToDetails = (id: string) => {

  }

  public redirectToUpdate = (id: string) => {

  }

  public redirectToDelete = (id: string) => {

  }

}
If we change the order of elements inside the
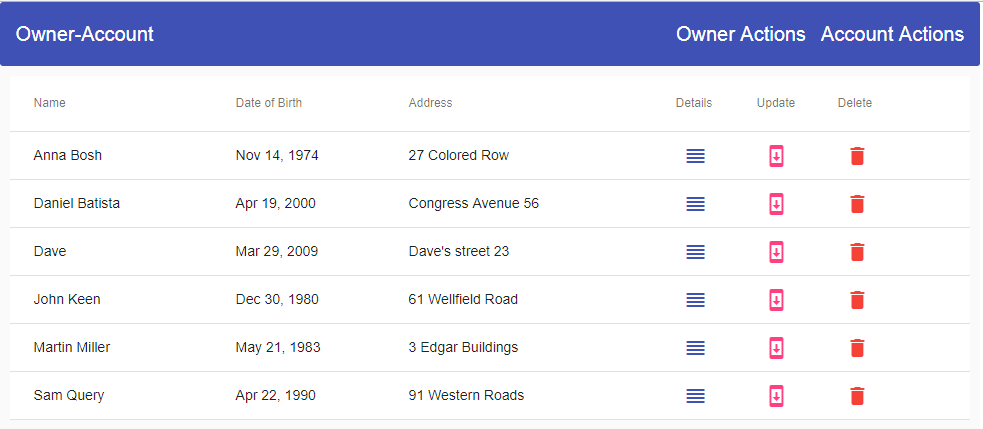
displayedColumns array, it will change the order of the columns inside our table.Right now, if we start our application and navigate to the Owner Actions menu, we are going to see a populated material table. But we are missing some styles, so let’s add those in the owner-list.component.css file:
table {
    width: 100%;
    overflow-x: auto;
    overflow-y: hidden;
    min-width: 500px;
}

th.mat-header-cell {
    text-align: left;
    max-width: 300px;
}
Now we should have a better-styled table:
Sorting Data in Material Table
We want to add the sorting functionality to our table, and for that purpose, we are going to use the matSort directive on the table tag. Moreover, we need to place the mat-sort-header directive for each header cell that will trigger sorting.
So, let’s do that now.
Modifying the table tag is going to be our first task:
<table mat-table [dataSource]="dataSource" matSort>
Then, we are going to add the
mat-sort-header directive to the Name, DateOfBirth, and Address tags:<th mat-header-cell *matHeaderCellDef mat-sort-header> Name </th> ... <th mat-header-cell *matHeaderCellDef mat-sort-header> Date of Birth </th> ... <th mat-header-cell *matHeaderCellDef mat-sort-header> Address </th>
To make sorting functionality up and running, we need to modify the
owner-list.component.ts file as well:import { Component, OnInit, ViewChild, AfterViewInit } from '@angular/core';
import { MatSort } from '@angular/material/sort';
...
export class OwnerListComponent implements OnInit, AfterViewInit {
public displayedColumns = ['name', 'dateOfBirth', 'address', 'details', 'update', 'delete'];
public dataSource = new MatTableDataSource<Owner>();
@ViewChild(MatSort) sort: MatSort;
constructor(private repoService: RepositoryService) { }
ngOnInit() {
this.getAllOwners();
}
ngAfterViewInit(): void {
this.dataSource.sort = this.sort;
}
.
.
.
Lastly, we need to add the
MatSortModule inside of the material.module.ts file:import { MatSortModule } from '@angular/material/sort';imports: [
MatSortModule,
exports: [
    MatSortModule,
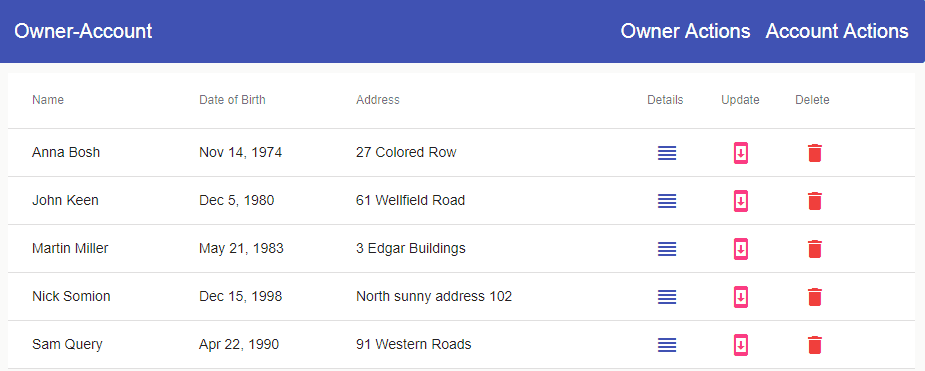
Now, we can check our result:
By default, sorting starts with ascending order first and then descending. We can change that behavior by adding the matSortStart attribute to desc next to the matSort directive:
<table mat-table [dataSource]="dataSource" matSort matSortStart="desc">
If we don’t want to use
MatTableDataSource for sorting, but to provide our own sorting logic, we can use the (matSortChange) event to receive the active sorting column and the sorting order as well:<table mat-table [dataSource]="dataSource" matSort (matSortChange)="customSort($event)">
Once we click on the name column it will generate the following JSON object (Of course, don’t forget to add the function in the .ts file):
{active: "name", direction: "asc"}

1. active:"name"
2. direction:"asc"
3. __proto__:ObjectFilter Functionality in Material Table
For this functionality, we need to provide our own input field and a custom function to filter our data. Only then, we can use MatTableDataSource’s filter property. To implement filtering, we are going to add the following code right above our table in the HTML file:
<div fxLayout fxLayoutAlign="center center">
  <mat-form-field fxFlex="40%">
    <input matInput type="text" (keyup)="doFilter($event.target.value)" placeholder="Filter">
  </mat-form-field>
</div>
And then to write the following function in the component file:
public doFilter = (value: string) => {
    this.dataSource.filter = value.trim().toLocaleLowerCase();
  }
Finally, because we are using the
matInput directive to transform regular input into the material input field, we need to register its modules inside the material.module.ts file:import { MatFormFieldModule } from '@angular/material/form-field';
import { MatInputModule } from '@angular/material/input';imports: [
MatFormFieldModule,
MatInputModule,
exports: [
    MatFormFieldModule,
    MatInputModule,
As we can see from the HTML file, we are using the
fxLayout directive. But, because this component is part of a new Owner module, we need to import FlexLayoutModule into the Owner module file as well:import { FlexLayoutModule } from '@angular/flex-layout';imports: [
...
FlexLayoutModule
],
Of course, this code repetition will be solved as well as soon as we create a Shared module.
Excellent.
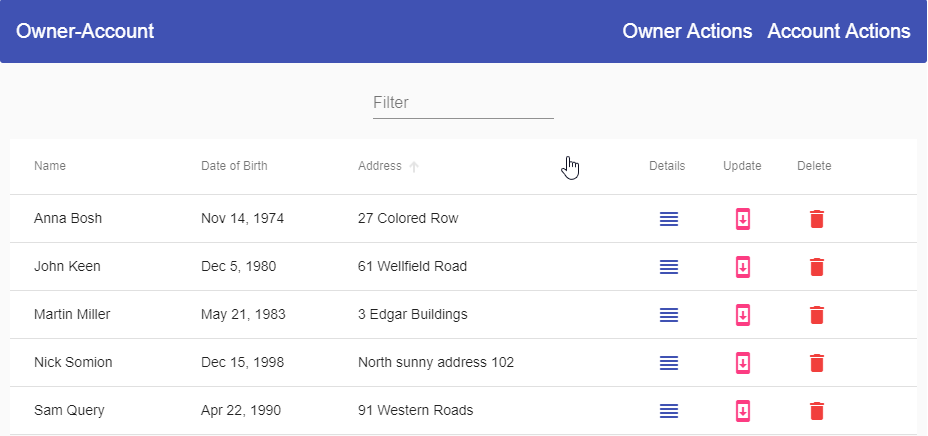
Now we can inspect the result:
Paging Functionality
To implement paging with a material table, we need to use a <mat-paginator> bellow our table. So, let’s start implementation by adding MatPaginatorModule inside the Material module:
import {MatPaginatorModule } from '@angular/material/paginator';imports: [
MatPaginatorModule,
exports: [
    MatPaginatorModule,
Then, let’s add
mat-paginator inside the HTML file:<mat-paginator [pageSize]="2" [pageSizeOptions]="[2, 4, 6, 10, 20]"> </mat-paginator>
And finally, let’s modify the
owner-list.component.ts file:import { MatPaginator } from '@angular/material/paginator';
...
@ViewChild(MatPaginator) paginator: MatPaginator;
constructor(private repoService: RepositoryService) { }
ngOnInit() {
this.getAllOwners();
}
ngAfterViewInit(): void {
this.dataSource.sort = this.sort;
this.dataSource.paginator = this.paginator;
}
...
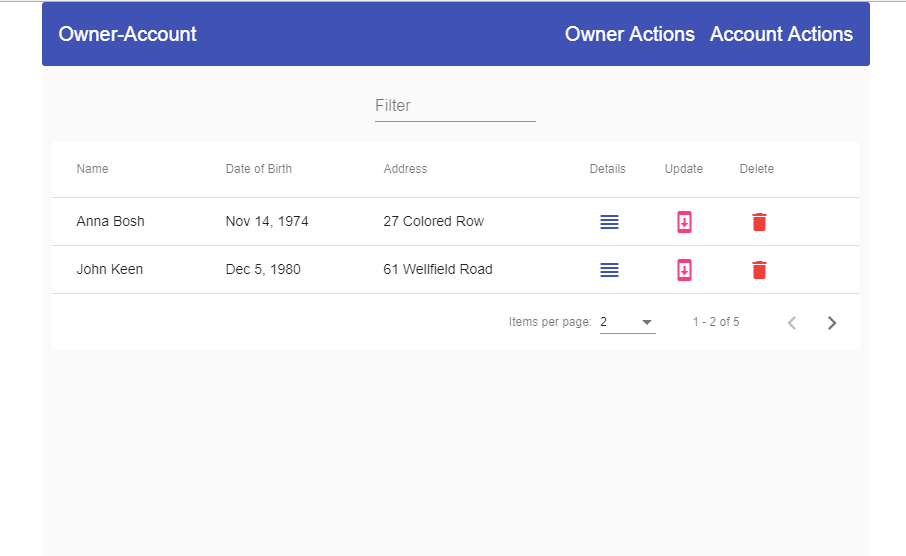
After these changes, we should have the following result:
If we want to write our custom pagination logic, we should use the (page) output event:
<mat-paginator [pageSize]="2" [pageSizeOptions]="[2, 4, 6, 10, 20]" (page)="pageChanged($event)">
</mat-paginator>
For the custom pagination logic, you will have to write a pagination logic on the Web API part. We have a great article that explains How to Write Paging in ASP.NET Core Web API. So, feel free to read it and acquire a better knowledge of the server-side paging as well.
Conclusion
So, that’s it. Now we have our material table with all the features like sorting, paging, and filtering data.
In this article, we have learned:
- How to use Environment files, HTTP client module, and Lazy Loading feature
- To create a material table
- To apply sorting, filtering, and pagination to the material table
In the next article, we are going to create error pages by focusing on the material components and to create owner details component.

