

In our two previous articles, we have covered a lot of ground regarding the CRUD operations with HttpClient. If you have read them both, you know how to use HttpClient to fetch data from API, and also to send POST, PUT and DELETE requests using HttpClient. When we talk about the PUT request, we know we use it for the full update of our resources. But we can improve that with partial updates using the HTTP PATCH requests. So, in this article, we are going to show you how to use HttpClient to send HTTP PATCH requests to achieve partial updates of our resources, thus improving the application’s performance.
You can also visit our HttpClient Tutorial page, to see all the articles from this tutorial.
So, let’s get going.

More About an HTTP PATCH Request
As we already mentioned, we use the PUT request for full updates and the PATCH request for partial updates. But this is not the only difference between these two HTTP requests. First of all, the request body is different. If we inspect the PUT action on the Web API’s side, we can see that the body of the request is a simple object:
[FromBody] CompanyForUpdateDto company
But if we do the same inspection for the PATCH request:
[FromBody] JsonPatchDocument<EmployeeForUpdateDto> patchDoc
We can see that if we want to support a request body for the PATCH requests, we have to use the JsonPatchDocument class. This class helps us describe different sets of operations that we can execute with the PATCH request.
Also, for the PUT request, we use the application/json as a media type. But for the PATCH request, the preferred media type is application/json-patch+json. We can use the application/json media type for the HTTP PATCH request, but as we mentioned the preferred media type is application/json-patch+json, and we are going to use that one in our example.
HTTP PATCH Operations
The PATCH request can execute one or multiple operations as a part of the JSON array. That said, let’s see the request body of the PATCH request:
[
    {
        "op": "replace",
        "path": "/name",
        "value": "new name"
    },
    {
        "op": "remove",
        "path": "/name"
    }
]
So, as we can see, the request body is basically an array of JSON objects that specify different operations. That said, we can confirm two operations: Replace and Remove, specified by the op property. The path part signifies the path to the object’s property that we want to modify – the Name property in this case. Finally, the value part represents a new value that we use to replace an old one for the Name property.
We have seen two operations but there are six operations in total. So, let’s explore all of them:
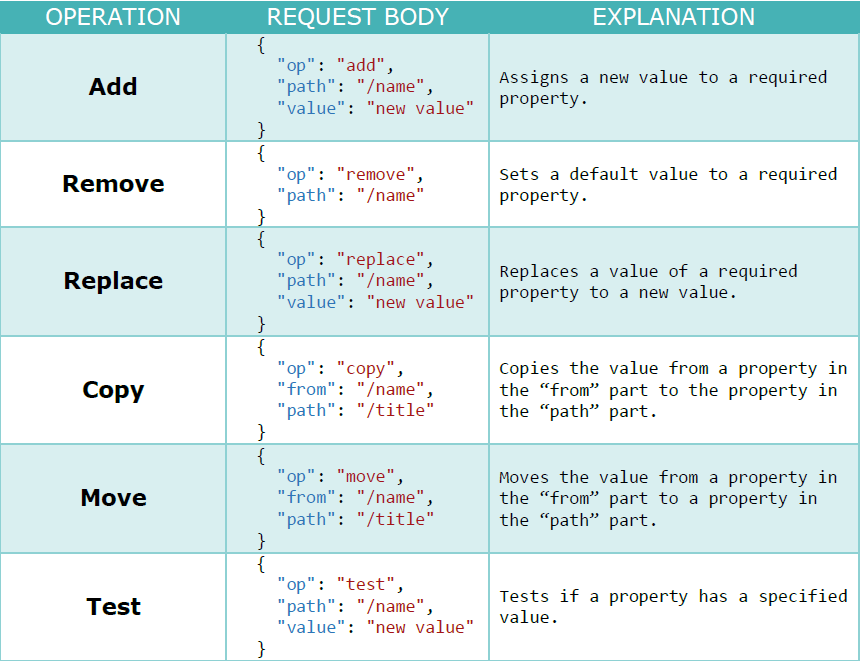
We have borrowed this picture from our Ultimate ASP.NET Core Web API book because it explains all the operations in a clear manner.
Now, after the theory part, we can start with some coding.
Using HttpClient’s PatchAsync Method to Send the HTTP Patch Request
Before we start with the client project modification, we can quickly take a look at the route for the PATCH action on the API’s side:
[Route("api/companies/{companyId}/employees")]
[ApiController]
public class EmployeesController : ControllerBase
So, we can see that we have implemented the PATCH action inside the EmployeesController. Since a single employee can’t exist without a single company, the route to this controller is: api/companies/{companyId}/employees. But, since we update only a single employee, we need an id for that employee:
[HttpPatch("{id}")]
public IActionResult PartiallyUpdateEmployeeForCompany(Guid companyId, Guid id, [FromBody] JsonPatchDocument<EmployeeForUpdateDto> patchDoc)
This means that the route for this action is: api/companies/{companyId}/employees/{id}.
We have removed the rest of the actions from this controller for the sake of simplicity, but to read in great detail about the restful API implementations of parent and child resources, refer to our mentioned book.
Also, just for reference, let’s show the API’s implementation of the action:
[HttpPatch("{id}")]
public IActionResult PartiallyUpdateEmployeeForCompany(Guid companyId, Guid id, [FromBody] JsonPatchDocument<EmployeeForUpdateDto> patchDoc)
{
    if(patchDoc == null)
    {
        _logger.LogError("patchDoc object sent from client is null.");
        return BadRequest("patchDoc object is null");
    }

    var company = _repository.Company.GetCompany(companyId, trackChanges: false);
    if (company == null)
    {
        _logger.LogInfo($"Company with id: {companyId} doesn't exist in the database.");
        return NotFound();
    }

    var employeeEntity = _repository.Employee.GetEmployee(companyId, id, trackChanges: true);
    if (employeeEntity == null)
    {
        _logger.LogInfo($"Employee with id: {id} doesn't exist in the database.");
        return NotFound();
    }

    var employeeToPatch = _mapper.Map<EmployeeForUpdateDto>(employeeEntity);

    patchDoc.ApplyTo(employeeToPatch);

    _mapper.Map(employeeToPatch, employeeEntity);

    _repository.Save();

    return NoContent();
}
We are accepting the JsonPatchDocument from the request body. Next, we check the patchDoc object for a null value, and if the company and employee exist in the database. Then, we map from the Employee type to the EmployeeForUpdateDto type. It is important for us to do that because the patchDoc object can apply only to the EmployeeForUpdateDto type. After calling the ApplyTo method, we map again to the Employee type (from employeeToPatch to employeeEntity) and save changes in the database.
Client-Side Implementation
Now, let’s open the client project and add a new service in the Services folder:
public class HttpClientPatchService : IHttpClientServiceImplementation
{
    private static readonly HttpClient _httpClient = new HttpClient();

    public HttpClientPatchService()
    {
        _httpClient.BaseAddress = new Uri("https://localhost:5001/api/");
        _httpClient.Timeout = new TimeSpan(0, 0, 30);
        _httpClient.DefaultRequestHeaders.Clear();
    }

    public async Task Execute()
    {
        throw new NotImplementedException();
    }
}
So, this is the initial configuration of the HttpClient class with the base address and the timeout set. This is the same as we have in our previous example. Once we start learning about the HttpClientFactory, we are going to show you how to store the configuration in a single place without repeating it for each service.
After this, we can implement the logic for sending the HTTP PATCH request by using the shortcut PatchAsync method:
private async Task PatchEmployee()
{
    var patchDoc = new JsonPatchDocument<EmployeeForUpdateDto>();
    patchDoc.Replace(e => e.Name, "Sam Raiden Updated");
    patchDoc.Remove(e => e.Age);

    var uri = Path.Combine("companies", "C9D4C053-49B6-410C-BC78-2D54A9991870", "employees", "80ABBCA8-664D-4B20-B5DE-024705497D4A");
    var serializedDoc = JsonConvert.SerializeObject(patchDoc);
    var requestContent = new StringContent(serializedDoc, Encoding.UTF8, "application/json-patch+json");

    var response = await _httpClient.PatchAsync(uri, requestContent);
    response.EnsureSuccessStatusCode();
}
Here, we create a new PATCH document with a help of the JsonPatchDocument class. To be able to use this class, we have to install the Microsoft.AspNetCore.JsonPatch library. Next, we create two operations (Replace and Remove) with the two helper methods from the JsonPatchDocument class. Then, we create a URI to the action, serialize the object, and create a new string content by providing our serialized object, encoding type, and media type. The important thing to notice here is that we don’t use JsonSerializer.Serialize() method from the System.Text.Json library but we use JsonConvert.SerializeObject() method from the Newtonsoft.Json library. We have to do this, otherwise, we get 400 bad request from our API since the patch document isn’t serialized well with System.Text.Json.
Finally, we send the request using the PatchAsync method and ensure that the response has a successful status code.
Now, let’s modify the Execute method:
public async Task Execute()
{
    await PatchEmployee();
}
And, let’s register this service in the Program class:
private static void ConfigureServices(IServiceCollection services)
{
    //services.AddScoped<IHttpClientServiceImplementation, HttpClientCrudService>();
    services.AddScoped<IHttpClientServiceImplementation, HttpClientPatchService>();
}
Excellent.
Let’s place the breakpoint in the PatchEmployee method and start both applications:

And we can see the 204 status code, with the No Content message.
Now, if we check the database:

We can see the Name column is modified and the Age column is set to its default value of 0.
Excellent.
Let’s see how we can use the HttpRequestMessage to achieve the same thing.
Using HttRequestMessage to Send the PATCH Request
As we did with all the previous HTTP requests, we are going to use the HttpRequestMessage class to send the PATCH request to the server. We already talked about the benefits of this approach in our previous articles from this tutorial.
So, let’s add another method in the HttpClientPatchService class:
private async Task PatchEmployeeWithHttpRequestMessage()
{
    var patchDoc = new JsonPatchDocument<EmployeeForUpdateDto>();
    patchDoc.Replace(e => e.Name, "Sam Raiden");
    patchDoc.Add(e => e.Age, 28);

    var uri = Path.Combine("companies", "C9D4C053-49B6-410C-BC78-2D54A9991870", "employees", "80ABBCA8-664D-4B20-B5DE-024705497D4A");
    var serializedDoc = JsonConvert.SerializeObject(patchDoc);

    var request = new HttpRequestMessage(HttpMethod.Patch, uri);
    request.Headers.Accept.Add(new MediaTypeWithQualityHeaderValue("application/json"));
    request.Content = new StringContent(serializedDoc, Encoding.UTF8);
    request.Content.Headers.ContentType = new MediaTypeHeaderValue("application/json-patch+json");

    var response = await _httpClient.SendAsync(request);
    response.EnsureSuccessStatusCode();
}
We create our JsonPatchDocument object again but this time, we revert the name of the employee and also add the age of 28. Then, we prepare URI and serialize the object. Once we do that, we create a new HttpRequestMessage providing the HTTP method we want to use and the URI. As we did with all our HttpRequestMessage examples, we add an accept header, content, and the content type for our request. Finally, we send the request using the SendAsync method and ensure a successful status code in the response.
To be able to execute this method, we have to call it in the Execute method:
public async Task Execute()
{
    //await PatchEmployee();
    await PatchEmployeeWithHttpRequestMessage();
}
That’s all.
We can place a breakpoint in our method and run both applications:

And we can see the 204 response.
We can confirm that by looking at the record in the Employees table:

Excellent. Both columns have been updated.
Conclusion
Great. With this article – including the previous ones, we have covered all the CRUD requests including the HTTP PATCH request. Now we know how to use HttpClient to send all these types of requests using both shortcut methods and the HttpRequestMessage class.
In the next article, we are going to talk about streams and how they help us improve performance and memory usage.
So, until then.
All the best.