

In this article, we are going to learn how to use Azure Active Directory (Azure AD) to secure our Blazor WebAssembly standalone application. First, we are going to show you how to use the Azure portal to register the Blazor Webassembly standalone application. Then, we are going to use the required information to connect our app to that Azure Active Directory. Finally, we are going to see what we get out of the box from the creation templates. We can use that information to add the Azure AD auth to an existing Blazor WASM application.
If you want to learn more about Blazor WebAssembly, we strongly suggest visiting our Blazor WebAssembly series of articles, where you can read about Blazor WebAssembly development, authentication, authorization, JSInterop, and other topics as well.
So, let’s start.
App Registration with Azure Active Directory
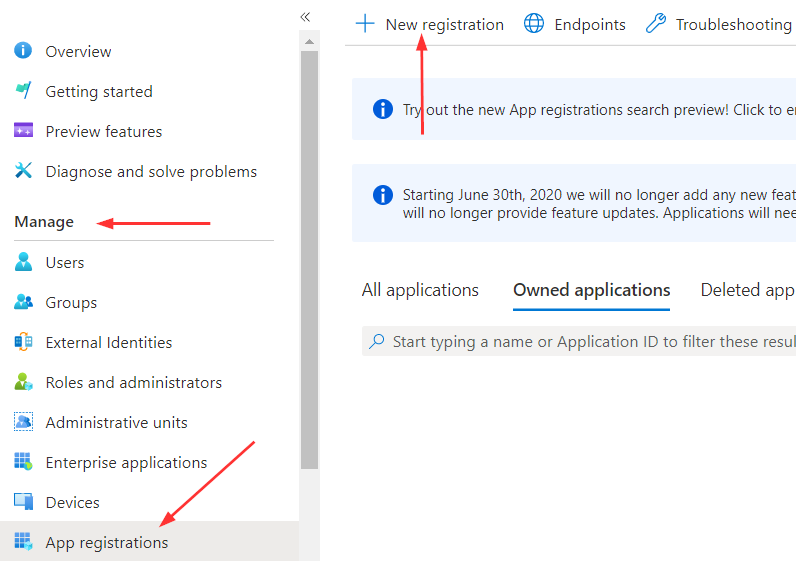
The first thing we have to do is to navigate to Azure Active Directory in our Azure Portal:

Then, under the Manage sections, we are going to choose App registrations, and click the New registration link:
In a new window, we have to provide the required information:
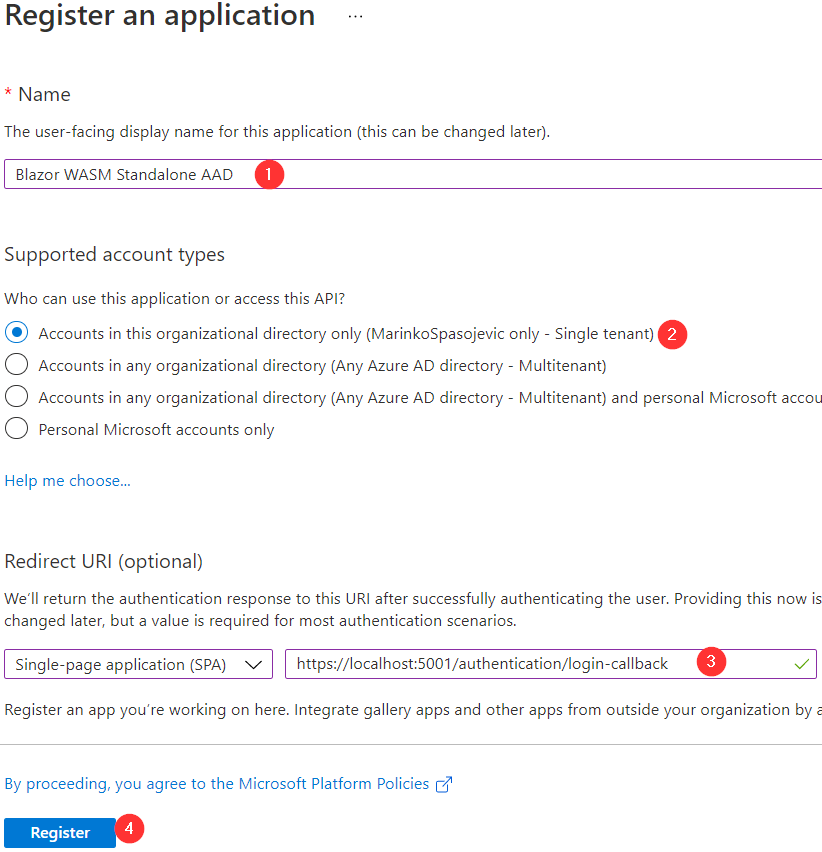
We can see, we have to provide a name for the app, the account we are going to use, state that this is a single page application, and provide a redirect URI. We can safely provide this URI because we will force our app to run on port 5001. After populating all the required fields, we can click the Register button.
Once we click that button, Azure will register our app and navigate us to the Overview page, where we can see all the details about our app:
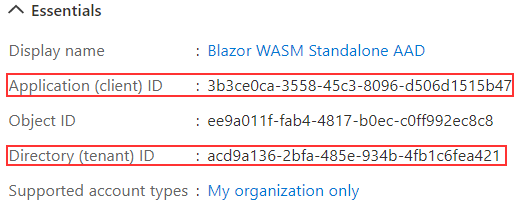
Soon, we are going to need the Application (client) ID and Directory (tenant) ID values so, we can save them in a document or just navigate back to the Overview page to copy these values.
Final Confirmation
To confirm our registration, we can navigate to the Authentication page under the Manage section:

Here, we can confirm our redirect URI is valid and also we can see that we are going to use Authorization Code Flow with PKCE, which is a recommended flow for a SPA. If you want to use Implicit or Hybrid flow, you can check any of the two checkboxes (Access tokens and ID tokens) provided a bit below on the Authentication page. Since we are using the Authorization Code flow, we are not going to select any of these options.
Creating an Application
We can create our application in two different ways. Via dotnet command or by using the Visual Studio template creation.
If we want to use the command, we have to create a new empty folder, open Command Prompt, navigate to that folder and execute the command:
dotnet new blazorwasm -au SingleOrg --client-id "{CLIENT ID}" -o {APP NAME} --tenant-id "{TENANT ID}"
We can see the placeholders for the client id, application name, and tenant id values. We already know the Application (client) ID and the Directory (tenant) ID values – from the Overview page. So, we can copy them and add them to the command. Also, we have to add our application’s name:
dotnet new blazorwasm -au SingleOrg --client-id "3b3ce0ca-3558-45c3-8096-d506d1515b47" -o BlazorWasmStandaloneAAD --tenant-id "acd9a136-2bfa-485e-934b-4fb1c6fea421"
If you use this way of creating the application, it is going to prepare everything for you and add provided information on the required places in the app.
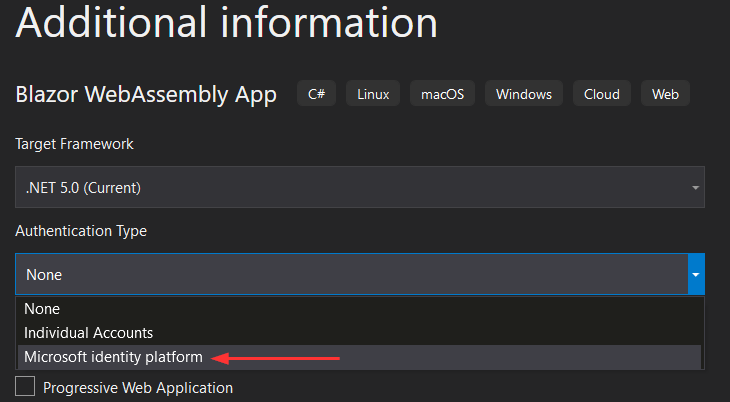
We are going to use Visual Studio (the second way) so we could show you step by step what is going on behind the scene.
That said, let’s create a new Blazor WebAssembly project, add it a name: BlazorWasmStandaloneAAD, and choose Microsoft Identity Platform for the authentication type:
Once we create the application, we can open the appsettings.json file (under the wwwroot folder) and modify the template data:
"AzureAd": {
    "Authority": "https://login.microsoftonline.com/acd9a136-2bfa-485e-934b-4fb1c6fea421",
    "ClientId": "3b3ce0ca-3558-45c3-8096-d506d1515b47",
    "ValidateAuthority": true
}
In the Authority part, we combine the Microsoft online URI (https://login.microsoftonline.com/) and our tenant ID value. Also, we populate the ClientId property with the value of our Application ID.
Finally, to force our app to start using port 5001, we are going to modify the launchSettings.json file:
{
    "profiles": {
        "BlazorWasmStandaloneAAD": {
            "commandName": "Project",
            "dotnetRunMessages": "true",
            "launchBrowser": true,
            "inspectUri": "{wsProtocol}://{url.hostname}:{url.port}/_framework/debug/ws-proxy?browser={browserInspectUri}",
            "applicationUrl": "https://localhost:5001;http://localhost:5000",
            "environmentVariables": {
                "ASPNETCORE_ENVIRONMENT": "Development"
            }
        }
    }
}
That’s all we need in that file.
Testing
Now, we can start our app.
As soon as it starts, we will be able to see the Login link next to the About link.
After we click that link, we are going to see the popup window requiring our credentials and another one for consent.
Once we click the SignIn button, the app redirects us to the Home page, and we can see the welcome message with our username:
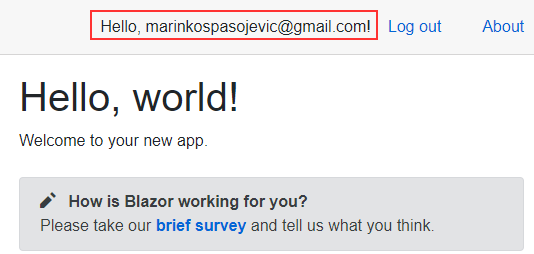
Also, we can see the Log out link, which we can use to log out from the app.
Now, let’s inspect all the application components that make this possible.
Application Overview
We have already seen the appsetings file, where we populate the required information (App ID and Tenant ID). But, let’s see how we make use of that info in our app.
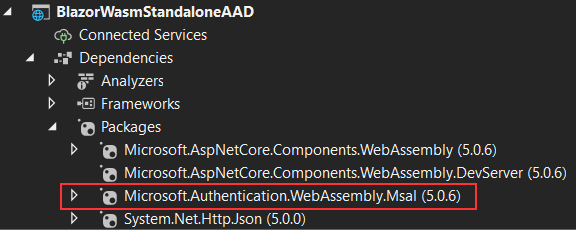
The first important thing is the Msal authentication package:
Additionally, to be able to read the data from the appsettings file, we are using the AddMsalAuthentication method in the Program.cs class:
builder.Services.AddMsalAuthentication(options =>
{
    builder.Configuration.Bind("AzureAd", options.ProviderOptions.Authentication);
});
This method accepts a callback where we can configure various settings for the authentication. Right now, we only fetch the data from the appsettings file. But, we can provide a default access token scopes, or if we want, we can set the login method to redirect instead of using a popup window:
builder.Services.AddMsalAuthentication(options =>
{
builder.Configuration.Bind("AzureAd", options.ProviderOptions.Authentication);
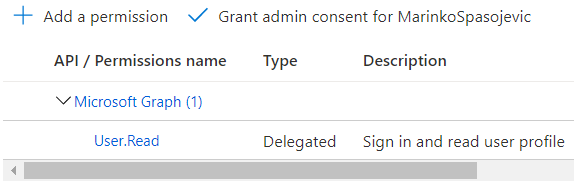
options.ProviderOptions.DefaultAccessTokenScopes.Add("https://graph.microsoft.com/User.Read");
options.ProviderOptions.LoginMode = "redirect";
});
You can find this scope in the API permissions menu under the Manage section of our registered application:
By adding a second option, as soon as we click the login button, the app redirects us to the login form instead of showing the popup window.
Additional Components and Files
If we inspect the index.html file, we are going to see the reference to this package’s js file:
<!DOCTYPE html>
<html>

<head>
    ...
</head>

<body>
    <div id="app">Loading...</div>

    ...
    <script src="_content/Microsoft.Authentication.WebAssembly.Msal/AuthenticationService.js"></script>
    <script src="_framework/blazor.webassembly.js"></script>
</body>

</html>
This script is important for handling authentication actions that we perform in our app.
It is also important to notice the @using Microsoft.AspNetCore.Components.Authorization using directive inside the Imports.razor file. This way it is enabled throughout the entire application.
Next, we can open the App.razor file:
<CascadingAuthenticationState>
    <Router AppAssembly="@typeof(Program).Assembly" PreferExactMatches="@true">
        <Found Context="routeData">
            <AuthorizeRouteView RouteData="@routeData" DefaultLayout="@typeof(MainLayout)">
                <NotAuthorized>
                    @if (!context.User.Identity.IsAuthenticated)
                    {
                        <RedirectToLogin />
                    }
                    else
                    {
                        <p>You are not authorized to access this resource.</p>
                    }
                </NotAuthorized>
            </AuthorizeRouteView>
        </Found>
        <NotFound>
            <LayoutView Layout="@typeof(MainLayout)">
                <p>Sorry, there's nothing at this address.</p>
            </LayoutView>
        </NotFound>
    </Router>
</CascadingAuthenticationState>
We can see different components here like CascadingAuthenticationState, AuthorizeRouteView, NotAuthorized. To learn more about how these components work and why do we wrap our code inside the CascadingAuthenticationState component, you can read our AuthenticationStateProvider article. Basically, with the CascadingAuthenticationState component, we expose the authentication state to the rest of the app. Additionally, we use the AuthorizeRouteView component to determine whether the user is authorized or not. If they are not, we use the RedirectToLogin component to redirect the user to the login page.
RedirectToLogin and Authentication Components
If we inspect the RedirectToLogin component:
@inject NavigationManager Navigation
@using Microsoft.AspNetCore.Components.WebAssembly.Authentication
@code {
    protected override void OnInitialized()
    {
        Navigation.NavigateTo($"authentication/login?returnUrl={Uri.EscapeDataString(Navigation.Uri)}");
    }
}
We can see it uses the NavigationManager service to navigate the user to the Authentication component with the login action as a parameter and additional query string for returnUrl.
So, if we open the Pages folder, we are going to find this component inside:
@page "/authentication/{action}"
@using Microsoft.AspNetCore.Components.WebAssembly.Authentication
<RemoteAuthenticatorView Action="@Action" />

@code{
    [Parameter] public string Action { get; set; }
}
It only calls the RemoteAuthenticatorView component, which includes a default set of UI pieces for each authentication state. If we want, we can modify all these default UI components.
Log in and Log out Links
If we open the LoginDisplay.razor file, we are going to see the code responsible for showing the Log in and Log out links:
@using Microsoft.AspNetCore.Components.WebAssembly.Authentication

@inject NavigationManager Navigation
@inject SignOutSessionStateManager SignOutManager

<AuthorizeView>
    <Authorized>
        Hello, @context.User.Identity.Name!
        <button class="nav-link btn btn-link" @onclick="BeginLogout">Log out</button>
    </Authorized>
    <NotAuthorized>
        <a href="authentication/login">Log in</a>
    </NotAuthorized>
</AuthorizeView>

@code{
    private async Task BeginLogout(MouseEventArgs args)
    {
        await SignOutManager.SetSignOutState();
        Navigation.NavigateTo("authentication/logout");
    }
}
If the user is authenticated, we are going to see the “Hello” message with the user’s username, and the Log out button. Otherwise, we are going to see the Log in button.
Protecting the Page
Currently, all of our components are accessible to unauthorized users. So, let’s change that.
Let’s open the FetchData file and add the [Authorize] attribute:
@page "/fetchdata"
@inject HttpClient Http
@using Microsoft.AspNetCore.Authorization
@attribute [Authorize]

<h1>Weather forecast</h1>
And that’s all it takes. You can read more about different ways of protecting your components in the previously linked article.
Now, if we start the app, and try to visit the FetchData page, the app will navigate us to the Login page first.
Conclusion
We can see how easy it is to use Azure Active Directory to secure our Blazor application. With a few registration steps on the Azure portal and a few changes in the code, we can create a secured application in a matter of minutes.
So, that’s it for this one and until the next article,
All the best.
