
If a user enters the wrong credentials several times, this could mean that the user forgot the password or someone is trying to hack the account. In this article, we are going to learn how to implement user lockout functionality with Angular and ASP.NET Core Identity to increase the security of our application and prevent too many wrong login attempts.
For complete navigation through the entire series, you can visit the Angular with ASP.NET Core Identity page.
Let’s get started.
Adding Configuration for the User Lockout Functionality
By default, the configuration for the user lockout functionality is already prepared but, if we want to modify it, we can do it by modifying the AddIdentity method in the Program class:
services.AddIdentity<User, IdentityRole>(opt =>
{
    opt.Password.RequiredLength = 7;
    opt.Password.RequireDigit = false;

    opt.User.RequireUniqueEmail = true;

    opt.Lockout.AllowedForNewUsers = true;
    opt.Lockout.DefaultLockoutTimeSpan = TimeSpan.FromMinutes(2);
    opt.Lockout.MaxFailedAccessAttempts = 3;
})
Here, we allow the user lockout functionality for the new users (it is like that by default but just to state it explicitly). Also, we add two minutes timespan for the lockout and set the number of wrong attempts (three) after which the lockout will take place.
With this in place, we can move on.
Modifying Existing Code to Support User Lockout Functionality
The first file we are going to modify is the userForAuthenticationDto interface:
export interface UserForAuthenticationDto {
  email: string;
  password: string;
  clientURI: string;
}
And, we have to modify the login component as well:
public loginUser = (loginFormValue) => {
  this.showError = false;
  const login = {... loginFormValue };
  const userForAuth: UserForAuthenticationDto = {
    email: login.username,
    password: login.password,
    clientURI: 'http://localhost:4200/authentication/forgotpassword'
  }

  ...
}
We need this URI because after the lockout happens, we want to notify the user by sending an email message containing the link to the forgot password page. Of course, as we stated in one of our previous articles, hardcoding the URI is not a great solution, it is better to use environment variables. But to avoid additional complexity, this will serve the purpose.
Now, we can modify the UserForAuthenticationDto class:
public class UserForAuthenticationDto
{
    [Required(ErrorMessage = "Email is required.")]
    public string Email? { get; set; }
    [Required(ErrorMessage = "Password is required.")]
    public string? Password { get; set; }
    public string? ClientURI { get; set; }
}
Then, let’s modify the Login action in the AccountsController:
[HttpPost("Login")]
public async Task<IActionResult> Login([FromBody] UserForAuthenticationDto userForAuthentication)
{
    var user = await _userManager.FindByNameAsync(userForAuthentication.Email);
    if (user == null)
        return BadRequest("Invalid Request");

    if (!await _userManager.IsEmailConfirmedAsync(user))
        return Unauthorized(new AuthResponseDto { ErrorMessage = "Email is not confirmed" });

    //you can check here if the account is locked out in case the user enters valid credentials after locking the account.

    if (!await _userManager.CheckPasswordAsync(user, userForAuthentication.Password))
    {
        await _userManager.AccessFailedAsync(user);

        if (await _userManager.IsLockedOutAsync(user))
        {
            var content = $"Your account is locked out. To reset the password click this link: {userForAuthentication.ClientURI}";
            var message = new Message(new string[] { userForAuthentication.Email },
                "Locked out account information", content, null);

            await _emailSender.SendEmailAsync(message);

            return Unauthorized(new AuthResponseDto { ErrorMessage = "The account is locked out" });
        }

        return Unauthorized(new AuthResponseDto { ErrorMessage = "Invalid Authentication" });
    }

    var signingCredentials = _jwtHandler.GetSigningCredentials();
    var claims = await _jwtHandler.GetClaims(user);
    var tokenOptions = _jwtHandler.GenerateTokenOptions(signingCredentials, claims);
    var token = new JwtSecurityTokenHandler().WriteToken(tokenOptions);

    return Ok(new AuthResponseDto { IsAuthSuccessful = true, Token = token });
}
We create a couple of changes here. As you can see, we use the AccessFailedAsync method to increment the number of failed attempts in the database. But this method does even more. If the failed attempts count reaches the threshold (we’ve set this number to three) it will set the LockoutEnd column in the database with the date until the account is locked out.
Then, we check if the user is locked out with the IsLockedOutAsync method. If it is, we notify the user by sending the email message with the forgot password link.
Testing the User Lockout Functionality
Now, let’s start both applications. We can navigate to the Login page and use the wrong password for our account. On the Angular side, we are going to see an error message stating that the authentication has failed. But, if we inspect the database:

We can see the AccessFailedCount increases.
If we repeat the same password two more times, we are going to get a different error message on the Angular side:
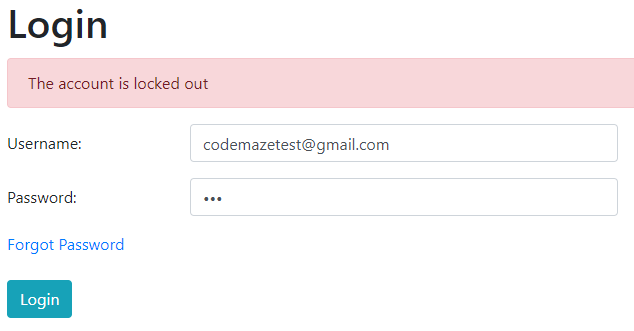
Also, we can check the database:

We can see the LockoutEnd column populated with the date until the account is blocked. Additionally, you can see that number of failed attempts resets.
Excellent.
But, there are still ways to improve this solution.
Unlocking the Account and Resetting the Failed Attempts Count
With the solution as-is, if the user enters a wrong password two times and then authenticates successfully, the failed count wouldn’t reset. This means the next time user enters the wrong password, the account is going to be locked out.
To prevent that, we have to make a small change to the Login action:
var signingCredentials = _jwtHandler.GetSigningCredentials();
var claims = await _jwtHandler.GetClaims(user);
var tokenOptions = _jwtHandler.GenerateTokenOptions(signingCredentials, claims);
var token = new JwtSecurityTokenHandler().WriteToken(tokenOptions);

await _userManager.ResetAccessFailedCountAsync(user);

return Ok(new AuthResponseDto { IsAuthSuccessful = true, Token = token });
The ResetAccessFailedCountAsync method does exactly that, resets the number of failed attempts.
Now, if we use the wrong password, the count will increase. But if in a second attempt we enter the correct password, the count resets for sure.
Also, we have to solve one additional thing.
Right now, after the lockout action, the user can reset the password by clicking the link provided in the email message. But even then, the user must wait for the lockout to expire to be able to log in again. If you want this type of behavior, just leave the solution as-is.
What we want to do is to enable the account as soon as the password reset action completes.
To do that, we are going to modify the ResetPassword action:
[HttpPost("ResetPassword")]
public async Task<IActionResult> ResetPassword([FromBody]ResetPasswordDto resetPasswordDto)
{
    //previous code

    await _userManager.SetLockoutEndDateAsync(user, new DateTime(2000, 1, 1));

    return Ok();
}
The SetLockoutEndDateAsync method will modify the LockoutEnd column in the database. If you set that column’s value to any date in the past, the account will be unlocked. That’s exactly what we do here.
You can test this for yourself.
Solving One More Problem
If the user tries to navigate to the Companies page, the application will redirect them to the Login page. But if the account is locked and the user enters valid credentials, the strange message will appear on the screen instead of the “The account is locked out” message. To solve this, we only have to change the if statement in the handleUnauthorized function in our error-handler service:
private handleUnauthorized = (error: HttpErrorResponse) => {
  if(this._router.url.startsWith('/authentication/login')) {
    return error.error.errorMessage;
  }
  else {
    this._router.navigate(['/authentication/login'], { queryParams: { returnUrl: this._router.url }});
    return error.message;
  }
}
That’s it. Now, if the same situation happens, the right message will appear on the screen.
Conclusion
We did a great job here.
With the user lockout functionality, we have created a more secure application with a way to inform our users if they make too many password mistakes or if someone tries to hack their accounts. Additionally, we have learned how to improve user experience by resetting the failed attempt count and enabling the account after a successful password reset action.
In the next article, we are going to learn about the Two-Step Verification with Angular and ASP.NET Core Identity.
So, see you there.

