

With the 2-Step Verification process, a user after entering valid credentials needs to enter an additional OTP (One-Time-Password, received via email or SMS) for the authentication to be successful. We have already learned how to implement this feature with the MVC client application. But in this article, we are going to learn how to implement a 2-step verification process with Angular and ASP.NET Core Identity.
This article is strongly connected to previous articles from this series so, for complete navigation through the entire series, you can visit the Angular with ASP.NET Core Identity page.
Let’s get going.
Initial Refactoring
Since we are going to need JWT for the 2-step verification process, and we don’t want to repeat ourselves, we are going to extract the logic for the token creation from the Login action. To do that, let’s open the JwtHandler class and modify it:
public async Task<string> GenerateToken(User user)
{
    var signingCredentials = GetSigningCredentials();
    var claims = await GetClaims(user);
    var tokenOptions = GenerateTokenOptions(signingCredentials, claims);
    var token = new JwtSecurityTokenHandler().WriteToken(tokenOptions);

    return token;
}
Also, we can modify the accessor of each method called inside this method from public to private.
Now, all we have to do is to remove the code lines we transferred to the JwtHandler class and just call the GenerateToken method inside the Login action:
var token = await _jwtHandler.GenerateToken(user);

await _userManager.ResetAccessFailedCountAsync(user);
That’s it.
Before we move on, we have to modify just one more thing.
In our AspNetUsers table, we have to enable the TwoFactorEnabled column:

The EmailConfirmed column was already set to true and we manually modified the value of the TwoFactorEnabled column. But if you want to do it in a code, you can use the _userManager.SetTwoFactorEnabledAsync method in the RegisterUser action.
Now, we can move on.
Generating OTP for the 2-Step Verification Process
To start with the 2-step verification process, we have to modify our Login action:
[HttpPost("Login")]
public async Task<IActionResult> Login([FromBody] UserForAuthenticationDto userForAuthentication)
{
    ...

    if (!await _userManager.IsEmailConfirmedAsync(user))
		return Unauthorized(new AuthResponseDto { ErrorMessage = "Email is not confirmed" });

    if (!await _userManager.CheckPasswordAsync(user, userForAuthentication.Password))
    {
	...
    }

    if (await _userManager.GetTwoFactorEnabledAsync(user))
        return await GenerateOTPFor2StepVerification(user);

    ...

    return Ok(new AuthResponseDto { IsAuthSuccessful = true, Token = token });
}
Here, we use the GetTwoFactorEnabledAsync method to check whether the user has two-factor authentication enabled. If they have, we call a private method to generate OTP. Since we don’t have that method, let’s create it:
private async Task<IActionResult> GenerateOTPFor2StepVerification(User user)
{
    var providers = await _userManager.GetValidTwoFactorProvidersAsync(user);
    if (!providers.Contains("Email"))
    {
	return Unauthorized(new AuthResponseDto { ErrorMessage = "Invalid 2-Step Verification Provider." });
    }

    var token = await _userManager.GenerateTwoFactorTokenAsync(user, "Email");
    var message = new Message(new string[] { user.Email }, "Authentication token", token, null);
    await _emailSender.SendEmailAsync(message);

    return Ok(new AuthResponseDto { Is2StepVerificationRequired = true, Provider = "Email" });
}
In this action, we call the GetValidTwoFactorProviderAsync method to verify if this user has an email provider registered. If this is not the case, we return the Unauthorized response. But if it is true, we generate the OTP with the GenerateTwoFactorTokenAsync method and send that OTP to the user by email.
Finally, we return the successful response but with the Is2StepVerificationRequired property set to true and the Provider property set to Email. Since we don’t have these properties in the AuthResponseDto class, we have to add them:
public class AuthResponseDto
{
    public bool IsAuthSuccessful { get; set; }
    public string? ErrorMessage { get; set; }
    public string? Token { get; set; }
    public bool Is2StepVerificationRequired { get; set; }
    public string? Provider { get; set; }
}
Nicely done.
Let’s move on to the Angular part.
Creating 2-Step Verification Angular Component
We are going to start with the AuthResponseDto interface modification:
export interface AuthResponseDto {
    isAuthSuccessful: boolean;
    errorMessage: string;
    token: string;
    is2StepVerificationRequired: boolean;
    provider: string;
}
After that, we are going to create the two-step-verification component:
ng g c authentication/two-step-verification --skip-tests
Then, let’s add the route to this component in the authentication.module.ts file:
RouterModule.forChild([
  { path: 'register', component: RegisterUserComponent },
  { path: 'login', component: LoginComponent },
  { path: 'forgotpassword', component: ForgotPasswordComponent },
  { path: 'resetpassword', component: ResetPasswordComponent },
  { path: 'emailconfirmation', component: EmailConfirmationComponent },
  { path: 'twostepverification', component: TwoStepVerificationComponent }
])
Since we have a route to this new component, we can modify the login.component.ts file:
loginUser = (loginFormValue) => {
  ...

  this.authService.loginUser('api/accounts/login', userForAuth)
  .subscribe({
    next: (res:AuthResponseDto) => {
      if (res.is2StepVerificationRequired){
        this.router.navigate(['/authentication/twostepverification'],
        { queryParams: { returnUrl: this.returnUrl, provider: res.provider, email: userForAuth.email }})
      }
      else {
        localStorage.setItem("token", res.token);
        this.authService.sendAuthStateChangeNotification(res.isAuthSuccessful);
        this.router.navigate([this.returnUrl]);
      }
  },
  error: (err: HttpErrorResponse) => {
   ...
  }})
}
As you can see, if the response is successful, we check if we require 2-step verification. If we do, we just navigate the user to the appropriate form and pass three parameters as query strings.
To continue, let’s create a new twoFactor folder under the _interfaces folder and add the twoFactorDto interface inside the twoFactor folder:
export interface TwoFactorDto {
    email: string;
    provider: string;
    token: string;
}
Then, we have to create a new function inside the authentication service file:
public twoStepLogin = (route: string, body: TwoFactorDto) => {
  return this.http.post<AuthResponseDto>(this.createCompleteRoute(route, this.envUrl.urlAddress), body);
}
With this in place, we can start implementing the two-step-verification component.
Two-Step-Verification Component Implementation
Let’s start with the two-step-verification.component.html file:
<div class="card">
  <div class="card-body">
      <h1 class="card-title">Two Step Verification</h1>
      <div *ngIf="showError" class="alert alert-danger" role="alert">
          {{errorMessage}}
      </div>
      <form [formGroup]="twoStepForm" autocomplete="off" novalidate (ngSubmit)="loginUser(twoStepForm.value)">
          <div class="mb-3 row">
              <label for="twoFactorCode" class="col-form-label col-sm-2">Code:</label>
              <div class="col-md-5">
                  <input type="text" id="twoFactorCode" formControlName="twoFactorCode" class="form-control" />
              </div>
              <div class="col-md-5">
                  <em *ngIf="validateControl('twoFactorCode') && hasError('twoFactorCode', 'required')">The Code is required</em>
              </div>
          </div>
          <br>
          <div class="mb-3 row">
              <div class="col-md-1">
                  <button type="submit" class="btn btn-info" [disabled]="!twoStepForm.valid">Submit</button>
              </div>
          </div>
      </form>
  </div>
</div>
We only have one input field where the user needs to enter the OTP sent to the email address. Also, we have a standard validation part and the Submit button.
With the HTML in place, we have to modify the .ts file:
import { AuthResponseDto } from './../../_interfaces/response/authResponseDto.model';
import { HttpErrorResponse } from '@angular/common/http';
import { TwoFactorDto } from './../../_interfaces/twoFactor/twoFactorDto.model';
import { AuthenticationService } from './../../shared/services/authentication.service';
import { Component, OnInit } from '@angular/core';
import { FormGroup, FormControl, Validators } from '@angular/forms';
import { ActivatedRoute, Router } from '@angular/router';

@Component({
  selector: 'app-two-step-verification',
  templateUrl: './two-step-verification.component.html',
  styleUrls: ['./two-step-verification.component.css']
})
export class TwoStepVerificationComponent implements OnInit {
  private provider: string;
  private email: string;
  private returnUrl: string;

  twoStepForm: FormGroup;
  showError: boolean;
  errorMessage: string;

  constructor(private authService: AuthenticationService, private route: ActivatedRoute,
    private router: Router) { }

  ngOnInit(): void {
    this.twoStepForm = new FormGroup({
      twoFactorCode: new FormControl('', [Validators.required]),
    });

      this.provider = this.route.snapshot.queryParams['provider'];
      this.email = this.route.snapshot.queryParams['email'];
      this.returnUrl = this.route.snapshot.queryParams['returnUrl'];
  }

  validateControl = (controlName: string) => {
    return this.twoStepForm.get(controlName).invalid && this.twoStepForm.get(controlName).touched
  }

  hasError = (controlName: string, errorName: string) => {
    return this.twoStepForm.get(controlName).hasError(errorName)
  }

  loginUser = (twoStepFromValue) => {
    this.showError = false;

    const formValue = { ...twoStepFromValue };

    let twoFactorDto: TwoFactorDto = {
      email: this.email,
      provider: this.provider,
      token: formValue.twoFactorCode
    }

    this.authService.twoStepLogin('api/accounts/twostepverification', twoFactorDto)
    .subscribe({
      next: (res:AuthResponseDto) => {
        localStorage.setItem("token", res.token);
        this.authService.sendAuthStateChangeNotification(res.isAuthSuccessful);
        this.router.navigate([this.returnUrl]);
      },
      error: (err: HttpErrorResponse) => {
        this.errorMessage = err.message;
        this.showError = true;
      }
    })
  }
}
This logic is familiar to us. The one interesting part is in the loginUser function. There, if we receive a successful response from the server, we do the same thing we did in the Login component.
2-Step Verification POST Action in Web API
To finish this process, we have to create an action on the API’s side. But before we do that, we require an additional DTO class:
public class TwoFactorDto
{
    [Required]
    public string? Email { get; set; }
    [Required]
    public string? Provider { get; set; }
    [Required]
    public string? Token { get; set; }
}
Now, we can implement the required action:
[HttpPost("TwoStepVerification")]
public async Task<IActionResult> TwoStepVerification([FromBody]TwoFactorDto twoFactorDto)
{
    if (!ModelState.IsValid)
        return BadRequest();

    var user = await _userManager.FindByEmailAsync(twoFactorDto.Email);
        if (user is null)
            return BadRequest("Invalid Request");

    var validVerification = await _userManager.VerifyTwoFactorTokenAsync(user, twoFactorDto.Provider, twoFactorDto.Token);
        if (!validVerification)
            return BadRequest("Invalid Token Verification");

    var token = await _jwtHandler.GenerateToken(user);
    return Ok(new AuthResponseDto { IsAuthSuccessful = true, Token = token });
}
As you can see, we accept the twoFactorDto object from the client and inspect if the model is valid. If it isn’t we just return a bad request. After that, we try to fetch the user by the provided email. Again, if we can’t find one, we return a bad request. If previous checks pass, we use the VerifyTwoFactorTokenAsync method to verify if the token is valid for our user and the provider. If that’s not true, we return a bad request. Finally, if the verification is valid, we create a new token and send it to the client.
Now if we try to visit the Companies page without logging in, we are going to end up on the Login screen. Once we enter our credentials, the application will navigate us to a 2-Step Verification page:
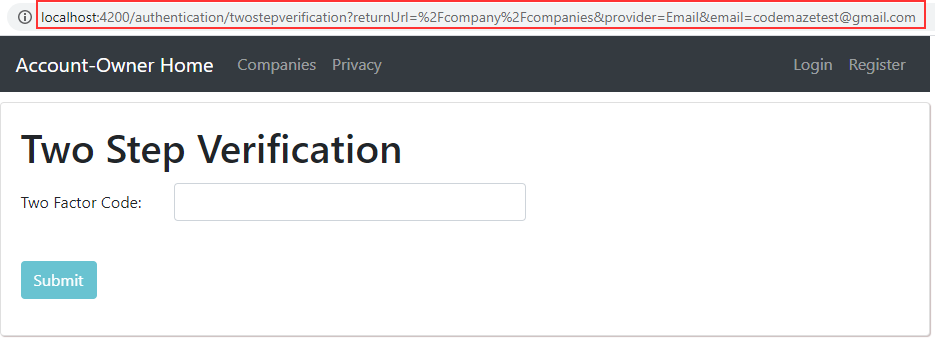
We can see all the query parameters in the URI.
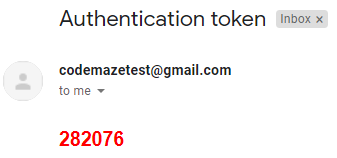
Now, let’s check our email:
Let’s get back to the application and try to enter an invalid code:
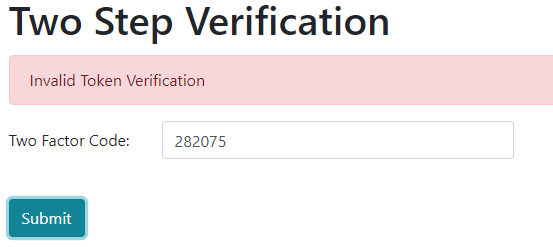
We can see the error message.
But if we enter a valid code, we are going to be navigated to the Companies page.
Excellent.
The 2-step verification is working as we expect.
Conclusion
There we go. We have learned how to implement the 2-step verification actions with both Angular and ASP.NET Core Web API. Now, our application provides an additional level of security for our users.
Best regards.

Great article. I have one question.
Scenario:
1. User type login and password.
2. Backend return Is2StepVerificationRequired = true (payload without jwt).
3. Method TwoStepVerification is unprotected (I guess [AllowAnnonymous]) due to allow unauthorized user type MFA code.
Attacker can use our email (without password) to retrieve jwt token.
Is it security issue or I missed something?
I have similar scenario in my project and I am looking solution.
Well first nothing is 100% protected, we can always find some sort of way to do something, the question is how someone can do that. I am not sure how an attacker will gain access to your email. Also, how will they retrieve jwt token with the email? Even though they retrieve it from the storage, you should create the token short-lived and thus allow access for a really short period of time.
Thanks for answer!
Hi Marinko
A very helpful article, But my question regarding cookie-based auth, then how do we handle this 2FA?
We have a series of articles with Identity and ASP.NET Ćire with MVC app so there you can find this with cookies. https://code-maze.com/asp-net-core-identity-series/
HI Marinko,
Thanks for the information,
I’ve got a question how can we make it happen usine phone provider / by text messages instead of email?
keep the good stuff 🙂
Well if you want to use text messages you can use some of the existing mobile providers. For example Twillio, we have an article on sending SMS with .NET Core: https://code-maze.com/send-sms-aspnetcore/
Hi Marinko,
Excellent stuff, as always. May I suggest, however that you add the
ResetAccessFailedCountAsynccall to the TwoStepVerification() method following successful one time password submission. 😉Thanks once again for an excellent tutorial series.
Yeah, that could be a good idea. We already talked about that method in the previous article of this series so, readers should be familiar with it and what it does. Thanks for the suggestion.