

Up until now, we’ve been working with our local authentication and authorization functionalities. Everything works great with our setup and we provide different security functionalities for our users (login, logout, email verification, lockout, etc.). But, what if our users want to use their social profiles to log in with our application? Well, in this article, we are going to learn how to sign in with a Google account using our existing Angular and Web API applications.
For complete navigation through the entire series, you can visit the Angular with ASP.NET Core Identity page.
There’s a lot to cover so, let’s move on.
Creating Google Credentials on the Google API Platform
The first thing we have to do is to register our application on the Google API Platform. With this registration, we will acquire a clientId that we are going to use for the token validation process.
Basically, once you create your credentials, your page should look something like this:
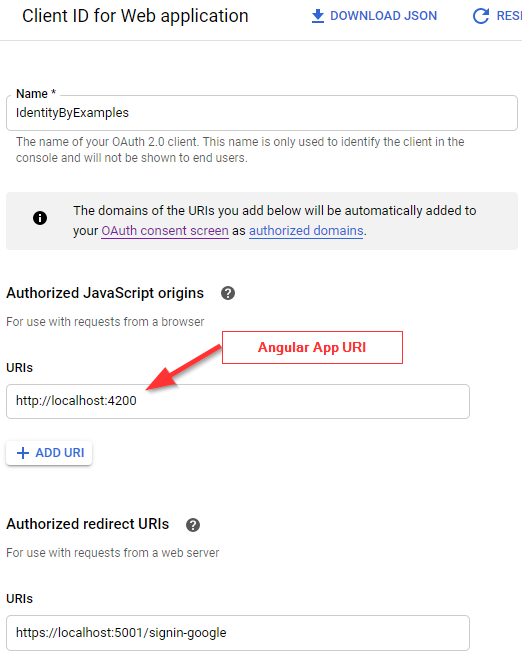
If you don’t know how to obtain the clientId for your application, we strongly suggest reading our External Identity Provider with ASP.NET Core Identity article. In the first section, you can find everything explained about this credentials creation process in great detail.
Once you have the required credentials, we can move on.
Angularx-Social-Login Library to Help Us Sign in with Google
To sign in with Google, we are going to use the angularx-social-login library, which is going to help us a lot in the process.
Let’s start with the installation part:
npm i @abacritt/angularx-social-login
After the installation, we have to modify the app.module.ts file:
import { SocialLoginModule, SocialAuthServiceConfig } from '@abacritt/angularx-social-login';
import { GoogleLoginProvider } from '@abacritt/angularx-social-login';
We have to import the SocialLoginModule class, the SocialAuthServiceConfig interface, and the GoogleLoginProvider class.
After that, we have to add the SocialLoginModule in the imports array:
imports: [
    BrowserModule,
    HttpClientModule,
    BrowserAnimationsModule,
    SocialLoginModule,
And modify the providers array in the same file:
providers: [
    {
      provide: HTTP_INTERCEPTORS,
      useClass: ErrorHandlerService,
      multi: true
    },
    {
      provide: 'SocialAuthServiceConfig',
      useValue: {
        autoLogin: false,
        providers: [
          {
            id: GoogleLoginProvider.PROVIDER_ID,
            provider: new GoogleLoginProvider(
              'your client id', {
                scope: 'email',
                plugin_name: 'the name of the Google OAuth project you created'
              }
            )
          },
        ],
        onError: (err) => {
          console.error(err);
        }
      } as SocialAuthServiceConfig
    }
  ],
It is important to notice that when we create a new GoogleLoginProvider instance, we pass our clientId (created on the Google API Platform) as a parameter. Of course, it is always a better practice to store it in some file, but this will work for the learning process. Of course, you will have a different clientId value.
Now, let’s modify the authentication.service.ts file by importing the required classes:
import { SocialAuthService, SocialUser } from "@abacritt/angularx-social-login";
import { GoogleLoginProvider } from "@abacritt/angularx-social-login";
Then, as we have created a Subject for regular authentication, we are going to do the same for the external one to emit our user to all the subscribers:
private authChangeSub = new Subject<boolean>();
private extAuthChangeSub = new Subject<SocialUser>();
public authChanged = this.authChangeSub.asObservable();
public extAuthChanged = this.extAuthChangeSub.asObservable();
Then, let’s inject the SocialAuthService class in the constructor:
constructor(private http: HttpClient, private envUrl: EnvironmentUrlService,
  private jwtHelper: JwtHelperService, private externalAuthService: SocialAuthService) {
    this.externalAuthService.authState.subscribe((user) => {
      console.log(user)
      this.extAuthChangeSub.next(user);
    })
  }
We also use the authState property from the externalAuthService service, to subscribe to the authentication response and emit the user’s data.
And create two functions to help us in the process:
public signInWithGoogle = ()=> {
  this.externalAuthService.signIn(GoogleLoginProvider.PROVIDER_ID);
}

public signOutExternal = () => {
  this.externalAuthService.signOut();
}
In the sigInWithGoogle function, we call the signIn function from the SocialAuthService class and pass a provider_id as a parameter. The signIn function is going to fetch the User’s data from the Google provider and return it back to our Angular application. Also, it emits an event to all the subscribers passing that user object and returns the Promise with the populated user object. We will use it later on in our app. The signOut function just removes the user and emits an event to all the subscribers passing null for the user’s value.
That’s it. Our library is prepared and ready to use.
Executing Google Sign-in Action
Our library is prepared but we still need to trigger the sign-in action.
The first thing we are going to do is to modify the login.component.html file by adding a new button on the form:
<div class="card">
    <div class="card-body">
        <h1 class="card-title">Login</h1>
        ...
        <form [formGroup]="loginForm" autocomplete="off" novalidate (ngSubmit)="loginUser(loginForm.value)">
            ...
        </form>
        <hr>
        <div>
            <h2>External Providers</h2>
            <div style="padding: 20px;">
                <button class="btn btn-info" type="button" (click)="externalLogin()">Google</button>
            </div>
        </div>
    </div>
</div>
Logically, we have to add the externalLogin function in our .ts file:
externalLogin = () => {
  this.showError = false;
  this.authService.signInWithGoogle();
}
Here, we hide the error message from the page and then call the signInWithGoogle function, which calls the signIn function from an external service.
Now, let’s test it.
Let’s start our Angular application and navigate to the Login page:
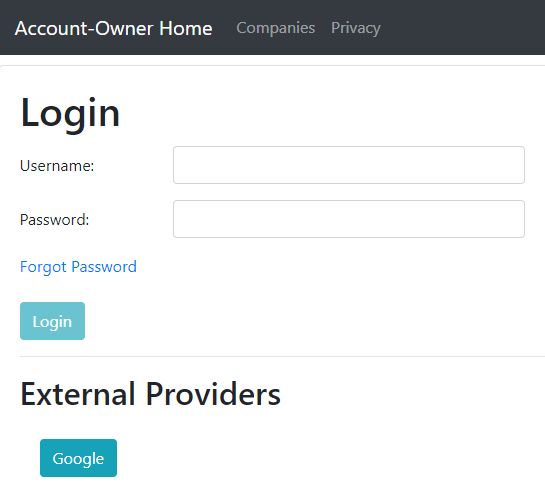
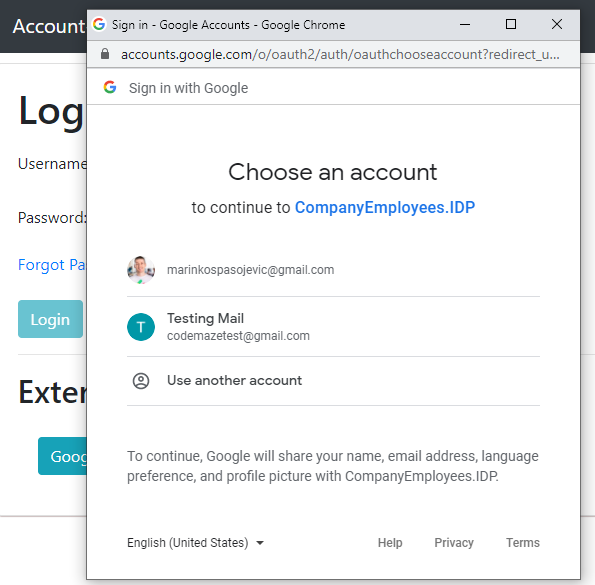
As soon as we click the Google button, we are going to see the popup window:
If we close the window, we are going to see the error message in the console:
Object
error: "popup_closed_by_user"
[[Prototype]]: Object
But if we select our account, we are going to see the user object returned from Google’s account:
{id: "108223206370324493495", name: "Testing Mail", email: "[email protected]", photoUrl: …}
authToken: "ya29.a0AfH6SMB_pXBrYm1wdIB3v-uAGohuXWDKfmsszvsFxuH4hn-gW7E5tf1IW4v32rgJbY6cEDsYgxcsWoVAfSs2ono..."
email: "[email protected]"
firstName: "Testing"
id: "108223206370324493495"
idToken: "eyJhbGciOiJSUzI1NiIsImtpZCI6ImJjNDk1MzBlMWZmOTA4M2RkNWV..."
lastName: "Mail"
name: "Testing Mail"
photoUrl: "https://lh6.googleusercontent.com/-URt2WpWJqRw/AAAAAAAAAAI/AAAAAAAAAAA/AMZuucmGZsYnDp0Ow4ubf2H-lN8kScXsYA/s96-c/photo.jpg"
provider: "GOOGLE"
response: Ew {NT: "108223206370324493495", Ad: "Testing Mail", tV: "Testing", uT: "Mail", TJ: "https://lh6.googleusercontent., …}
__proto__: Object
As we can see, we have different information regarding our Google account. The important part for the Web API’s side is that we have the provider property and the idToken property. These are the properties we are going to send to our server-side application.
Sending Data to the Server
As we know, from our previous posts, our authentication works around the JWT generated by our Web API application. So, in order to continue with the same practice, we have to send some parameters to the server-side app for validation.
That said, let’s start with a new interface:
export interface ExternalAuthDto {
    provider: string;
    idToken: string;
}
Then, we have to modify the externalLogin function:
externalLogin = () => {
  this.showError = false;
  this.authService.signInWithGoogle();

  this.authService.extAuthChanged.subscribe( user => {
    const externalAuth: ExternalAuthDto = {
      provider: user.provider,
      idToken: user.idToken
    }

    this.validateExternalAuth(externalAuth);
  })
}
We call the signInWithGoogle function to start the sign-in process. Then, as soon as we get the data from our Subject, we extract the provider and idToken properties to a new externalAuth object and use it in the validateExternalAuth function:
private validateExternalAuth(externalAuth: ExternalAuthDto) {
  this.authService.externalLogin('api/accounts/externallogin', externalAuth)
    .subscribe({
      next: (res) => {
          localStorage.setItem("token", res.token);
          this.authService.sendAuthStateChangeNotification(res.isAuthSuccessful);
          this.router.navigate([this.returnUrl]);
    },
      error: (err: HttpErrorResponse) => {
        this.errorMessage = err.message;
        this.showError = true;
        this.authService.signOutExternal();
      }
    });
}
So, we send an HTTP request to the API’s endpoint where we are going to generate a new JWT (amongst all the other logic – but we’ll come to that). Also, we store that token in storage and navigate to the Home page. If an error happens, we show it on the page and sing out the user from the external provider.
Of course, for this to work, we have to add the externalLogin function in the authentication.service.ts file:
public externalLogin = (route: string, body: ExternalAuthDto) => {
  return this.http.post<AuthResponseDto>(this.createCompleteRoute(route, this.envUrl.urlAddress), body);
}
With all this in place, we are ready to learn how to sign in with Google using our Web API application.
How to Sign in with Google using Web API
In our Angular application, we use the externalLogin function to fetch the user’s data from the Google provider and extract provider and idtoken in a new object, which we send to the server for validation. Just to make things clear, we are going to validate only idtoken. The provider is here for other purposes.
That said, let’s create our DTO in the Entities folder:
public class ExternalAuthDto
{
    public string? Provider { get; set; }
    public string? IdToken { get; set; }
}
Then, for validation purposes, we need to install the Google.Apis.Auth library:

Now, let’s open the appsettins.json file and add the GoogleAuthSettings property:
"GoogleAuthSettings": {
  "clientId": "client id from the Google OAuth Project"
},
Here, we just store the clientId of our application.
Then, let’s open the JwtHandler class and modify the constructor:
private readonly IConfiguration _configuration;
private readonly IConfigurationSection _jwtSettings;
private readonly IConfigurationSection _goolgeSettings;
private readonly UserManager<User> _userManager;
public JwtHandler(IConfiguration configuration, UserManager<User> userManager)
{
    _userManager = userManager;
    _configuration = configuration;
    _jwtSettings = _configuration.GetSection("JwtSettings");
    _goolgeSettings = _configuration.GetSection("GoogleAuthSettings");
}
After that, we can add a new method to validate idtoken:
public async Task<GoogleJsonWebSignature.Payload> VerifyGoogleToken(ExternalAuthDto externalAuth)
{
    try
    {
        var settings = new GoogleJsonWebSignature.ValidationSettings()
        {
            Audience = new List<string>() { _goolgeSettings.GetSection("clientId").Value }
        };

        var payload = await GoogleJsonWebSignature.ValidateAsync(externalAuth.IdToken, settings);
        return payload;
    }
    catch (Exception ex)
    {
        //log an exception
        return null;
    }
}
This method accepts the externalAuth parameter that we send from the client and returns the GoogleJsonWebSignature.Payload object that contains different users’ information. Before we start the validation, we have to create a ValidationSettings object and populate the Audience property with the clientId of our application. With this property, we ensure the token validation is for our application (because we assigned the clientId of our app). Finally, we call the ValidateAsync method and pass the token and the settings parameters. This method validates our token and if valid, returns the user’s data (Name, Family Name, Given Name, Email…).
Also, we wrap this method inside the try-catch block because the ValidateAsync method will throw an exception if idtoken is invalid.
Modifying Controller
After the validation part, we can add an action inside the AccountsController:
[HttpPost("ExternalLogin")]
public async Task<IActionResult> ExternalLogin([FromBody] ExternalAuthDto externalAuth)
{
    var payload =  await _jwtHandler.VerifyGoogleToken(externalAuth);
    if(payload == null)
        return BadRequest("Invalid External Authentication.");

    var info = new UserLoginInfo(externalAuth.Provider, payload.Subject, externalAuth.Provider);

    var user = await _userManager.FindByLoginAsync(info.LoginProvider, info.ProviderKey);
    if (user == null)
    {
        user = await _userManager.FindByEmailAsync(payload.Email);

        if (user == null)
        {
            user = new User { Email = payload.Email, UserName = payload.Email };
            await _userManager.CreateAsync(user);

            //prepare and send an email for the email confirmation

            await _userManager.AddToRoleAsync(user, "Viewer");
            await _userManager.AddLoginAsync(user, info);
        }
        else
        {
            await _userManager.AddLoginAsync(user, info);
        }
    }

    if (user == null)
        return BadRequest("Invalid External Authentication.");

    //check for the Locked out account

    var token = await _jwtHandler.GenerateToken(user);
    return Ok(new AuthResponseDto { Token = token, IsAuthSuccessful = true });
}
The first thing, we do here is validate idtoken and populate the payload variable. If it is null, it means that validation failed and we return a bad request. Next, we create a new UserLoginInfo variable to use for adding external login info (information about the external login provider) for the specific user.
Now comes the fun part.
In our database, we can have three different situations. The user that tries to log in doesn’t exist at all, the user exists but without external login information, and the user exists with the external login information. This is exactly what we check in the rest of the code.
So, by using the FindByLoginAsync method, we try to find a user by the external login information. If we find one, we navigate to the end of the method and just generate a new token. But if we can’t find that user, we try to find them by email from the payload object. If we still can’t find the user, we create a new user, connect them to the Viewer role (AddToRoleAsync), and assign the external provider information by calling the AddLoginAsync method. Also, you can add the email confirmation logic here. But, if we manage to find a user by email, this means the user exists but without the external login information, so, we create one.
Finally, if the user is still null, we call the BadRequest method. Otherwise, we create a token and send it back to the client. Of course, if you want, you can add the lockout logic here.
Testing Google Sign-in Functionality
Now, we can test this.
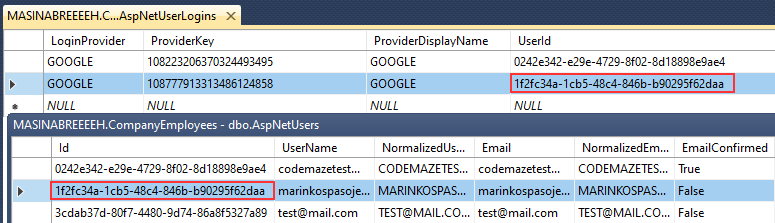
We have the codemazetest user in the database without external login info. If we login with that user:
We are going to see the Home page soon enough. This means our authentication was successful. Also, we can check the database and see the connected external info for this user:
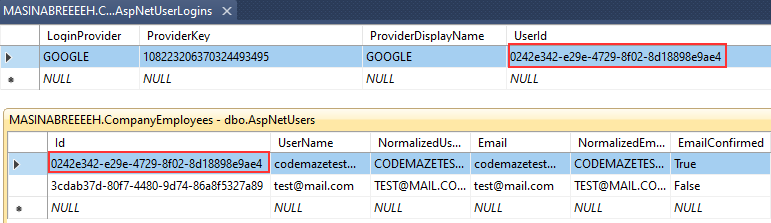
Moreover, we can test this with a different account that doesn’t exist in the database (the other one from the picture), and we will find a new user in the database with the external info connected:
Awesome.
But we still have one thing to do.
Logout From External Provider
After successful login, we can click the logout button and we will be logged out for sure. But, if you inspect the logout logic, you can see that we only delete the JWT stored in local storage. This means we didn’t remove the user object from the external provider. In other words, we didn’t use the signOut function.
That said, let’s add one more property inside the authetication.service.ts file:
...
public isExternalAuth: boolean;

constructor(private http: HttpClient, private envUrl: EnvironmentUrlService,
  private jwtHelper: JwtHelperService, private externalAuthService: SocialAuthService) {
    this.externalAuthService.authState.subscribe((user) => {
      console.log(user);
      this.extAuthChangeSub.next(user);
      this.isExternalAuth = true;
    })
  }
We have a new isExternal property that we set to true once the external authentication is successfully completed.
Now, let’s open the menu.component.ts file and modify the logout function:
public logout = () => {
  this.authService.logout();

  if(this.authService.isExternalAuth)
    this.authService.signOutExternal();

  this.router.navigate(["/"]);
}
Lastly in the logout function, we check the isExternalAuth property and if it is true, we sign out the user from the application. We have to do this check, otherwise, the application will throw an error if a user is not authenticated via an external provider.
That’s it. We can now safely sign out from our application whether we use our external account or not.
Of course, we just have to set this isExternalAuth property to false, if we try to authenticate with our credentials. So, let’s do that inside the loginUser function:
loginUser = (loginFormValue) => {
    this.authService.isExternalAuth = false;
    this.showError = false;
    const login = { ...loginFormValue };

    ...
Conclusion
Excellent.
We did a great job here and covered a lot of functionalities on the Angular’s and the Web API’s side.
Feel free to check the entire flow to verify that everything is working as expected.
Until the next article,
All the best.

