

Using an external identity provider while login to the application is a quite common case. This enables us to log in with our external accounts like Google, Facebook, etc. By using ASP.NET Core Identity, we are going to see that this is not a hard process at all.
So, in this article, we are going to learn how to configure an external identity provider in our ASP.NET Core application and how to use a Google account to log in to our application. Of course, in a very similar way, you can configure any other external account.
One important thing to know here. Once an external user logs in to our system, they will always bring an identifier that is unique for that user in our system. That user could have different Ids for different sites but for our site, that Id will always be the same.
To navigate through the entire series, visit the ASP.NET Core Identity series page.
So, let’s get on it.
Google API Platform
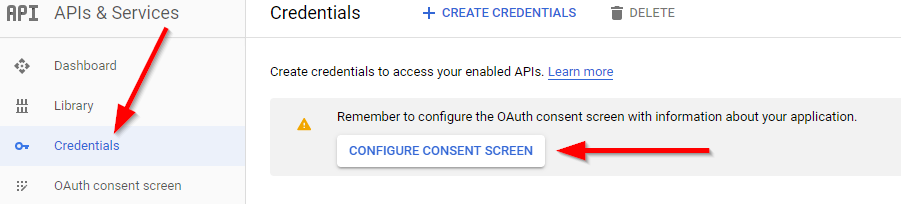
The first thing we have to do is to navigate to the Integrate Google Sign-In page. In the middle of the screen, we can see a blue Credentials page button with an additional explanation below it.
After clicking that button, we are going to be directed to the page for creating our credentials. If we don’t have any project created, we have to click on the CREATE PROJECT button at the top-right corner of the screen, add a project name, and click the create button.
Then in the Credentials menu, we have to configure a consent screen:
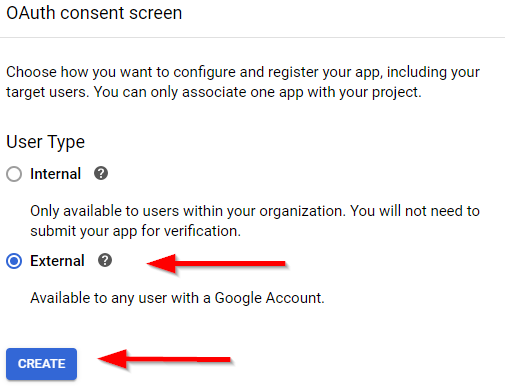
Choose the External user type:
And finally, add the name of the application, and click the Save button at the bottom of the screen:

After that, we can navigate back to the credentials page:

There we can click the create credentials link menu and choose the OAuth client ID.
Now, we have to choose the Application Type, Name, and add a redirect URIs for our application:
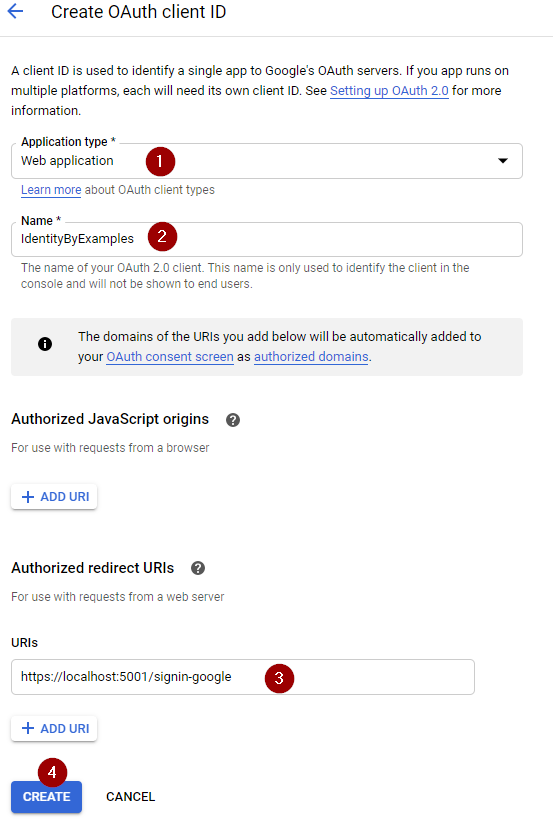
Once we click the Create button, we will get the ClientID and ClientSecret values. For now, just save them in a notepad file for example.
And that’s it. We can move on to the project configuration.
External Identity Provider configuration
Now, we are going to register Google as our external identity provider. To do that, we have to install the Microsoft.AspNetCore.Authentication.Google package first:

After the installation, we have to modify the appsettings.json file:
"Authentication": {
    "Google": {
      "ClientId": "871483539737-m7u9ohi6rg16sk77hs4v73ddibevgbjm.apps.googleusercontent.com",
      "ClientSecret": "mTSMmqtTlNf5w5oDirvAN7eb"
    }
  },
...
So, we just store our ClientId and ClientSecret values in a separate file. Of course, the better practice would be to store these values as a secret or environment variable, but for this example, the appsetting file will do just fine.
Now let’s configure Google as an external provider by modifying the ConfigureServices method in .NET 5 or previous versions:
services.AddAuthentication()
    .AddGoogle("google", opt =>
    {
        var googleAuth = Configuration.GetSection("Authentication:Google");

        opt.ClientId = googleAuth["ClientId"];
        opt.ClientSecret = googleAuth["ClientSecret"];
        opt.SignInScheme = IdentityConstants.ExternalScheme;
    });
In .NET 6, we have to modify the Program class:
builder.Services.AddAuthentication()
    .AddGoogle("google", opt =>
    {
        var googleAuth = Configuration.GetSection("Authentication:Google");
        opt.ClientId = googleAuth["ClientId"];
        opt.ClientSecret = googleAuth["ClientSecret"];
        opt.SignInScheme = IdentityConstants.ExternalScheme;
    });
The AddIdentity method configures default scheme settings. But the AddAuthentication allows configuring different authentication options, like Google for example. That’s why this method must be placed below the AddIdentity method.
Now, let’s create the _ExternalAuthentication partial view, to support external authentication:
@using Microsoft.AspNetCore.Identity
@using IdentityByExamples.Models

@inject SignInManager<User> SignInManager

<div class="col-md-4 offset-2">
    <section>
        <h4>Use different service for log in:</h4>
        <hr />
        @{
            var providers = (await SignInManager.GetExternalAuthenticationSchemesAsync()).ToList();
            if (!providers.Any())
            {
                <div>
                    <p>
                        We couldn't find any external provider
                    </p>
                </div>
            }
            else
            {
                <form asp-action="ExternalLogin" asp-route-returnurl="@ViewData["ReturnUrl"]" method="post" class="form-horizontal">
                    <div>
                        <p>
                            @foreach (var provider in providers)
                            {
                                <input type="submit" class="btn btn-info" value="@provider.Name" name="provider" />
                            }
                        </p>
                    </div>
                </form>
            }
        }
    </section>
</div>
By using the SignInManager.GetExternalAuthenticationSchemesAsync method, we fetch all the registered providers in our application. And if we find any, we show it in the view. So, in order to see these changes, let’s just include this partial view in the Login view:
<div class="col-md-4">
    <form asp-action="Login" asp-route-returnUrl="@ViewData["ReturnUrl"]">
          //code removed for clarity reasons
    </form>
</div>
<partial name="_ExternalAuthentication" />
Now, if we navigate to the Login view:
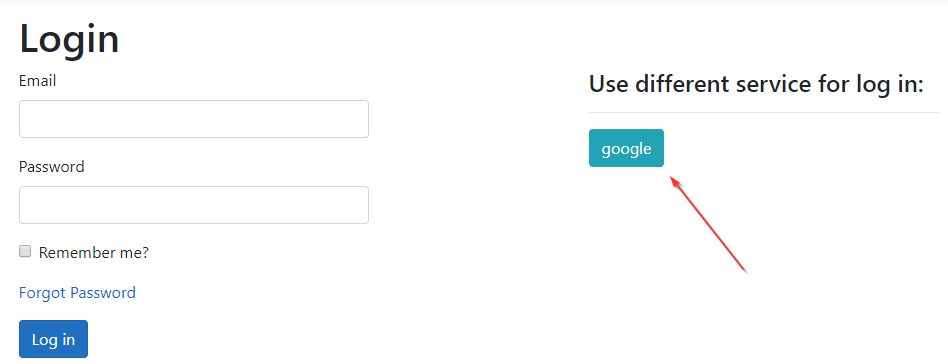
This looks great. Now, we can implement actions in the Account controller.
External Identity Provider Implementation
The form the _ExternalAuthentication partial view alreadt targets the ExternalLogin action. So we have to create it and add the required logic:
[HttpPost]
[ValidateAntiForgeryToken]
public IActionResult ExternalLogin(string provider, string returnUrl = null)
{
    var redirectUrl = Url.Action(nameof(ExternalLoginCallback), "Account", new { returnUrl });
    var properties = _signInManager.ConfigureExternalAuthenticationProperties(provider, redirectUrl);
    return Challenge(properties, provider);
}
This is the action that we target by clicking the google button. It has two parameters: provider and returnUrl. If you take a look at the submit button code, you are going to see the name attribute with the provider value. Therefore, MVC will pair the value from that button to the provider parameter in this action. The second parameter is populated through the URI.
Inside the action, we create two variables: redirectUrl and properties. We assign the redirect address to the first variable and use the ConfigureExternalAuthenticationProperties method to create an object of type AuthenticationProperties that contains our provider and redirectUrl:
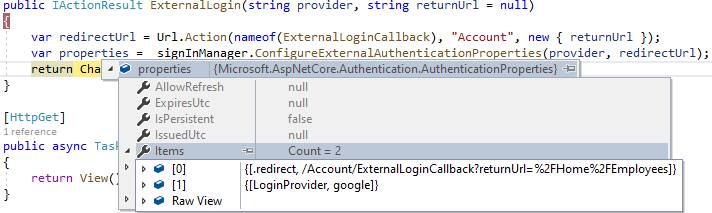
After that, we return a challenge. With it, we challenge a user to provide an identity supplied by the provider, in this case, Google.
Of course, we have to implement the ExternalLoginCallback action.
Additional Implementation
So, let’s create a new action and add the required logic:
[HttpGet]
public async Task<IActionResult> ExternalLoginCallback(string returnUrl = null)
{
    var info = await _signInManager.GetExternalLoginInfoAsync();
    if (info == null)
    {
        return RedirectToAction(nameof(Login));
    }

    var signInResult = await _signInManager.ExternalLoginSignInAsync(info.LoginProvider, info.ProviderKey, isPersistent: false, bypassTwoFactor: true);
    if(signInResult.Succeeded)
    {
        return RedirectToLocal(returnUrl);
    }
    if(signInResult.IsLockedOut)
    {
        return RedirectToAction(nameof(ForgotPassword));
    }
    else
    {
        ViewData["ReturnUrl"] = returnUrl;
        ViewData["Provider"] = info.LoginProvider;
        var email = info.Principal.FindFirstValue(ClaimTypes.Email);
        return View("ExternalLogin", new ExternalLoginModel { Email = email });
    }
}
With the GetExternalLoginInfoAsync method, we collect exactly that – external login info. So the information like provider, given name, last name, email, name identifier, etc, are going to be provided in the info variable. If it’s not null we try to sign in a user with an external provider by using the ExternalLoginSignInAsync method. If this succeeds, we redirect the user to the Home or some other view.
On the other hand, if the account is locked out, we currently just redirect to the ForgotPassword view, but you can implement a different logic that suits your needs. Finally, if nothing checks out, we extract an email and the provider from the info variable and redirect the user to the ExternalLogin view, where they need to associate an external account to the existing one.
If you want users to manually enter their email address, you have to remove the Email property initialization in the ExternalLoginModel.
As you can see, we are missing some parts of this action. So, let’s add those.
ExternalLogin and ExternalLoginConfirmation Implementation
The first thing, we are going to do is to add the ExternalLoginModel class:
public class ExternalLoginModel
{
    [Required]
    [EmailAddress]
    public string Email { get; set; }

    public ClaimsPrincipal Principal { get; set; }
}
Then, we have to create a view:
@model IdentityByExamples.Models.ExternalLoginModel

<h4>External provider registration</h4>
<hr />

<p class="text-info">
    Enter an email to associate your <strong>@ViewData["Provider"]</strong> account.
</p>

<div class="row">
    <div class="col-md-4">
        <form asp-action="ExternalLoginConfirmation" asp-route-returnurl="@ViewData["ReturnUrl"]">
            <div asp-validation-summary="All" class="text-danger"></div>
            <div class="form-group">
                <label asp-for="Email" class="control-label"></label>
                <input asp-for="Email" class="form-control" />
                <span asp-validation-for="Email" class="text-danger"></span>
            </div>
            <div class="form-group">
                <input type="submit" value="Submit" class="btn btn-primary" />
            </div>
        </form>
    </div>
</div>
There is nothing new in this view. But, you can see that once the user clicks the Submit button, they will be directed to the ExternalLoginConfirmation action, to either associate the account or create a new one if it doesn’t exist. Well, to support that logic, we need that action:
[HttpPost]
[ValidateAntiForgeryToken]
public async Task<IActionResult> ExternalLoginConfirmation(ExternalLoginModel model, string returnUrl = null)
{
    if (!ModelState.IsValid)
        return View(model);

    var info = await _signInManager.GetExternalLoginInfoAsync();
    if (info == null)
        return View(nameof(Error));

    var user = await _userManager.FindByEmailAsync(model.Email);
    IdentityResult result;

    if(user != null)
    {
        result = await _userManager.AddLoginAsync(user, info);
        if (result.Succeeded)
        {
            await _signInManager.SignInAsync(user, isPersistent: false);
            return RedirectToLocal(returnUrl);
        }
    }
    else
    {
        model.Principal = info.Principal;
        user = _mapper.Map<User>(model);
        result = await _userManager.CreateAsync(user);
        if (result.Succeeded)
        {
            result = await _userManager.AddLoginAsync(user, info);
            if (result.Succeeded)
            {
                //TODO: Send an emal for the email confirmation and add a default role as in the Register action
                await _signInManager.SignInAsync(user, isPersistent: false);
                return RedirectToLocal(returnUrl);
            }
        }
    }

    foreach (var error in result.Errors)
    {
        ModelState.TryAddModelError(error.Code, error.Description);
    }

    return View(nameof(ExternalLogin), model);
}
So, we first check for the model validity and check the external login info as in the previous action. Then, we try to get a user from the database. If exists, we just associate this external account with the existing one by adding another entry in the AspNetUserLogins table and sign in the user. But if we can’t find a user, we create a new one in the AspNetUsers table, connect the external account with the AddLoginAsync method and sing in that user. Of course, we didn’t want to repeat the same code, but you can extract the code for sending a confirmation email and adding a role to the user in the separate method and call it in here.
Finally, if something fails, we collect errors and return a view.
Testing the Solution
We are going to start with the existing user. So, after starting our application, we are going to navigate to the Login page and click the Google button. Once we do that, our challenge appears:
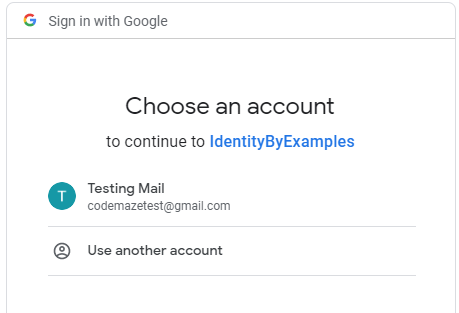
After we click on the Testing Mail option, we are going to be redirected to the ExternalLogin view:
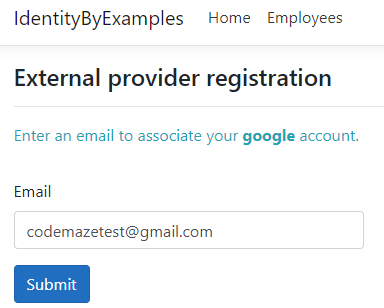
Once we click the Submit button, we will be logged in.
Now if we inspect the database:
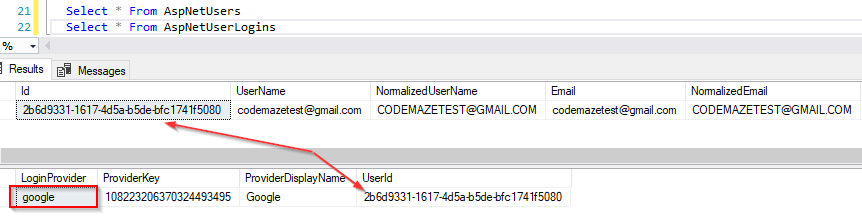
We can see the Google provider assigned to the codemazetest user. If you log out and log in again with the external account, you will be logged in as soon as you choose your external account. You will skip the external provider registration. Of course, this will be the case only if you set the bypassTwoFactor parameter to true. If that parameter is set to false, you would have to add additional logic in the ExternalLoginConfirmation action because it opens some different use cases. If you want, you can play a bit with the bypassTwoFactore parameter.
Additionally, if we remove our user from the database and then repeat the login process again, a new user is going to be created in the database and an external provider will be assigned. Of course, don’t forget to implement an email confirmation functionality.
Conclusion
So, that’s all it takes to configure and integrate an external identity provider into our ASP.NET Core application.
To sum up. We have learned:
- How to configure our project with the Google API
- The way to configure External Identity Provider in our application
- How to implement External Identity Provider with actions and views
We hope you have enjoyed this article and the complete series as well.

Hello,
can I kindly ask you for example what should the code for the TODO part be?
I’ve tried by myself, but I can’t get it right.
Well, basically, you should add something like this:
var token = await _userManager.GenerateEmailConfirmationTokenAsync(user); var confirmationLink = Url.Action(nameof(ConfirmEmail), “Account”, new { token, email = user.Email }, Request.Scheme);
var message = new Message(new string[] { user.Email }, “Confirmation email link”, confirmationLink, null);
await _emailSender.SendEmailAsync(message);
await _userManager.AddToRoleAsync(user, “Visitor”);
This is the same thing you already have in the Register action. Of course, it would be much better to extract this logic and not repeat it.
Can I ask you how you populate this table in SQL – AspNetUserLogins
There is no info in mine and the “if (signInResult.Succeeded)” in “ExternalLoginCallback” is always failed for me?
As much as I remember the AddLoginAsync should do that automatically for you. I am not sure why your table is empty. Unless there is an issue with that method execution even before the sign-in part.
is any of this in git?
Everything is. Just check the link at the beginning of the article.
for ASP.NET 6 don’t forget to make Principal property in ExternalLoginModel as nullable else ModelState.IsValid will be false sending you to an unavailable view “ExternalLoginConfirmation”
Hello Anas. Thanks for the comment. Yeah, VS would even ask from you to make it nullable, so it is a good hint as well.
Hi, Are the ebooks upto date with the latest .net version? Noticed the repo is 3 year old already and no modifications made
Hello Rodwin. Yes, they are. All support .NET 6. Moreover, all of these articles are still valid since there were no changes in Identity over different .NET versions. That’s why we didn’t modify the repo.
Howdy, great article as always. I have one question – can we handle external authentication in API, like all I can find is that we can only use Web API MVC (like in this article) or spa, for this (because of cookie), if I’m right?
Yes you can. We have an article about Google auth with API and Angular, you can find it on our site. You don’t need to use cookies, you can work with JWT.
Yea, I see, thx!
link on an article: https://code-maze.com/how-to-sign-in-with-google-angular-aspnet-webapi/
I got an error in this line :
user = _mapper.Map(model);
Hi Marinko, just wanted to say I’ve loved your tutorial from start to finish been super helpful.
I was wondering if you have anything on using Microsoft.AspNetCore.Authentication.AzureAD.UI so Azure AD authentication instead of Google? Maybe source code or good resources to follow?
Thanks!!
Hello Shane. First of all, thank you for the kind words. It means a lot to me. Regarding your question, all we have is a couple of Blazor with Azure articles. You can find them by typing Blazor azure in the search field on our site and check if those are helpful at all for you.
Hello,
Thanks for the article. I have small issue, I’m failing on ExternalLoginConfirmation my model is not valid, Principal are null, what could I do wrong ?
Thanks and Regards,
Hello Danijel. Well, I really can’t tell why is this happening to you. My question, have you tried comparing your source code with ours? Maybe you missed something there and you can find it easily by comparing both projects.
Hello, I had tried to be honest I didn’t found any difference, maybe I do not see them. If you have time and if you have the will, here is my source code
https://dev.azure.com/danchi88/Milking
Only diff which I know it is, my app is layered and from Infrastructure layer I have config for Identity, which is later called in presentation layer.
Thanks and regards,
How to use generic external oauth provider (eg: Ping Federate)?
Hello @disqus_GtEeIZUUDN:disqus,
I’ve been trying to follow your articles, fantastic they are!
Perhaps can you give me a hand with this?
https://stackoverflow.com/questions/65960175/error-with-google-login-and-asp-net-core-web-api
Hello Jorge. Well, I didn’t manage to do that. Using Blazor WASM Hosted makes that easy. Also I’ve managed to integrated Google auth in the static Blazor WASM app. But not together with API. I couldn’t send data from google (once registered on the client side) to the API because AddOidcAuthentication on the client side doesn’t return any data Blazor client app. I tried to do something like this https://code-maze.com/how-to-sign-in-with-google-angular-aspnet-webapi/ but as I said, couldn’t retrieve data from Google.
I’ve been trying for the past days different ways.. and I believe that I end up in a similar point as you were. I can connect to Google OAuth and return succesfully to Blazor. I can see in the Session storage the id_token. But now I can’t retrieve it using IAccessTokenProvider TokenProvider
https://stackoverflow.com/questions/66083740/google-auth-error-getting-access-token-in-blazor/
Is that where you were? Any ideas?
Yes, that’s where I left 🙂 I didn’t try anything since then. Maybe there are ways to include token, but didn’t have a dpare time to play with it. Anyhow, if you find a solution, it would be so great of you to help us all with the way you did it 🙂
I did progress a little bit more. You can check the stackoverflow answer. Now the token can be retrieve at least. Is it helpful for you?
If you can extract the id_token from google, than it should be easy afterwards. I already linked my article with Angular, Web API and Google, in my first comment, and there you can see that once you have that token, you can send it to the Web API, verify it and issue a JWT token to your client app and always include it in the request, as I saw you did with this id_token on StackOverflow. I think you have to do it this way, since your Web API as a server is not issuing a token but Google does and only for the client app. At least, I managed to do it that way in the mentioned article 🙂
I see what you mean, so perhaps I could’ve skipped the access_token part. In any case, thank you again for your fantastic articles
This article is good. I am curious what would happen if a new user enters other persons email in external provider information form. New user is authenticated but will be associated with other person’s identity.
Hello Sunny. You can always make an additional check because in info.Principal you have the valid email from a curent user (because user had to click on it’s email on the challenge screen). And if that don’t match to the email address user provided in a text box, than you can throw an error or anything like it.
User is landed on this page since he is not a authenticated i.e already what existed in info.Principal. If we match the entered email with info.Principal, issue will remain the same and user is added as new user instead.
Maybe I didn’t understand you but from what I see the situation is following:
User clicks the Google button
Redirection happens on the Chanlenge screen
In there User has to pick their own email address and this address will persist in info.Principal property
Then the External screen appears with the email inside the text box
If a user modifies that mail, you should throw an error in your code – and that you can check by comparing email from the Principal property and model.Email (the email address user entered in the text box).
Thank you now I get it.
For clarity, User intially registered with Google account. Now the same user logs in through Facebook account and system will prompt to enter email address since “providerkey” is different.
Here the expectation is that Facebook email address and Google email address(already present in system) should match otherwise a new user is created.