

In this article, we are going to look at how the API Gateway pattern can be used to encapsulate microservices and abstract away the underlying implementation details, allowing consumers to have a consistent entry point into our system.
So, let’s start.
Prerequisites
To build and test out our application, we are going to need:
Since microservices is a fairly complicated topic before we jump into code in the next section let’s spend a moment explaining the basics.
Basics of Microservices
Microservices are an architectural style, and therefore the implementation of this style can vary greatly and is often a hotly debated topic. However, most experts agree that a microservice has the following attributes:
- Loosely coupled
- Easily maintainable
- Independently deployable
- Testable
- Organized around business capabilities
Monolith vs Microservices
Let’s consider the following diagram comparing the monolith vs microservices architecture:
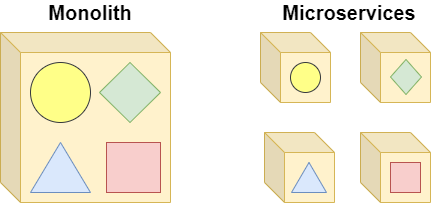
Most of us are familiar with the “monolith” architecture, where a single application (often containing multiple logical “layers”, such as UI/business/data), is deployed onto one or more servers as a single process.
The microservices architecture looks to break the application up into smaller pieces, and deploy them independently. The process of breaking up the application is a complex and important one outside the scope of this article, therefore some research on Domain-Driven-Design (DDD) is recommended here.
Describing the differences between the monolith and microservices architecture is a topic on its own, and as we touched on some benefits of microservices earlier we won’t go into too much detail here. For the purposes of this article, the main benefit we’d like to focus on is independence. That is, we’ll see how changing a single microservice will not bring the entire application down, and other microservices do not even need to be concerned with the change. This is vastly different from the monolith architecture, where we need to bring down and update the entire application for any small change.
Decomposing our monolith
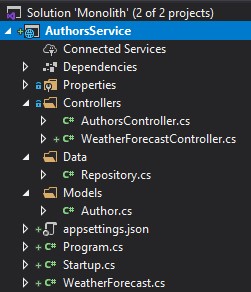
Let’s open up the sample monolith application we downloaded earlier, and inspect the solution:
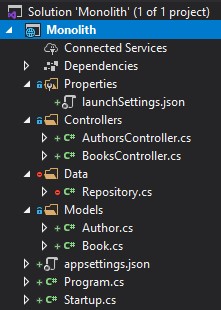
We can see it’s a simple ASP.NET Core API, with a controller each for authors and books.
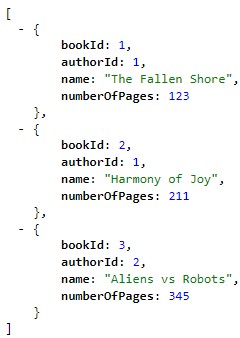
Let’s hit CTRL+F5 to run the application in our browser, which will invoke the “/books” endpoint:
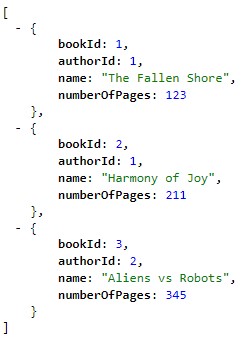
We can see it returns a fake list of books.
Let’s change the URL in our browser to “/authors”:

Given we have two separate API endpoints and models, let’s now decompose this application into two separate APIs. One for “Books”, and one for “Authors”.
Creating the AuthorsService
First, let’s create the AuthorsService by adding a new ASP.NET Core API to the solution:
Now, we can do a bit of refactoring to extract the relevant code from our monolith to our new AuthorsService.
Let’s copy:
- AuthorsController from the Controllers folder
- Author from the Models folder
- Repository from the Data folder
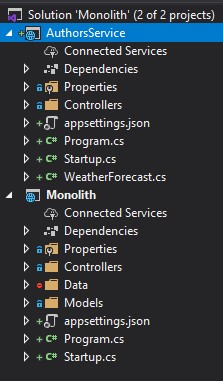
We should end up with the following structure:
Next, we are going to make a few adjustments to get the AuthorsService up and running.
First, let’s add the following line to the ConfigureServices method in Startup.cs:
services.AddSingleton<Repository>();
The Singleton instantiation is simply due to the fact the Repository is a fake class.
Next, let’s remove the references to Book in our Repository, ending up with:
public class Repository
{
    private IEnumerable<Author> _authors { get; set; }

    public Repository()
    {
        _authors = new[]
        {
            new Author
            {
                AuthorId = 1,
                Name = "John Doe"
            },
            new Author
            {
                AuthorId = 2,
                Name = "Jane Smith"
            }
        };
    }

    public IEnumerable<Author> GetAuthors() => _authors;
}
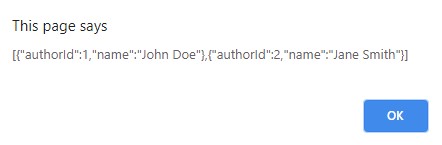
Now, we can run our new AuthorsService and point the URL to the “/authors” path:
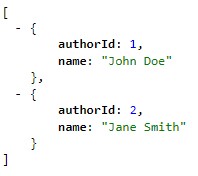
Great! We’ve got our Authors microservice up and running.
Creating the BooksService
Let’s now follow the exact same steps above to extract the relevant Books code from the Monolith to a new BooksService API. We’ll save repeating all the steps again here, as it should be self-explanatory.
Let’s run the new service and point the URL to the “/books” path:
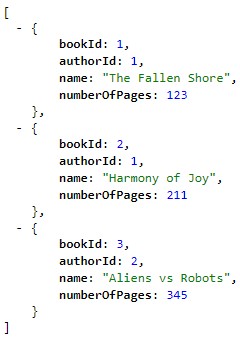
We now have our Books microservice up and running.
At this point, we could deploy these two microservices independently on two different servers and expose their endpoints for use. They are not coupled together in any way.
But in the next section, we are going to discuss how we can use the API Gateway pattern here to solve some problems with this approach.
API Gateway pattern
If someone wants to consume our monolith API, it’s very simple as there is only one host to deal with, e.g “https://ourmonolithapi.ourcompany.com”
However, now that we have extracted this monolith into two separate microservices, this becomes more difficult as the consumer needs to interact with multiple APIs:
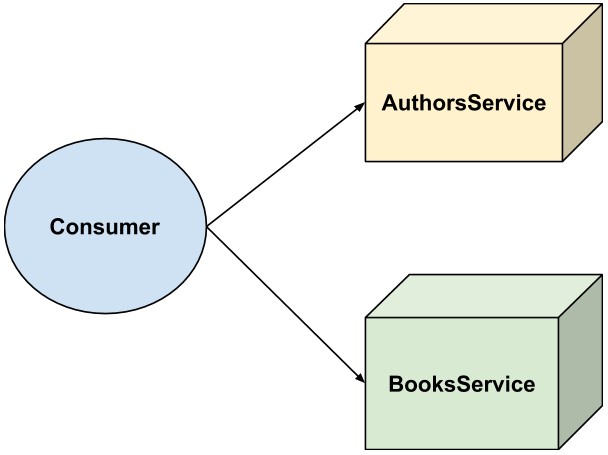
Questions arise such as:
- Where is each service located? (discoverability)
- Do the services use the same protocol? (complexity)
- How many round-trips do I need to render this page that includes both books and authors? (performance)
How the API Gateway Pattern Helps
This is where the API Gateway pattern comes in, as it insulates the consumers from all of these questions, by sitting in “front” of the microservices:
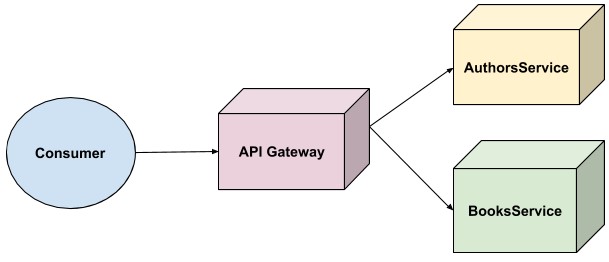
Now back to our earlier questions:
- Where is each service located? Answer: the consumer doesn’t care. It just deals with the API Gateway, which then interacts with the service on the consumer’s behalf
- Do the services use the same protocol? Answer: again the consumer doesn’t care. If the microservices use a different protocol (for example, if we wanted to change the BooksService to use gRPC instead of HTTP), it’s the responsibility of the API Gateway to map between these protocols.
- How many round-trips do I need to render this a page that includes both books and authors? Answer: the API Gateway can ‘aggregate’ these calls for the consumer. This is especially important because we can’t control the network of the consumer (they might be on a slow connection), but, we can control our internal network. So, by having the API Gateway and microservices close together, we can maximize network efficiency.
It’s also worth mentioning a similar pattern, called the “BFF” pattern. No, it doesn’t mean best friends forever, but rather “Backend-for-frontend”. This pattern is very similar to the API Gateway, but it involves creating an API Gateway per “frontend”.
This picture illustrates how we could implement the BFF pattern for our use case:
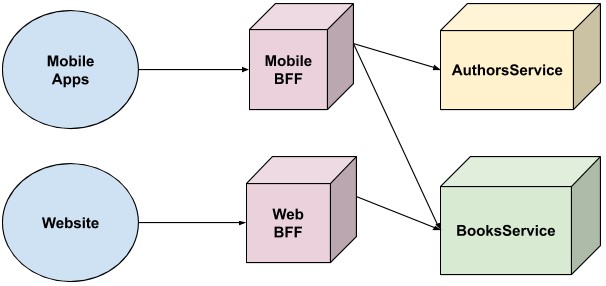
In this case, each client has it’s own BFF / API Gateway, whose features can be tailored for that particular client. For example, maybe the web apps would like some SEO functionality, that the mobile apps don’t care about. This allows the mobile and web teams to operate autonomously and own their own data layer.
However, for this article, let’s focus purely on a single API Gateway for a single consumer.
How can we implement the API Gateway pattern?
There are a number of ways we can implement the API Gateway pattern, including using off-the-shelf software. The choice will ultimately depend on the features required for the API Gateway.
Some common features that we might want include:
- Authentication
- Rate limiting
- Analytics
- Logging
- Documentation
Services such as Traefik, Kong, and Azure API Management can provide all or some of these features, so it’s worth reading up on them depending on what’s needed for your use case.
However, for the purposes of the article, we are going to exclude those features and focus on the bare minimum functionality, being a simple HTTP-based proxy between the consumer and our microservices. To implement that, we can very easily do it ourselves with ASP.NET Core.
Adding our API Gateway
Since we already have the monolith API in our solution and we are planning on using ASP.NET Core for our API Gateway, we can simply convert it into one for our purpose.
First, let’s delete the “Controllers”, “Data” and “Models” folders, as we no longer need them.
Next, let’s add the following line to ConfigureServices() in Startup:
services.AddHttpClient();
This is so we can call our new microservices via HTTP Client.
Next, let’s add a new controller called ProxyController:
[Route("[action]")]
[ApiController]
public class ProxyController : ControllerBase
{
    private readonly HttpClient _httpClient;

    public ProxyController(IHttpClientFactory httpClientFactory)
    {
        _httpClient = httpClientFactory.CreateClient();
    }

    [HttpGet]
    public async Task<IActionResult> Books()
        => await ProxyTo("https://localhost:44388/books");

    [HttpGet]
    public async Task<IActionResult> Authors()
        => await ProxyTo("https://localhost:44307/authors");

    private async Task<ContentResult> ProxyTo(string url)
        => Content(await _httpClient.GetStringAsync(url));

}
The code should be fairly self-explanatory, but essentially we are using HttpClient to make calls to our new microservices and returning the response straight back.
Let’s build and run all three of our projects in the solution, and we should have:
- https://localhost:44307 (Authors)
- https://localhost:44388 (Books)
- https://localhost:5001 (API Gateway)
With everything running, let’s open up our browser to https://localhost:5001/books:
Similarly, let’s navigate to https://localhost:5001/authors:

We now have a functioning API Gateway, proxying requests to our two microservices!
In the next section, let’s add a simple consumer of our API Gateway.
Adding a simple consumer
Now that we have an API Gateway, let’s look at adding a simple web page that can consume our API.
Before we do that, we need to enable CORS in our API Gateway, so that we can make cross-domain requests.
Let’s open up Startup.cs and modify ConfigureServices():
services.AddCors(options =>
{
    options.AddDefaultPolicy(builder =>
    {
        builder.AllowAnyOrigin();
    });
});
For testing purposes, we are allowing CORS from any origin. But for a production application, we’d want a more strict CORS policy.
Next, let’s add the CORS middleware to the ASP.NET Core pipeline in the Configure() method:
app.UseCors();
Let’s build and run our application, to deploy the new changes.
Next, let’s create a very simple HTML page:
<html>
    <head></head>
    <body>
        <button onclick="callAPI('books')">Get Books</button>
        <button onclick="callAPI('authors')">Get Authors</button>
    </body>
    <script type="text/javascript">
    function callAPI(path) {
        let request = new XMLHttpRequest();
        request.open("GET", "https://localhost:5001/" + path);
        request.send();
        request.onload = () => {
            if (request.status === 200) {
                alert(request.response);
            } else {
                alert(`Error: ${request.status} ${request.statusText}`);
            }
        }
    }
    </script>
</html>
Here we simply have a couple of buttons, which when clicked will call our API Gateway and alert the result.
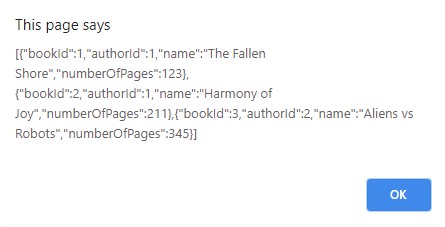
Let’s open the HTML page in our browser, hit the “Get Books” button, and we see a browser popup:
Let’s then hit the “Get Authors” button:
We see that our consumer was able to call our API Gateway, which in turn was able to proxy these requests to the relevant microservice.
In the next section let’s see how we can go about changing one of our microservices, which will highlight one of the benefits of microservices the API Gateway pattern.
Changing a Microservice
We talked earlier about how microservices should be independently deployable, and that changing one microservice shouldn’t need to bring down the entire application (the “application” in this case, being the API Gateway).
We can prove that theory, by changing the “Authors” microservice.
First, let’s “bring down” the Authors microservice, by stopping the site in IIS Express:

If we then hit the “Get Authors” button again, we’ll see an error:

However, if we hit the “Get Books” button:

As expected, it is still returning a result.
Now, we are going to make some changes to our Authors microservice.
Changing the Authors Microservice
First, let’s add a new property to the Author class:
public string Country { get; set; }
Next, let’s update our repository to return our new field:
_authors = new[]
{
    new Author
    {
        AuthorId = 1,
        Name = "John Doe",
        Country = "Australia"
    },
    new Author
    {
        AuthorId = 2,
        Name = "Jane Smith",
        Country = "United States"
    }
};
This is a trivial change, but the point is that the change could be anything: a new field sourced from a new database, upgrading a package, or even rewriting the entire app under a different programming language. As long as the contract between the microservice and the API Gateway is adhered to (e.g no breaking changes), nothing else needs to happen.
Let’s build and run our Authors service again, then hit the “Get Authors” button:

We see our new change coming through to the consumer.
It’s worth pausing here for a moment, to see what we have achieved:
- We created a consumer, that interacts with two microservices via a single application (the API Gateway)
- We brought down one of the microservices and did an update
- The other microservice was able to continue to serve functionality
Consider if our consumer was more feature-rich, and for example, listed all the books. If this feature didn’t require any author functionality, the feature could continue to be served to users even with updates to the authors.
This is very powerful, as it allows “graceful” degradation of some functionality, whilst preserving others. We could even add more features to the API Gateway around this, for example, detecting the outage of the downstream service and returning cached data, or leveraging backup functionality. The point is, consumers of our backend are insulated from any changes behind the scenes by the API Gateway.
Conclusion
In this article, we took a brief look at the theory behind microservices and the API Gateway pattern and were able to create a very simple setup demonstrating some of the key concepts.
Even though our implementation was very basic, what’s important is the possibilities of what we set up. We were able to continue serving some functionality of our app to our consumers, even though we were doing some upgrades to other functionality. This is often the case in microservices, where they may be different teams working on different functionality and microservices. With this approach, the team upgrading the functionality is responsible for the update, without extensive coordination across other teams.
The API Gateway provides a great “face” to our backend, where can easily control how our backend functionality is served to our consumers, without pushing those concerns downstream to each service. This means the actual services are much more agile and only need to be concerned with what they need to deliver to the API Gateway.
The next logical steps would be to build more microservices, enhance the API Gateway with more functionality such as logging, analytics, and resiliency, however, each of those points is essentially a new topic on its own, so let’s cash in our chips and applaud our efforts, leaving that for another day.
Hope you enjoyed the article. Happy coding!

Really a wonderful article, very informative.
I have one question. How the security will be handled. Each project (API) Service will have their own security. Let’s say Token Based or some of the API’s could have different mechanism. How that will be handled? from the Proxy Class (Monolith Project in this example) ?
Hi Usman, glad you enjoyed the article
🙂
There are a few options here.
The simplest solution is:
– decide on a common auth mechanism between your services (eg JWT / OAuth)
– have the API gateway expose a token endpoint that interacts with an auth server to issue tokens to the client (eg a service like Auth0)
– clients get a token via the token endpoint, and issue that to all further requests in the “Authorisation” http header
– make sure the API gateway forwards on the header to the microservices
– setup middleware in each microservice to read the JWT and perform auth
Hope that helps
How can I deploy it on azure and utilize the microservices?
I’ve been trying to deploy on azure app service and consume it but my mciroservice url is not found.
Please help me
Hi Animesh, thanks for reading and commenting.
If you depoy to Azure the code in this article needs to be modified a little. Instead of having https://localhost:<port> for each microservice, you’ll need to change the hostname and port for all the microservices to the relevant <yoursite>.azurewebsites.net URL (leave out the port). E.g “https://your-books-microservice.azurewebsites.net”. As long as you don’t have any additional Azure networking setup, this should work fine.
Hope that helps.
Hi Ryan,
I tried the above approach but still it’s not working, I’m getting 404 error. I don’t have any networking setup as well
Hi there,
This doesn’t really sound like a microservice problem, more a basic Azure connection / proxy concept. But let’s see if we can figure it out..
Can you give an example of a microservice URL you are trying to connect to? Can you connect to it with your browser?
Then, double-check the URL that you are connecting to, from code?
Basically, if you can open the URL in a browser, then the code should be able to do the same thing, assumiung the URL’s are the same.
Hopefully that helps.
Thanks you sir for this article. Can you right article on authorization in microservice. How to secure Services using JWT token By Api Getway thanks.
Hello Umari. I will add this topic to our topic list, so it will be done.
Thanks
Can you Drop link there. I am searching but still not not found
You didn’t understand me. We don’t have an article on that topic yet. I’ve just added the topic to our topic list. So, we will write an article on this topic soon.
Okey
Sir any update on this article ?
Not yet. Sorry.
what if i want to access the two microservices with same UI consisting of 2 buttons and getting their result(for eg. if i make 2 apis, one for add and one to multiply and in the ui we have 2 textboxes{for inputs} and 2 buttons {add and multiply} hit button then it calls api and returns the result).. hope you get my vision 🙁
Assuming you have 10 API endpoints for each microservices, in your case this sum to 20 for the two microservices. You have to write 2o “ProxyTo” in your API gateway which might be tedious.
I’d suggest you consider implementing the API gateway with Ocelot
Hello there. We just wanted to show how this pattern works in a nutshell. Once readers understand it, they can use whatever tool they like. I agree with you that using Ocelot is a great way to implement this and we will cover that in one of our next articles for sure.
Good article, the truth is that I learn a lot with your tutorials, how can we protect our endpoints with api gateway token?
Hi Angelru, since this article is essentially talking about an “API in front of a bunch of other APIs”, you’ve got full control on how you secure these endpoints (depending on the technology).
The most common approach would be to use JWT-based authentication on the actual API microservices, using something like IdentityServer, Auth0, etc. So when the API Gateway proxies an unauthorised request to the microservice, it would respond with an appropriate error code (400, 401, etc) back to the client as normal.
Another approach would be to do the authentication at the API Gateway itself. This means we don’t waste network hops to the microservices, but the downside is you are building authentication rules into the API Gateway, when arguably they should be done closer to the actual microservices.
Hope that helps!
Hi Ryan Miranda,
I understand and know how to apply jwt to protect the endpoints, it seems a bit redundant to me to have to apply it in each microservice, a correct approach could be to put the microservices as private and that they are only accessible from API Gateway, a policy is put in the microservices CORS so that it only accepts requests from API Gateway and jwt in API Gateway and everything that goes with it, would that be a correct approach?
Hi Angelru,
That’s a perfectly fine approach, if the authorisation rules are the same for all endpoints. But often the case is that the rules are different, e.g claims-based authorisation.
For example, let’s say you have an endpoint that needs a particular claim, while another endpoint doesn’t. You would have to build this “logic” into the API Gateway, when arguably it should be built into the actual microservice.
You could also do a hybrid approach.. where the API Gateway protects initial authentication (e.g all requests must be authenticated), but then further authorisation also occurs at the microservice level.
As you can see, it really depends on what authorisation rules you require for your use case.
Hope that helps 🙂
Any plan to write a book focused only on Microservices? I’d buy it
Hello there. Well, TBH we have a lot of plans and not so much time 🙂 Anyway, thank you for the suggestion.
MarinkoSpasojevic.Clone() will be a nice Feature 🙂 Thanks for all your great articles
😀 😀 You are most welcome.
Out of curiosity, what service would be responsible for correlating information and basically returning all books of a given author or all the authors of a given book?
Great question, and one hotly debated.. so there’s no one ‘answer’.
Some options:
1) have one of the services have a ‘copy’ of the data needed to service the request. This data can be pushed via message buses when data changes at the source. this is the most common approach.
2) have the API gateway itself (or another service, such as GraphQL) do the aggregation, e.g multiple HTTP calls across the services.
3) have the client do the individual calls
Something like this is a huge discussion, and probably a topic on it’s own 🙂
Nice idea, we’ve done very similar ourselves. FYI You can remove the need for the ‘ProxyTo’ method by using ‘AddApplicationPart’ in netcore MvcBuilder – an example is shown in https://blog.boro2g.co.uk/monolith-microservice-or-something-in-between/
Hi @boro2g, thanks for jumping in! AddApplicationPart is an interesting approach to the solution, however I think a better approach long term is the one shown in the article, because the coupling is at the HTTP level, not the physical/code level. This allows the microservices to be flexible in their implementation, as long as they abide by the schema and protocol.
For example, we could change the Authors service to run as a Python service, without needing to change the API Gateway, whereas if we used AddApplicationPart that wouldn’t be possible as the projects are taking a direct dependency on one another.
That said, microservices provide a set of patterns to build distributed services, not rules. So whatever provides the most benefit to you and your team with the minimum complexity is a win. 🙂
“So whatever provides the most benefit to you and your team with the minimum complexity is a win.” – I’m 100% behind this ethos! 🙂
Out of interest, do you find you often work on multi-tech solutions? We tend to stick with 1, at least for all ‘backend’ work – rather than spanning multiple e.g. .net/python/….
Most of the time, the teams I’ve been involved with stick with the same tech in the backend because of the small team size (5-10). But, if you’re migrating to a microservices architecture, there’s usually good reasons for that, including team autonomy, which might align with an organizational change (e.g. a shift to ‘squads’ or feature teams).
If you want microservices & the teams that look after them to be fully autonomous, the technology should be agnostic and fully decoupled. If the team looking after the “AuthorsService” wants to build their service in Python, they should be empowered to do so without coordinating with other teams. If the teams/services need to ‘move together’ (deployment, technology decisions, etc), one would argue they aren’t really independent microservices.
Again, all theory/opinions -> lots out there so again, choose what works for you 🙂