

Almost all applications need to do some sort of background work. Whether it’s a long and tedious task or a repetitive job that we need to do every other day, in this article we are going to learn how we can easily implement it. For this, we are going to be using Hangfire – an open-sourced library for ASP.NET Core.
Let’s start.
VIDEO: Schedule Jobs in ASP.NET Core With Hangfire.
Introduction to Background Tasks
To keep our applications running smoothly and our users happy, for certain tasks we can utilize a concept called background processing. A task is a method in our code with some logic that we need to execute. Processing it in the background means that we can execute it away from the application’s main thread.
When Should We Use Background Processing?
There are many situations in which we need to keep specific work away from the spotlight.
Sometimes it’s a long-running task that the UI data display doesn’t depend on and it slows down the application flow. An example might be uploading a bunch of photos to a social media platform. We wouldn’t want this action to prevent our users from using the platform while we process the photos. We can do the upload task behind the scenes and the user can continue to browse freely.
We also may need to schedule some tasks to run every hour, week, or maybe a month. Like watching out for inactive users or sending subscription invoices. Or we may need to send a notification to our user once, except not right now, but in about three days.
We can handle all these tasks with a good background task scheduler that takes care of the details for us. This is where Hangfire shines.
What Is Hangfire?
Hangfire is an open-source and well-documented task scheduler for ASP.NET and ASP.NET Core. It’s multi-threaded, easily scalable, and offers a variety of job types. It’s well structured, simple to use, and gives a powerful performance.
Most Notable Hangfire Features
Comparing to other available schedulers, Hangfire offers a lot of advantages. Among other things, it’s notably easy to install and configure, it uses persistent storage and it has a nice UI dashboard to check up on our jobs at any time. It supports multiple queue processing and we can also explicitly choose which queue we want to use for a specific job.
Because the persistent storage saves the job state, we also have a great bonus – job retries. This feature helps make sure our jobs finish executing even if they run into a transient exception or if the dedicated application pool crashes. If a job fails, Hangfire will try to run it again as soon as possible.
How Hangfire Works?
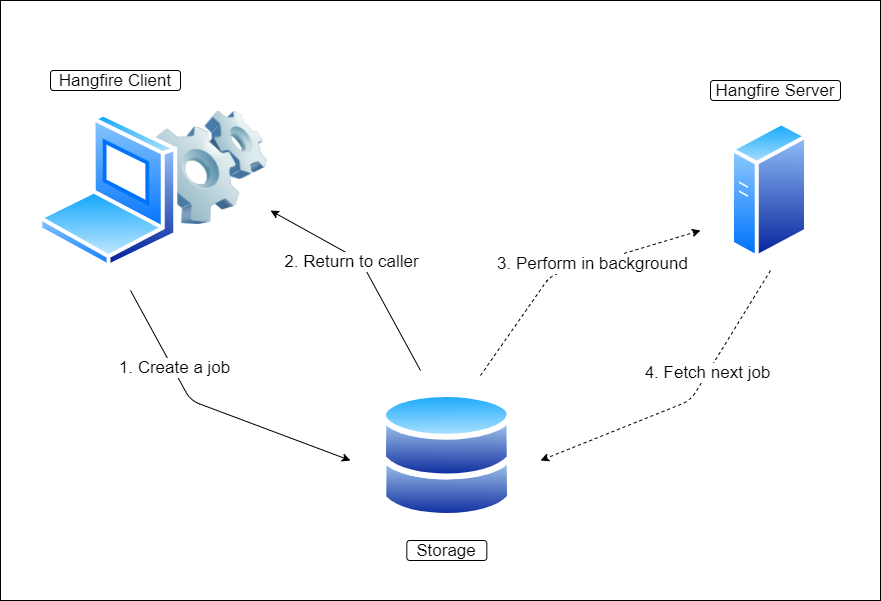
There are three main components of Hangfire architecture – the client, the server, and the storage. They are closely intertwined in the whole process and depend on each other.
The Role of Each Component
Let’s see what each component is responsible for:
- Hangfire client – These are the actual libraries inside our application. The client creates the job, serializes its definition, and makes sure to store it into our persistent storage.
- Hangfire storage – This is our database. It uses a couple of designated tables that Hangfire creates for us. It stores all the information about our jobs – definitions, execution status, etc. Hangfire supports both RDBMS and NoSQL options, so we can choose which one works for our project. By default, it uses SQL Server, but any other supported option is also easy to configure.
- Hangfire server – The server has the task of picking up job definitions from the storage and executing them. It’s also responsible for keeping our job storage clean from any data that we don’t use anymore. The server can live within our application, or it can be on another server. It always points to the database storage so its location doesn’t play a role, but this diversity can be very useful.
Since Hangfire is built as generic as possible, we can also extend some of its parts like storage implementation, job creation, or job activation processes manually to fit specific needs.
The Hangfire Workflow
The workflow between components is pretty simple:
After we specify our task in the code and call the appropriate Hangfire method to create it, the Hangfire client creates the job and stores it in the database. The control then returns to the application so the main thread can continue with its work.
When a job is in the storage, the server picks it up and creates a background thread to process the fetched job.
We can represent this flow with four consecutive actions in two different branches – one between client and storage and the other one between storage and server:
Setting up Hangfire in ASP.NET Core
After we’ve learned about the mechanics of Hangfire architecture, let’s see how it works in practice.
To start, let’s create a new ASP.NET Core Web API project:
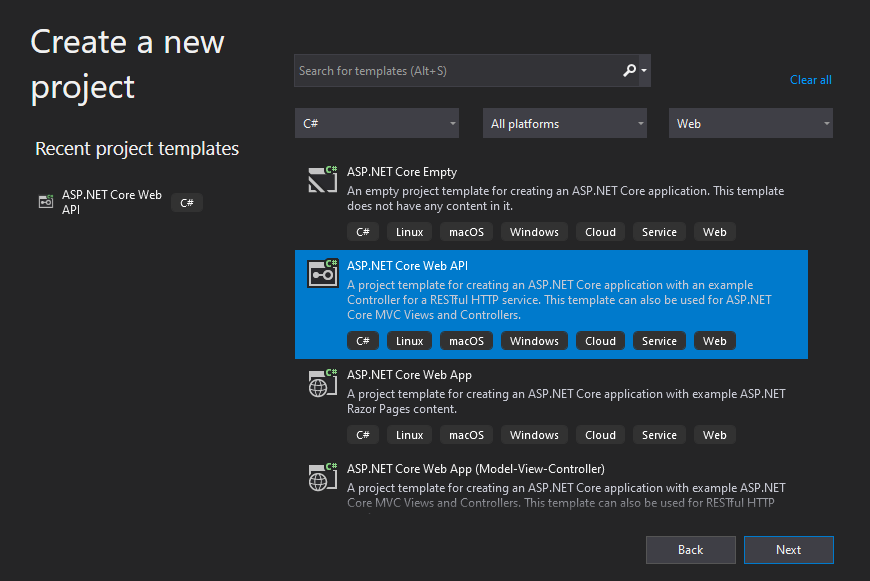
We will also be using Swagger to send out HTTP requests. We can easily add it to our .NET project if we mark the Enable OpenAPI support checkbox.
Hangfire NuGet Package
First, we are going to install the Hangfire NuGet package. We can search for Hangfire in the package manager:

or run the command in the package manager console:
PM> Install-Package Hangfire
After installing this package, it references other necessary packages like Hangfire.Core and Hangfire.SqlServer by default and you don’t have to worry about them.
The exception is if you are using a different storage option than SQL Server. In that case, be sure to add the additional NuGet package for that type of storage.
Also, we need an SqlCLient library to be able to connect Hangfire with our SQL database:
PM>Install-Package System.Data.SqlClient
Persistent Storage
For storing job definitions and statuses, as we’ve now learned, Hangfire can use a SQL Server database by default and we can also choose other options. In our example project, for simplicity’s sake, we are going to use MSSQL LocalDB storage.
Whatever type of database we use, local or remote, we should have a database definition – even if it’s empty. Hangfire will create the tables that we need for job storage, but it cannot create a database, so we need to provide that.
After setting up our local database, we need to update the appsettings.json file:
"AllowedHosts": "*",
    "ConnectionStrings": {
        "DBConnection": "Server=(localdb)\\MSSQLLocalDB;Database=HangfireApplication;Trusted_Connection=True"
    }
Inside the ConnectionStrings object, we add our LocalDB connection string. If you decide to use an already existing database or simply an alternative to LocalDB, you should alter the connection string for your specific case.
Just a note that you must have an already created database, so feel free to do that first.
Program Class
After we install the Hangfire package and set up the database, we also need to configure it in the Program class:
var builder = WebApplication.CreateBuilder(args);

builder.Services.AddHangfire(x =>
{
    x.UseSimpleAssemblyNameTypeSerializer()
        .UseRecommendedSerializerSettings()
        .UseSqlServerStorage(builder.Configuration.GetConnectionString("sqlCon"));
});

builder.Services.AddHangfireServer();
With the AddHangfire() method we add the Hangfire service along with the SQL Server storage option. We provide the connection string that we specified inside the appsettings.json file.
We also add the Hangfire server with the AddHangfireServer() method. The Hangfire server in our project is going to live inside the application.
Additionally, we have to update our request processing pipeline:
app.UseHttpsRedirection();

app.UseAuthorization();

app.UseHangfireDashboard();
Here, we add the Hangfire dashboard to our pipeline, by calling the UseHangfireDashboard() method, so we can easily monitor our jobs later on.
This dashboard is, by default, configured to be accessible only locally, but if you want to access it remotely, you can configure that as well. However, it exposes a lot of sensitive information, so always be careful with that configuration.
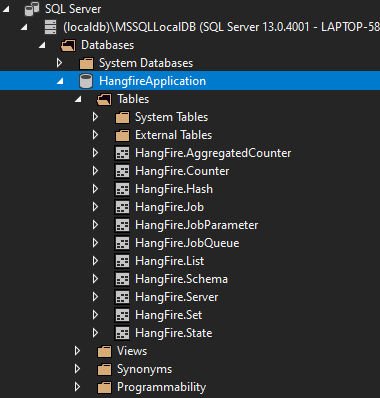
When we run our application, Hangfire will automatically check our designated storage for the necessary tables, and if they don’t exist yet, it will create them for us:
That’s it as far as configuration goes and we’re all set to start using Hangfire. Now let’s quickly inspect the Hangfire dashboard and then see how we can create some background tasks.
Hangfire Dashboard
If we start our application and navigate to https://localhost:5001/hangfire URL, we can see the very useful dashboard included out of the box:

Within the dashboard, we can see all the running and scheduled jobs that we create with our Hangfire client. We can also monitor servers, job retries, failed jobs and keep an eye on all jobs in the queue. Another great thing that we can do in the dashboard is we can manually trigger any existing jobs.
We’ll cover the other tabs a bit later when we try out the different types of jobs Hangfire supports, but for now, let’s quickly check the Servers tab:

Here we can see the server that is running in our test application. If we had more server instances running, we would also see them listed here. Hangfire checks server usage periodically, so if there is a server that is not in use anymore, it will be automatically removed from the list.
Types of Background Jobs in Hangfire
Hangfire supports different job types that we can use for different occasions. From one-time tasks to everyday tasks, we are covered. Let’s see how to easily implement them and check up on their execution in the dashboard.
To start testing the job scheduling, let’s create a Services folder with a JobTestService class and its belonging interface:
public interface IJobTestService
{
    void FireAndForgetJob();

    void ReccuringJob();

    void DelayedJob();

    void ContinuationJob();

}
First, we specify the IJobTestService interface where we register four different methods – named conveniently after Hangfire job types.
After that, we can move on to modifying the service class:
public class JobTestService : IJobTestService
{
    private ILogger _logger;

    public JobTestService(ILogger<JobTestService> logger)
    {
        _logger = logger;
    }

    public void ContinuationJob()
    {
        _logger.LogInformation("Hello from a Continuation job!");
    }

    public void DelayedJob()
    {
        _logger.LogInformation("Hello from a Delayed job!");
    }

    public void FireAndForgetJob()
    {
        _logger.LogInformation("Hello from a Fire and Forget job!");
    }

    public void ReccuringJob()
    {
        _logger.LogInformation("Hello from a Scheduled job!");
    }
}
Our JobTestService class implements the IJobTestService interface we’ve created. Each method in the class only prints out some text to our console, instead of doing the actual work as it would in a real application.
In the real world, inside methods like these, there may be code that uploads a photo, or checks for user inactivity. In our example, the simple Console.WriteLine() calls will allow us to focus more on actually scheduling the jobs.
After defining the service class, we should modify our Startup class again:
builder.Services.AddHangfireServer();

builder.Services.AddScoped<IJobTestService, JobTestService>();

builder.Services.AddControllers();
To be able to use our new service with dependency injection, we register our interface implementation using the AddScoped() method.
Fire and Forget Jobs
The first job type that we are going to cover is the Fire and Forget job. When we create this type of job, the server executes it only once, as soon as it can.
Inside the Controllers folder in our application, we can create and modify a JobTestController.cs file:
[Route("api/[controller]")]
[ApiController]
public class JobTestController : ControllerBase
{
    private readonly IJobTestService _jobTestService;
    private readonly IBackgroundJobClient _backgroundJobClient;

    public JobTestController(IJobTestService jobTestService, IBackgroundJobClient backgroundJobClient)
    {
        _jobTestService = jobTestService;
        _backgroundJobClient = backgroundJobClient;
    }
We create the JobTestController constructor and inject the IBackgroundJobClient interface that Hangfire provides. We will be using this interface’s methods for scheduling different types of jobs. Besides that, we also inject the IJobTestService interface that we created.
Now let’s add a test endpoint that will help us schedule the job:
[HttpGet("/FireAndForgetJob")]
public ActionResult CreateFireAndForgetJob()
{
    _backgroundJobClient.Enqueue(() => _jobTestService.FireAndForgetJob());
    return Ok();
}
Our new endpoint uses the injected Hangfire interface to schedule this type of job. We call the interface’s Enqueue() method and pass it our FireAndForgetJob() service method call as the parameter.
This convenient Enqueue method takes care of creating and saving the job definition to our storage and, of course, enqueuing it for processing.
Now, we can send a GET request to this endpoint using Swagger, and as a result, this is going to create our first job with Hangfire!
After sending the request, let’s check the job in the dashboard. Navigate to the Jobs tab, where it should now be visible under the Succeeded section:
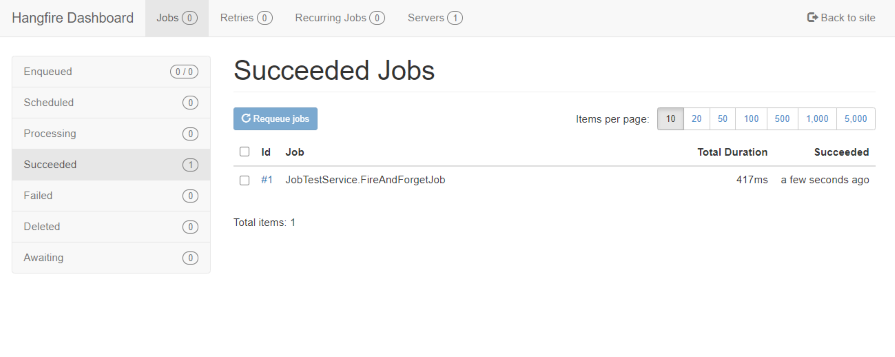
Here we can execute any succeeded job again manually if we’d like, with the Requeue jobs button.
Delayed Jobs
Delayed tasks are those that we surely want to execute, but just not right now. We can schedule them at a certain time, maybe a minute from now or three months from now.
To test out this type of job, let’s create a new endpoint in our JobTestController:
[HttpGet("/DelayedJob")]
public ActionResult CreateDelayedJob()
{
    _backgroundJobClient.Schedule(() => _jobTestService.DelayedJob(), TimeSpan.FromSeconds(60));
    return Ok();
}
We add a CreateDelayedJob() endpoint, where we are again using the IBackgroundJobClient interface. This time, however, we are not calling the Enqueue() method. Instead, we use the Schedule() method and pass two arguments – our DelayedJob() service method call, and the delay.
The Schedule() method will create the job definition and save it, but it will also make sure to schedule it in the queue at the specified time.
Now when we send a GET request to this endpoint, we schedule a job 60 seconds in the future. It shows up in the Scheduled section of the dashboard’s Jobs tab:
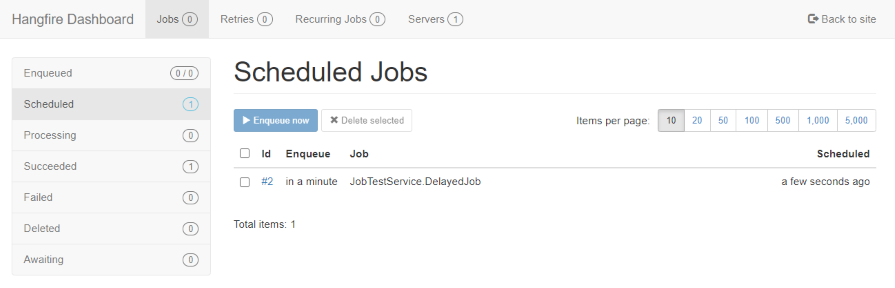
After it executes successfully, it moves to the Succeeded tab.
Recurring Jobs
We schedule our recurring jobs so they can repeat in a certain interval. For those types of tasks, Hangfire makes use of the CRON software utility.
To schedule this job we will need a different Hangfire interface, so let’s first modify our controller’s constructor:
[Route("api/[controller]")]
[ApiController]
public class JobTestController : ControllerBase
{
    private readonly IJobTestService _jobTestService;
    private readonly IBackgroundJobClient _backgroundJobClient;
    private readonly IRecurringJobManager _recurringJobManager;

    public JobTestController(IJobTestService jobTestService, IBackgroundJobClient backgroundJobClient, IRecurringJobManager recurringJobManager)
    {
        _jobTestService = jobTestService;
        _backgroundJobClient = backgroundJobClient;
        _recurringJobManager = recurringJobManager;
    }
We now also inject the Hangfire IReccuringJobManager interface inside the constructor. It exposes useful methods for handling recurring jobs and we will use it to schedule our new job.
Now we can create a new endpoint to test the job:
[HttpGet("/ReccuringJob")]
public ActionResult CreateReccuringJob()
{
    _recurringJobManager.AddOrUpdate("jobId", () => _jobTestService.ReccuringJob(), Cron.Minutely);
    return Ok();
}
We use the newly injected interface’s AddOrUpdate() method. To this method, we pass a job id of choice, our RecurringJob() method call, and the CRON interval.
The hangfire method will create a new job with the specified id, or update an existing one. In this example, we will just be creating the job for the first time.
After sending a GET request to the endpoint using Swagger, our recurring job becomes visible under the Recurring Jobs tab in the dashboard:
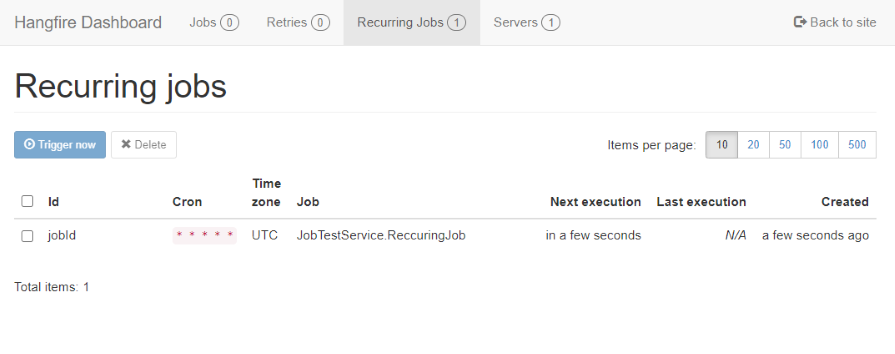
While this shows that we scheduled our job to repeat at the specified time, every time the server processes it, the processed instance will become visible in the Succeeded section of the Jobs tab.
Continuation Jobs
The last type of job we are going to cover is the Continuation job. Its main feature is that it chains together task execution. With it, we can get two jobs to run one after the other in continuation.
We already have a method for this type of job prepared in our service class, so let’s modify our controller:
[HttpGet("/ContinuationJob")]
public ActionResult CreateContinuationJob()
{
    var parentJobId = _backgroundJobClient.Enqueue(() => _jobTestService.FireAndForgetJob());
    _backgroundJobClient.ContinueJobWith(parentJobId, () => _jobTestService.ContinuationJob());

    return Ok();
}
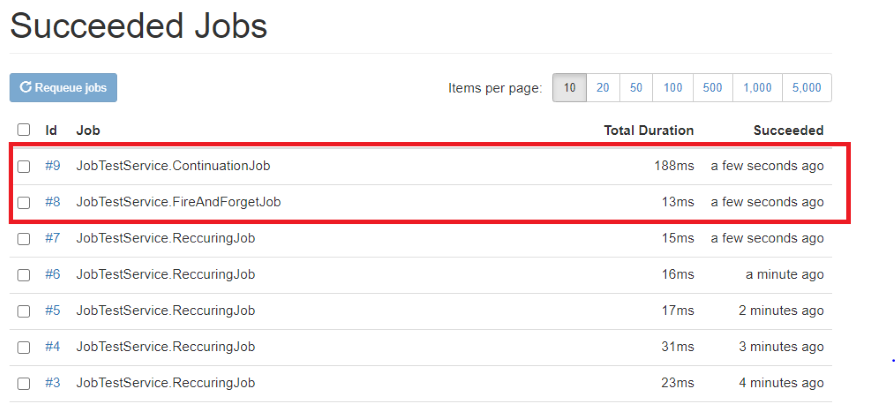
In the CreateContinuationJob() endpoint, we again use the Hangfire IBackgroundJobClient interface. We first use it to create a simple Fire and Forget job – now we know how to do that :).
We want this job to be a trigger for the next job, so we make sure to collect the id that the Enqueue() method returns. After it’s created, we call the interface’s ContinueJobWith() method and pass the job id of the created job along with our ContinuationJob() method call. The ContinueJobWith() method will make sure to chain our two jobs together.
After reaching this endpoint with a GET request, if we check out the Succeeded section of the Dashboard’s Jobs tab we can see that our two jobs ran one after the other:
Great, everything works!
Conclusion
We’ve learned a lot about the simple and powerful library called Hangfire. We now know how to set it up in our ASP.NET Core application and how to use it to schedule different types of jobs. Now it’s time to go schedule some background tasks!
Until the next article.
Best regards.

How to remove server from Hangifre
Do these jobs run inside the same process as the web api?
All should be executed as background tasks.
In my application I run the hang fire server in a different process/instance, isolated from my WebAPI process to ensure it is not affected as long as the database is functioning as expected.
To do so what code we have to remove from web api as whenever i remove any of the above mentioned code in blog my web api throws error
Hey Saurabh, try comparing it to our solution. Maybe you’ll find out what’s missing.