

In this article, we will delve into ASP.NET Core forms and how to add rows to them dynamically. We’ll use razor pages to create the form and SQLite as our database.
However, before we get started with our problem and its solution, let’s first understand how forms work in Razor Pages.
Razor Page Forms in ASP.NET Core
Razor Pages in ASP.NET Core help us create web applications that are page-focused while offering a clean separation of concerns. They act as an alternative to using an MVC application with controllers and views. It’s often easier to work with a single page that handles everything than creating multiple controllers and views to achieve the same result.
With Razor Page forms, we can create user interfaces that gather data from users. They enable us to achieve tasks like user registration, performing search operations, and content submission.
Here, we define the structure and layout of the user interface using HTML elements and leverage Razor syntax to integrate server-side code. We also have built-in validation mechanisms. Using these mechanisms, we can ensure that the user data is valid and safe. Thus, it helps prevent errors and safeguards against potential security threats.
Why Use Dynamic Forms
In web application development, we often want to enable users to input multiple sets of related data, like adding items to a shopping cart, entering details for multiple attendees, or creating a dynamic survey form.
We want to ensure that users can add and remove rows dynamically and that the data they enter is correctly handled. This involves proper binding to the server-side model and performing validation checks to maintain data accuracy and security.
Let’s look at some of the key aspects of this task:
- Dynamic Row Addition: We need to design a mechanism that enables users to add new rows dynamically to the form as needed
- Data Binding: We need to ensure that the data entered into the dynamically added rows is correctly bound to the server-side model, so we can save it as part of the form submission
- Data Validation: We need to implement validation for the dynamically added rows to ensure data accuracy and security
Let’s begin by setting up the application.
Razor Page Forms Setup
Let’s create a simple ASP.NET Core Web application that deals with products. With this application, we’ll be able to list, add, and delete products from the database.
First, let’s navigate to the folder we want our application in and run the dotnet new webapp command:
dotnet new webapp -n DynamicFormInASPNetCore
This creates a new ASP.NET web application using razor pages.
Nuget Packages Installation
We’ll use SQLite for our database. Hence, once the application creation is complete, let’s install the required packages.
In Visual Studio, we can open the NuGet Package Manager Console by navigating to “Tools > NuGet Package Manager > Package Manager Console.”
Next, let’s install a couple of packages. We’ll install the Entity Framework SQLite package, and then we’ll get the tools package for enabling migrations:
Install-Package Microsoft.EntityFrameworkCore.Sqlite
Install-Package Microsoft.EntityFrameworkCore.Tools
Model Class Creation
Now, let’s create our Product model class:
public class Product
{
    public int Id { get; set; }
    public string Name { get; set; }
    public decimal Price { get; set; }
}
Here, we create a simple class that represents a Product record in our database with Id, Name, and Price columns.
Database Context Configuration
Let’s create a class DataContext:
public class DataContext : DbContext
{
    public DataContext(DbContextOptions options) : base(options)
    {
    }

    public DbSet<Product> Products { get; set; }
}
This class derives from DbContext provided by Entity Framework. The DbContextOptions injection in the constructor allows us to configure the database connection. Additionally, the Products property represents the “Products” table in the database.
In the Main() method of the Program class, while configuring services we need to make sure this DataContext instance is available throughout the application using ASP.NET Core’s dependency injection:
builder.Services.AddDbContext<DataContext>(options =>
{
    options.UseSqlite(builder.Configuration.GetConnectionString("DefaultConnectionString"));
});
Finally, we need to create and apply initial migrations in the Package Manager Console:
Add-Migration InitialCreate
Update-Database
With these steps completed, we now have an ASP.NET Core Web application. Next, let’s look at how to add and remove rows from ASP.NET dynamically.
Dynamic Row Addition in Razor Page Forms
Let’s create a Razor Page form:
<div class="row fw-bold">
    <div class="col-md-4">Name</div>
    <div class="col-md-4">Price</div>
    <div class="col-md-4">Action</div>
</div>

@foreach (var product in Model.Products)
{
    <div class="row my-1">
        <div class="col-md-4">@product.Name</div>
        <div class="col-md-4">@product.Price</div>
        <div class="col-md-4">
            <form method="post" asp-page-handler="RemoveRow">
                <input type="hidden" name="id" asp-for="Product.Id" value="@product.Id" />
                <button type="submit" class="btn btn-danger">
                    <i class="fas fa-trash"></i>
                </button>
            </form>
        </div>
    </div>
}
Here, we create a table-like structure to display a list of products, with the option to delete each product using a form submission.
The RemoveRow handler on the server will process the form submission and remove the corresponding product from the data store.
Now, let’s create a blank row that allows us to add a new Product record dynamically:
<form method="post" asp-page-handler="AddRow">
    <div class="row">
        <div class="col-md-4">
            <input asp-for="Product.Name" class="form-control" />
        </div>
        <div class="col-md-4">
            <input asp-for="Product.Price" class="form-control" />
        </div>
        <div class="col-md-4">
            <button type="submit" class="btn btn-success">
                <i class="fas fa-plus"></i>
            </button>
        </div>
    </div>
</form>
Now, in the page model of the Index.cshtml, let’s create a method OnPostAddRow() to add records dynamically:
public IActionResult OnPostAddRow()
{
    if (ModelState.IsValid)
    {
        _dataContext.Products.Add(Product);
        _dataContext.SaveChanges();
    }

    return RedirectToPage();
}
When we click on the “+” (add) button on the form, this method adds and saves the product to the database.
Let’s implement a similar method OnPostRemoveRow() to remove the product:
public IActionResult OnPostRemoveRow(int id)
{
    var product = _dataContext.Products.Find(id);

    if (product != null)
    {
        _dataContext.Products.Remove(product);
        _dataContext.SaveChanges();
    }

    return RedirectToPage();
}
Finally, let’s see the application in action:

On clicking the “+” button, the application executes the OnPostAddRow() method. This adds the product to the database table and the page refreshes to display the added product:
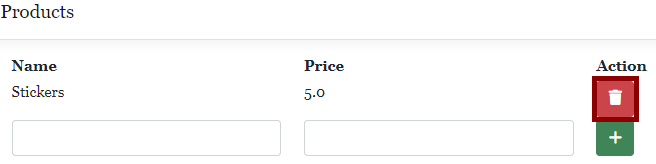
Clicking on the “trash” icon in front of the record removes the product from the database, which is reflected on the refreshed form. We can dynamically add or remove multiple products in a similar way.
Data Validation in Razor Page Forms
Now, we have a form to manage products. However, the form is open to all kinds of invalid data. We’d ideally want to validate the user input to keep the data clean and secure.
It’s also important to implement data validation to keep our application safe from SQL injection attacks.
Let’s add validations to the Product class using data annotations:
public class Product
{
    public int Id { get; set; }

    [Required(ErrorMessage = "Name is required.")]
    public string Name { get; set; }

    [Required(ErrorMessage = "Price is required.")]
    [Range(0.01, double.MaxValue, ErrorMessage = "Price must be greater than 0.")]
    public decimal Price { get; set; }
}
We enforce the Required annotation on both the Name and the Price properties. Thus, a user can’t leave them blank while adding a new row.
Additionally, we also want every Product object to have a valid price. We enforce this through the Range annotation. Hence, a user can’t give a negative or zero price to any product.
Let’s modify the Index.cshtml.cs page model to return the error messages if the ModelState is not valid:
public IActionResult OnPostAddRow()
{
    if (ModelState.IsValid)
    {
        _dataContext.Products.Add(Product);
        _dataContext.SaveChanges();

        return RedirectToPage();
    }

    Products = _dataContext.Products.ToList();

    return Page();
}
Here, in case we have errors in the ModelState, we don’t add the invalid product. Instead, we show the associated error messages to the user.
The data validations also add to user-friendliness. When a user enters invalid data, they instantly know what’s wrong and what to fix:

Conclusion
In this article, we learned about Razor Page forms in ASP.NET Core. We also saw how to dynamically add and remove rows from the form and implement data validations.
