

In this article, we are going to learn how to read a string from a .resx file. While doing this, we are also going to understand what is going on under the hood. Additionally, we will follow some of the best practices on how to manage resource files, and lastly, offer some advice at the end.
Before diving in, we must understand what a resource file is, its format, and its primary purpose.
What Is a .resx File?
For starters, following good practices, we should include resources used in a C# application: strings, images, sound files, and movies, in a specialized file, a resource file (.resx).
Resource files allow us to have more control over where resources are and how to manage them more efficiently.
Moreover, these resource files have many additional advantages:
- They allow access to resources in a strong-typed manner
- Centralize many kinds of resources in a single place, contributing to better management
- Compiling and linking them in the final binary allows for greater performance
- They facilitate the redistribution of changes to any resource, without the recompilation of the main application, by using additional assemblies containing only resources.
Adding Resources
Let’s create the main project we are going to use for our example, include our resource file, and create some resources in it. For our example, we only need a small console project, so we are going to create a clean one using the template Visual Studio already provides.
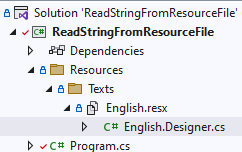
After this step is done, let’s add the resource file. Since it is a good practice to have our resources organized, we are going to create it under a folder named Resources\Texts.
Let’s see the steps:
- Right-clicking over the project’s name, a menu with several options will appear, we are going to select Add/New Folder and name it Resources
- Beneath this newly created folder, we are going to create another one that will hold our file. We right-click on this newly created folder and repeat the prior command, Add/New Folder, and name this new one as Texts
Right-clicking over the Texts folder will open a menu with several options, where we are going to select Add/New Item. In the following window that will appear, we are going to search for the resource file:

Let’s name this file as English.resx, and click Add to close the window.
By now, we should have our project structured:
Then, with our file in place, it’s time to fill it with some content. Let’s double-click on the file to open it and, in the window that will show up, create two entries:
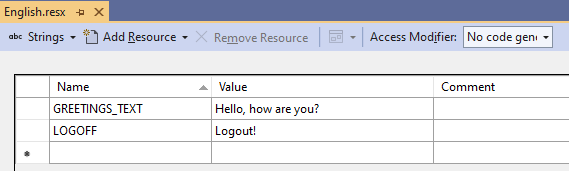
There! We have our project set up with the basics to start learning.
Read a String From a Resource File
Interestingly, it’s very easy to work with resource files, once we understand them. Also, Visual Studio gives us some help by generating some code for us. That’s exactly what we are going to cover next.
Understanding Designer Classes
ReadStringFromResourceFile.Resources.Texts.English class. Almost at the end, we can see GREETINGS_TEXT and LOGOFF properties, that expose the values associated with these names:internal static string GREETINGS_TEXT {
get {
return ResourceManager.GetString("GREETINGS_TEXT", resourceCulture);
}
}
internal static string LOGOFF {
get {
return ResourceManager.GetString("LOGOFF", resourceCulture);
}
}
Fetch a String Resource
We can take advantage of these Designer files to obtain any resource by simply writing ReadStringFromResourceFile.Resources.Texts.English.GREETINGS_TEXT. The same can be done to fetch the LOGOFF resource text.
By watching carefully this big path, used to reach the intended resource, we can deduce that ReadStringFromResourceFile indicates the namespace of our project, the Resources and Texts references the two folders we created earlier, and finally, the English is the name of the resource file itself.
What Is Happening Under the Hood?
If we open the English.Designer.cs file we can see the code generated by Visual Studio. To fetch the GREETINGS_TEXT string, for example, this generated class exposes a read-only property:
internal static string GREETINGS_TEXT {
    get {
        return ResourceManager.GetString("GREETINGS_TEXT", resourceCulture);
    }
}
When calling this property, the ResourceManager.GetString() function is invoked. This ResourceManager class is in turn declared in the same file as a read-only property, which returns an instance of the ResourceManager class, from the System.Resources namespace:
const string BASE_PATH = "ReadStringFromResourceFile.Resources.Texts.English";
internal static global::System.Resources.ResourceManager ResourceManager {
    get {
        if (object.ReferenceEquals(resourceMan, null)) {
            global::System.Resources.ResourceManager temp
                = new global::System.Resources.ResourceManager(BASE_PATH, typeof(English).Assembly);
            resourceMan = temp;
        }
        return resourceMan;
    }
}
We can see that this property implements the Singleton pattern and uses a class that already exists in the System.Resources. This System.Resources.ResourceManager exposes some methods that allow the user to retrieve any resource, given the BASE_PATH to reach it and the assembly where it resides.
Testing the Final Resource Application
Let’s create an example that reads strings from our resource file, by using two different methods:
var rmEnglish
    = new ResourceManager(@"ReadStringFromResourceFile.Resources.Texts.English",
    Assembly.GetExecutingAssembly());
Console.WriteLine(rmEnglish.GetString("GREETINGS_TEXT"));

Console.WriteLine(English.GREETINGS_TEXT);
In the first line, we created an instance of ResourceManager class, from the System.Resources namespace. In this case, we have to pass the path where the text entry can be reached and a reference to the assembly where this resource file resides. Because our namespace is ReadStringFromResourceFile, then comes the Resources folder, then the Texts folder, and finally the name of the resource file, the final path must be ReadStringFromResourceFile.Resources.Texts.English.
On the second Console.WriteLine() statement, we are referecing the resource directly, without all the fuss of creating a class to manage it.
Let’s run our code:
Hello, how are you?
Hello, how are you?
The output shows us the two strings with the resource name GREETINGS_TEXT.
Best Practices to Keep Resource Files Organized
Now, when it comes to keeping resources organized and following best practices, a few guidelines stand out:
- We should never hardcode any strings when presenting information to the user, we should put them in resource files
- We should use several resource files when localizing an application, each for every language we intend to use
- The names we give to each resource should be clear about its purpose, just like when creating variable names
- We should use uppercase when naming our resources.
Conclusion
