

In this article, we are going to talk about creating .NET Project Templates.
Let’s get started.
What are .NET Project Templates?
We can use .NET Project templates to create ready-to-run projects that make it easy to start with a working set of code. The .NET SDK comes with a set of default templates to cover the essential project types that we may require like the Console Apps, Class Libraries, ASP.NET Core apps, etc.
To see all the available templates, we can use the dotnet new command with the --list option:
dotnet new --list
This will list all built-in templates as well as the custom ones if we have installed any.
However, sometimes we may need to create our project templates for specific contexts. For instance, an organization may have a requirement that all projects that they create need to follow a specific structure and format. The .NET CLI includes a template engine, which can create projects from a specified template. We are going to see how we can create our project template to use with .NET CLI and Visual Studio.
How to Create a .NET Project Template?
For that, first, let’s prepare a project.
We can start by creating a standard ASP.NET Core Web API project and then customizing it.
That said, let’s create a new project using dotnet CLI:
dotnet new webapi -o codemazeapi
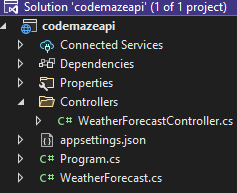
Since we specify the output folder name as codemazeapi, this will create a new folder named codemazeapi and an ASP.NET Core Web API project named codemazeapi inside it. The project will have the structure of a standard ASP.NET Core Web API:
Now we are going to customize this project a bit. First, let’s remove the WeatherForecastController and the WeatherForecast class. Then let’s add a ValuesController inside the Controller folder with just a GET action method:
public class ValuesController : ControllerBase
{
    public IActionResult Get()
    {
        return Ok("Hi from Code-Maze Web API Template");
    }
}
Finally, in the launchSettings.json file, let’s modify the launchUrl value to api/values. This will make sure the application hits this controller endpoint on start-up.
Note that in this example we are working with .NET 6. If we use a different version, the default templates and source files could be a little different, but we can always customize those to match this example.
Our customized Web API project is ready. The next step is to create a template out of it.
Creating Template from Existing .NET Project
For creating a template from an existing project, we need to create a new folder .template.config in the root of the project and add a template.json file inside it. This file is the most important part of building our custom template. It contains all the key information required for transforming our .NET project into a project template:
{
  "$schema": "http://json.schemastore.org/template",
  "author": "Muhammed Saleem",
  "classifications": [ "Web", "WebAPI", "C#" ],
  "identity": "CodeMazeTemplates.WebAPI",
  "name": "Code-Maze Web API Template",
  "shortName": "codemazeapi",
  "tags": {
    "language": "C#",
    "type": "project"
  }
}
$schema– It defines the schema for the JSON file.author– defines the author of the templateclassifications– This is used to classify and group the templates. It becomes easier to search and find templates based on the values we provide for this propertyidentity– It uniquely identifies the templatename– the name of the template when it is listedshortName– a short name that we can use while creating a new project from the template usingdotnet newtags– defines a set of tags for the project. Here we specify that it is aprojecttemplate in theC#language
With this, our custom project template is ready. The next step is to install it.
For installing the project template locally, we have to run the dotnet new with the --install or -i command from the project root directory:
dotnet new -i .
Notice that we used . argument with the install command to indicate the template is located in the current folder. If our template location is different, we need to specify that folder path instead.
This will install the template package locally:
The following template packages will be installed:
   C:\code-maze-repo\templates\codemazeapi

Success: C:\code-maze-repo\templates\codemazeapi installed the following templates:
Template Name               Short Name   Language  Tags
--------------------------  -----------  --------  -------------
Code-Maze Web API Template  codemazeapi  [C#]      Web/WebAPI/C#
Now if we run the dotnet new --list command, it will list our custom template along with the .NET default templates:
Template Name                                 Short Name           Language    Tags
--------------------------------------------  -------------------  ----------  -------------------------------------
ASP.NET Core Empty                            web                  [C#],F#     Web/Empty
ASP.NET Core gRPC Service                     grpc                 [C#]        Web/gRPC
ASP.NET Core Web API                          webapi               [C#],F#     Web/WebAPI
ASP.NET Core Web App                          razor,webapp         [C#]        Web/MVC/Razor Pages
ASP.NET Core Web App (Model-View-Controller)  mvc                  [C#],F#     Web/MVC
ASP.NET Core with Angular                     angular              [C#]        Web/MVC/SPA
ASP.NET Core with React.js                    react                [C#]        Web/MVC/SPA
ASP.NET Core with React.js and Redux          reactredux           [C#]        Web/MVC/SPA
Blazor Server App                             blazorserver         [C#]        Web/Blazor
Blazor WebAssembly App                        blazorwasm           [C#]        Web/Blazor/WebAssembly/PWA
Class Library                                 classlib             [C#],F#,VB  Common/Library
Code-Maze Web API Template                    codemazeapi          [C#]        Web/WebAPI/C#
Console App                                   console              [C#],F#,VB  Common/Console
...
We have created our .NET project template and installed it locally. The next step is to create a project using that template.
Creating New Projects Using a Custom Template
For creating a new project using our template, we can use the dotnet new command:
dotnet new codemazeapi
This will create a new project based on the codemazeapi template.
Note that the project and solution have the same name as the template. Similarly, it uses the same namespace as defined in the template. Additionally, we can notice that this command did not create a project folder, it just creates the project in the same folder where we ran the above command. In the next section, we’ll look at how to customize all these.
Customizing .NET Project Templates
Even though we have created a custom project template and created a new project from that template, right now it doesn’t do anything exciting other than copying the source files from the original project folder. However, it is possible to customize the template by modifying the template.json file and providing additional parameters while creating projects. Let’s take a look at a few parameters that come out of the box with .NET templates.
The Output Parameter
While creating new projects using dotnet new, it is possible to specify an output folder by using the -o parameter:
dotnet new codemazeapi -o MyFirstAPI
This will create a new output folder and place the project files inside it. It is a good way to organize projects into separate folders, but the rest of the project contents remain as it is.
The SourceName Parameter
Now let’s take a look at the sourceName parameter. This represents the name of the project and the namespace that it uses. Once we specify this in the template.json file, it acts as a placeholder and we can override that value while creating projects using the -n parameter:
{
...
  "shortName": "codemazeapi",
  "sourceName": "codemazeapi",
  "tags": {
    "language": "C#",
    "type": "project"
  }
}
After making any changes to the template, we need to uninstall and reinstall the template to update it with the latest changes.
For uninstalling the template, we can use dotnet new -u command. Along with that, we need to either specify the folder of the template or use the . argument if we are running this command from the template’s root folder:
dotnet new -u .
This will uninstall the template. We can install it once again using the dotnet new -i as we did in the earlier section.
After installing the updated template, let’s create a new project once again. This time, let’s specify the project name argument as well:
dotnet new codemazeapi -n MySecondAPI
This creates a new project as before, but this time we can see it renames the project and solution file with the name that we specified:
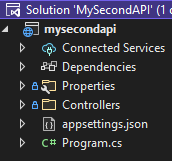
Additionally, we can see that the namespace is also updated with the name that we provided.
However, in this case, we can see that the template creates a new project in the folder in which we ran the command and did not create a separate project folder.
To continue on, let’s see how we can create a new project folder based on the project name.
The PreferNameDirectory Property
The preferNameDirectory parameter, once set to true, will match the output folder with the name of the project:
{
...
  "shortName": "codemazeapi",
  "sourceName": "codemazeapi",
  "preferNameDirectory":true,
  "tags": {
    "language": "C#",
    "type": "project"
  }
}
Let’s uninstall and install the template once again to update it with the latest changes. After that let’s create a new project once again using the updated template:
dotnet new codemazeapi -n MyThirdAPI
This time we can see that it created a new output folder matching the project name and then creates the project files inside it. This is pretty cool and almost matches the capabilities that an inbuilt .NET project template provides.
Creating Custom Parameters for .NET Project Templates
It is possible to configure the templates to accept custom parameters and customize the projects based on that. In this section, we are going to see how to implement that.
For defining custom parameters, we can use the symbols property :
{
...
  "symbols":{
    "domain": {
        "type": "parameter",
        "description": "Your domain.",
        "defaultValue": "mydomain.com",
        "replaces":"{DOMAIN}"
    }
  }
}
In this example, we define just one parameter called domain.
Each parameter has these properties:
type– This defines the type of symbol, which is theparameterin this casedescription– Provides a description for the parameterdefaultValue– If the user does not provide a value for the parameter, it takes this as the default valuereplaces– This is a placeholder that we can specify in the template’s source code. While creating projects, the templating engine will replace all instances of this value with user-specified or default values
Along with that, let’s modify the controller to include the {DOMAIN} placeholder:
public class ValuesController : ControllerBase
{
    public IActionResult Get()
    {
        return Ok("Hi from {DOMAIN} Web API Template");
    }
}
To see the parameter in action, let’s uninstall and install the template once again.
For checking the available parameters, we can use the help -h argument:
dotnet new codemazeapi -h
We can see that the custom parameter is now listed as an option.
Code-Maze Web API Template (C#)
Author: Muhammed Saleem
Options:
  -d|--domain  Your domain.
               string - Optional
               Default: {DOMAIN}
Now let’s create a new project and provide the parameter value :
dotnet new codemazeapi -n MyFourthAPI --domain code-maze.com
This will generate a new project and we can see that it replaces the domain placeholder with the value that we provided:
public IActionResult Get()
{
    return Ok("Hi from code-maze.com Web API Template");
}
Of course, if we do not provide the parameter, it will use the default value:
public IActionResult Get()
{
    return Ok("Hi from mydomain.com Web API Template");
}
Adding Optional Contents to a .NET Project Template
Our next step is to make some parts of the template optional and to give users the ability to choose it.
Let’s add a new method to the ValuesController and make it optional:
#if (EnableContactInfo)
        [Route("about")]
        public IActionResult About()
        {
            return Ok("visit us at https://code-maze.com/about/");
        }
#endif
Here we are using the C# #if preprocessor directive to define an optional section in the template by using the parameter EnableContactInfo. Similarly, while modifying other file types, we need to use the supporting syntax.
Along with that, let’s add the EnableContactInfo parameter in template.json file:
{
...
  "symbols":{
    "domain": {
        "type": "parameter",
        "description": "Your domain.",
        "defaultValue": "mydomain.com",
        "replaces":"{DOMAIN}"
    },
    "EnableContactInfo": {
        "type": "parameter",
        "dataType":"bool",
        "defaultValue": "false"
    }
  }
}
We define the datatype as bool to indicate that this accepts a true or false value.
Now let’s add a new controller and see how to make it optional.
To do that, we are going to add a ContactController class:
public class ContactController : ControllerBase
{
    public IActionResult Get()
    {
        return Ok("visit us at https://code-maze.com/contact/");
    }
}
Then let’s modify the template.json file to specify that ContactController should be optional based on EnableContactInfo parameter:
{
...
  "sources": [
    {
      "modifiers": [
        {
          "condition": "(!EnableContactInfo)",
          "exclude": [
            "Controllers/ContactController.cs"
          ]
        }
      ]
    }
  ]
}
Here we add a modifier to the sources element which excludes the ContactController if the EnableContactInfo parameter is set to false. This is a simple condition, but we can build complex logic using operators like &&, ||, !, <,>, =, etc. if required.
Now let’s uninstall and install the template for reflecting it with the latest changes.
After that, let’s create a new project using the template:
dotnet new codemazeapi -n MyFinalAPI --domain code-maze.com --EnableContactInfo true
Note that we set the EnableContactInfo argument to true. This will create the project with two controllers. Additionally, we can see that the ValuesController has two endpoint methods.
However, If we set the EnableContactInfo to false while creating the project, it will generate a project with just one controller and the ValuesController will have just one endpoint method.
Conclusion
In this article, we have learned how to build a custom .NET template and create projects out of it. Additionally, we have discussed customizing the template further by introducing parameters and optional contents.

Hello, I have tried implementing the logic above but encountered some issues. When creating a new web api using the template, only the folder name changes to my preferred name. The rest of the files still has the template name.
Thank you so much! Please post an article on how to create a custom template for a solution with a library project and web mvc project for .NET 6
Thanks again, your article helped me a lot!
Glad to know that this article helped you! Will definitely add that topic to our list.
Thank you. I will keep an eye on the notifications for that article. I am creating a custom template that contains a solution with 2 projects inside: An MVC web application and a Class library all on .NET 6. So any insights are always welcome.
i have a question: Is it possible to create also a folder structure using the custom template? So for example I want to have the solution at a parent folder and the projects in subfolders and so on?
Here is a reference on how to Create multi-project templates and an example with Example with solution folders.
Hope this helps.