
In this article, we are going to talk about how to create and publish a NuGet package from .NET Class Library using .NET CLI.
Let’s get going.
NuGet Workflow
Most of us working on .NET projects might be already familiar with NuGet and would have added NuGet references to our projects. However, not everyone is familiar with the NuGet ecosystem and the flow of packages between Creators, Host, and Consumers. NuGet, being the Microsoft recommended way of sharing .NET code, defines how to create, host, and consume the packages and provides the essential tools required for that.

By using NuGet, package creators can easily wrap up the class libraries and publish them, which provides an excellent way to share the code with other developers. Under the hood, a NuGet package is a zip file with the .nupkg extension that contains the compiled assemblies (DLLs) and their dependencies along with a manifest that includes information about the package.
While publishing NuGet packages, we can either host them publicly on the nuget.org repository or set up a private NuGet feed within an organization or on the cloud for a limited set of users. A host acts as the point of connection between package creators and package consumers.
It is possible to represent the NuGet workflow between the Creators, Host, and Consumers using a simple diagram:
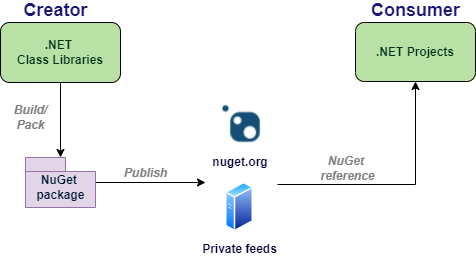
The essential NuGet tools are included with .NET Core SDK and most modern Visual Studio workloads. That said, we can always install the NuGet client tools separately in case they are not present in the system. Furthermore, while consuming the packages, NuGet maintains a reference of packages used in a project, which gives us the ability to restore and update those packages at any time.
Preparing a .NET Class Library Project
Now, let’s start by creating a new CodeMaze.Utilities.TemperatureConverter .NET class library project. We are going to add a Converter utility class and define the methods to convert the temperature between Fahrenheit and Degree Celsius:
public static class Converter
{
    public static double ToFahrenheit(double degreeCelciusTemp)
    {
        return (degreeCelciusTemp * 9 / 5) + 32;
    }

    public static double ToDegreeCelcius(double fahrenheitTemp)
    {
        return (fahrenheitTemp - 32) * 5 / 9;
    }
}
Our class library is ready. The next step is to package it using NuGet.
Building a NuGet Package
For creating a NuGet package, first, we need to add the package metadata to the project file.
We can include the metadata information inside the PropertyGroup tag of the .csproj file:
<PropertyGroup>
  <TargetFramework>net6.0</TargetFramework>
  <ImplicitUsings>enable</ImplicitUsings>
  <Nullable>enable</Nullable>
  <PackageId>CodeMaze.Utilities.TemperatureConverter</PackageId>
  <Version>1.0.0</Version>
  <Authors>Muhammed Saleem</Authors>
  <Company>Code-Maze</Company>
  <PackageTags>Temperature,Converter</PackageTags>
  <Description>This package will help in converting temperature between Fahrenheit and Degree Celsius</Description>
</PropertyGroup>
When defining the metadata, the PackageId tag should be unique across the host. While we can use Version tag for tracking changes in each update, Authors, Company, and Description are informational tags and can help in identifying the package when people search for it. Similarly, the PackageTags helps in defining some tags for the package and classifying them.
After modifying the .csproj file, we can use the dotnet pack command to build and pack the project.
This will create a NuGet package in the bin folder with the .nupkg extension, which is nothing but a zip file that bundles the assembly and all its dependencies. The metadata information is included in a separate file with the .nuspec extension. Of course, if we want to create the package in another folder instead of bin, we can use the --output or -o argument and specify the custom output directory.
If we want to automatically package the project every time we build it, we can set the GeneratePackageOnBuild property to true as well in the .csproj file:
<GeneratePackageOnBuild>true</GeneratePackageOnBuild>
We have seen how to package a class library project. Next, we are going to learn how to publish a NuGet package.
Steps to Publish a NuGet Package
For publishing a package to nuget.org, first we need to register for a nuget.org account and acquire the API Key.
Creating the API Key
After registering and signing into the nuget.org portal, we need to navigate to the API Keys section (under the profile section) and use the Create option to create a new API key. While creating a new API Key, we need to provide some details:
Key Name– We need to provide a name for the API keyExpiry– This indicates the expiry period for the keyPackage Owner– If multiple users have access to our packages, we can use this selection to indicate who should be the package owner
Additionally, there is an option to select scopes and packages.
Scoping the API Key
By using scopes, we can create separate API keys for different purposes. For instance, we can scope each key to specific operations like pushing new packages and updates, pushing just the updates for a single package, delisting a package, etc.
In this example, let’s leave the default values for Select Scopes which will enable the key to push new packages as well as updates to an existing package.
Associating Packages with the Key
To select which packages to associate with a key, we can either use a Glob Pattern, select Available Packages, or use a combination of both. By using a glob pattern, we can replace any sequence of characters with '*'. For instance, we can use * to select all packages or abc.* to select any package whose PackageId begins with abc.
In this example, let’s provide the Glob Pattern as *, which will associate the API Key with all packages in our NuGet account.
After providing these details, we can create the API key by clicking on the Create button.
Once we create a new API key, it is a good practice to copy and store the key somewhere safe as it is not possible to retrieve it later. Also, we should keep a key a secret because if someone gets access to it, they can use it to manage our packages. However, we can always delete or regenerate a key if we think it is compromised.
Pushing the Package
For pushing a package, we can execute the dotnet nuget push command from the folder containing the package. Along with this, we have to pass the package name, api-key, and source as arguments:
dotnet nuget push CodeMaze.Utilities.TemperatureConverter.1.0.0.nupkg --api-key PASTE_YOUR_API_KEY_HERE --source https://api.nuget.org/v3/index.json
Since we specify the source as nuget.org URL, this will push our package to nuget.org. For pushing the packages to a private feed, we have to specify the corresponding URL as a source.
Once we publish a package, it will take some time for the validation and indexing to complete. Our package will become active, start appearing in search results, and will be available for installation only after it completes this step. Additionally, we will receive an email once the validation and indexing are complete.
Handling Publish Errors
While publishing the packages, we may encounter a few errors in some cases. One of the errors might be if we provide the identifier name that already exists in the NuGet host. In this case, we just need to provide a different identifier.
Similarly, sometimes we forget to update the version number while pushing an update to an already existing package. In such cases, we just need to change the version number. Also, in some cases, the API key might be invalid or expired. In that scenario, we can regenerate the API key or create a new one.
In all such cases, once we make the necessary corrections, we just need to build and pack the project and push it once again.
Consuming a NuGet Package
Once our package is published, anyone can use it by adding the NuGet reference to their projects using the dotnet add command:
dotnet add package CodeMaze.Utilities.TemperatureConverter --version 1.0.0
Additionally, the package will start listing in the searches as well and anyone can now search for and install it:
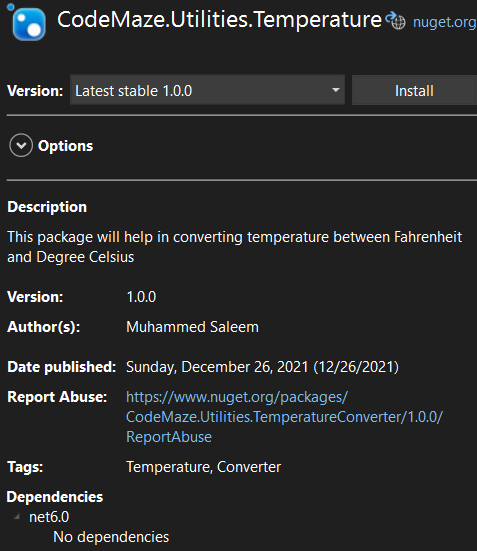
We can see all the information about the package like its description, version, author, tags, etc. when we search for it. Additionally, if our package has some dependencies, it will show that as well. In this case, we just have a dependency on .NET 6.
Once we add this package to a project as NuGet reference, we can start using its capabilities:
using CodeMaze.Utilities.TemperatureConverter;

var farenHeitTemp = 65;
Console.WriteLine(Converter.ToDegreeCelsius(farenHeitTemp));
That’s all it takes.
Managing a NuGet Package
We can manage all the packages that we publish to nuget.org from our profile section. From the Manage Packages part of the profile section, we can choose the package that we wish to manage. For instance, if we don’t want to list this package in search results anymore, we can unlist it by unchecking that option in the Listing section:
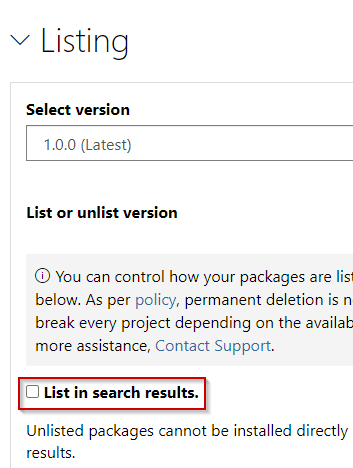
Once we save this change, the package will not be listed in search results and users will not be able to install it anymore.
Conclusion
In this article, we’ve learned about how to create a NuGet package from a .NET class library project. Also, we’ve talked about how to publish a NuGet package into nuget.org and manage it.