

In this article, we will enable Two-Factor Authentication with Web API and Angular using Google Authenticator. We can use the Google Authenticator app to get a One-Time Password (OTP) value to enter during login.
The initial steps of this article have been taken from the Angular Security with ASP.NET Core Identity series. You may refer to this series for more details and explanations.
We will start with creating an ASP.NET Core Web API project that will host our backend. Inside this project, we will also create the Angular frontend project. Moreover, you can check on the Angular series for a complete account of how to set up an Angular project with ASP.NET Core.

Let’s start.
Preparing the Environment
To begin with, let’s install the ASP.NET Core Identity library. We will find it in NuGet under the Microsoft.AspNetCore.Identity.EntityFramework name.
Then, we create a new folder named Models. Inside this folder, let’s create a new User class that inherits from the IdentityUser class:
public class User : IdentityUser
{
    public string? FirstName { get; set; }
    public string? LastName { get; set; }
}
Let’s proceed with adding a context class:
public class RepositoryContext : IdentityDbContext<User>
{
    public RepositoryContext(DbContextOptions options)
    : base(options)
    {
    }

    protected override void OnModelCreating(ModelBuilder modelBuilder)
    {
        base.OnModelCreating(modelBuilder);
    }
}
Next, let’s modify the Program.cs file to register ASP.NET Core Identity in our project:
var builder = WebApplication.CreateBuilder(args);
var allowSpecificOrigins = "two_factor_auth_cors";

builder.Services.AddCors(options =>
{
    options.AddPolicy(allowSpecificOrigins,
        builder =>
          builder.WithOrigins("http://localhost:4200", "https://localhost:4200")
        .AllowAnyMethod()
        .AllowAnyHeader()
        .AllowCredentials());
});

builder.Services.AddDbContext<RepositoryContext>(opts =>
    opts.UseSqlServer(builder.Configuration.GetConnectionString("sqlConnection")));

builder.Services.AddIdentity<User, IdentityRole>()
    .AddEntityFrameworkStores<RepositoryContext>()
    .AddDefaultTokenProviders();

builder.Services.AddAutoMapper(typeof(MappingProfile));
builder.Services.AddControllers();

var app = builder.Build();
app.UseCors(allowSpecificOrigins);
app.UseHttpsRedirection();
app.UseAuthorization();
app.MapControllers();
app.Run();
Program.cs is also the place to register the Context and the AutoMapper, as well as add CORS support.
Finally, let’s create a migration for all ASP.NET Core Identity tables in our database:
PM> Add-Migration IdentityTablesCreation
PM> Update-Database
Two-Factor Authentication Options
Upon successful registration, the user will move to the login page. The user will initially log in without Two-Factor Authentication. Then, after logging in, the user can go to the settings page to set up the Two-Factor Authentication with Google Authenticator.
Of course, there are different approaches how to handle TFA. One way could be to make TFA mandatory for logging in. This way, we would require the user to set up TFA at the same time as registration.
In this article, we choose to make TFA optional. The user should go to the TFA setup page and manually enable it.
Here, we will not discuss the registration process as it is not related to the Two-Factor Authentication process. However, you may check the article’s code on GitHub, especially the AccountsController file in ASP.NET Core and the RegistrationComponent file in Angular for the implementation. Moreover, you can have a look at our article on User registration for a detailed account.
Here is a screenshot of the registration page:

Now, let’s start with the Two-Factor Authentication setup.
Two-Factor Authentication Using Google Authenticator in Angular Frontend
First, let’s add a HomeComponent that is going to be a simple home page containing a link to the settings page:
<h1>Two factor authentication with Google Authenticator</h1>
<p>
    <a routerLink="/tfa-setup">Press here to set up two-factor authentication</a>
</p>
Then, let’s add the routing entry for this component in the app-routing.module.ts file:
const routes: Routes = [
  { path: '', component: HomeComponent  },
  { path: 'register', component: RegisterUserComponent  }
}
To set up Two-Factor Authentication (TFA) with Google Authenticator, we create a TfaSetupComponent component.
The TFA setup process consists of two steps:
- The TFA setup page displays a QR code that the user must scan using the Google Authenticator app. Alternatively, the user may type the displayed authenticator code into the app.
- The user enters the code provided by Google Authenticator in the corresponding text box.
The user can always disable TFA by pressing the respective button on the page.
We will use the <qr-code> Angular component to display the QR Code. Let’s install it via NPM:
npm install angular2-qrcode
We should not forget to import it in the app.module.ts file:
imports: [
  ...
  QRCodeModule,
  ...
]
The template of the TfaSetupComponent consists of two blocks. The first part handles Two-Factor Authentication deactivation:
<h1>Two-Factor Authentication with Google Authenticator - Setup</h1>
<div *ngIf="isLoading" class="spinner-border" role="status"></div>
<div *ngIf="showError" class="alert alert-danger" role="alert">
{{errorMessage}}
</div>
<div *ngIf="!isLoading">
<div *ngIf ="tfaEnabled">
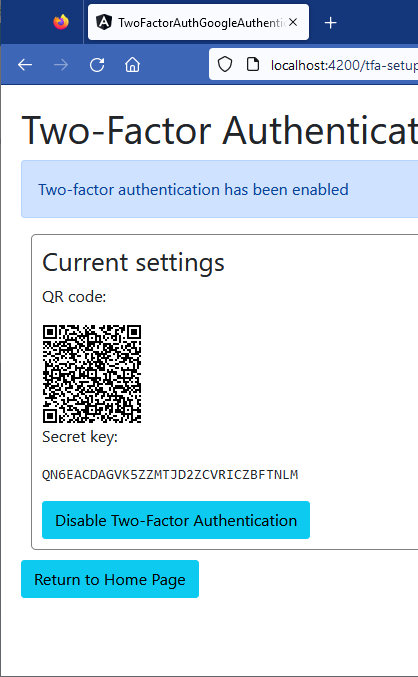
<p class="alert alert-primary">Two-factor authentication has been enabled</p>
<div class="box">
<h2>Current settings</h2>
<p>QR code:</p>
<qr-code [value]="qrInfo"></qr-code>
<p>Secret key:</p>
<pre>{{authenticatorKey}}</pre>
<button class="btn btn-info" (click)="disableTfa()">Disable Two-Factor Authentication</button>
</div>
</div>
The second part handles Two-Factor Authentication activation:
<div *ngIf ="!tfaEnabled">
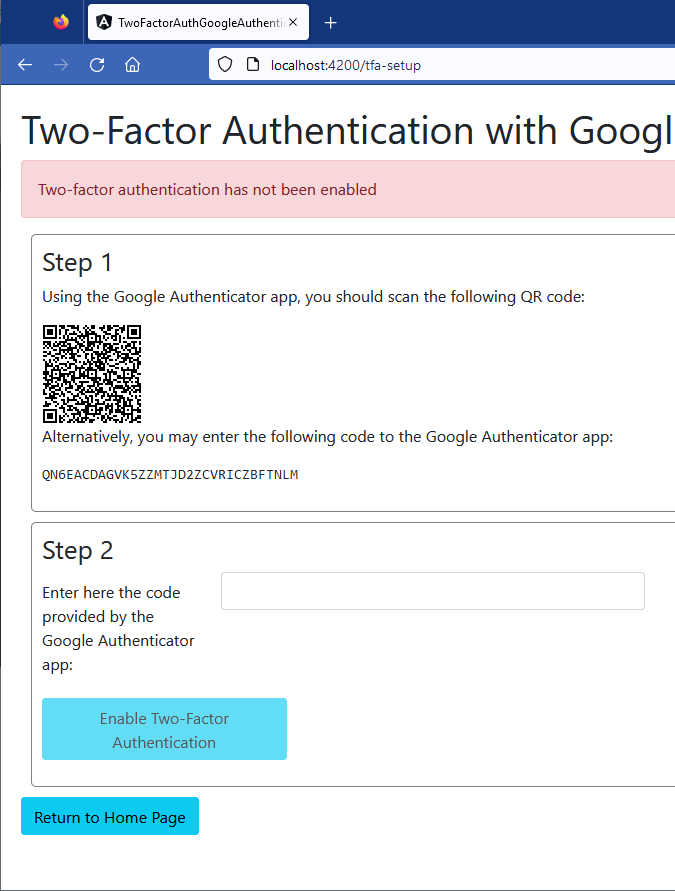
<p class="alert alert-danger">Two-factor authentication has not been enabled</p>
<div>
<div class="box">
<h2>Step 1</h2>
<p>Using the Google Authenticator app, you should scan the following QR code:</p>
<qr-code [value]="qrInfo"></qr-code>
<p>Alternatively, you may enter the following code to the Google Authenticator app:</p>
<pre>{{authenticatorKey}}</pre>
</div>
<div class="box">
<h2>Step 2</h2>
<div>
<form [formGroup]="tfaForm" (ngSubmit)="enableTfa(tfaForm.value)">
<div class="mb-3 row">
<label for="code" class="col-form-label col-sm-2">
Enter here the code provided by the Google Authenticator app:
</label>
<div class="col-md-5">
<input type="text" id="code" formControlName="code" class="form-control" />
</div>
<div class="col-md-5">
<em *ngIf="validateControl('code') && hasError('code', 'required')">
Code is required
</em>
</div>
</div>
<div class="mb-3 row">
<div class="col-md-3">
<button type="submit" class="btn btn-info" [disabled]="!tfaForm.valid">
Enable Two-Factor Authentication
</button>
</div>
</div>
</form>
</div>
</div>
</div>
</div>
<a href="/" class="btn btn-info" >Return to Home Page</a>
</div>
You can check the full component template here.
Now, let’s implement the component’s class. During initialization, we retrieve the authenticator key from the backend API:
import { HttpErrorResponse } from '@angular/common/http';
import { Component, OnInit } from '@angular/core';
import { FormControl, FormGroup, Validators } from '@angular/forms';
import { TfaSetupDto } from 'src/app/models/TfaSetupDto';
import { AuthenticationService } from 'src/app/shared/services/authentication.service';

@Component({
  selector: 'app-tfa-setup',
  templateUrl: './tfa-setup.component.html',
  styleUrls: ['./tfa-setup.component.css']
})
export class TfaSetupComponent implements OnInit {

  tfaForm: FormGroup  = new FormGroup({
    code: new FormControl("", [Validators.required])
  });

  isLoading: boolean = true;
  tfaEnabled: boolean = false;
  showError: boolean = false;
  errorMessage: string = "";
  qrInfo: string = "";
  authenticatorKey: string = "";

  constructor(public authService: AuthenticationService) { }

  ngOnInit(): void {
    let email = localStorage.getItem("email") ?? '';
    this.authService.getTfaSetup(email)
      .subscribe((response:TfaSetupDto) => {
        this.tfaEnabled = response.isTfaEnabled ?? false;
        this.qrInfo = response.formattedKey ?? '';
        this.authenticatorKey = response.authenticatorKey ?? '';
        this.isLoading = false;
      }
    );
  }

  validateControl = (controlName: string) => {
    return this.tfaForm.get(controlName)?.invalid && this.tfaForm.get(controlName)?.touched
  }

  hasError = (controlName: string, errorName: string) => {
    return this.tfaForm.get(controlName)?.hasError(errorName)
  }
When the user chooses to disable TFA, we call the disableTFA() function:
disableTfa = () => {
  let email = localStorage.getItem("email") ?? '';
  this.authService.disableTfa(email)
  .subscribe({
    next: (res:any) => {
      this.tfaEnabled = false;
    },
    error: (err: HttpErrorResponse) => {
      this.showError = true;
      this.errorMessage
        = "Two-factor authentication was not disabled for this account (Message: " + err.message + ")";
    }})
}
Also, we use the enableTFA() function to enable Two-Factor Authentication:
  enableTfa = (tfaFormValue: any) => {
    const tfaForm = {... tfaFormValue };

    const tfaSetupDto: TfaSetupDto = {
      email: localStorage.getItem("email") ?? '',
      code: tfaForm.code
    }

    this.authService.postTfaSetup(tfaSetupDto)
    .subscribe({
      next: (res:any) => {
        this.tfaEnabled = true;
      },
      error: (err: HttpErrorResponse) => {
        this.showError = true;
        this.errorMessage
          = "Two-factor authentication was not activated for this account (Message: " + err.message + ")";
      }})
  }
}
The key will be available in two forms:
- Formatted, for the creation of the QR code
- Unformatted, so that the user may enter it manually if needed
We will see how we can create both versions when we will develop the backend functionality later on.
Next, let’s add more functions to the AuthenticationService class:
public getTfaSetup = (email: string) => {
  return this.http.get<TfaSetupDto> (`${environment.apiUrl}/accounts/tfa-setup?email=${email}`);
}

public postTfaSetup = (body: TfaSetupDto) => {
  return this.http.post<TfaSetupDto> (`${environment.apiUrl}/accounts/tfa-setup`, body);
}

public disableTfa = (email: string) => {
  return this.http.delete<TfaSetupDto> (`${environment.apiUrl}/accounts/tfa-setup?email=${email}`);
}
As shown above, our component calls postTfaSetup() and disableTfa() functions from the authentication service when the user chooses to enable or disable TFA support respectively.
Now we need to implement the functionality for TFA set up in the backend.
Two-Factor Authentication using Google Authenticator in ASP.NET Core Backend
Let’s start with creating the authenticator key with the UserManager object:
[HttpGet("tfa-setup")]
public async Task<IActionResult> GetTfaSetup(string email)
{
    var user = await _userManager.FindByNameAsync(email);

    if (user == null)
        return BadRequest("User does not exist");

    var isTfaEnabled = await _userManager.GetTwoFactorEnabledAsync(user);

    var authenticatorKey = await _userManager.GetAuthenticatorKeyAsync(user);
    if (authenticatorKey == null)
    {
        await _userManager.ResetAuthenticatorKeyAsync(user);
        authenticatorKey = await _userManager.GetAuthenticatorKeyAsync(user);
    }
    var formattedKey = GenerateQrCode(email, authenticatorKey);

    return Ok(new TfaSetupDto
        { IsTfaEnabled = isTfaEnabled, AuthenticatorKey = authenticatorKey, FormattedKey = formattedKey });
}
Then, let’s add the GenerateQRCode() method to create the formatted key that the frontend will use to display the QR Code:
private string GenerateQRCode(string email, string unformattedKey)
{
    return string.Format(
        AuthenticatorUriFormat,
        _urlEncoder.Encode("Code Maze Two-Factor Auth"),
        _urlEncoder.Encode(email),
        unformattedKey);
}
In order for Google Authenticator to successfully scan the QR Code, let’s format its URI in a specific way:
private const string AuthenticatorUriFormat = "otpauth://totp/{0}:{1}?secret={2}&issuer={0}&digits=6";
Next, let’s define the TfaSetupDto class that will transmit the formatted and unformatted keys:
public class TfaSetupDto
{
    public string Email { get; set; }
    public string Code { get; set; }
    public bool IsTfaEnabled { get; set; }
    public string? AuthenticatorKey { get; set; }
    public string? FormattedKey { get; set; }
}
After the user has scanned the QR code and has entered the code provided by the Google Authenticator app, the frontend will post this code to the backend:
[HttpPost("tfa-setup")]
public async Task<IActionResult> PostTfaSetup([FromBody] TfaSetupDto tfaModel)
{
    var user = await _userManager.FindByNameAsync(tfaModel.Email);

    var isValidCode = await _userManager
        .VerifyTwoFactorTokenAsync(user,
          _userManager.Options.Tokens.AuthenticatorTokenProvider,
          tfaModel.Code);

    if (isValidCode)
    {
        await _userManager.SetTwoFactorEnabledAsync(user, true);
        return Ok(new TfaSetupDto { IsTfaEnabled = true} );
    }
    else
    {
        return BadRequest("Invalid code");
    }
}
Here, let’s verify that the code is correct, again with the use of the UserManager object. If verification is successful, UserManager will enable Two Factor Authentication for the specific user.
In cases where the user chooses to disable TFA, UserManager performs this action too:
[HttpDelete("tfa-setup")]
public async Task<IActionResult> DeleteTfaSetup(string email)
{
    var user = await _userManager.FindByNameAsync(email);

    if (user == null)
    {
        return BadRequest("User does not exist");
    }
    else
    {
        await _userManager.SetTwoFactorEnabledAsync(user, false);
        return Ok(new TfaSetupDto { IsTfaEnabled = false } );
    }
}
Now, when the user uses the TFA setup page for the first time he is prompted to scan the QR Code and then add the Google Authenticator code:
When the Two-Factor Authentication is enabled, we review the current settings and we can disable TFA if we want:
Login Using Google Authenticator in ASP.NET Core Backend
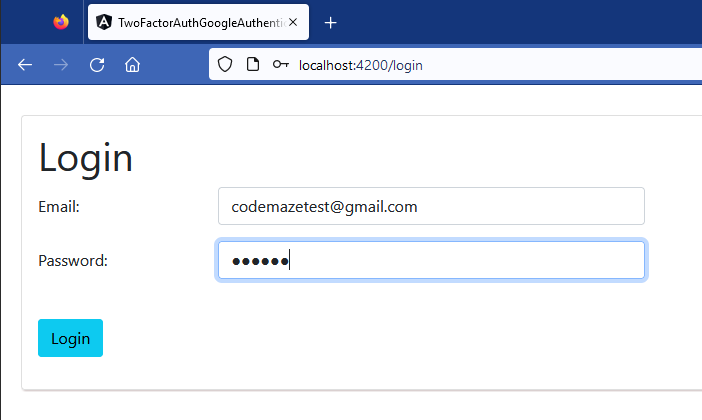
Now it is time to proceed with the login process using Two-Factor Authentication with Web API and Angular using Google Authenticator. The login process consists of two steps. First, the user uses a plain login dialog to enter his email and password as usual.
If the user provides the correct credentials and enables Two-Factor Authentication, our app asks the user to enter the One-Time Password (OTP) from Google Authenticator. If the user has chosen to disable Two-Factor Authentication, he is directly logged into the app and redirected to the home page.
Let’s begin by creating Data Transfer Objects (DTOs) that will be used during the login process. First, let’s create the UserForAuthenticationDto class to transmit the email and password from the client:
public class UserForAuthenticationDto
{
    [Required(ErrorMessage = "Email is required.")]
    public string Email { get; set; }
    [Required(ErrorMessage = "Password is required.")]
    public string Password { get; set; }
}
Moreover, class AuthResponseDto will transfer the corresponding response:
public class AuthResponseDto
{
    public bool IsAuthSuccessful { get; set; }
    public bool IsTfaEnabled { get; set; }
    public string? ErrorMessage { get; set; }
    public string? Token { get; set; }
}
Let’s proceed with the modification of the AccountsController class by adding two methods, Login() and LoginTfa():
[HttpPost("login")]
public async Task<IActionResult> Login([FromBody] UserForAuthenticationDto userForAuthentication)
{
    var user = await _userManager.FindByNameAsync(userForAuthentication.Email);

    if (user == null
        || !await _userManager.CheckPasswordAsync(user, userForAuthentication.Password))
        return Unauthorized(new AuthResponseDto { ErrorMessage = "Invalid Authentication" });

    var isTfaEnabled = await _userManager.GetTwoFactorEnabledAsync(user);

    if(!isTfaEnabled)
    {
        var signingCredentials = _jwtHandler.GetSigningCredentials();
        var claims = _jwtHandler.GetClaims(user);
        var tokenOptions = _jwtHandler.GenerateTokenOptions(signingCredentials, claims);
        var token = new JwtSecurityTokenHandler().WriteToken(tokenOptions);

        return Ok(new AuthResponseDto { IsAuthSuccessful = true, IsTfaEnabled = false, Token = token });
    }

    return Ok(new AuthResponseDto { IsAuthSuccessful = true, IsTfaEnabled = true });
}
The Login() method implements the first step of the login process, as it verifies the correctness of the credentials and checks whether Two-Function authentication has been enabled.
Let’s add the LoginTfa() method:
[HttpPost("login-tfa")]
public async Task<IActionResult> LoginTfa([FromBody] TfaDto tfaDto)
{
    var user = await _userManager.FindByNameAsync(tfaDto.Email);

    if (user == null)
        return Unauthorized(new AuthResponseDto { ErrorMessage = "Invalid Authentication" });

    var validVerification =
      await _userManager.VerifyTwoFactorTokenAsync(
         user, _userManager.Options.Tokens.AuthenticatorTokenProvider, tfaDto.Code);
    if (!validVerification)
        return BadRequest("Invalid Token Verification");

    var signingCredentials = _jwtHandler.GetSigningCredentials();
    var claims = _jwtHandler.GetClaims(user);
    var tokenOptions = _jwtHandler.GenerateTokenOptions(signingCredentials, claims);
    var token = new JwtSecurityTokenHandler().WriteToken(tokenOptions);

    return Ok(new AuthResponseDto { IsAuthSuccessful = true, IsTfaEnabled = true, Token = token });
}
The LoginTfa() method is used during the second step and verifies the correctness of the OTP submitted by the user. Upon successful login, we create a new JWT token and send it to the frontend.
You may check the code to see how we use JWT in our project. Moreover, we already have an article on JWT support for Angular.
Login Using Google Authenticator in Angular Frontend
On the frontend side, let’s also begin by creating DTOs for communication with the backend:
export interface UserForAuthenticationDto {
    email?: string;
    password?: string;
}
Interface UserForAuthenticationDto carries the user credentials, while AuthResponseDto returns the response:
export interface AuthResponseDto {
    isAuthSuccessful: boolean;
    isTfaEnabled: boolean;
    errorMessage: string;
    token: string;
}
Next, let’s create the login component:
<div class="card">
    <div class="card-body">
        <h1 class="card-title">Login</h1>

        <div *ngIf="showError" class="alert alert-danger" role="alert">
            {{errorMessage}}
        </div>

        <div>
            <form [formGroup]="loginForm" autocomplete="off" novalidate
                (ngSubmit)="loginUser(loginForm.value)">
                <div class="mb-3 row">
                    <label for="email" class="col-form-label col-sm-2">Email:</label>
                    <div class="col-md-5">
                        <input type="text" id="email" formControlName="email" class="form-control" />
                    </div>
                    <div class="col-md-5">
                        <em *ngIf="validateControl('email') && hasError('email', 'required')">
                            Email is required
                        </em>
                    </div>
                </div>
                <div class="mb-3 row">
                    <label for="password" class="col-form-label col-sm-2">Password:</label>
                    <div class="col-md-5">
                        <input type="password" id="password" formControlName="password" class="form-control" />
                    </div>
                    <div class="col-md-5">
                        <em *ngIf="validateControl('password') && hasError('password', 'required')">
                            Password is required
                        </em>
                    </div>
                </div>
                <br>
                <div class="mb-3 row">
                    <div class="col-md-1">
                        <button type="submit" class="btn btn-info" [disabled]="!loginForm.valid">
                            Login
                        </button>
                    </div>
                </div>
            </form>
        </div>
    </div>
  </div>
Let’s add the component class. First, the initialization part:
import { HttpErrorResponse } from '@angular/common/http';
import { Router, ActivatedRoute } from '@angular/router';
import { AuthenticationService } from './../../shared/services/authentication.service';
import { Component, OnInit } from '@angular/core';
import { FormGroup, FormControl, Validators } from '@angular/forms';
import { UserForAuthenticationDto } from 'src/app/models/UserForAuthenticationDto';
import { AuthResponseDto } from 'src/app/models/AuthResponseDto';

@Component({
  selector: 'app-login',
  templateUrl: './login.component.html',
  styleUrls: ['./login.component.css']
})
export class LoginComponent implements OnInit {
  private returnUrl: string = "";
  isTfaEnabled: boolean = false;

  loginForm: FormGroup  = new FormGroup({
    email: new FormControl("", [Validators.required]),
    password: new FormControl("", [Validators.required])
  });

  tfaForm: FormGroup  = new FormGroup({
    tfaCode: new FormControl("", [Validators.required])
  });

  errorMessage: string = '';
  showError: boolean = false;
  email:string = "";

  constructor(
    private authService: AuthenticationService,
    private router: Router,
    private route: ActivatedRoute) { }

  ngOnInit(): void {
    this.returnUrl = this.route.snapshot.queryParams['returnUrl'] || '/';
  }

  validateControl = (controlName: string) => {
    return this.loginForm.get(controlName)?.invalid
        && this.loginForm.get(controlName)?.touched
  }

  hasError = (controlName: string, errorName: string) => {
    return this.loginForm.get(controlName)?.hasError(errorName)
  }
Then, the loginUser() function:
  loginUser = (loginFormValue: any) => {
    this.showError = false;
    const login = {... loginFormValue };

    const userForAuth: UserForAuthenticationDto = {
      email: login.email,
      password: login.password
    }

    this.authService.loginUser(userForAuth)
    .subscribe({
      next: (res:AuthResponseDto) => {
       this.isTfaEnabled = res.isTfaEnabled;

       if(this.isTfaEnabled){
        this.router.navigate(['twostepverification'],
          { queryParams: { returnUrl: this.returnUrl, email: login.email }})
       }
       else{
        localStorage.setItem("token", res.token);
        localStorage.setItem("email", login.email);
        this.router.navigate([this.returnUrl]);
       }
    },
    error: (err: HttpErrorResponse) => {
      this.errorMessage = err.message;
      this.showError = true;
    }})
  }
}
You can find the component class file here.
This is the login page that we get:
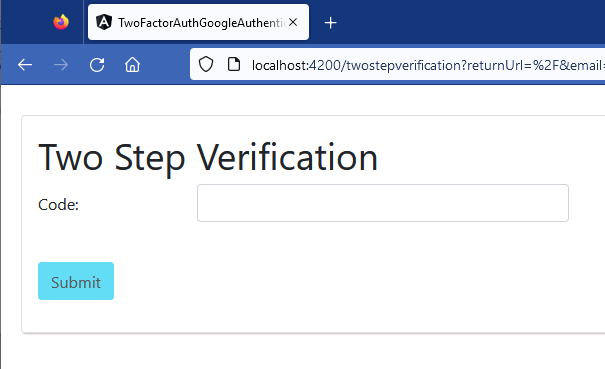
Upon successful login, we check the response to see whether Two-Factor Authentication is enabled. In this case, we forward the user to the component for OTP entry (TwoStepVerificationComponent). If not, we store the returned JSON Web Token (JWT) in the local storage and redirect the user to the home page.
The second step of the login process takes place in the TwoStepVerificationComponent:
<div class="card">
    <div class="card-body">
        <h1 class="card-title">Two Step Verification</h1>
        <div *ngIf="showError" class="alert alert-danger" role="alert">
            {{errorMessage}}
        </div>
        <form [formGroup]="twoStepForm" autocomplete="off" novalidate
            (ngSubmit)="loginUser(twoStepForm.value)">
            <div class="mb-3 row">
                <label for="twoFactorCode" class="col-form-label col-sm-2">Code:</label>
                <div class="col-md-5">
                    <input type="text" id="twoFactorCode"
                        formControlName="twoFactorCode" class="form-control" />
                </div>
                <div class="col-md-5">
                    <em *ngIf="validateControl('twoFactorCode') && hasError('twoFactorCode', 'required')">
                        The Code is required
                    </em>
                </div>
            </div>
            <br>
            <div class="mb-3 row">
                <div class="col-md-1">
                    <button type="submit" class="btn btn-info" [disabled]="!twoStepForm.valid">
                        Submit
                    </button>
                </div>
            </div>
        </form>
    </div>
</div>
First, let’s add the initialization part of the component:
import { HttpErrorResponse } from '@angular/common/http';
import { Component, OnInit } from '@angular/core';
import { FormControl, FormGroup, Validators } from '@angular/forms';
import { ActivatedRoute, Router } from '@angular/router';
import { AuthResponseDto } from 'src/app/models/AuthResponseDto';
import { TfaDto } from 'src/app/models/tfaDto';
import { AuthenticationService } from 'src/app/shared/services/authentication.service';

@Component({
  selector: 'app-two-step-verification',
  templateUrl: './two-step-verification.component.html',
  styleUrls: ['./two-step-verification.component.css']
})
export class TwoStepVerificationComponent implements OnInit {
  private email: string = "";
  private returnUrl: string = "";

  twoStepForm = new FormGroup({
    twoFactorCode: new FormControl('', [Validators.required]),
  });
  showError: boolean = false;
  errorMessage: string = "";

  constructor(private authService: AuthenticationService,
    private route: ActivatedRoute,
    private router: Router) { }

  ngOnInit(): void {
      this.email = this.route.snapshot.queryParams['email'];
      this.returnUrl = this.route.snapshot.queryParams['returnUrl'];
      this.email = this.route.snapshot.queryParams['email'];
  }

  validateControl = (controlName: string) => {
    return this.twoStepForm.get(controlName)?.invalid && this.twoStepForm.get(controlName)?.touched
  }
  hasError = (controlName: string, errorName: string) => {
    return this.twoStepForm.get(controlName)?.hasError(errorName)
  }
Then, the loginUser() function:
  loginUser = (twoStepFromValue: any) => {
    this.showError = false;

    const formValue = { ...twoStepFromValue };
    let twoFactorDto: TfaDto = {
      email: this.email,
      code: formValue.twoFactorCode
    }
    this.authService.loginUserTfa(twoFactorDto)
    .subscribe({
      next: (res:AuthResponseDto) => {
        localStorage.setItem("token", res.token);
        localStorage.setItem("email", this.email);
        this.router.navigate([this.returnUrl]);
      },
      error: (err: HttpErrorResponse) => {
        this.errorMessage = err.message;
        this.showError = true;
      }
    })
  }
}
Here, the component sends the OTP to the backend API for verification. Upon successful request, it saves the JWT and moves to the home page. You can find the component class file here.
Here is a snapshot of this page:
Also, let’s not forget to modify the AuthenticationService by adding the functions for the login steps:
public loginUser = (body: UserForAuthenticationDto) => {
  return this.http.post<AuthResponseDto>(`${environment.apiUrl}/accounts/login`, body);
}

public loginUserTfa = (body: TfaDto) => {
  return this.http.post<AuthResponseDto>(`${environment.apiUrl}/accounts/login-tfa`, body);
}
Finally, let’s add routes to the new components in app-routing.module.ts:
const routes: Routes = [
  { path: '', component: HomeComponent, canActivate: [AuthGuard]  },
  { path: 'register', component: RegisterUserComponent  },
  { path: 'login', component: LoginComponent },
  { path: 'twostepverification', component: TwoStepVerificationComponent },
  { path: 'tfa-setup', component: TfaSetupComponent, canActivate: [AuthGuard]  }
];
One final addition is the AuthGuard class that enables access to protected routes:
import { Injectable } from "@angular/core";
import { ActivatedRouteSnapshot, CanActivate, Router, RouterStateSnapshot } from "@angular/router";

@Injectable({
  providedIn: 'root'
})
export class AuthGuard implements CanActivate {
    constructor(
      private router: Router
    ) { }

    canActivate(route: ActivatedRouteSnapshot, state: RouterStateSnapshot) {
      if(localStorage.getItem("email")){
        return true;
      }
      this.router.navigate(['/login'], { queryParams: { returnUrl: state.url } });
      return false;
    }
}
That’s it! Now we can use Google Authenticator to provide One-Time Passwords for our web application.
Conclusion
In this article, we learned how to implement Two-Factor Authentication with Web API and Angular using Google Authenticator in our web applications. Now, we can secure our applications by adding a second step, with the generation of a One-Time Password (OTP) from Google Authenticator.