

Content negotiation is the process of selecting the best resource for a response when multiple resource representations are available. Content negotiation is an HTTP feature that has been around for a while, but for one reason or another, it is, maybe, a bit underused.
In short, content negotiation lets you choose or rather “negotiate” the content you want to get in response to the REST API request.
Let’s dive in.

How Does Content Negotiation Work?
Content negotiation happens when a client specifies the media type it wants as a response to the request Accept header. By default, ASP.NET Core Web API returns a JSON formatted result and it will ignore the browser Accept header.
ASP.NET Core supports the following media types by default:
application/jsontext/jsontext/plain
To try this out let’s create a default Web API project and simple model for a BlogPost:
public class BlogPost
{
    public string Title { get; set; }
    public string MetaDescription { get; set; }
    public bool Published { get; set; }
}
And one class that lists all the blog posts called Blog:
public class Blog
{
    public string Name { get; set; }
    public string Description { get; set; }

    public List<BlogPost> BlogPosts { get; set; }

    public Blog()
    {
        BlogPosts = new List<BlogPost>();
    }
}
We are going to create a controller called BlogController with only one method Get() that ads one blog post and one blog and returns them as a result:
[Route("api/blog")]
public class BlogController : Controller
{
    public IActionResult Get()
    {
        var blogs = new List<Blog>();
        var blogPosts = new List<BlogPost>();

        blogPosts.Add(new BlogPost
        {
            Title = "Content Negotiation in Web API",
            MetaDescription = "Content negotiation is the process of selecting the best resource for a response when multiple resource representations are available.",
            Published = true
        });

        blogs.Add(new Blog()
        {
            Name = "Code Maze",
            Description = "C#, .NET and Web Development Tutorials",
            BlogPosts = blogPosts
        });

        return Ok(blogs);
    }
}
Content negotiation is implemented by ObjectResult and the Ok() method inherits from OkObjectResult that inherits from ObjectResult. That means our controller method is able to return the content negotiated response.
We are returning the result with the Ok() helper method which returns the object and the status code 200 OK all the time.
Return the Default JSON Response
If we run our application right now, we’ll get a JSON response by default when run in a browser:
[
  {
    "name": "Code Maze",
    "description": "C#, .NET and Web Development Tutorials",
    "blogPosts": [
      {
        "title": "Content Negotiation in Web API",
        "metaDescription": "Content negotiation is the process of selecting the best resource for a response when multiple resource representations are available.",
        "published": true
      }
    ]
  }
]
For the sake of testing the responses properly we’re going to use Postman:
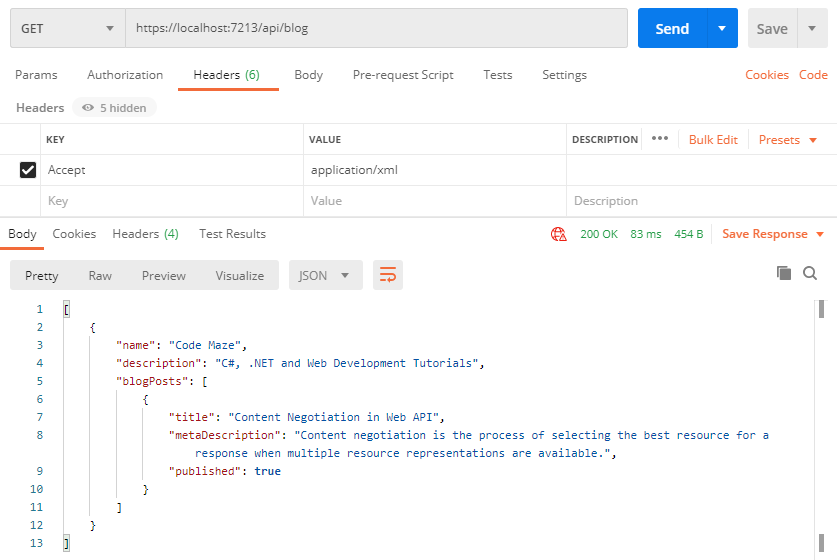
You can clearly see that the default result when calling GET on /api/blog returns our JSON result. Those of you with sharp eyes might have even noticed that we used the Accept header with application/xml to try forcing the server to return other media types like plain text and XML.
But that doesn’t work. Why?
Because we need to configure server formatters to format a response the way we want it.
Let’s see how to do that.
Return XML Response
A server does not explicitly specify where it formats a response to JSON. But we can override it by changing configuration options through the AddControllers() method options. By default, it can be found in the Program class and it looks like this:
builder.Services.AddControllers();
We can add the following options to enable the server to format the XML response when the client tries negotiating for it:
builder.Services.AddControllers(options =>
{
    options.RespectBrowserAcceptHeader = true;
}).AddXmlSerializerFormatters();
First things first, we must tell a server to respect the Accept header. After that, we just add the AddXmlSerializerFormatters() method to support XML formatters.
Now that we have our server configured let’s test the content negotiation once more:
<ArrayOfBlog xmlns:i="http://www.w3.org/2001/XMLSchema-instance" xmlns="http://schemas.datacontract.org/2004/07/ContentNegotiation.Models">
    <Blog>
        <BlogPosts>
            <BlogPost>
                <MetaDescription>Content negotiation is the process of selecting the best resource for a response when multiple resource representations are available.</MetaDescription>
                <Published>true</Published>
                <Title>Content Negotiation in Web API</Title>
            </BlogPost>
        </BlogPosts>
        <Description>C#, .NET and Web Development Tutorials</Description>
        <Name>Code Maze</Name>
    </Blog>
</ArrayOfBlog>
Let’s see what happens now if we fire the same request through Postman:
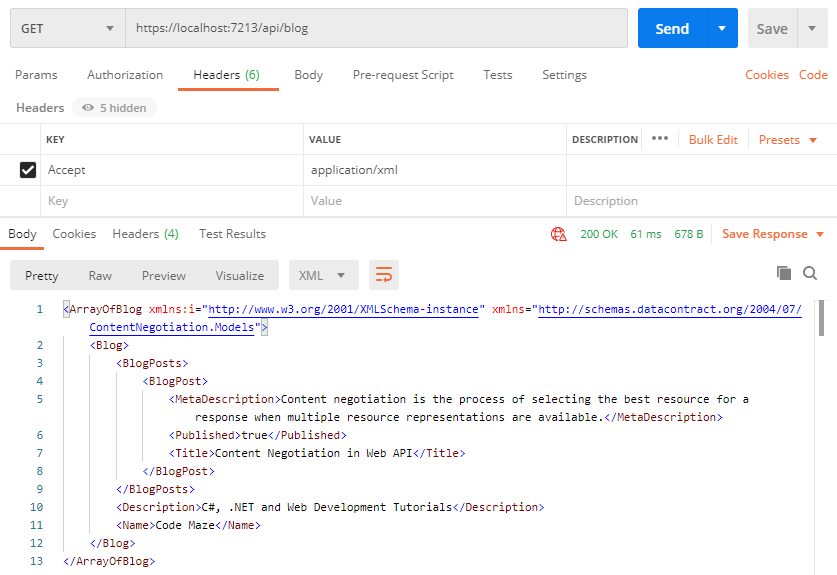
There is our XML response, the response is no longer a default one. By changing the Accept header we can get differently formatted responses.
But what if despite all this flexibility a client requests a media type that a server doesn’t know how to format?
Restricting Media Types in Content Negotiation
Currently, the response will default to JSON if the media type is not recognized.
But we can restrict this behavior by adding one line to the configuration:
builder.Services.AddControllers(options =>
{
    options.RespectBrowserAcceptHeader = true;
    options.ReturnHttpNotAcceptable = true;
}).AddXmlSerializerFormatters();
We’ve added the ReturnHttpNotAcceptable = true option, which tells the server that if the client tries to negotiate for the media type the server doesn’t support, it should return the 406 Not Acceptable status code.
This will make your application more restrictive and force the API consumer to request only the types the server supports. The 406 status code is created for this purpose. You can find more details about that in our HTTP Reference article, or if you want to go even deeper you can check out the RFC2616.
Now, let’s try fetching the text/css media type using Postman to see what happens:
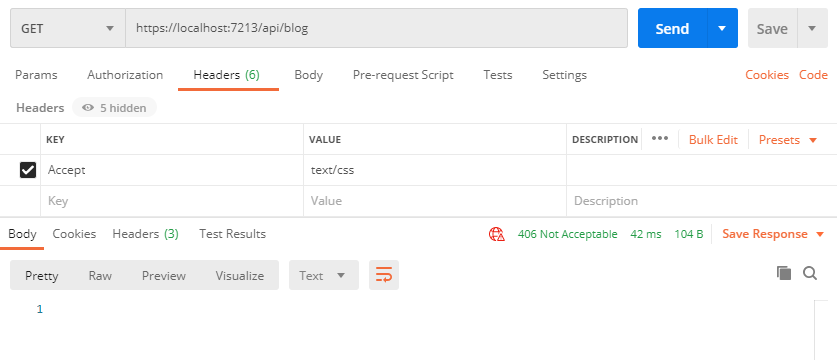
And as expected, there is no response body, and all we get is a nice 406 Not Acceptable status code.
Custom Formatters in ASP.NET Core
Let’s imagine we are making a public REST API and it needs to support content negotiation for a type that is not “in the box”.
ASP.NET Core supports the creation of custom formatters. Their purpose is to give you the flexibility to create your own formatter for any media types you need to support.
We can make the custom formatter using the following method:
- Create an output formatter class that inherits the
TextOutputFormatterclass - Create an input formatter class that inherits the
TextInputformatterclass - Add input and output classes to
InputFormattersandOutputFormatterscollections the same way as we did for the XML formatter
Let’s implement a custom CSV output formatter for our example.
Implementing a Custom Formatter in ASP.NET Core
Since we are only interested in formatting responses in this article, we need to implement only an output formatter. We would need an input formatter only if a request body contained a corresponding type.
The idea is to format a response to return the list of blogs and their corresponding list of blog posts in a CSV format.
Let’s add a CsvOutputFormatter class to our project:
public class CsvOutputFormatter : TextOutputFormatter
{
    public CsvOutputFormatter()
    {
        SupportedMediaTypes.Add(MediaTypeHeaderValue.Parse("application/csv"));
        SupportedEncodings.Add(Encoding.UTF8);
        SupportedEncodings.Add(Encoding.Unicode);
    }

    protected override bool CanWriteType(Type? type)
        => typeof(Blog).IsAssignableFrom(type)
            || typeof(IEnumerable<Blog>).IsAssignableFrom(type);

    public override async Task WriteResponseBodyAsync(OutputFormatterWriteContext context, Encoding selectedEncoding)
    {
        var response = context.HttpContext.Response;
        var buffer = new StringBuilder();

        if (context.Object is IEnumerable<Blog>)
        {
            foreach (var Blog in (IEnumerable<Blog>)context.Object)
            {
                FormatCsv(buffer, Blog);
            }
        }
        else
        {
            FormatCsv(buffer, (Blog)context.Object);
        }

        await response.WriteAsync(buffer.ToString(), selectedEncoding);
    }

    private static void FormatCsv(StringBuilder buffer, Blog blog)
    {
        foreach (var blogPost in blog.BlogPosts)
        {
            buffer.AppendLine($"{blog.Name},\"{blog.Description},\"{blogPost.Title},\"{blogPost.Published}\"");
        }
    }
}
There are a few things to note here.
In the constructor, we define which media type this formatter should parse as well as encodings.
The CanWriteType method is overridden, and it indicates whether or not the Blog type can be written by this serializer. The WriteResponseBodyAsync method constructs the response. And finally, we have the FormatCsv method that formats a response the way we want it.
The class is pretty straightforward to implement, and the main thing that you should focus on is the FormatCsv method logic.
Now, we just need to add the newly made CsvOutputFormatter to the list of OutputFormatters in the AddMvcOptions() method:
builder.Services.AddControllers(options =>
{
    options.RespectBrowserAcceptHeader = true;
    options.ReturnHttpNotAcceptable = true;
}).AddXmlSerializerFormatters()
  .AddMvcOptions(options => options.OutputFormatters.Add(new CsvOutputFormatter()));
Now let’s run this and see if it actually works. This time we will put the application/csv as the value for the Accept header in a Postman request:
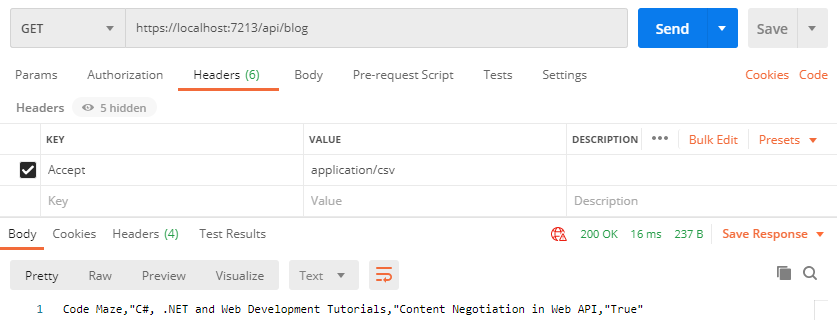
It works, our only entry is formatted as a CSV response.
There is a great page about custom formatters in ASP.NET Core if you want to learn more about them.
Conclusion
In this blog post, we went through a concrete implementation of the content negotiation mechanism in an ASP.NET Core project. We have learned about formatters and how to make a custom one, and how to set them up in your project configuration as well.
We have also learned how to restrict an application only to certain content types, and not accept any others.
Absolutely great blog here.
It has a lot of key elements that truly makes it work.
Thanks TAFF, we do our best.
In AspNetCore 2.2, if you manually add the XmlFormatters to the config like you have, then it fails to correctly serialize errors, but if you add them by calling AddXmlSerializerFormatters on the IMvcBuilder, then it all works. Like:
services.AddMvc(config=>{ ... stuff here ...}).AddXmlSerializerFormatters().SetCompatibilityVersion(CompatibilityVersion.Version_2_2);Hi Robert, great information, thanks!
Do you have an example or a blog post that shows off this behavior?
Thank you
Hey Richard, glad it helped!