

In this article, we are going to learn about creating the Blazor WebAssembly Authentication mechanism and how to implement it on both the server-side and the client-side. In one of the previous articles, we have implemented the test AuthenticationStateProvider class with all the required functionalities for the authentication mechanism to work. That article is strongly related to this one, so we recommend reading it if you haven’t already.
Of course, we don’t want the test class for the authentication functionality. So, we are going to replace it with the real AuthenticationStateProvider implementation.
Since we already learned about the Registration Functionality in Blazor WebAssembly, this article is going to be a logical continuation with the Login and Logout functionalities. With both of these articles, you will have great knowledge about the Blazor WebAssembly Authentication mechanism and how it should be implemented.
For the complete navigation for this series, you can visit the Blazor Series page.
So, let’s start.
Implementing JWT in the Web API Project
The first thing, we are going to do, is to add a JWT configuration section in the appsettings.json file:
{
  "Logging": {
    "LogLevel": {
      "Default": "Information",
      "Microsoft": "Warning",
      "Microsoft.Hosting.Lifetime": "Information",
      "Microsoft.EntityFrameworkCore": "Information"
    }
  },
  "ConnectionStrings": {
    "sqlConnection": "server=.; database=CodeMazeBlazor; Integrated Security=true"
  },
  "JWTSettings": {
    "securityKey": "CodeMazeSecretKey",
    "validIssuer": "CodeMazeAPI",
    "validAudience": "https://localhost:5011",
    "expiryInMinutes": 5
  },
  "AllowedHosts": "*"
}
Then, we have to install the Microsoft.AspNetCore.Authentication.JwtBearer library in our application:
![]()
After the installation, let’s show how we can register JWT in .NET 5 and .NET 6 and above projects.
In .NET 5, we have to modify the ConfigureServices method:
services.AddIdentity<IdentityUser, IdentityRole>()
    .AddEntityFrameworkStores<ProductContext>();

var jwtSettings = Configuration.GetSection("JWTSettings");
services.AddAuthentication(opt =>
{
    opt.DefaultAuthenticateScheme = JwtBearerDefaults.AuthenticationScheme;
    opt.DefaultChallengeScheme = JwtBearerDefaults.AuthenticationScheme;
}).AddJwtBearer(options =>
{
    options.TokenValidationParameters = new TokenValidationParameters
    {
        ValidateIssuer = true,
        ValidateAudience = true,
        ValidateLifetime = true,
        ValidateIssuerSigningKey = true,

        ValidIssuer = jwtSettings["validIssuer"],
        ValidAudience = jwtSettings["validAudience"],
        IssuerSigningKey = new SymmetricSecurityKey(Encoding.UTF8.GetBytes(jwtSettings["securityKey"]))
    };
});

services.AddControllers();
We have to mention that in the Configure method, we already have registered Authentication and Authorization:
app.UseAuthentication();
app.UseAuthorization();
In .NET 6 and above, we don’t have ConfigureServices and Configure methods, so, we have to do all the configuration in the Program class:
builder.Services.AddIdentity<IdentityUser, IdentityRole>()
    .AddEntityFrameworkStores<ProductContext>();

var jwtSettings = builder.Configuration.GetSection("JWTSettings");
builder.Services.AddAuthentication(opt =>
{
    opt.DefaultAuthenticateScheme = JwtBearerDefaults.AuthenticationScheme;
    opt.DefaultChallengeScheme = JwtBearerDefaults.AuthenticationScheme;
}).AddJwtBearer(options =>
{
    options.TokenValidationParameters = new TokenValidationParameters
    {
        ValidateIssuer = true,
        ValidateAudience = true,
        ValidateLifetime = true,
        ValidateIssuerSigningKey = true,

        ValidIssuer = jwtSettings["validIssuer"],
        ValidAudience = jwtSettings["validAudience"],
        IssuerSigningKey = new SymmetricSecurityKey(Encoding.UTF8.GetBytes(jwtSettings["securityKey"]))
    };
});

builder.Services.AddControllers();

var app = builder.Build();

//the rest of code

app.UseAuthentication();
app.UseAuthorization();
The last thing we have to do is to protect our endpoints. To do that, let’s open the ProductsController and add the [Authorize] attribute on top of it to protect all the actions inside:
[Route("api/products")]
[ApiController]
[Authorize]
public class ProductsController : ControllerBase
That’s it. We can move on to the authentication logic part.
Adding the Login Functionality in the Web API Project
Before we start with the Login implementation, we have to create two DTO classes to support the authentication process. So, let’s create the UserForAuthenticationDto and AuthResponseDto classes in the Entities/DTO folder:
public class UserForAuthenticationDto
{
    [Required(ErrorMessage = "Email is required.")]
    public string Email { get; set; }
    [Required(ErrorMessage = "Password is required.")]
    public string Password { get; set; }
}

public class AuthResponseDto
{
    public bool IsAuthSuccessful { get; set; }
    public string ErrorMessage { get; set; }
    public string Token { get; set; }
}
Now, in the AccountController, we have to implement the Login action:
[HttpPost("Login")]
public async Task<IActionResult> Login([FromBody] UserForAuthenticationDto userForAuthentication)
{
    var user = await _userManager.FindByNameAsync(userForAuthentication.Email);

    if (user == null || !await _userManager.CheckPasswordAsync(user, userForAuthentication.Password))
    return Unauthorized(new AuthResponseDto { ErrorMessage = "Invalid Authentication" });

    var signingCredentials = GetSigningCredentials();
    var claims = GetClaims(user);
    var tokenOptions = GenerateTokenOptions(signingCredentials, claims);
    var token = new JwtSecurityTokenHandler().WriteToken(tokenOptions);

    return Ok(new AuthResponseDto { IsAuthSuccessful = true, Token = token });
}
Here we use the FindByNameAsync method to extract the user and if the user exists, we check the password with the CheckPasswordAsync method. The UserManager class provides these methods for us and to learn more about the authentication process with ASP.NET Core Identity, feel free to read our Authentication with ASP.NET Core Identity article.
If the check passes, we generate signing credentials, add claims, create token options, and create a token. As you can see, for each of these actions we have a separate method. For the sake of simplicity, we are going to implement them in the same controller, but you can always move the logic to a separate class:
private SigningCredentials GetSigningCredentials()
{
    var key = Encoding.UTF8.GetBytes(_jwtSettings["securityKey"]);
    var secret = new SymmetricSecurityKey(key);

    return new SigningCredentials(secret, SecurityAlgorithms.HmacSha256);
}

private List<Claim> GetClaims(IdentityUser user)
{
    var claims = new List<Claim>
    {
        new Claim(ClaimTypes.Name, user.Email)
    };

    return claims;
}

private JwtSecurityToken GenerateTokenOptions(SigningCredentials signingCredentials, List<Claim> claims)
{
    var tokenOptions = new JwtSecurityToken(
        issuer: _jwtSettings["validIssuer"],
        audience: _jwtSettings["validAudience"],
        claims: claims,
        expires: DateTime.Now.AddMinutes(Convert.ToDouble(_jwtSettings["expiryInMinutes"])),
        signingCredentials: signingCredentials);

    return tokenOptions;
}
Of course, we have to modify the constructor of the controller:
private readonly UserManager<IdentityUser> _userManager;
private readonly IConfiguration _configuration;
private readonly IConfigurationSection _jwtSettings;

public AccountsController(UserManager<IdentityUser> userManager, IConfiguration configuration)
{
    _userManager = userManager;
    _configuration = configuration;
    _jwtSettings = _configuration.GetSection("JwtSettings");
}
That’s all it takes. If we test this with a Postman, we are going to get our response with the generated token:

It’s time to move on to the client part.
Blazor WebAssembly Authentication – AuthenticationStateProvider
We have already seen how we can use the test AuthenticationStateProvider to enable the auth mechanism in the Blazor WebAssembly application. In that article, you can learn what library you need to install and how to implement the AuthorizeRouteView component, Authorizing, NotAuthorizing components as well as the CascadingAuthenticationState component. These components are crucial for the Blazor WebAssembly Authentication process and if you are not familiar with them, we strongly suggest reading the mentioned article.
Since we have all these components in place, we can start replacing the test AuthenticationStateProvider with the real one.
That said, let’s start with a new JwtParser class in the Features folder. We are going to use this class to extract the claims from the token:
public static class JwtParser
{
    public static IEnumerable<Claim> ParseClaimsFromJwt(string jwt)
    {
        var claims = new List<Claim>();
        var payload = jwt.Split('.')[1];

        var jsonBytes = ParseBase64WithoutPadding(payload);

        var keyValuePairs = JsonSerializer.Deserialize<Dictionary<string, object>>(jsonBytes);

        claims.AddRange(keyValuePairs.Select(kvp => new Claim(kvp.Key, kvp.Value.ToString())));

        return claims;
    }

    private static byte[] ParseBase64WithoutPadding(string base64)
    {
        switch (base64.Length % 4)
        {
            case 2: base64 += "=="; break;
            case 3: base64 += "="; break;
        }
        return Convert.FromBase64String(base64);
    }
}
You can find this code originally in the Steve Sanderson’s Mission Control project.
As you can see, we accept the token in the ParseClaimsFromJwt method and then extract the claims from that token. We are not extracting the roles yet since that’s something we are going to do in the next article of this series.
After this, we can create a new AuthStateProvider class in the AuthProviders folder:
public class AuthStateProvider : AuthenticationStateProvider
{
    private readonly HttpClient _httpClient;
    private readonly ILocalStorageService _localStorage;

    public AuthStateProvider(HttpClient httpClient, ILocalStorageService localStorage)
    {
        _httpClient = httpClient;
        _localStorage = localStorage;
    }

    public override async Task<AuthenticationState> GetAuthenticationStateAsync()
    {
        throw new NotImplementedException();
    }
}
This class must inherit from the AuthenticationStateProvider abstract class and we inject HttpClient and ILocalStorageService through the constructor injection. Of course, we have to install the Blazored.LocalStorage library to be able to use ILocalStorageService in our application:

Now, we can implement the GetAuthenticationStateAsync method and add new methods to this class:
public class AuthStateProvider : AuthenticationStateProvider
{
    private readonly HttpClient _httpClient;
    private readonly ILocalStorageService _localStorage;
    private readonly AuthenticationState _anonymous;

    public AuthStateProvider(HttpClient httpClient, ILocalStorageService localStorage)
    {
        _httpClient = httpClient;
        _localStorage = localStorage;
        _anonymous = new AuthenticationState(new ClaimsPrincipal(new ClaimsIdentity()));
    }

    public override async Task<AuthenticationState> GetAuthenticationStateAsync()
    {
        var token = await _localStorage.GetItemAsync<string>("authToken");
        if (string.IsNullOrWhiteSpace(token))
            return _anonymous;

        _httpClient.DefaultRequestHeaders.Authorization = new AuthenticationHeaderValue("bearer", token);

        return new AuthenticationState(new ClaimsPrincipal(new ClaimsIdentity(JwtParser.ParseClaimsFromJwt(token), "jwtAuthType")));
    }

    public void NotifyUserAuthentication(string email)
    {
        var authenticatedUser = new ClaimsPrincipal(new ClaimsIdentity(new[] { new Claim(ClaimTypes.Name, email) }, "jwtAuthType"));
        var authState = Task.FromResult(new AuthenticationState(authenticatedUser));
        NotifyAuthenticationStateChanged(authState);
    }

    public void NotifyUserLogout()
    {
        var authState = Task.FromResult(_anonymous);
        NotifyAuthenticationStateChanged(authState);
    }
}
AuthProvider Code Explanation
First, we just create an anonymous user since we are going to use it throughout this class. Then, in the GetAuthenticationStateAsync method, we extract the token from the local storage. If it doesn’t exist, we return an anonymous user (the user is not authenticated). Otherwise, we set the default authorization header for the HttpClient and return authenticated user – the ClaimsIdentity constructor is populated with the parsed claims and the authentication type parameters.
The CascadingAuthenticationState component uses this method to determine whether the current user is authenticated or not.
There are two more helper methods in this class. In the NotifyUserAuthentication method, we create an authenticated user and call the NotifyAuthenticationStateChanged method that raises the AuthenticationStateChanged event for the AuthenticationStateProvider. We are going to use this method as soon as the user logs in.
The second method does the same thing but it notifies the AuthenticationStateProvider as soon as the user logs out.
After this implementation, we have to register the LocalStorage service and to modify AuthenticationStateProvider registration by replacing the TestAuthStateProvider class with the AuthStateProvider class:
builder.Services.AddBlazoredLocalStorage();
builder.Services.AddAuthorizationCore();
builder.Services.AddScoped<AuthenticationStateProvider, AuthStateProvider>();
That’s it. We can now modify the AuthenticationService class by adding Login and Logout actions.
Blazor WebAssembly Authentication Actions with AuthenticationService
Let’s start by modifying the IAuthenticationService interface:
public interface IAuthenticationService
{
    Task<RegistrationResponseDto> RegisterUser(UserForRegistrationDto userForRegistration);
    Task<AuthResponseDto> Login(UserForAuthenticationDto userForAuthentication);
    Task Logout();
}
Now, we can modify the AuthenticationService class. Let’s start with the constructor modification:
private readonly HttpClient _client;
private readonly JsonSerializerOptions _options;
private readonly AuthenticationStateProvider _authStateProvider;
private readonly ILocalStorageService _localStorage;

public AuthenticationService(HttpClient client, AuthenticationStateProvider authStateProvider, ILocalStorageService localStorage)
{
    _client = client;
    _options = new JsonSerializerOptions { PropertyNameCaseInsensitive = true };
    _authStateProvider = authStateProvider;
    _localStorage = localStorage;
}
After that, we can implement Login and Logout methods:
public async Task<AuthResponseDto> Login(UserForAuthenticationDto userForAuthentication)
{
    var content = JsonSerializer.Serialize(userForAuthentication);
    var bodyContent = new StringContent(content, Encoding.UTF8, "application/json");

    var authResult = await _client.PostAsync("accounts/login", bodyContent);
    var authContent = await authResult.Content.ReadAsStringAsync();
    var result = JsonSerializer.Deserialize<AuthResponseDto>(authContent, _options);

    if (!authResult.IsSuccessStatusCode)
        return result;

    await _localStorage.SetItemAsync("authToken", result.Token);
    ((AuthStateProvider)_authStateProvider).NotifyUserAuthentication(userForAuthentication.Email);
    _client.DefaultRequestHeaders.Authorization = new AuthenticationHeaderValue("bearer", result.Token);

    return new AuthResponseDto { IsAuthSuccessful = true };
}

public async Task Logout()
{
    await _localStorage.RemoveItemAsync("authToken");
    ((AuthStateProvider)_authStateProvider).NotifyUserLogout();
    _client.DefaultRequestHeaders.Authorization = null;
}
In the Login method, we send the request to the login endpoint and deserialize the response. If it is not successful, we just return that response containing the error message. Otherwise, we set the token in the local storage, call the NotifyUserAuthentication method from the AuthStateProvider class, add the token as a default authorization header for the HttpClient and return the successful result.
In the Logout method, we remove the token from the local storage, call the NotifyUserLogout method from the AuthStateProvider class, and remove a default authorization header.
Excellent, we can move on.
Creating Login and Logout Components
In the Pages folder, we are going to create two new files – Login.razor and Login.razor.cs:
public partial class Login
{
    private UserForAuthenticationDto _userForAuthentication = new UserForAuthenticationDto();

    [Inject]
    public IAuthenticationService AuthenticationService { get; set; }
    [Inject]
    public NavigationManager NavigationManager { get; set; }
    public bool ShowAuthError { get; set; }
    public string Error { get; set; }

    public async Task ExecuteLogin()
    {
        ShowAuthError = false;

        var result = await AuthenticationService.Login(_userForAuthentication);
        if (!result.IsAuthSuccessful)
        {
            Error = result.ErrorMessage;
            ShowAuthError = true;
        }
        else
        {
            NavigationManager.NavigateTo("/");
        }
    }
}
This is almost the same implementation as the Registration.razor.cs file. We call the Login method from the AuthenticationService class and if the result is not successful, we show an error message. Otherwise, we navigate to the Home page.
Now, let’s implement the component file:
@page "/login"
<h3>Login</h3>

@if (ShowAuthError)
{
    <div class="alert alert-danger" role="alert">
        <p>@Error</p>
    </div>
}

<EditForm Model="_userForAuthentication" OnValidSubmit="ExecuteLogin" class="card card-body bg-light mt-5">
    <DataAnnotationsValidator />
    <div class="form-group row">
        <label for="email" class="col-md-2 col-form-label">Email:</label>
        <div class="col-md-10">
            <InputText id="email" class="form-control" @bind-Value="_userForAuthentication.Email" />
            <ValidationMessage For="@(() => _userForAuthentication.Email)" />
        </div>
    </div>

    <div class="form-group row">
        <label for="password" class="col-md-2 col-form-label">Password:</label>
        <div class="col-md-10">
            <InputText type="password" id="password" class="form-control" @bind-Value="_userForAuthentication.Password" />
            <ValidationMessage For="@(() => _userForAuthentication.Password)" />
        </div>
    </div>

    <div class="row">
        <div class="col-md-12 text-right">
            <button type="submit" class="btn btn-success">Login</button>
        </div>
    </div>
</EditForm>
There is nothing new here, simple input fields with the EditForm component and validation messages.
Let’s continue by creating the Logout files in the Pages folder.
The Logout.razor file will have only the @page directive:
@page "/logout"
We need nothing more in the component file. But we need some implementation in the class file:
public partial class Logout
{
     [Inject]
     public IAuthenticationService AuthenticationService { get; set; }
     [Inject]
     public NavigationManager NavigationManager { get; set; }

     protected override async Task OnInitializedAsync()
     {
         await AuthenticationService.Logout();
         NavigationManager.NavigateTo("/");
     }
}
And that’s all it takes. As soon as this component initializes, it will call the Logout method from the AuthenticationService class and navigate the user to the Home page.
Testing the Blazor WebAssembly Authentication Functionality
Before we start, let’s just open the Counter.razor file, and remove the Roles part inside the AuthorizeView component. We have to do that because we are not using the TestAuthProvider class anymore and we are going to implement the Role-Based Authorization in the next article.
After that, let’s start both the server and the client applications.
We can see the Home page, without the Products menu since it is only available for the authenticated users (already implemented in the AuthenticationStateProvider article). Now, let’s click the Login link and try to log in without credentials:
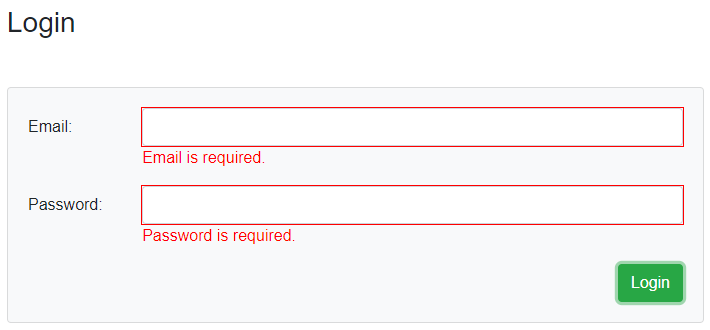
We can see the validation is working as expected.
Let’s add invalid credentials and click the Login button:
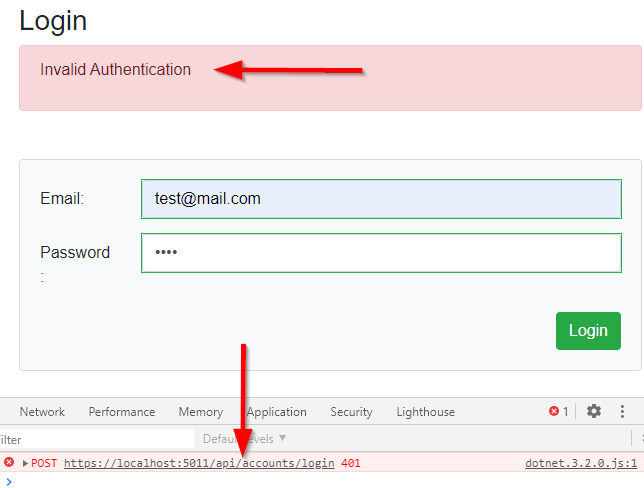
We can see the server responds with 401 and our error message is displayed on the screen.
As soon as we enter the valid credentials, we are going to be navigated to the Home page and the Products menu will be available:
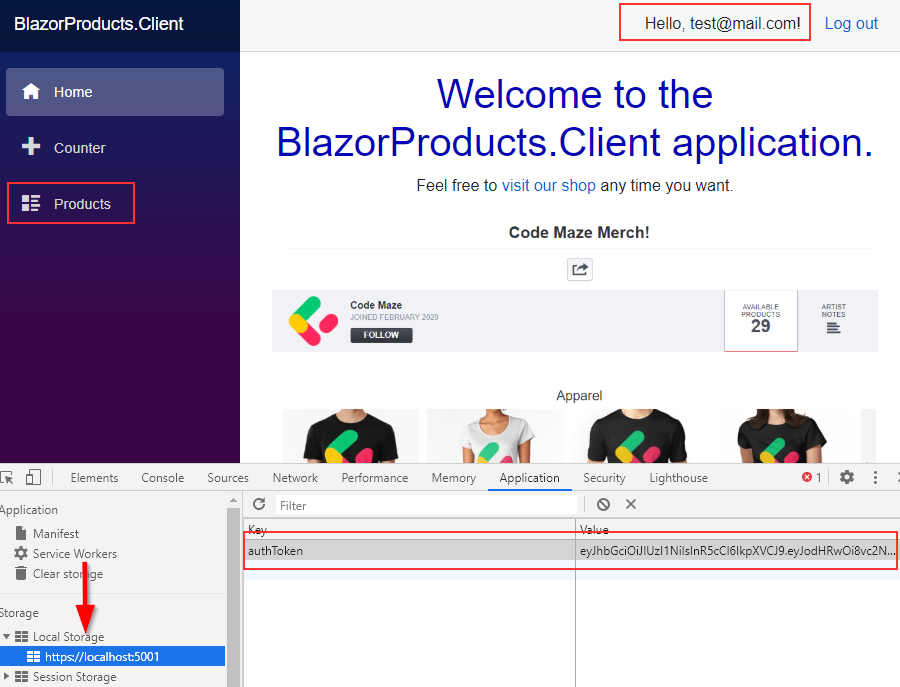
Additionally, we can find the token stored in the Local Storage.
Since we are storing this token in the HttpClient’s authorization header, we can click the Products link and fetch all the products from the protected endpoint.
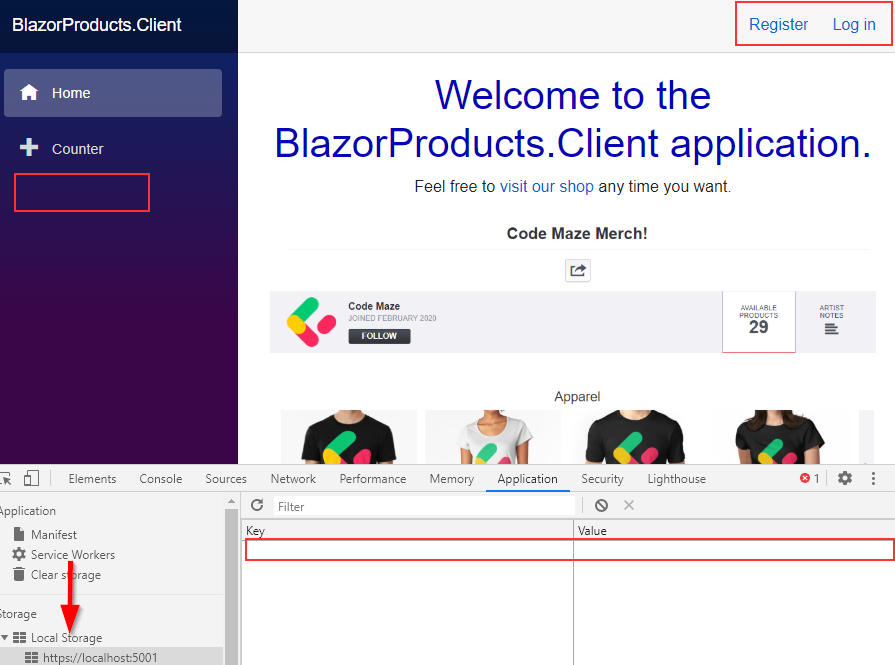
If we click the Logout link, we are going to be navigated to the Home page (or stay on it if we were already there), the Products link will disappear, and the token will be removed from the Local Storage:
Excellent.
You can check the Counter page as well to see that the counter increases for the authenticated user and vice versa.
Conclusion
Right now, we have working authentication in our Blazor WebAssembly application. We can register a new user, and that user can log in and log out from our application. Also, we have provided a way to protect some resources that are not allowed for unauthorized users.
But, we are missing roles here.
Well, that’s exactly what we are going to cover in the next article about Blazor WebAssembly Role-Based Authorization.

Hi, nice tutorial. I was following allong but ran in to the following: I was wondering though how is the refresh token expiry is handled? I see you set it to an expiry of 7 days but i can’t seem to find any place where you actually act when the refresh token expiry date is expired. Could you explain this?
Hi Bob. Refresh token logic is not handled in this article. This is the one: https://code-maze.com/refresh-token-with-blazor-webassembly-and-asp-net-core-web-api/
Will this work if we use Blazor Prerender?
I never tried that, so I am not sure.
I tried and found that it won’t work. It will give an error:
InvalidOperationException: JavaScript interop calls cannot be issued during server-side prerendering, because the page has not yet loaded in the browser. Prerendered components must wrap any JavaScript interop calls in conditional logic to ensure those interop calls are not attempted during prerendering.
at this line
var token = await _localStorage.GetItemAsync<string>("authToken");Obviously, the storage library uses JS Interop to work with browser and you probably need to wrap that line in a condition where you can check for prerendering. As much as I could find, yiu can use IHttpContextAccessor.HttpContext.Response.HasStarted to check whether your app is still prerendering or not. Again, didn’t use it, just found it online.
Excellent demo. One question. How do you deal with identity and multiple tabs? For example, I can open one tab and log in as Steve. Then I can open another tab and log in as Dave. If I go back to the first tab is has Steve’s info, but is now logged in as Dave. If I refresh tab 1, it loads Dave. If I logout of tab 1, it looks like I am still logged in as Dave on tab 2, but if I try and do anything it fails because I am logged out. So how do you deal with multiple tabs?
I am not sure, since this is an edge case. Basically, you don’t want to share your browser as a customer with another customer. That can be a security risk for your account for sure. There are ways to prevent multi-tab browsing. Just Google the “preventing multi-tab browsing of asp.net application” and you will find several ideas how to do that.
This article is very out of date, it does not cover .net 6, so is irrelevant.
The only thing that is correct in your comment is that this article is not updated to .NET 6, everything else is completely incorrect. This just means that you didn’t even try to read it and code with it. If you just use the Program class instead of the Startup class, you will see that everything is the same and that the article is perfectly valid.
Thanks for your reply. Int the article it reads “After the installation, let’s modify the
ConfigureServicesmethod to register the JWT authentication:”But there is no longer a ConfigureServices section ?
What I am saying is that this is going to be confusing for new users.
There are so many articles on the web that have gone out of date, author’s need to update them for new tech that comes along. They may even find themselves on the receiving end of many, many coffees. I mean, how long would it take for you to update to .net 6.0 – ?
Cheers!
As I have said, you don’t have the Startup class, so all you have to do is to switch to the Program class. Trust me if readers of this article don’t know how to switch to Program in .NET 6 from Startup in .NET 5, then this is not a good article for them, they should learn the .NET 6 basics, and for that, we have the updated .NET Core Web API series of articles.
Now regarding your question how long would it take for me to update… It is easy for you to say when you are looking at this single article, but we have around 600 articles on the site, so yes, it takes a lot of time because having a blog is not only about updating old articles but preparing new ones, taking care of your writers, costs, etc… I’ve already updated some articles, but there is no way to update them all at once, it just takes time.
That said, even though this whole Blazor series (and all the blazor articles) are written in .NET 5, they are perfectly valid for .NET 6. Of course, we will try to update the articles as soon as we can.
Best regards.
Hi Marinko,
Great tutorial, thank you for your sharing. One little question, should we put the token expiry check within the GetAuthenticationStateAsync()? In case an accident that refresh token doesn’t work and we should return _anonymous state.
I am not sure about that, but it doesn’t mean that you shouldn’t put that logic there. You know the flow and the needs of your app the best, so you should implement it in the way you think is the best.
Hi Marinko,
This was excellent and really helped with a blazor project I was working on. One thing I did was add an extra claim to the GetClaims function: new Claim(“id”, id.ToString()), to use this in http calls to select the relevant data for the user without needing to do a call to the users table each time.
For example on an authorised route on api controller:
var identity = HttpContext.User.Identity as ClaimsIdentity;
            if (identity != null)
            {
                return await _studentService.GetStudentContacts(Convert.ToInt32(identity.FindFirst("id").Value));
            }
            else return null;
This works brilliantly when first logging in but after about 5-10 minutes of inactivity the user still appears as authorised in blazor and .net api but the id claim is no longer available and the find value fails.
Is there something really obvious I am missing? Very new to JWT so my assumption is its me and not the great code supplied.
I can’t be 100% sure here, but it looks as if your token has expired. Have you protected your blazor and API parts with the [Authorize] attribute? Basically, if the token is invalid, you should, at least, get the 401 response from the API’s side. Also, one question, have you finished this entire series of articles, since there are more articles that explain security a bit more using Roles…
Yes I have the Authorize on both the controller and on the razor pages. I must admit I have not looked at the roles one as I didn’t need to use role based security in the project I am working on.
The token expiring makes sense as logging off and on it works again (until 5-10 minutes has passed again).
It appears that the RefreshTokenDto object does not contain anything in the RefreshToken parameter when attmpeting to refresh so this is what is failing
Found the issue and as suspected it was me 🙂
For anyone reading this, make sure to follow the refresh token article after the roles one and ensure the Login method returns the refreshtoken in the AuthResponseDto
Hi Richard. I am glad you solved the issue. Basically, we couldn’t place all the materials into a single article, it had to be split. So, my usual advice, when reading articles from the series, is to follow the series all the way long, to avoid things like this. Anyhow, thanks a lot for sharing the solution with us.
Hi, i’ve tried to write comments here but they keep disappearing.
Anyway, the username/email disappears from the navbar if you refresh/reload the page. I can’t seem to find a reason for that, any idea how to fix that?
Edit: I found the reason. I forgot to include the email with the JWT claims in my web api.
Hi where did you do this? Got the same problem
Hey guys, in the Login method:
var authResult = await _client.PostAsync(“https://localhost:5011/api/accounts/login”, bodyContent);
how would you het the URL from the appsettings.json?
There are several ways to do that. Please visit this https://code-maze.com/net-core-series/ page and find articles about configuration. You have everything in there.
Hey guys, in the Login method:
var authResult = await _client.PostAsync(“https://localhost:5011/api/accounts/login”, bodyContent);
how would you het the URL from the appsettings.json?
Hi Marinko, I am looking currently into Blazor WebAssembly, and checking out this tutorial, but it throws an exception here ((AuthStateProvider)_authStateProvider).NotifyUserAuthentication(userForAuthentication.Email);
saying it is an invalid cast. The login functionality works for me from Postman, but from the client, I keep getting this error. I even copied the code for AuthenticationService from your repo, still the same error.
If your AuthStateProvider class inherits from the AuthenticationStateProvider, then this cast is just fine. The _authStateProvider variable is of the AuthenticationStateProvider type and since our custom AuthStateProvider inherits from it, we can safely cast this variable to be able to call methods from that custom class. Without your code, I can’t help you more.
Ok, I found it, I used the Test Auth Provider also as a registered service in program.cs. Please ignore my above comment.
I have to tell you that in my projects I follow your structure, it seems to me the cleanest and most readable, how do we handle here when the token has expired?
Hi. Thanks a lot for your support.
Regarding the refresh token, it is a bit of custom work because we have to implement it on our own.
Maybe we will write an article on that topic, but what you have to do is to implement a service to check for the validiti of your token, for example:
public class TokenRefresher
{
private readonly AuthenticationStateProvider _auth;
public TokenRefresher(AuthenticationStateProvider auth)
{
_auth = auth;
}
public async Task TryRefreshToken()
{
var authState = await _auth.GetAuthenticationStateAsync();
var user = authState.User;
var exp = user.FindFirst(c => c.Type.Equals("exp")).Value;
var expTime = DateTimeOffset.FromUnixTimeSeconds(Convert.ToInt64(exp));
Console.WriteLine(expTime);
var timeUTC = DateTime.UtcNow;
Console.WriteLine(timeUTC);
var diff = expTime - timeUTC;
if (diff.TotalMinutes <= 2) Console.WriteLine("Send refresh token request"); else Console.WriteLine("Token is still valid"); } }
This is just dummy code that checks the exp claim from the JWT and verifies shoud we send the refresh token request or not.
Then you can call this method before you execute your HTTP request or before your protected component initializes. After the refresh token request is finished you should store a new access token and refresh token in the storage.
Of course, for the API side logic, you can read this article https://code-maze.com/using-refresh-tokens-in-asp-net-core-authentication/ . It is with Angular and ASP.NET Core Web API, but, the point is the same.
Thank you very much, I had something like that in mind but I wasn’t sure, I think it’s the way to go
But let’s imagine this is a web application and it will only be used on the web and not on another (mobile) platform, is it worth making controllers? Wouldn’t it be better to access directly through a service and not through httpclient?
Well, if you don’t have client application that consumes your server app, but just a server web app, then you can implement it with just services. We had to do it this way, since we worked with Web API + Angular. And I will do the same for this series, since our Blazor WASM app is our client app.
very clear introduction, thanks. how should i proceed if i want to Identity(login/registration/genearte jwt token) and product (service webapi/check token) in two different web apps? actually I want use different data stores (sqlserver and mongodb). should i share the same JWT settings?
If you want to have to client web applications and a single server for the authorization, you should use IdentityServer4. This is prefered way for authentication with multiple client apps. You can read more about it here: https://code-maze.com/identityserver-4-series/. Then in the IS4 project, you can intergrate ASP.NET Core Identity and provide user management actions.
Thanks Marinko, i have already go through the Tutorial, I think i got the point, thanks for the excellent tutorial