

Up until now, we have learned how to use AuthenticationStateProvider in Blazor WebAssembly. Additionally, we have learned how to create registration functionality as well as Login and Logout functionalities in our application. But what about the roles? Well, in this article, we are going to learn how to create a role-based authorization in our Blazor WebAssembly application and how to modify AuthenticationStateProvider to support this feature.
For the complete navigation for this series, you can visit the Blazor Series page.
So, let’s start.
Adding Roles to the Database
If we inspect the Startup.cs class in the Web API project, or the Program class in .NET 6 and above, we are going to see that we already support roles:
services.AddIdentity<IdentityUser, IdentityRole>()
    .AddEntityFrameworkStores<ProductContext>();
So, all we have to do is to add different roles to the database. To do that, let’s create a new RoleConfiguration class inside the Configuration folder and modify it:
public class RoleConfiguration : IEntityTypeConfiguration<IdentityRole>
{
    public void Configure(EntityTypeBuilder<IdentityRole> builder)
    {
        builder.HasData(
            new IdentityRole
            {
                Name = "Viewer",
                NormalizedName = "VIEWER"
            },
            new IdentityRole
            {
                Name = "Administrator",
                NormalizedName = "ADMINISTRATOR"
            }
        );
    }
}
Here we just create two roles that we are going to seed to the database.
After that, we are going to modify the OnModelCreating method in the ProductContext class:
protected override void OnModelCreating(ModelBuilder modelBuilder)
{
    base.OnModelCreating(modelBuilder);

    modelBuilder.ApplyConfiguration(new ProductConfiguration());
    modelBuilder.ApplyConfiguration(new RoleConfiguration());
}
With this in place, we are ready to create our migration files:
PM> Add-Migration InitialRoleSeed
And update the database:
PM> Update-Database
With that, we have our roles added to the database.
Just one more thing. Since we already have a single user in our database, we can assign an administrator role to that user. All we have to do is to write a simple INSERT query in the SQL Management Studio:
INSERT INTO AspNetUserRoles
VALUES ('22da8bd7-7ba3-40ad-9ebd-f0c149e759d6','c2671493-8bcf-4a82-969b-6c5fbc2cd5e0')
Of course, you have to replace these id values with your user and role id values.
Supporting Role-Based Authorization with Register Action and Claims
What we want to do here is to assign a Viewer role to every user registered through the Registration form. To do that, we have to slightly modify the RegisterUser action in the Accounts controller:
[HttpPost("Registration")]
public async Task<IActionResult> RegisterUser([FromBody] UserForRegistrationDto userForRegistration)
{
    if (userForRegistration == null || !ModelState.IsValid)
        return BadRequest();

    var user = new IdentityUser { UserName = userForRegistration.Email, Email = userForRegistration.Email };

    var result = await _userManager.CreateAsync(user, userForRegistration.Password);
    if (!result.Succeeded)
    {
        var errors = result.Errors.Select(e => e.Description);

        return BadRequest(new RegistrationResponseDto { Errors = errors });
    }

    await _userManager.AddToRoleAsync(user, "Viewer");

    return StatusCode(201);
}
That’s all it takes, but we require one more thing. We want to add this role or multiple roles related to a single user, inside the JWT claims. To do that, we have to modify the private GetClaims method in the same controller:
private async Task<List<Claim>> GetClaims(IdentityUser user)
{
    var claims = new List<Claim>
    {
        new Claim(ClaimTypes.Name, user.Email)
    };

    var roles = await _userManager.GetRolesAsync(user);
    foreach (var role in roles)
    {
        claims.Add(new Claim(ClaimTypes.Role, role));
    }

    return claims;
}
Additionally, since this method is now the async one, we have to add the await keyword while calling it inside the Login action:
var claims = await GetClaims(user);
Excellent.
Once we send the Postman request to the Login action, we are going to get the valid token as we did in a previous article. But this time, if we inspect the token, we are going to find an additional role claim inside it:
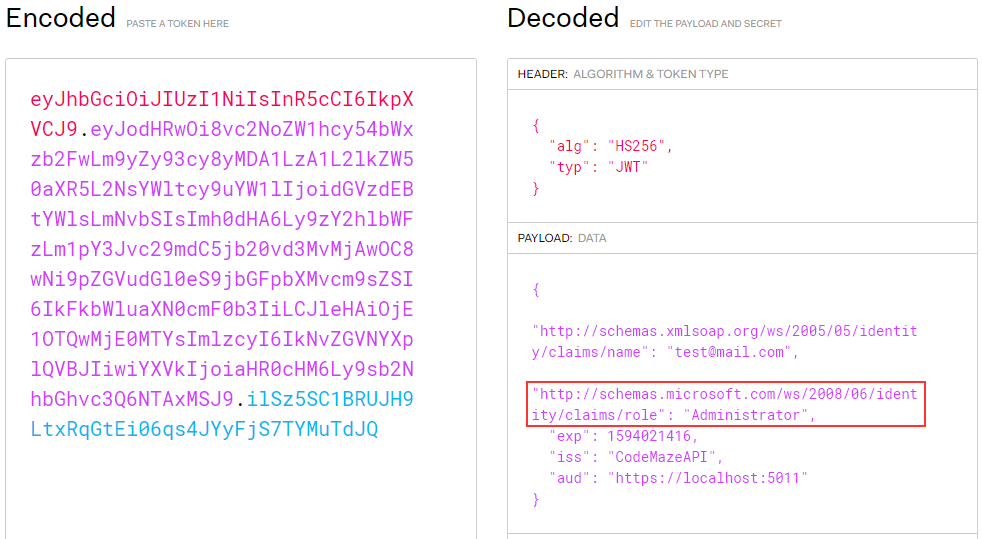
Nicely done.
We can move on to the Blazor WebAssembly part.
Role-Based Authorization with the Blazor Client Application
In a previous part, we have implemented our AuthenticationStateProvider with the JwtParser class that extracts claims from our token. But in that class, we didn’t cover the role claims. So, it is time to change that.
Let’s first modify the ParseClaimsFromJwt method:
public static IEnumerable<Claim> ParseClaimsFromJwt(string jwt)
{
    var claims = new List<Claim>();
    var payload = jwt.Split('.')[1];

    var jsonBytes = ParseBase64WithoutPadding(payload);

    var keyValuePairs = JsonSerializer.Deserialize<Dictionary<string, object>>(jsonBytes);

    ExtractRolesFromJWT(claims, keyValuePairs);

    claims.AddRange(keyValuePairs.Select(kvp => new Claim(kvp.Key, kvp.Value.ToString())));

    return claims;
}
As you can see, we are calling an additional method to extract roles from JWT. That said, let’s create this missing method:
private static void ExtractRolesFromJWT(List<Claim> claims, Dictionary<string, object> keyValuePairs)
{
    keyValuePairs.TryGetValue(ClaimTypes.Role, out object roles);

    if (roles != null)
    {
        var parsedRoles = roles.ToString().Trim().TrimStart('[').TrimEnd(']').Split(',');

        if (parsedRoles.Length > 1)
        {
            foreach (var parsedRole in parsedRoles)
            {
                claims.Add(new Claim(ClaimTypes.Role, parsedRole.Trim('"')));
            }
        }
        else
        {
            claims.Add(new Claim(ClaimTypes.Role, parsedRoles[0]));
        }

        keyValuePairs.Remove(ClaimTypes.Role);
    }
}
Here, we try to extract roles from the keyValuePairs dictionary. If the roles exist, we split the roles into a string array. If we have more than one role, we iterate through each of them and add them to the claims list. Otherwise, we just add that single role to the claims list. Also, we are using the Trim, TrimStart, and TrimEnd methods to remove the square brackets and quotation marks from our roles. If a user has multiple roles, the roles object looks like this: ["FirstRole","SecondRole"]. So, by using all the Trim methods, we are removing these brackets and quotation marks.
Now, we want to modify the NotifyUserAuthentication method from the AuthStateProvider class:
public void NotifyUserAuthentication(string token)
{
    var authenticatedUser = new ClaimsPrincipal(new ClaimsIdentity(JwtParser.ParseClaimsFromJwt(token), "jwtAuthType"));
    var authState = Task.FromResult(new AuthenticationState(authenticatedUser));
    NotifyAuthenticationStateChanged(authState);
}
As you can see, we don’t accept just an email as a parameter but the entire token. Additionally, for the ClaimsIdentity, we use all the claims parsed from the JwtParser class.
Due to this change, we have to modify the call to this method from the Login method inside the AuthenticationService class:
public async Task<AuthResponseDto> Login(UserForAuthenticationDto userForAuthentication)
{
    //previous code

    await _localStorage.SetItemAsync("authToken", result.Token);

    ((AuthStateProvider)_authStateProvider).NotifyUserAuthentication(result.Token);
    _client.DefaultRequestHeaders.Authorization = new AuthenticationHeaderValue("bearer", result.Token);

    return new AuthResponseDto { IsAuthSuccessful = true };
}
We are using the entire token as a parameter instead of just an email.
Testing Role-Based Authorization
Before we start with testing, we are going to register another user in our application. After registration, this user will have the Viewer role.
Right now, only authorized users can access the Products page. But, let’s change that a bit. Let’s assume that only administrators can access this page. To do that, we have to modify the [Authorize] attribute in the Products.razor file:
@attribute [Authorize(Roles = "Administrator")]
We add the Roles property with the Administrator value.
Now, if we start both applications and login as a viewer, we won’t be able to access this page:
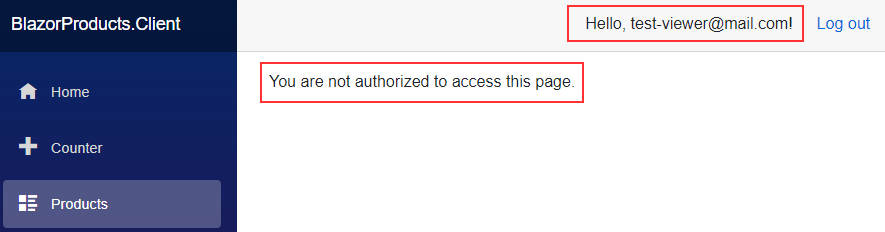
But if we try to login with the administrator account:
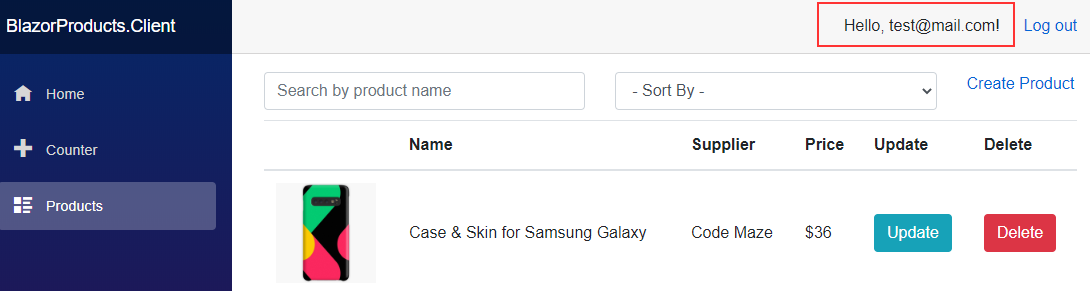
We can see that we can access the page.
Additionally, if we don’t want to allow users with the Viewer role to even see the Products menu item, we can do that by modifying the NavMenu.razor file:
<AuthorizeView Roles="Administrator">
    <Authorized>
        <li class="nav-item px-3">
            <NavLink class="nav-link" href="products">
                <span class="oi oi-list-rich" aria-hidden="true"></span> Products
            </NavLink>
        </li>
    </Authorized>
</AuthorizeView>
With the previous logic, the Products menu was visible only to authorized users. Now, we allow this link to be visible only to authorized users in the Administrator role.
Again, you can log in with both users and confirm that the Viewers can’t see the Products menu item.
Finally, since the client code can be bypassed, we should ensure that our API’s endpoint is protected properly as well:
[Route("api/products")]
[ApiController]
[Authorize(Roles = "Administrator")]
public class ProductsController : ControllerBase
And that’s all it takes.
We have implemented Role-Based authorization in our Blazor WebAssembly application.
Conclusion
In this article, we have learned how to implement Role-Based authorization with Blazor WebAssembly and our API application. We have seen how to add roles to the database, how to include them in the JWT as claims, and how to parse them on the client level.
Additionally, we have learned how to protect endpoints, limit access to some pages, and how to hide pages using roles in our Blazor WASM application.
In the next article, we are going to show you how to refresh your access token with Blazor WebAssembly and ASP.NET Core Web API.
Best regards.

Why do authors not keep their articles up to date? I am using .net 6.0 and your code does not help against .net 6.0. There is NO CONFIGURATION folder to add a class to!!
Hello Luke. My big big advice to you is to read the article carefully before adding comments like this one. Also, we can read small letters as well, so no need for all caps. If you’ve read the article carefully, you would notice a sentence like this one: “Up until now, we have learned how to use AuthenticationStateProvider in Blazor WebAssembly.” or even this one: “For the complete navigation for this series, you can visit the Blazor Series page.” – the last one even has a link to all the articles from the series. Yes, from the series, so this is just a part of the entire Blazor WebAssembly series of articles. That means that we have created the Context/Configuration folder in one of the previous articles and in this one we just continue the story. So, no matter how much article is updated or not, you will find nowhere the Configuration folder because it is a custom-created one.
Also, when we already talking about up-to-date articles – all the articles from this series are up to date. I went through each of them and added the differences between .NET 5 and .NET 6 so that people using both versions can follow the series.
One last piece of advice – we always leave a source code for each of our articles, and you can find it on top of the article. If you just looked at it, you would’ve found the Context folder and inside the Configuration folder, so it would be pretty easy for you to follow along with the article – but again, I guess it is much easier to take a keyboard turn on Caps Lock and start waging an online war because why not…
If you want to use claims.Add(new Claim(“roles”, role)); instead of claims.Add(new Claim(ClaimTypes.Role, role)); use Policy= instead of Role=
https://stackoverflow.com/questions/71170416/blazor-wasm-using-new-claimroles-role-cause-attribute-authorizeroles
Better solution :
return new AuthenticationState(new ClaimsPrincipal(new ClaimsIdentity(ParseClaimsFromToken(token), “jwtAuthType”, ClaimTypes.Name, “Roles”)));
var authenticatedUser = new ClaimsPrincipal(new ClaimsIdentity(ParseClaimsFromToken(token), “jwtAuthType”, ClaimTypes.Name, “Roles”));
When you have this type of error, and you are not aware why do you have it, it is always recommended to download our source code and compare it to yours. This way, you can easily find the differences in implementation.
As you can see from the article’s image, it works, since I’ve captured that image from a working application 🙂
Hi Marinko,
Firstly, thanks for your great effort on this series.
I have followed this article, every thing works perfectly, until the last statement: [Authorize(Roles = “Administrator”)] it stopped working. Note: I used .NET5 to follow your article. Here the error:
Failed to load resource: the server responded with a status of 404 ()
blazor.webassembly.js:1 crit: Microsoft.AspNetCore.Components.WebAssembly.Rendering.WebAssemblyRenderer[100]
Unhandled exception rendering component:
System.ApplicationException
at BlazorWebAssemblyRoleBasedAuth.HttpRepository.ProductHttpRepository.GetProducts(ProductParameters productParameters) in C:\ProjectNet5\Blazor Lab\BlazorWebAssemblyRoleBasedAuth\HttpRepository\ProductHttpRepository.cs:line 41
at BlazorWebAssemblyRoleBasedAuth.Pages.Products.GetProducts() in C:\ProjectNet5\Blazor Lab\BlazorWebAssemblyRoleBasedAuth\Pages\Products.razor.cs:line 32
at BlazorWebAssemblyRoleBasedAuth.Pages.Products.OnInitializedAsync() in C:\ProjectNet5\Blazor Lab\BlazorWebAssemblyRoleBasedAuth\Pages\Products.razor.cs:line 22
at Microsoft.AspNetCore.Components.ComponentBase.RunInitAndSetParametersAsync()
at Microsoft.AspNetCore.Components.RenderTree.Renderer.GetErrorHandledTask(Task taskToHandle).
Any help will be appreciated.
Tam
Hi Tam. As you can see, you are getting the 404 error (Not Found), so I don’t think that using the Authorize attribute caused that. In this case, it just prevents unauthorized users, even authorized without the Administrator role, to access the page. Try placing breakpoints on line 41 of the ProductHtpRepository class and the Web API’s action to see what is going on there.
Hi Marinko,
Thanks for postpone quickly. Here the break point attached. Note if I remove [Authorize(Roles = “Administrator”)] from the Products Controller, it works fine.
Regards,
Tam
Hi Marinko,
Here you are when I comment out the [Authorize(Roles = “Administrator”)] from the Products Controller. It reaches the controller. Please see attached picture.
Regards,
Tam
Ah, you’ve sent me the stack trace of the client project, so I thought the Authorize attribute is from the client’s project, not the server’s. Is there any error from the server side? Have you tried removing the Roles part from the Authorize attribute? If this works, can you inspect your claims by inspecting the User.Claims collection inside the controller’s action, to see if it contain roles at all? Finally, have you compared your project to ours? Try downloading our solution and compare it. It is pretty hard for me, based on the data I currently have, to help you more.
Hi Maninko,
I don’t remove [Authorize(Roles = “Administrator”)], it fails on the client side, but if I remove it from products controller, no problem, it returns the response as expected. Here the server side attached.
Regards,
Tam
Ok, but again, at this point, I am not sure why the problem exists. Try downloading our server-side project (it is .NET 5 as well), and try running it with your client-side to see if this works. If it is, then it is something related to your server-side project, so you just have to compare those two and find the differences.
Hi Marinko,
Here the attached that I have compared many time.
Regards,
Tam
I didn’t mean that. Implementation of the auth functionality is no related to these classes. Compare the auth implementation, JWT configuration, and all the other stuff related to the Authentication mechanism on the server-side. That is the problem, as much as I can understand from your comments.
Hi Marinko,
Thanks for response. I will investigate into this issue.
Reagrds,
Tam
Hi, thank you for your effort in this tutorials. When I try to asign Administrator role to user in database in table AspNetUserRoles, I got this error: “The INSERT statement conflicted with the FOREIGN KEY constraint “FK_AspNetUserRoles_AspNetRoles_RoleId”. The conflict occurred in database “CodeMazeBlazor11”, table “dbo.AspNetRoles”, column ‘Id’.” Thank you
Well, as the error states you have a conflict in the database. RoleId must be the same inside the aspnetroles and aspnetuserroles tables.
Once again thank you on your effort, This working nice,
May I please you for help:
How we can handle 401 Unauthorized http requests in client.
Here is scenario:
On server app in WeatherForecastController add specific role access
[Authorize(Roles = "NonExistingRole")]On client app on page FetchData leave
@attribute [Authorize]without role.When user open FetchData page client app will crash.
In console there is 401 error but user is only see crash and relaoad button.
Is there way to configure http service on client app whenever hits 401 error user be redirected to AccesResticet page on client.
For this, you would have to use a custom HTTP logic, as we did in our project. With that setup, you can check if your response is successful and if it is not, you can create additional actions. For exampe, you can look at our ProductHttpRepository service. There you can find the GetProducts method and in the middle you can see the if(!response.IsSuccessStatusCode) expression. If this returns false, it means the response was not successful and you can always check which status code was returned (response.StatusCode) and pass it to the component where you could navigate your user to the required page or just show an error message.
Once again thank you on your code and sample, so far I fund two issues in your code.
First:
If you try to from server send some claim which contain name with non Base64 chars you will get exception.
In Login controller in method GetClaims add claim with non standard chars
claims.Add(new Claim(ClaimTypes.NameIdentifier, "žćčđšŽĆČĐŠ"));This will throw exception on client in ParseBase64WithoutPadding
Unhandled exception rendering component: The input is not a valid Base-64 string as it contains a non-base 64 character, more than two padding characters, or an illegal character among the padding characters.
My workaround for this solution is
private static byte[] ParseBase64WithoutPadding(string payload){
payload = payload.Replace('-', '+').Replace('_', '/');
var base64 = payload.PadRight(payload.Length + (4 - payload.Length % 4) % 4, '=');
return Convert.FromBase64String(base64);
}
Other issue is handling roles.
If user has multiple roles for claim method ExtractRolesFromJWT shoud looks like
keyValuePairs.TryGetValue(ClaimTypes.Role, out object roles);(roles.ToString()); if (roles != null)
{
if (roles.ToString().Trim().StartsWith("["))
{
var parsedRoles = JsonSerializer.Deserialize
foreach (var parsedRole in parsedRoles)
{
claims.Add(new Claim(ClaimTypes.Role, parsedRole));
}
}
else
{
claims.Add(new Claim(ClaimTypes.Role, roles.ToString()));
}
keyValuePairs.Remove(ClaimTypes.Role);
}
claims.AddRange(keyValuePairs.Select(kvp => new Claim(kvp.Key, kvp.Value.ToString())));
Thanks a lot for the code samples, this will help someone for sure if they face these kind of situations (None base64 characters and multiple roles for a single user). Our example didn’t work that way and that’s the reason why we didn’t cover this cases. But again, thank you very much for sharing the code samples with us.
Thank you for your code and knowledge, Does this is still up to date since .net core ver 3.1. Now in default new app from visaul stuido they osing Oid proveder
You will get an OIDC provider if you want to use a default implementation for authentication. Depends what you want to do. As I said in my previous comment, and as you could confirm if you type the code from this and all the other articles, this is completely valid and up to date code.
Thank you for your code and knowledge, Does this is still up to date since .net core ver 3.1. ?
Since deff app now using builder.Services.AddHttpClient
Hello. First of all you are welcome and thanks for reading the article.
Yes, everything is up to date, moreover entire series was created with the ASP.NET Core 3.1 version. For now, or at least for the time I was creating all these articles related to Blazor WASM, this was the default way to register HttpClient in Blazor WASM applications.