

In this article, we are going to show you how to implement a refresh token with Blazor WebAssembly and ASP.NET Core Web API. We are going to change our solution from the previous articles, on both API and Blazor sides, to support refresh token actions.
With step-by-step explanations and modifications, we are going to have a fully functional solution that silently refreshes our access token before it expires.
If you have followed our entire Blazor series, then you have the starting code for this article. If not, you can visit the previous article and download the source code as a starting point for this project.
For the complete navigation for this series, you can visit the Blazor Series page.
So, let’s get started.
User Class Creation, Class Modifications, and New Migration
Because we want to add a new refresh token functionality for our users, we have to extend the AspNetUsers table. To do that, we are going to modify our Web API project and create a new User class in the Context folder:
public class User : IdentityUser
{
    public string RefreshToken { get; set; }
    public DateTime RefreshTokenExpiryTime { get; set; }
}
For more information regarding this User class and extending the tables from ASP.NET Core Identity, you can read our article that covers this topic in great detail.
After that, we have to modify the ProductContext class:
public class ProductContext : IdentityDbContext<User>
{
    public ProductContext(DbContextOptions options)
        :base(options)
    {
    }

    ...
}
As you can see, our context class doesn’t inherit from the IdentityDbContext<IdentityUser> class anymore, but from the IdentityDbContext<User> class.
Also, we have to modify the Identity registration inside the Startup class:
services.AddIdentity<User, IdentityRole>()
    .AddEntityFrameworkStores<ProductContext>();
Or in .NET 6 and above:
builder.Services.AddIdentity<User, IdentityRole>()
  .AddEntityFrameworkStores<ProductContext>();
Here as well, we are not using the IdentityUser class anymore but the User class instead.
Then, we have to modify our AccountsController class. Basically, we have to replace all IdentityUser occurrences with the User class. The easiest way to do that is to press CTRL+H and enter the required terms for the replace action:
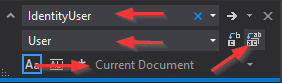
We should replace four IdentityUser occurrences in this document.
Finally, to reflect these changes in our database, we are going to create and execute migration:
Add-Migration AdditionalUserFiledsForRefreshToken
Update-Database
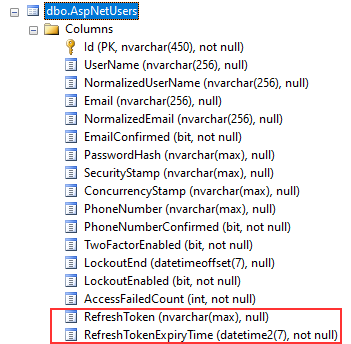
As soon as we do that, our AspNetUsers table will have two additional columns:
Token Service Implementation
Now, we came to the point where we need to implement a refresh token logic. For that, we are going to create a separate service and use it inside the Accounts controller. But, let’s go step by step.
First, we are going to create a TokenHelpers folder and inside a new ITokenService interface:
public interface ITokenService
{
    SigningCredentials GetSigningCredentials();
    Task<List<Claim>> GetClaims(User user);
    JwtSecurityToken GenerateTokenOptions(SigningCredentials signingCredentials, List<Claim> claims);
    string GenerateRefreshToken();
    ClaimsPrincipal GetPrincipalFromExpiredToken(string token);
}
The first three members are the methods that we already have in the AccountsController – we are going to move them in a bit. The other two are the new ones.
So, let’s create a new TokenService class in the same folder.
And let’s register this service in the Startup class:
services.AddScoped<ITokenService, TokenService>();
Or in .NET 6 and above in the Program class:
builder.Services.AddScoped<ITokenService, TokenService>();
Before we add implementation to the TokenService class, let’s go to the AccountsController, cut the GetSigningCredentials, GetClaims, and GenerateTokenOptions methods, and paste them in the TokenService class. Also, we can move the IConfiguration and IConfiguratoinSection variables from the AccountsController to this class.
Lastly, we can inject the ITokenService inside the AccountsController, and fix the errors in the Login action:
[Route("api/accounts")]
[ApiController]
public class AccountsController : ControllerBase
{
    private readonly UserManager<User> _userManager;
    private readonly ITokenService _tokenService;

    public AccountsController(UserManager<User> userManager, ITokenService tokenService)
    {
        _userManager = userManager;
        _tokenService = tokenService;
    }

    [HttpPost("Registration")]
    public async Task<IActionResult> RegisterUser([FromBody] UserForRegistrationDto userForRegistration)
    {
        ...
    }

    [HttpPost("Login")]
    public async Task<IActionResult> Login([FromBody] UserForAuthenticationDto userForAuthentication)
    {
        var user = await _userManager.FindByNameAsync(userForAuthentication.Email);

        if (user == null || !await _userManager.CheckPasswordAsync(user, userForAuthentication.Password))
            return Unauthorized(new AuthResponseDto { ErrorMessage = "Invalid Authentication" });

        var signingCredentials = _tokenService.GetSigningCredentials();
        var claims = await _tokenService.GetClaims(user);
        var tokenOptions = _tokenService.GenerateTokenOptions(signingCredentials, claims);
        var token = new JwtSecurityTokenHandler().WriteToken(tokenOptions);

        return Ok(new AuthResponseDto { IsAuthSuccessful = true, Token = token });
    }
}
As we already have some implementation in the TokenService class, we have to add two more methods:
public class TokenService : ITokenService
{
    private readonly IConfiguration _configuration;
    private readonly IConfigurationSection _jwtSettings;
    private readonly UserManager<User> _userManager;

    public TokenService(IConfiguration configuration, UserManager<User> userManager)
    {
        _configuration = configuration;
        _jwtSettings = _configuration.GetSection("JwtSettings");
        _userManager = userManager;
    }

    public SigningCredentials GetSigningCredentials()
    {
        var key = Encoding.UTF8.GetBytes(_jwtSettings["securityKey"]);
        var secret = new SymmetricSecurityKey(key);

        return new SigningCredentials(secret, SecurityAlgorithms.HmacSha256);
    }

    public async Task<List<Claim>> GetClaims(User user)
    {
        var claims = new List<Claim>
        {
            new Claim(ClaimTypes.Name, user.Email)
        };

        var roles = await _userManager.GetRolesAsync(user);
        foreach (var role in roles)
        {
            claims.Add(new Claim(ClaimTypes.Role, role));
        }

        return claims;
    }

    public JwtSecurityToken GenerateTokenOptions(SigningCredentials signingCredentials, List<Claim> claims)
    {
        var tokenOptions = new JwtSecurityToken(
            issuer: _jwtSettings["validIssuer"],
            audience: _jwtSettings["validAudience"],
            claims: claims,
            expires: DateTime.Now.AddMinutes(Convert.ToDouble(_jwtSettings["expiryInMinutes"])),
            signingCredentials: signingCredentials);

        return tokenOptions;
    }

    public string GenerateRefreshToken()
    {
        var randomNumber = new byte[32];
        using (var rng = RandomNumberGenerator.Create())
        {
            rng.GetBytes(randomNumber);
            return Convert.ToBase64String(randomNumber);
        }
    }

    public ClaimsPrincipal GetPrincipalFromExpiredToken(string token)
    {
        var tokenValidationParameters = new TokenValidationParameters
        {
            ValidateAudience = true,
            ValidateIssuer = true,
            ValidateIssuerSigningKey = true,
            IssuerSigningKey = new SymmetricSecurityKey(
                Encoding.UTF8.GetBytes(_jwtSettings["securityKey"])),
            ValidateLifetime = false,
            ValidIssuer = _jwtSettings["validIssuer"],
            ValidAudience = _jwtSettings["validAudience"],
        };

        var tokenHandler = new JwtSecurityTokenHandler();
        SecurityToken securityToken;
        var principal = tokenHandler.ValidateToken(token, tokenValidationParameters, out securityToken);

        var jwtSecurityToken = securityToken as JwtSecurityToken;
        if (jwtSecurityToken == null || !jwtSecurityToken.Header.Alg.Equals(SecurityAlgorithms.HmacSha256,
            StringComparison.InvariantCultureIgnoreCase))
        {
            throw new SecurityTokenException("Invalid token");
        }

        return principal;
    }
}
GenerateRefreshToken() contains the logic to generate the refresh token. We use the RandomNumberGenerator class to generate a cryptographic random number for this purpose.
We also use the GetPrincipalFromExpiredToken()method to get the user principal from the expired access token. We make use of the ValidateToken() method of JwtSecurityTokenHandler class for this purpose. This method validates the token and returns the ClaimsPrincipal object. Other methods in this class are the same as they were in the AccountsController.
Login Action Update to Support Refresh Token Flow
With the TokenService in place, we can modify our Login action to create a refresh token and its expiration period for newly logged-in users.
Just before we do that, let’s modify the AuthResponseDto class (Entities/DTO folder) to support a refresh token in the response to the client :
public class AuthResponseDto
{
    public bool IsAuthSuccessful { get; set; }
    public string ErrorMessage { get; set; }
    public string Token { get; set; }
    public string RefreshToken { get; set; }
}
Now, we can modify the Login action:
[HttpPost("Login")]
public async Task<IActionResult> Login([FromBody] UserForAuthenticationDto userForAuthentication)
{
    var user = await _userManager.FindByNameAsync(userForAuthentication.Email);

    if (user == null || !await _userManager.CheckPasswordAsync(user, userForAuthentication.Password))
        return Unauthorized(new AuthResponseDto { ErrorMessage = "Invalid Authentication" });

    var signingCredentials = _tokenService.GetSigningCredentials();
    var claims = await _tokenService.GetClaims(user);
    var tokenOptions = _tokenService.GenerateTokenOptions(signingCredentials, claims);
    var token = new JwtSecurityTokenHandler().WriteToken(tokenOptions);

    user.RefreshToken = _tokenService.GenerateRefreshToken();
    user.RefreshTokenExpiryTime = DateTime.Now.AddDays(7);

    await _userManager.UpdateAsync(user);

    return Ok(new AuthResponseDto { IsAuthSuccessful = true, Token = token, RefreshToken = user.RefreshToken });
}
So, here we populate additional properties with the refresh token and its expiration period, and then just update the logged-in user.
That’s all regarding the AccountsController.
Implementing Refresh Token Action in the TokenController
Let’s continue by creating a new RefreshTokenDto class in the Entities/DTO folder:
public class RefreshTokenDto
{
    public string Token { get; set; }
    public string RefreshToken { get; set; }
}
When the client application sends the refresh token request, it must provide a request body with the access and refresh tokens. So, with this class, we are going to accept that request body.
Now, let’s create a new TokenController in the Controller folder and modify it:
[Route("api/token")]
[ApiController]
public class TokenController : ControllerBase
{
    private readonly UserManager<User> _userManager;
    private readonly ITokenService _tokenService;

    public TokenController(UserManager<User> userManager, ITokenService tokenService)
    {
        _userManager = userManager;
        _tokenService = tokenService;
    }

    [HttpPost]
    [Route("refresh")]
    public async Task<IActionResult> Refresh([FromBody]RefreshTokenDto tokenDto)
    {
        if (tokenDto is null)
        {
            return BadRequest(new AuthResponseDto { IsAuthSuccessful = false, ErrorMessage = "Invalid client request" });
        }

        var principal = _tokenService.GetPrincipalFromExpiredToken(tokenDto.Token);
        var username = principal.Identity.Name;

        var user = await _userManager.FindByEmailAsync(username);
        if (user == null || user.RefreshToken != tokenDto.RefreshToken || user.RefreshTokenExpiryTime <= DateTime.Now)
            return BadRequest(new AuthResponseDto { IsAuthSuccessful = false, ErrorMessage = "Invalid client request" });

        var signingCredentials = _tokenService.GetSigningCredentials();
        var claims = await _tokenService.GetClaims(user);
        var tokenOptions = _tokenService.GenerateTokenOptions(signingCredentials, claims);
        var token = new JwtSecurityTokenHandler().WriteToken(tokenOptions);
        user.RefreshToken = _tokenService.GenerateRefreshToken();

        await _userManager.UpdateAsync(user);

        return Ok(new AuthResponseDto { Token = token, RefreshToken = user.RefreshToken, IsAuthSuccessful = true });
    }
}
In the Refresh action, we check if the model is valid and if it is not, we return a BadRequest. Then, we extract the principal from the expired token and use the Identity.Name property, which is the email of the user, to fetch that user from the database. If the user doesn’t exist, or the refresh tokens are not equal, or the refresh token has expired, we return BadRequest. Otherwise, we use the methods from TokenService to create access and refresh tokens and update the user in the database. Finally, we return a response with the Token and RefreshToken.
That’s it.
Let’s move on to the BlazorWebassembly project.
Refresh Token Implementation with Blazor WebAssembly
After we are done with the server-side implementation, we are going to continue with the client-side.
Now, once we log in, we are not getting only the access token from the Web API but also the refresh token. Due to that, we have to store both tokens in the storage and also remove both of them during the logout action. To do that, we have to modify the Login method in the AuthenticationService class:
public async Task<AuthResponseDto> Login(UserForAuthenticationDto userForAuthentication)
{
    var content = JsonSerializer.Serialize(userForAuthentication);
    var bodyContent = new StringContent(content, Encoding.UTF8, "application/json");

    var authResult = await _client.PostAsync("accounts/login", bodyContent);
    var authContent = await authResult.Content.ReadAsStringAsync();
    var result = JsonSerializer.Deserialize<AuthResponseDto>(authContent, _options);

    if (!authResult.IsSuccessStatusCode)
        return result;

    await _localStorage.SetItemAsync("authToken", result.Token);
    await _localStorage.SetItemAsync("refreshToken", result.RefreshToken);
    ((AuthStateProvider)_authStateProvider).NotifyUserAuthentication(result.Token);
    _client.DefaultRequestHeaders.Authorization = new AuthenticationHeaderValue("bearer", result.Token);

    return new AuthResponseDto { IsAuthSuccessful = true };
}
Also, we have to modify the Logout method from the same class:
public async Task Logout()
{
    await _localStorage.RemoveItemAsync("authToken");
    await _localStorage.RemoveItemAsync("refreshToken");
    ((AuthStateProvider)_authStateProvider).NotifyUserLogout();
    _client.DefaultRequestHeaders.Authorization = null;
}
Good.
At this point, we are storing and removing both access and refresh tokens to/from our storage. But, this only works for the Login and Logout actions. What about the refresh action itself?
Well, let’s start working on that.
The first thing we have to do is to modify the IAuthenticationService interface:
public interface IAuthenticationService
{
    Task<RegistrationResponseDto> RegisterUser(UserForRegistrationDto userForRegistration);
    Task<AuthResponseDto> Login(UserForAuthenticationDto userForAuthentication);
    Task Logout();
    Task<string> RefreshToken();
}
After that, we have to implement this new member in the AuthenticationService class:
public async Task<string> RefreshToken()
{
    var token = await _localStorage.GetItemAsync<string>("authToken");
    var refreshToken = await _localStorage.GetItemAsync<string>("refreshToken");

    var tokenDto = JsonSerializer.Serialize(new RefreshTokenDto { Token = token, RefreshToken = refreshToken });
    var bodyContent = new StringContent(tokenDto, Encoding.UTF8, "application/json");

    var refreshResult = await _client.PostAsync("token/refresh", bodyContent);
    var refreshContent = await refreshResult.Content.ReadAsStringAsync();
    var result = JsonSerializer.Deserialize<AuthResponseDto>(refreshContent, _options);

    if (!refreshResult.IsSuccessStatusCode)
        throw new ApplicationException("Something went wrong during the refresh token action");

    await _localStorage.SetItemAsync("authToken", result.Token);
    await _localStorage.SetItemAsync("refreshToken", result.RefreshToken);

    _client.DefaultRequestHeaders.Authorization = new AuthenticationHeaderValue("bearer", result.Token);

    return result.Token;
}
Because our Refresh action on the API level accepts the DTO that contains both access and refresh tokens, we have to provide that from this method. As you can see, we are doing exactly that by fetching the tokens from the storage and placing them in the tokenDto variable. Then, we just send the request and deserialize the response from the API. If it is not successful, we just throw an Application exception (of course, you can add additional actions here, but this is not the focus of this article). If it’s successful, we store our new tokens in the storage and set the Authorization header for our HTTP Client with a new access token. Finally, we return a new token.
Adding a Service to Check Whether to Refresh Token with Blazor WebAssembly
We are having the RefreshToken method to send that request to the API. But, we don’t want to do that for every single HTTP request. What we want to do is to check our access token first, and then if it is expired or about to expire, send the refresh request.
To do that, we are going to create a new RefreshTokenService class in the HttpRepository folder, and modify it:
public class RefreshTokenService
{
    private readonly AuthenticationStateProvider _authProvider;
    private readonly IAuthenticationService _authService;

    public RefreshTokenService(AuthenticationStateProvider authProvider, IAuthenticationService authService)
    {
        _authProvider = authProvider;
        _authService = authService;
    }

    public async Task<string> TryRefreshToken()
    {
        var authState = await _authProvider.GetAuthenticationStateAsync();
        var user = authState.User;

        var exp = user.FindFirst(c => c.Type.Equals("exp")).Value;
        var expTime = DateTimeOffset.FromUnixTimeSeconds(Convert.ToInt64(exp));

        var timeUTC = DateTime.UtcNow;

        var diff = expTime - timeUTC;
        if (diff.TotalMinutes <= 2)
            return await _authService.RefreshToken();

        return string.Empty;
    }
}
Here, we use the AuthenticationStateProvider object to extract the user’s authentication state with the GetAuthenticationStateAsync method. From the authState variable of type AuthenticationState, we can extract the ClaimsPrincipal object by using the User property. Once we have the claims in the user variable, we extract the expiry claim in the exp variable and convert it to the DateTimeOffset type inside the expTime variable. We also get the current date in the timeUTC variable. After that, we subtract the current time from the expiration time. If the result in minutes is less than equal to two, we want to execute the RefreshToken method from the AuthenticationService and return the result. Otherwise, we just return an empty string.
It is a common practice to refresh a token if it is about to expire, and that’s the reason why we are using the value of two minutes. Of course, you will fit this value to your needs.
Now, before we continue, we are going to register this service in the Program.cs class:
builder.Services.AddScoped<RefreshTokenService>();
Good.
Let’s move on.
Intercepting HTTP Requests Using HTTP Interceptor
Right now, we have our refresh token logic that will work if we call our TryRefreshToken method before sending HTTP requests. In this case, we would have to call this method in all the methods from the ProductHttpRepository class. This should work just fine, but we wan to do something different here.
The thing we want here is to intercept our outgoing HTTP requests and check if we should refresh our token. The advantage of this approach is that we can implement this only in one place and our logic will execute for each request we send to the server.
Let’s see how to do that.
First, we have to install the HttpClientInterceptor library:

After the installation, we have to register the interceptor service and attach it to the specific client in the Program.cs class:
builder.Services.AddScoped(sp => new HttpClient
{
    BaseAddress = new Uri(builder.HostEnvironment.BaseAddress)
}
.EnableIntercept(sp));

 ...

builder.Services.AddHttpClientInterceptor();

...

await builder.Build().RunAsync();
With the AddHttpClientInterceptor method, we are registering the interceptor service in the IOC. Also, we are using the EnableIntercept method to attach interception functionality for this specific HttpClient. This means that our interceptor will intercept any HTTP request sent with this HttpClient. It also means if we register another client and don’t attach the interceptor to it, any request from that client won’t be intercepted.
Now, to use this interceptor, we are going to create another class HttpInterceptorService in the HttpRepository folder:
public class HttpInterceptorService
{
    private readonly HttpClientInterceptor _interceptor;
    private readonly RefreshTokenService _refreshTokenService;

    public HttpInterceptorService(HttpClientInterceptor interceptor, RefreshTokenService refreshTokenService)
    {
        _interceptor = interceptor;
        _refreshTokenService = refreshTokenService;
    }

    public void RegisterEvent() => _interceptor.BeforeSendAsync += InterceptBeforeHttpAsync;

    public async Task InterceptBeforeHttpAsync(object sender, HttpClientInterceptorEventArgs e)
    {
        var absPath = e.Request.RequestUri.AbsolutePath;

        if (!absPath.Contains("token") && !absPath.Contains("accounts"))
        {
            var token = await _refreshTokenService.TryRefreshToken();

            if(!string.IsNullOrEmpty(token))
            {
                e.Request.Headers.Authorization = new AuthenticationHeaderValue("bearer", token);
            }
        }
    }

    public void DisposeEvent() => _interceptor.BeforeSendAsync -= InterceptBeforeHttpAsync;
}
Let’s Explain the Code
First, we inject our registered HttpClientInterceptor and RefreshTokenService services. Then we have three methods.
The HttpClientInterceptor contains four event handlers that enable us to control when the interception will happen. Two of them are synchronous and two of them are asynchronous (BeforeSend/Async, AfterSend/Async). In this class, we are using asynchronous event handlers.
So, in the RegisterEvent method, we are registering our event to the BeforeSendAsync event handler. This means, that before our HTTP request is sent, we are going to intercept it and fire our event.
In the DisposeEvent method, we are doing exactly that. We remove our event subscription from the event handler.
Finally, in our InterceptBeforeHttpAsync event, we first check the request URI of the intercepted request. If it contains token or accounts, we don’t want to invoke refresh token actions, because that request could already be the one we use for the refresh token or login/logout action. But if it doesn’t contain these words in the URI, we call the TryRefreshToken method, and if that method returns a refreshed token, we attach it to the current request before we let it move on towards the API.
The last thing we have to do is to register this class as a service in the Program.cs class:
builder.Services.AddScoped<HttpInterceptorService>();
That’s it.
Using the Interceptor Service
Now, all we have to do is to use this interceptor in the component that we use to fetch the data from the server. It is the Products component.
So, let’s modify the Products.razor.cs file:
public partial class Products : IDisposable
{
    public List<Product> ProductList { get; set; } = new List<Product>();
    public MetaData MetaData { get; set; } = new MetaData();

    private ProductParameters _productParameters = new ProductParameters();

    [Inject]
    public IProductHttpRepository ProductRepo { get; set; }

    [Inject]
    public HttpInterceptorService Interceptor { get; set; }

    protected async override Task OnInitializedAsync()
    {
        Interceptor.RegisterEvent();
        await GetProducts();
    }

    //All the other methods in this class - Get, Sort, Search, Delete

    public void Dispose() => Interceptor.DisposeEvent();
}
So, we inject our interceptor service here and as soon as our component initializes, we register our event to the event handler. This means as long as we are on this component, every request will be intercepted and checked for the refresh token action. Also, we have the Dispose method where we dispose of our event as soon as we navigate away from this component.
Testing Refresh Token Functionality
Before you test this, you should be aware of the expiration period of the token. It is set in the Web API’s appsettings.json file to five minutes.
Token is Valid
Now, as soon as we log in, we will get our access token with the mentioned expiration period. If we navigate to the Products menu, the app is going to send an HTTP request to fetch the products from the server. At that moment, our interceptor will intercept the request and call the TryRefreshToken method, since the URI contains neither token nor accounts word. But because the token is not even close to expiring, the TryRefreshToken method will return an empty string, and our request will just move forward to the API.
The token is About to Expire
After three minutes we can try navigating to the Products page again, or if we are on the Products page, we can just click another link on the pagination. This is going to trigger another HTTP request to fetch the products from the server. But at that point, our token expiration period is fewer than two minutes. This means the TryRefreshToken method will call the RefreshToken method where we send an HTTP request to refresh the token. Our interceptor will intercept that request as well, but since its URI contains the token word, it will be released towards the API. As soon as we get a new token back, our HttpInterceptorService will store it in the Authorization header of a previous request and let it move on towards the API. Also, in the RefreshToken method, this new token will be stored in the Authorization header for all the other requests from our HttpClient.
Testing with the Expired Token
Finally, if you want to test the functionality with the expired token, you will have to wait for about ten or slightly more minutes. That’s because the server adds additional five minutes to the token expiration when validating the access token sent from the client. But after ten minutes, you will see that you will get a new token back from the server, as long as the refresh token hasn’t expired.
Conclusion
That’s it.
We have learned how to implement refresh token functionality with both Blazor WebAssembly and ASP.NET Core Web API applications. Also, we’ve learned some neat tricks to intercept our requests on the client-side, thus allowing us to make changes only in one place in the app.
So, until another article…
All the best.

