

In the previous article, we have created our material navigation menu with a sidebar. Now, since we can navigate on our application, it is time to use the Blazor material table component, to display some data on our page. To fetch the data from the database, we are going to use our ASP.NET Core Web API project, from the Blazor WebAssembly series. The API is already prepared, and we are going to use its functionalities to implement Paging, Searching, and Sorting in our client application.
Since the main focus of this article is on the Blazor material table and paging, searching, and sorting functionalities, we are not going to explain in great detail the Blazor WebAssembly development process. To learn more about that, you can visit our Blazor WebAssembly series of articles, where you can read about Blazor WebAssembly development, authentication, authorization, JSInterop, and other topics as well.
Let’s get down to business.
Web API Project Overview
Our API project already implements Paging, Searching, and Sorting functionalities. So, in this article, we are just going to reuse them for our client application requirements. Since you can read all about these features in the linked articles, we are not going to spend our time explaining them. That said, let’s have a quick overview of the project:
We can find two projects in this solution. The Entities project contains our model class and additional classes (MetaData and ProductParameters) required for Paging, Searching, and Sorting. If we open the ProductParameters class, we are going to see what parameters we expect from our client app:
public class ProductParameters
{
    const int maxPageSize = 50;
    public int PageNumber { get; set; } = 1;
    private int _pageSize = 10;
    public int PageSize
    {
        get
        {
            return _pageSize;
        }
        set
        {
            _pageSize = (value > maxPageSize) ? maxPageSize : value;
        }
    }

    public string SearchTerm { get; set; }
    public string OrderBy { get; set; } = "name";
}
Then, in the main project, we can find several folders with files. In the Repository folder, we have our logic to fetch the data by implementing the Paging, Searching, and Sorting functionalities:
public class ProductRepository : IProductRepository
{
    private readonly ProductContext _context;

    public ProductRepository(ProductContext context)
    {
        _context = context;
    }

    public async Task<PagedList<Product>> GetProducts(ProductParameters productParameters)
    {
        var products = await _context.Products
            .Search(productParameters.SearchTerm)
            .Sort(productParameters.OrderBy)
            .ToListAsync();

        return PagedList<Product>
            .ToPagedList(products, productParameters.PageNumber, productParameters.PageSize);
    }
}
If we open the ProductsController class, we are going to see the entry point for the client’s HTTP requests:
[HttpGet]
public async Task<IActionResult> Get([FromQuery] ProductParameters productParameters)
{
    var products = await _repo.GetProducts(productParameters);

    Response.Headers.Add("X-Pagination", JsonConvert.SerializeObject(products.MetaData));

    return Ok(products);
}
Again, you can find all the information about these functionalities in this section’s linked articles.
Since this project implements an automatic migration, all you have to do is to modify the connection string in the appsettings.json file (if you have to) and start the app. As a result, this will seed all the required data into the database.
Now, we can move on towards the Blazor material table implementation.
Using Blazor Material Table to Show Data
To fetch the data from our API, we are going to follow the steps from our Blazor WebAssembly HttpClient article. So, let’s first modify the Program.cs class:
public class Program
{
    public static async Task Main(string[] args)
    {
        var builder = WebAssemblyHostBuilder.CreateDefault(args);
        builder.RootComponents.Add<App>("#app");

        builder.Services.AddScoped(sp => new HttpClient
        {
            BaseAddress = new Uri("https://localhost:5011/api/")
        });

        builder.Services.AddMudServices();

        await builder.Build().RunAsync();
    }
}
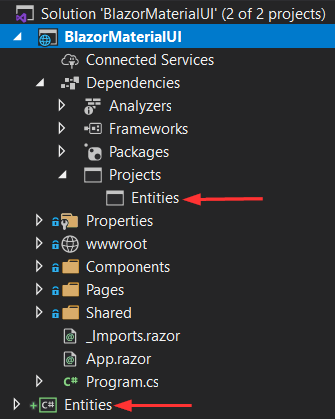
Now, that we target a good API’s address, we can continue by adding the Entities project to our client project and adding a reference:
Now, let’s create a new HttpRepository folder and a new IHttpClientRepository interface inside it:
public interface IHttpClientRepository
{
    Task<List<Product>> GetProducts();
}
Then, we can create a new HttpClientRepository class inside the same folder, and modify it:
public class HttpClientRepository : IHttpClientRepository
{
    private readonly HttpClient _client;
    private readonly JsonSerializerOptions _options;

    public HttpRepository(HttpClient client)
    {
        _client = client;
        _options = new JsonSerializerOptions { PropertyNameCaseInsensitive = true };
    }

    public async Task<List<Product>> GetProducts()
    {
        using (var response = await _client.GetAsync("products"))
        {
            response.EnsureSuccessStatusCode();

            var stream = await response.Content.ReadAsStreamAsync();

            var products = await JsonSerializer.DeserializeAsync<List<Product>>(stream, _options);

            return products;
        }
    }
}
In this class, we fetch the data from the API and use streams to read the content from the response. If you want, you can read our HttpClient with ASP.NET Core series, to learn more about the HttpClient and also using streams.
Lastly, we have to register this service in the Program class:
builder.Services.AddScoped<IHttpClientRepository, HttpClientRepository>();
Adding Blazor Material Table
Now, in the Pages folder, we are going to create a new class named FetchData.razor.cs:
public partial class FetchData
{
    [Inject]
    public IHttpClientRepository Repository { get; set; }

    public List<Product> Products { get; set; } = new List<Product>();

    protected override async Task OnInitializedAsync()
    {
        Products = await Repository.GetProducts();
    }
}
And finally, modify the FetchData.razor file to add material components for our Blazor material table :
@page "/fetchdata"

<MudTable Items="@Products" Hover="true" Breakpoint="Breakpoint.Sm" RightAlignSmall="true">
    <HeaderContent>
        <MudTh>Image</MudTh>
        <MudTh>Name</MudTh>
        <MudTh>Supplier</MudTh>
        <MudTh>Price</MudTh>
    </HeaderContent>
    <RowTemplate>
        <MudTd DataLabel="Image">
            <MudAvatar Color="Color.Transparent" Size="Size.Large" Image="@context.ImageUrl" />
        </MudTd>
        <MudTd DataLabel="Name">@context.Name</MudTd>
        <MudTd DataLabel="Supplier">@context.Supplier</MudTd>
        <MudTd DataLabel="Price">[email protected]</MudTd>
    </RowTemplate>
</MudTable>
Here, we use the MudTable component to create our Blazor material table. Additionally, we populate the Items property with our Products property to provide all the products fetched from the server. With the Hover property, we enable the hover effect. Furthermore, we use the Breakpoint property to specify the point where our table will switch to the mobile layout, and the RightAlignSmall property to align our content to the right on the mobile layout. For all the additional information about the MudTable component, you can visit the API documentation.
Then, we can see the HeaderContent component with all the MudTh components, which we use to create a header for our table. Furthermore, to create our rows, we use the RowTemplate component with all MudTd components.
Now, let’s start both API and the client app, and navigate to the FetchData page:
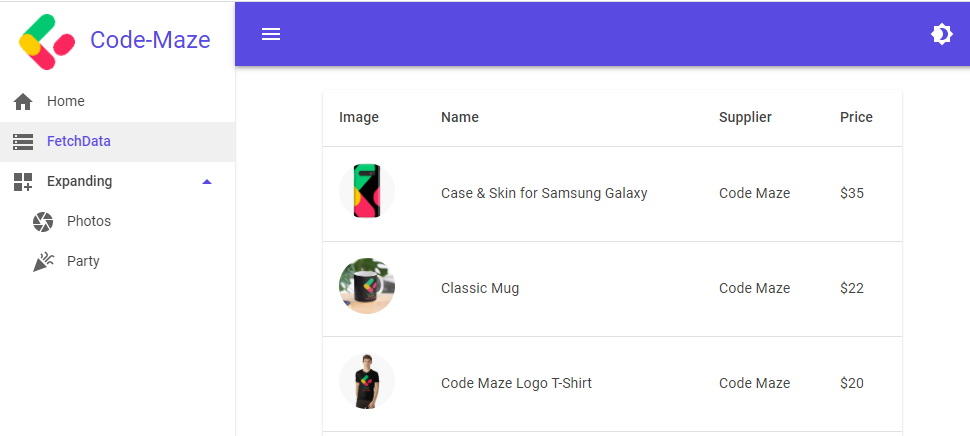
We can see our products displayed on the page. Also, if we switch our browser to the mobile layout:

We can see it works as well.
Excellent.
Let’s continue with a paging implementation.
Implementing Blazor Material Table Pagination
As you saw, at the beginning of this article, we have to send the PageSize and PageNumber parameters to our API. If we don’t pass them, the default value for the PageNumber is one, and for the PageSize is ten. Well, we don’t want default values all the time so, we have to add some changes to our implementation.
First, let’s create a new Features folder and inside a new PagingResponse class. All of that in our main project:
public class PagingResponse<T> where T : class
{
    public List<T> Items { get; set; }
    public MetaData MetaData { get; set; }
}
Now, let’s modify the IHttpClientRepository interface:
public interface IHttpClientRepository
{
    Task<PagingResponse<Product>> GetProducts(ProductParameters productParameters);
}
Of course, we have to change the GetProducts method implementation:
public async Task<PagingResponse<Product>> GetProducts(ProductParameters productParameters)
{
    var queryStringParam = new Dictionary<string, string>
    {
        ["pageNumber"] = productParameters.PageNumber.ToString(),
        ["pageSize"] = productParameters.PageSize.ToString()
    };

    using (var response = await _client.GetAsync(QueryHelpers.AddQueryString("products", queryStringParam)))
    {
        response.EnsureSuccessStatusCode();

        var metaData = JsonSerializer
            .Deserialize<MetaData>(response.Headers.GetValues("X-Pagination").First(), _options);

        var stream = await response.Content.ReadAsStreamAsync();

        var pagingResponse = new PagingResponse<Product>
        {
            Items = await JsonSerializer.DeserializeAsync<List<Product>>(stream, _options),
            MetaData = metaData
        };

        return pagingResponse;
    }
}
This logic is explained in great detail in our Blazor WebAssembly Pagination article, so if you are not familiar with it, feel free to read the article or just the linked section. Basically, we change our previous method to deserialize both Items and MetaData from our response, and we also use the QueryHelpers class to help us with adding the query string parameter to our request. For this, we have to install the Microsoft.AspNetCore.WebUtilities library.
Adding Pagination Component
After these changes, we are going to modify the FetchData.razor component, to support our pagination logic:
@page "/fetchdata"
@using Entities.Models

<MudTable ServerData="@(new Func<TableState, Task<TableData<Product>>>(GetServerData))"
          Hover="true" Breakpoint="Breakpoint.Sm" RightAlignSmall="true"
          @ref="_table" RowsPerPage="4">
    <HeaderContent>
        <MudTh>Image</MudTh>
        <MudTh>Name</MudTh>
        <MudTh>Supplier</MudTh>
        <MudTh>Price</MudTh>
    </HeaderContent>
    <RowTemplate>
        <MudTd DataLabel="Image">
            <MudAvatar Color="Color.Transparent" Size="Size.Large" Image="@context.ImageUrl" />
        </MudTd>
        <MudTd DataLabel="Name">@context.Name</MudTd>
        <MudTd DataLabel="Supplier">@context.Supplier</MudTd>
        <MudTd DataLabel="Price">[email protected]</MudTd>
    </RowTemplate>
    <PagerContent>
        <MudTablePager PageSizeOptions="@_pageSizeOption" RowsPerPageString="Products per page" />
    </PagerContent>
</MudTable>
Here, we first modify the MudTable component by introducing the ServerData property. We supply the async function to this property, which will reload the data we get from the server. As you can see, in the Func delegate, our function will accept the TableState parameter and will return the Task<TableData<Product>> as a result. The name of the function, which we are going to create in a minute, will be GetServerData. Additionally, we use the @ref property to reference our MudTable, and we set the initial number of rows per page to four with the RowsPerPage property.
Next, we add the PagerContent component. Inside it, we provide the MudTablePager component to show our pagination component and we set the page size options with PageSizeOptions property, and the string description for rows per page with the RowsPerPageString property.
To continue, let’s support these changes by modifying the FetchData.razor.cs file:
public partial class FetchData
{
    private MudTable<Product> _table;
    private ProductParameters _productParameters = new ProductParameters();
    private readonly int[] _pageSizeOption = { 4, 6, 10 };

    [Inject]
    public IHttpClientRepository Repository { get; set; }

    private async Task<TableData<Product>> GetServerData(TableState state)
    {
        _productParameters.PageSize = state.PageSize;
        _productParameters.PageNumber = state.Page + 1;

        var response = await Repository.GetProducts(_productParameters);

        return new TableData<Product>
        {
            Items = response.Items,
            TotalItems = response.MetaData.TotalCount
        };
    }
}
First, we create the _table variable as a reference for our MudTable component. Additionally, we create the _productParameters variable to send different parameters to our API, and also the _pageSizeOption variable for the pagination size options. With this variable, we enable only these options (4,6,10) for the page size option component. Then, we create our GetServerData method. With the TableState parameter, we can extract the values for the current page, page size, sort label, and sort direction. And as you can see, currently we only use the PageSize and the Page (which is a zero index-based) property to create our product parameters. After that, we call the method from our repository and return the required result.
Good.
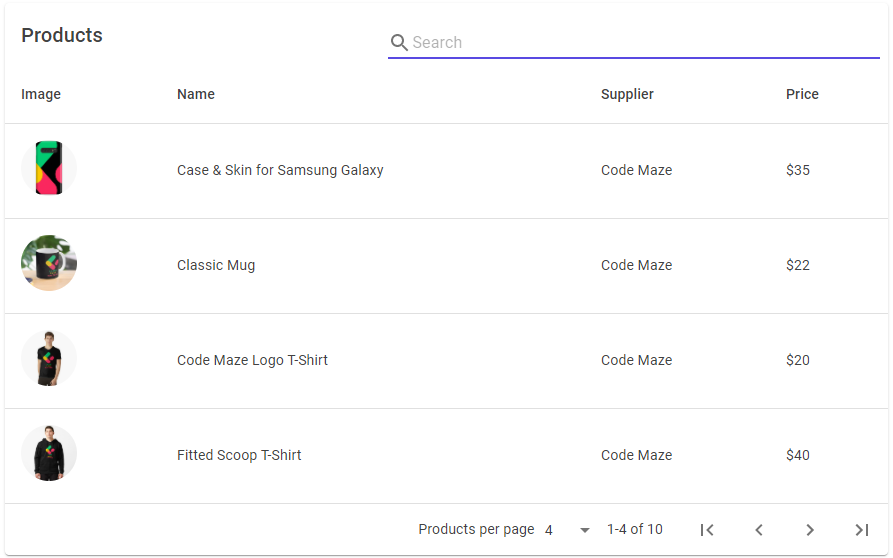
Now, let’s start our client app and navigate to the FetchData page:
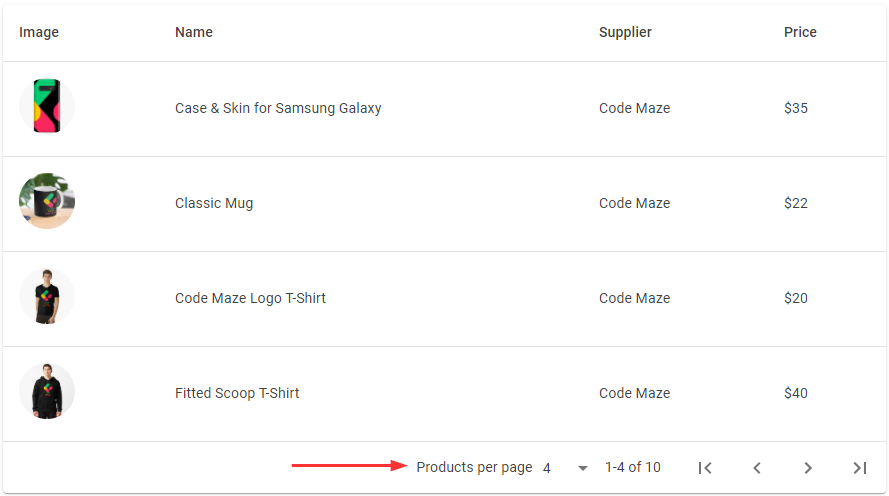
As you can see, we have our pagination, and also we show only four products on the page. We can also modify the rows number per page, and we can navigate to different pages.
Awesome.
Let’s move on to the searching logic.
Adding Searching to Blazor Material Table
To add a searching functionality to our Blazor material table, we have to change the GetProducts method in the HttpClientRepository class. Well, to be more precise, we only have to expand our queryStringParam dictionary:
var queryStringParam = new Dictionary<string, string>
{
    ["pageNumber"] = productParameters.PageNumber.ToString(),
    ["pageSize"] = productParameters.PageSize.ToString(),
    ["searchTerm"] = productParameters.SearchTerm ?? ""
};
That’s it regarding the repository class.
Now, we can move on to the FetchData.razor file modification:
<MudTable ServerData="@(new Func<TableState, Task<TableData<Product>>>(GetServerData))"
          Hover="true" Breakpoint="Breakpoint.Sm" RightAlignSmall="true"
          @ref="_table" RowsPerPage="4">
    <ToolBarContent>
        <MudText Typo="Typo.h6">Products</MudText>
        <MudToolBarSpacer/>
        <MudTextField T="string" ValueChanged="@(searchTerm => OnSearch(searchTerm))" Placeholder="Search"
                      Adornment="Adornment.Start" AdornmentIcon="@Icons.Material.Filled.Search"
                      IconSize="Size.Medium" Class="mt-0"></MudTextField>
    </ToolBarContent>
    <HeaderContent>
        <MudTh>Image</MudTh>
        <MudTh>Name</MudTh>
        <MudTh>Supplier</MudTh>
        <MudTh>Price</MudTh>
    </HeaderContent>
    <RowTemplate>
        <MudTd DataLabel="Image">
            <MudAvatar Color="Color.Transparent" Size="Size.Large" Image="@context.ImageUrl" />
        </MudTd>
        <MudTd DataLabel="Name">@context.Name</MudTd>
        <MudTd DataLabel="Supplier">@context.Supplier</MudTd>
        <MudTd DataLabel="Price">[email protected]</MudTd>
    </RowTemplate>
    <PagerContent>
        <MudTablePager PageSizeOptions="@_pageSizeOption" RowsPerPageString="Products per page" />
    </PagerContent>
</MudTable>
As you can see, all the changes are inside the ToolBarContent component. This component places all the content at the top of our table. Inside it, we have a simple title, spacing component, and a text field that we create with the MudTextField component. We have to provide a type for the text field – with the T property, which is a string in this case. With this in place, our app will know that the searchTerm argument in the ValueChanged event will be of the string type. In that event, we call the OnSearch method, which we are about to create. Additionally, we add a placeholder and an icon, which we place at the input field’s start with a medium size.
To support these changes, we have to modify the FetchData.razor.cs file:
private void OnSearch(string searchTerm)
{
    _productParameters.SearchTerm = searchTerm;
    _table.ReloadServerData();
}
We create the OnSearch method that accepts one parameter of type string. We assign the value of that parameter to the SearchTerm property of our _productParameters object and just call the ReloadServerData method with the _table reference. By calling the ReloadServerData method, we execute the GetServerData method.
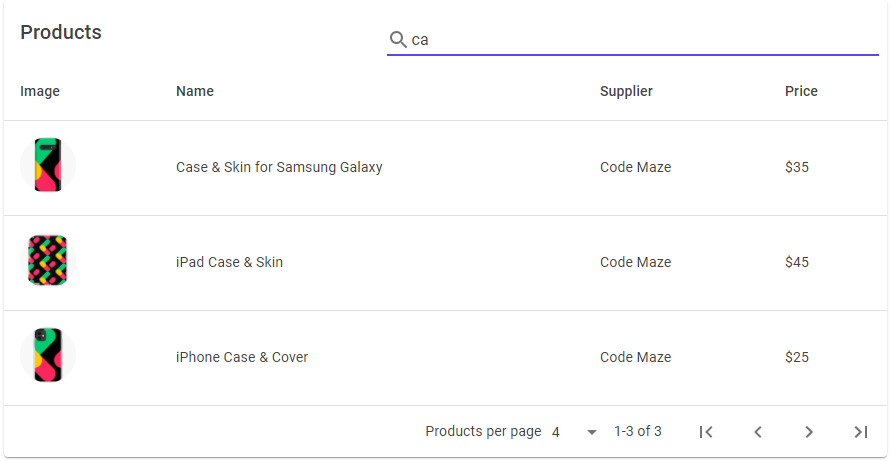
Now, if we start our app and navigate to the FetchData component, we are going to see our updated table:
Once we type our search term and navigate away from the input field, or press the Enter key, we are going to see our new result:
Excellent.
Modifying Searching Implementation
As we mentioned, if we want to execute our search query, we have to navigate away from the input file or press the Enter key. But, often our users want to execute the search query while typing the search term. To support that, the first thought would be to modify the event from the ValueChanged to the OnKeyUp. Of course, with this new event, we are going to fire an HTTP request to the server for every single character from the search term. Well, this is something we want to avoid.
We have talked about this problem and how to solve it in our Blazor WebAssembly Searching with ASP.NET Core Web API article. If you’ve read the linked article, you could’ve seen that we use the Timer to add some delay on the search execution. But with MudBlazor, the solution is even easier. We can introduce the DebounceInterval property and the OnDebounceIntervalElapsed event callback.
That said, let’s modify the FetchData.razor file modification:
<ToolBarContent>
    <MudText Typo="Typo.h6">Products</MudText>
    <MudToolBarSpacer/>
    <MudTextField OnDebounceIntervalElapsed="OnSearch" Placeholder="Search" Adornment="Adornment.Start"
        AdornmentIcon="@Icons.Material.Filled.Search" IconSize="Size.Medium"
        Class="mt-0" T="string" DebounceInterval="500"></MudTextField>
</ToolBarContent>
We only modify the MudTextField component. Now we use the OnDebounceIntervalElapsed event callback, and we use the DebounceInterval property to set the time in milliseconds we want to wait for before changing the text value. The OnDebounceIntervalElapsed event callback will trigger after the interval we set in the DebounceInterval property (500 milliseconds) elapses. This event callback also sends a string parameter to the subscribed method.
And that’s it.
With this implementation, our app will reload the server data and send the HTTP request to the server as soon as we finish typing. We don’t have to press the Enter key or navigate away from the input field.
Sorting Implementation
Before we start with the sorting implementation, we strongly recommend reading our Blazor WebAssembly Sorting with ASP.NET Core Web API article. From that article, you are going to learn in more detail about our API sorting implementation and what it expects as the sorting parameter. Long story short, if the sorting direction is ascending, then we have to provide just the sorting label. But if the sorting direction is descending, we have to add the desc keyword behind the sorting label: name desc. Again, for more detailed information, feel free to read the linked article.
Now, let’s start with the queryStringParam modification, as we did in a previous example:
var queryStringParam = new Dictionary<string, string>
{
    ["pageNumber"] = productParameters.PageNumber.ToString(),
    ["pageSize"] = productParameters.PageSize.ToString(),
    ["searchTerm"] = productParameters.SearchTerm ?? "",
    ["orderBy"] = productParameters.OrderBy ?? "name"
};
We are going to continue with the FetchData.razor file modification:
<HeaderContent>
    <MudTh>Image</MudTh>
    <MudTh><MudTableSortLabel SortLabel="name" T="Product">Name</MudTableSortLabel></MudTh>
    <MudTh>Supplier</MudTh>
    <MudTh><MudTableSortLabel SortLabel="price" T="Product">Price</MudTableSortLabel></MudTh>
</HeaderContent>
We modify only the HeaderContent part of our MudTable. In this example, we want to sort only the Name and Price columns. For these columns, we use the MudTableSortLabel component and provide the value for the SortLabel property. We also have to provide the type of the parameter. Pay attention that in our case, the value of the SortLabel property must be the same as the property names of the Product object (Name => name, Price => price). Parameters can be all small caps because our API handles that correctly.
Of course, we have to modify the GetServerData method:
private async Task<TableData<Product>> GetServerData(TableState state)
{
    _productParameters.PageSize = state.PageSize;
    _productParameters.PageNumber = state.Page + 1;

    _productParameters.OrderBy = state.SortDirection == SortDirection.Descending ?
        state.SortLabel + " desc" :
        state.SortLabel;

    var response = await Repository.GetProducts(_productParameters);

    return new TableData<Product>
    {
        Items = response.Items,
        TotalItems = response.MetaData.TotalCount
    };
}
Here we additionally populate the OrderBy property of our _productParameters object. As you can see, if the sorting direction is descending, we just add the desc keyword behind the sorting label.
And that’s it.
We can navigate to the FetchData component and click the Price header for example:
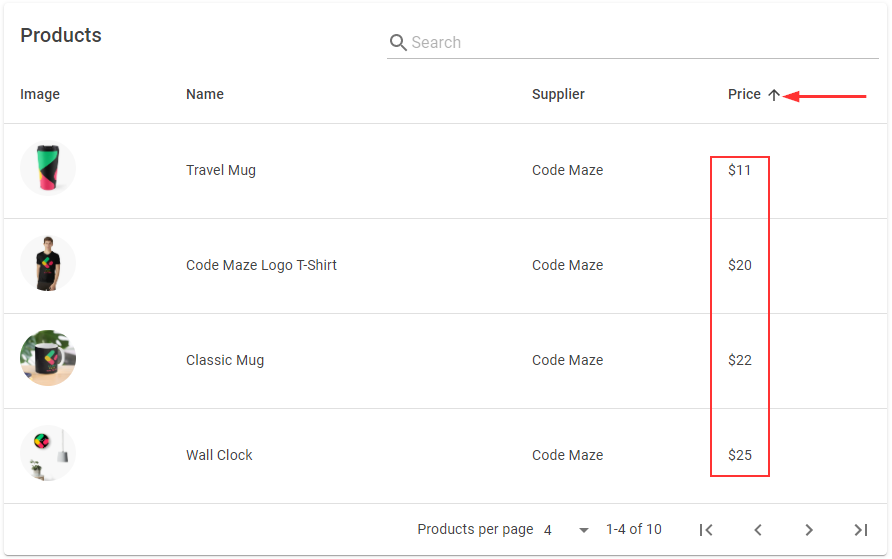
If you click it again, the rows will be sorted in descending order. You can also combine results with searching and paging.
Conclusion
Well done. We did a great job here, and now we have a fully functional Blazor material table in our project.
In the next article, we are going to create a product details page and implement a lot of material components like Grid, Expansion Panel, Rating, Charts, etc.
So, until that article.
Best regards.

Hi,
I have implemented the same thing in MudBlazor – Wasm Hosted Project. But It’s showing me “An unhandled error has occurred“.
Microsoft.AspNetCore.Components.WebAssembly.Rendering.WebAssemblyRenderer[100]
Unhandled exception rendering component: TypeError: Failed to fetch
System.Net.Http.HttpRequestException: TypeError: Failed to fetch
—> System.Runtime.InteropServices.JavaScript.JSException: TypeError: Failed to fetch
at System.Net.Http.BrowserHttpHandler.SendAsync(HttpRequestMessage request, CancellationToken cancellationToken)
— End of inner exception stack trace —
at System.Net.Http.BrowserHttpHandler.SendAsync(HttpRequestMessage request, CancellationToken cancellationToken)
at System.Net.Http.HttpClient.<SendAsync>g__Core|83_0(HttpRequestMessage request, HttpCompletionOption completionOption, CancellationTokenSource cts, Boolean disposeCts, CancellationTokenSource pendingRequestsCts, CancellationToken originalCancellationToken)
at MudPageFinal.Client.Services.HttpService.GetUserTables(Parameters parameters) in C:\Users\OneDrive\Documents\Csharp\Mudblazor\MudPageFinal\Client\Services\HttpService.cs:line 33
at MudPageFinal.Client.Pages.Counter.GetServerData(TableState state) in C:\Users\OneDrive\Documents\Csharp\Mudblazor\MudPageFinal\Client\Pages\Counter.razor:line 48
at MudBlazor.MudTable
1.<InvokeServerLoadFunc>d__132[[MudPageFinal.Shared.Entities.Models.UserTable, MudPageFinal.Shared, Version=1.0.0.0, Culture=neutral, PublicKeyToken=null]].MoveNext()1.<OnAfterRenderAsync>d__123[[MudPageFinal.Shared.Entities.Models.UserTable, MudPageFinal.Shared, Version=1.0.0.0, Culture=neutral, PublicKeyToken=null]].MoveNext()at MudBlazor.MudTable
at Microsoft.AspNetCore.Components.RenderTree.Renderer.GetErrorHandledTask(Task taskToHandle, ComponentState owningComponentState)
Do I have to change anything for wasm hosted project? Can you tell me? I’m a beginner, sorry if I did any mistake.
Thank You
getting a 405 error trying with blazor server and web api all dotnet 6
Dear Marinko,
While implementing this example i am facing a problem. The exception thrown by system is
Microsoft.AspNetCore.Components.WebAssembly.Rendering.WebAssemblyRenderer[100]
Unhandled exception rendering component: Value cannot be null. (Parameter ‘value’)
System.ArgumentNullException: Value cannot be null. (Parameter ‘value’)
at System.Text.Encodings.Web.TextEncoder.Encode(String value)
at Microsoft.AspNetCore.WebUtilities.QueryHelpers.AddQueryString(String uri, IEnumerable`1 queryString)
at Microsoft.AspNetCore.WebUtilities.QueryHelpers.AddQueryString(String uri, IDictionary`2 queryString)
I searched the net and got the following answer on stackoverflow website
Your List dataModels; is initially null.
Either initialize it to an empty list,
List dataModels = new List ();
or wrap most of your razor code in an @if (dataModels != null) { … }
look at the FetchData template page for an example.
It could be that the Blazorise.DataGrid does know how to handle a null collection, I would expect it to. But you also have foreach() loop in the Filter of the “Cidade” column, it looks like that is throwing the exception.
I have looked at another github repository
https://github.com/Garderoben/MudBlazor/blob/master/src/MudBlazor.Docs/Pages/Components/Table/Examples/TableServerSidePaginateExample.razor
they have following variable
private IEnumerable pagedData;
private MudTable table;
private int totalItems;
private string searchString = null;
if you could please help that ‘ll be so nice of you.
regards
zia ul hassan
Hi Zia,
It seems you are using a wrong package. You are supposed to use MudBlazor instead of Blazorise.
If you follow the laid down examples with the right packages, it should work. I used MudBlazor v5.1.2.
Best regards.
Gerald.