

In our Blazor WebAssembly series, we have talked about binding in Blazor and learned how to use one-way and two-way binding. In this article, we are going to learn even more about binding in Blazor applications and go deeper into the topic. Next to the one-way and two-way binding techniques, we are going to learn about formats and unparseable values, and also about the binding with multiple components.
If you want to learn more about Blazor WebAssembly, we strongly suggest visiting our Blazor WebAssembly series of articles, where you can read about Blazor WebAssembly development, authentication, authorization, JSInterop, and other topics as well.
So, let’s start.
One-Way Binding in Blazor Applications
One-Way binding has a one-directional flow. This means that the value is set by the application and then rendered on the page. Basically, the user can’t modify the value directly on the page since this value can only be set by the application itself.
Well, let’s see this with an example.
We are going to create a new Blazor WebAssembly application and modify the Index.razor file:
@page "/"

<h1>Binding Examples</h1>
<ul>
    <li>
        <a href="/one-way-binding">One-Way Binding</a>
    </li>
    <li>
        <a href="/two-way-binding">Two-Way Binding</a>
    </li>
</ul>
These links will be our main navigation through the examples. Now, let’s create a new OneWayBinding.razor component:
@page "/one-way-binding"

<h3>@Title</h3>

@code {
    public string Title { get; set; } = "One-Way Binding";
}
Here we see the Title property already set by the application. Also, in the HTML part, we can see the @Title expression. With the @ symbol in front of the property, we are creating a one-way binding in Blazor applications. Of course, we don’t have to use only properties, we can use fields or methods as well.
Now, if we start our application and click the first link, we are going to see our result:
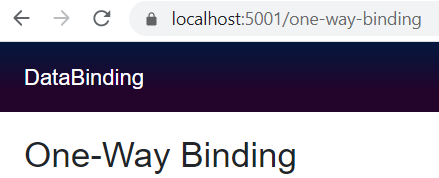
And there it is. The value of the Title property is rendered on the page.
Two-Way Binding in Blazor Applications
The two-way binding is a multi-directional binding technique. This means that the application and the user can update the values. Take the update form for example. As soon as we navigate to the update form, we see all the input fields populated but also, the user can change the values, which is the main purpose of the update form. We use the @bind HTML element attribute to provide two-way binding in Blazor applications.
To see this with an example, we are going to create a new TwoWayBinding.razor component:
@page "/two-way-binding"

<h3>@Title</h3>

Enter the title:
<input type="text" class="form-control" @bind="Title" />

@code {
    public string Title { get; set; } = "Two-Way Binding";
}
This code has an additional input field comparing to the previous component. We can see that we use the @bind attribute to create two-way binding with the Title property.
Now, we can start our application and click the second link:
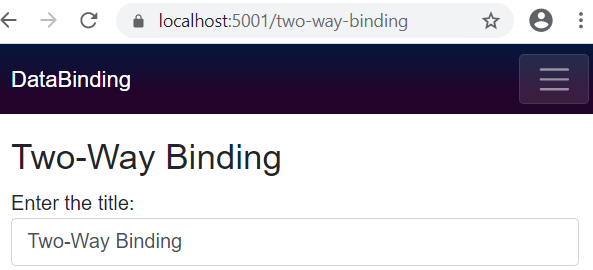
And we can see the “Two-Way Binding” as the value of the <h3> element as well as the value of the input element. Now, if we modify the value of the input element and press enter or click on the form, the value of the <h3> element will change:
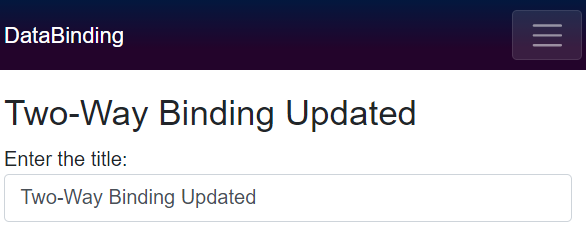
This means that our Title property receives a new value as soon as we modify the value in the input control (and trigger an event). Of course, as soon as the property receives a new value, it will be displayed in the <h3> element.
Changing an Event for Two-Way Binding
Right now, we must press an Enter key or our input element has to lose focus in order to update the value of the Title property. If we want to assign a new event to our binding, we have to use the @bind:event attribute as an addition to the @bind attribute:
@page "/two-way-binding"

<h3>@Title</h3>

Enter the title:
<input type="text" class="form-control" @bind="Title" @bind:event="oninput" />

@code {
    public string Title { get; set; } = "Two-Way Binding";
}
Now if you start your application and navigate to the required component, you will see the title changes as soon as you start typing in the input control.
Format Strings and Unparsable Values
The @bind attribute provides us with the formatting feature for the DateTime type. To accomplish that, we have to use the @bind:format attribute:
@page "/two-way-binding"

<h3>@Title</h3>

Enter the title:
<input type="text" class="form-control" @bind="Title" @bind:event="oninput" />

<br />
Date value:
<input type="text" class="form-control" @bind="Date" @bind:format="dd-MM-yyyy" />

@code {
    public string Title { get; set; } = "Two-Way Binding";
    public DateTime Date { get; set; } = new DateTime(2020, 02, 12);
}
Here, we create a new DateTime property named Date and initialize it. In the HTML part, we create an input field with the binding attribute and use the @bind:format attribute to specify the format of the value in the control:
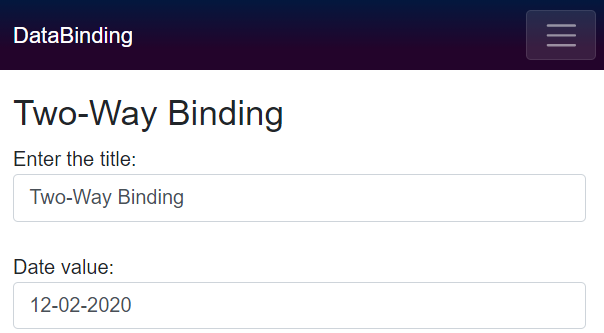
And there we go. We can see the date string formatted as day-month-year.
In addition to this, the @bind attribute checks whether the value can be parsed to the required type.
That said if we try to enter “Some date” in the input control (for date), we are going to see that the value will be reverted to a previous one. So, as soon as onchange event triggers, additional checks are applied to verify the validity of the value. Of course, for any other more complex validation, we should use form validation components as we did in our Forms and Form Validation article.
Binding with Child Components
We can use a binding mechanism to bind values between parent and child components. It can be applied for both one-way and two-way bindings.
One-Way Binding with Child Components
To see this with an example, we are going to create a new ChildOneWayBinding component:
Main Title in a child component:
<h3>@MainTitle</h3>

@code {
    [Parameter]
    public string MainTitle { get; set; }
}
So, to bind values from a parent component to a child component, we use parameters. In this example, we have a single MainTitle parameter, which we display on the page.
After this, we have to modify the parent component to bind our Title property to the MainTitle parameter:
@page "/one-way-binding"

<h3>@Title</h3>

<button type="button" class="btn btn-info" @onclick="ModifyTitle">Modify Title</button>

<hr />

<ChildOneWayBinding MainTitle="@Title" />

@code {
    public string Title { get; set; } = "One-Way Binding";

    private void ModifyTitle() => Title = "One-Way Binding Modified";
}
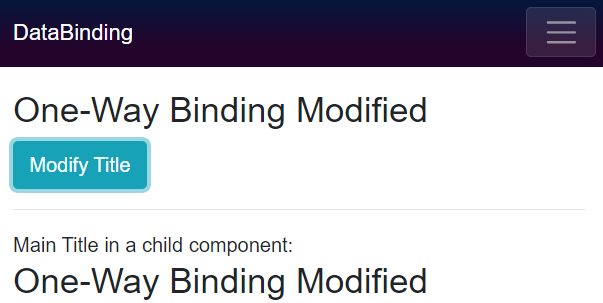
As you can see, when we call the ChildOneWayBinding component, we pass the Title property as a value for the MainTitle parameter. And that’s all it takes. In addition, we create a new button just to show that modifying the Title will affect the MainTitle parameter in a child component.
So, let’s start the app, and navigate to the OneWayBinding component:
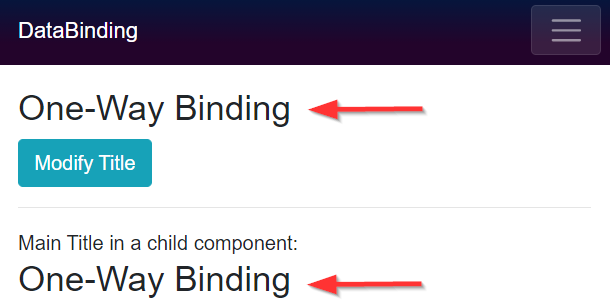
We can see that both Title and MainTitle have the same value. Furthermore, as soon as we click the Modify Title button, we are going to see the modified value on both ends:
Okay. Now let’s see how this works with two-way binding.
Two-Way Binding with Child Components
The two-way binding allows us to update the child component values from a parent component and vice versa. For a Parent-Child direction, we have to use the @bind-{Child Property or Field} syntax. For a Child-Parent direction, we have to create an EventCallback to update the value in the parent component.
That said, let’s create a new ChildTwoWayBinding component:
Main Title in a child component:
<h3>@MainTitle</h3>

Enter the title:
<input type="text" class="form-control" @bind="MainTitle" @bind:event="oninput" @onkeyup="ModifyMainTitle" />

@code {
    [Parameter]
    public string MainTitle { get; set; }
    [Parameter]
    public EventCallback<string> MainTitleChanged { get; set; }

    private async Task ModifyMainTitle() => await MainTitleChanged.InvokeAsync(MainTitle);
}
As we had in a previous example, we have the MainTitle parameter here. Also, we have an EventCallback named MainTitleChanged, which we invoke in the ModifyMainTitle method. In the HTML part, we show the MainTitle’s value and also create an input control that we use to bind with the MainTitle property and also to call the ModifyMainTitle method with the onkeyup event. We are using a similar technique for implementing the search functionality in Blazor WebAssembly with a child component.
Now, let’s modify the TwoWayBinding component:
@page "/two-way-binding"

<h3>@Title</h3>

Enter the title:
<input type="text" class="form-control" @bind="Title" @bind:event="oninput" />

<br />
Date value:
<input type="text" class="form-control" @bind="Date" @bind:format="dd-MM-yyyy" />

<hr />

<ChildTwoWayBinding @bind-MainTitle="Title" @bind-MainTitle:event="MainTitleChanged"/>

@code {
    public string Title { get; set; } = "Two-Way Binding";
    public DateTime Date { get; set; } = new DateTime(2020, 02, 12);
}
All we do here is call a child component, use the @bind-MainTitle attribute to bind the value from the Title property to the MainTitle parameter, and use the @bind-MainTitle:event attribute to point to the MainTitleChanged EventCallback in a child component.
That’s all. We can start the app and navigate to the TwoWayBinding component:
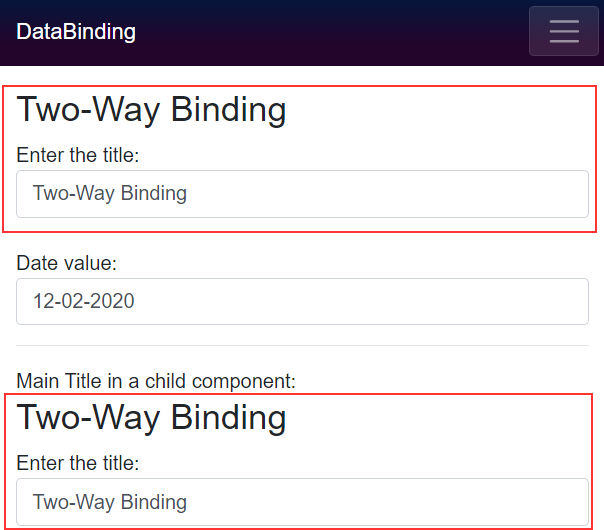
We can see that both components have the same value for the <h3> and input elements. Also, if modify the value of any input control, we are going to see modified value in both parent and child components.
Conclusion
Excellent.
Now we have a better understanding of how binding works in Blazor applications and how to use one-way and two-way binding between components.
Until another article.
All the best.
