

Many developers widely use API key authentication to secure API endpoints. This approach necessitates clients to provide a valid API key for accessing the endpoints. When implementing API key authentication in ASP.NET Core, it’s crucial to understand how to pass the API key and retrieve it from the incoming request.
Let’s dive in.
VIDEO: API Key Authentication in .NET Web API.
Authentication Methods in ASP.NET Core
In addition to API key authentication, we can use other authentication methods like Basic authentication, Token-based authentication, and OAuth authentication.
Basic authentication relies on a username and password combination sent in the request header. While easy to implement, it lacks advanced security features such as token expiration or refresh. This makes it less suitable for public-facing APIs, as there is a risk of exposing credentials in requests.
Token-based authentication issues a token, often a JSON Web Token (JWT), upon successful login. These tokens contain user-specific information and an expiration time. Unlike API key and Basic authentication, token-based authentication offers higher security. Tokens can expire, reducing the window of vulnerability if compromised, and we can cryptographically sign for added security.
OAuth is an authorization framework to delegate access rights to third-party applications. We commonly use it when an application needs to access resources on behalf of a user without sharing the user’s credentials. OAuth enables us to manage authorization and access control securely and in a standardized manner, making it an ideal choice for scenarios that demand granular access control.
In summary, the choice of authentication mechanism depends on the specific use case’s security requirements and complexity.
Before diving into the implementation details, let’s briefly discuss how to pass the API key to the server. We recommend reading how to pass parameters with a GET request in ASP.NET Core.
Different Ways of Passing API Key in a Request
There are several ways we can include the API key in a request:
- Query Parameters
- Request Body
- Request Headers
Let’s explore each method briefly.
Initial Setup
First, let’s add the API key in the appsetting.json:
{
  "Logging": {
    "LogLevel": {
      "Default": "Information",
      "Microsoft.AspNetCore": "Warning"
    }
  },
  "AllowedHosts": "*",
  "ApiKey": "6CBxzdYcEgNDrRhMbDpkBF7e4d4Kib46dwL9ZE5egiL0iL5Y3dzREUBSUYVUwUkN"
}
We add the ApiKey configuration property with the random 64-bit string value.
Please be aware that the values are currently being stored in the appsettings.json file for testing convenience. Nevertheless, when deploying your application in a production setting, it is crucial to prioritize security by opting for safer approaches like using environment variables or a vault mechanism to store this information.
Then, let’s create a Constants class that holds two constants:
public static class Constants
{
    public const string ApiKeyHeaderName = "X-API-Key";

    public const string ApiKeyName = "ApiKey";
}
Next, let us create a interface in which we declare a method for validating the API key:
public interface IApiKeyValidation
{
    bool IsValidApiKey(string userApiKey);
}
Finally, let’s define the ApiKeyValidation class:
public class ApiKeyValidation : IApiKeyValidation
{
    private readonly IConfiguration _configuration;

    public ApiKeyValidation(IConfiguration configuration)
    {
        _configuration = configuration;
    }

    public bool IsValidApiKey(string userApiKey)
    {
        if (string.IsNullOrWhiteSpace(userApiKey))
            return false;

        string? apiKey = _configuration.GetValue<string>(Constants.ApiKeyName);

        if (apiKey == null || apiKey != userApiKey)
            return false;

        return true;
    }
}
Let’s begin by implementing the interface method IsValidApiKey and then we can inject the IConfiguration into the constructor.
After that, we check if the userApiKey provided is null, empty, or contains only whitespace. If the userApiKey is found to be null or empty, the method returns false, indicating an invalid API key.
Moving on, we utilize the configuration object to retrieve the API key from the configuration using the GetValue<string>() method. Once we have both the API key from the configuration and the userApiKey, we compare them to determine if they match. If the keys do not match, we return false, indicating an invalid API key.
On the other hand, if the provided userApiKey matches the API key from the configuration, we conclude that the API key is valid and return true.
Finally, we register the ApiKeyValidation class in the Program.cs class using ASP.NET Core dependency injection container. Specifically, we use the AddTransient method to configure the service lifetime of IApiKeyValidation:
builder.Services.AddTransient<IApiKeyValidation, ApiKeyValidation>();
For further insights into dependency injection and its service lifetimes, we suggest reading our article on Dependency Injection in ASP.NET Core and Dependency Injection Lifetimes in ASP.NET Core.
Query Parameters
One way to pass the API key is by appending it as a parameter in the URL’s query string. While this method is simple and straightforward, remember that the API key becomes visible in the URL, which may affect security and privacy.
For example, we can include the API key in the request URL:
https://localhost:7178/api/WeatherForecast?apiKey=6CBxzdYcEgNDrRhMbDpkBF7e4d4Kib46dwL9ZE5egiL0iL5Y3dzREUBSUYVUwUkN.
Let’s create a GET method that takes API key parameter from the query string:
[Route("api/[controller]")]
[ApiController]
public class WeatherForecastController : ControllerBase
{
    private readonly IApiKeyValidation _apiKeyValidation;

    public WeatherForecastController(IApiKeyValidation apiKeyValidation)
    {
        _apiKeyValidation = apiKeyValidation;
    }

    [HttpGet]
    public IActionResult AuthenticateViaQueryParam(string apiKey)
    {
        if(string.IsNullOrWhiteSpace(apiKey))
            return BadRequest();

        bool isValid = _apiKeyValidation.IsValidApiKey(apiKey);

        if (!isValid)
            return Unauthorized();

        return Ok();
    }
}
We define a GET endpoint that has the apiKey parameter. Initially, we validate if the apiKey is null or white spaces, and if so, we return the BadRequest() response. Subsequently, we call the IsValidApiKey method to validate the API key we get from the query parameter.
If the API key is not valid, we return the Unauthorized response indicating that the user is not authorized to access the requested resource. Conversely, if the API key is valid we return an Ok response indicating successful authentication.
Let’s send a request to the endpoint with the API key as a query parameter in the request URL:
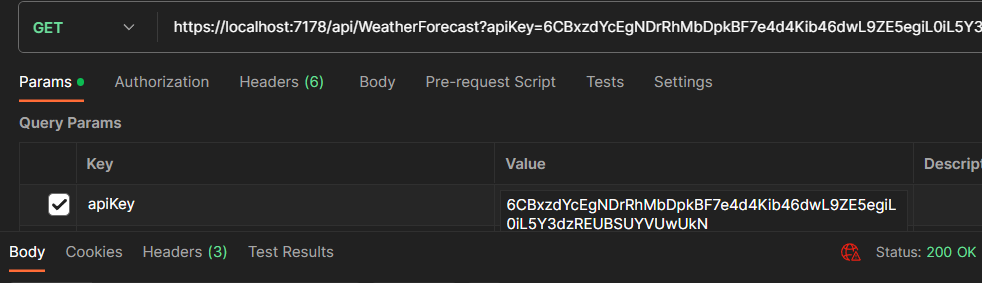
As we can see, we are authenticated to access the endpoint, and it returns the status 200 OK.
Now, let’s test the same endpoint by passing the invalid API key in the query parameter:
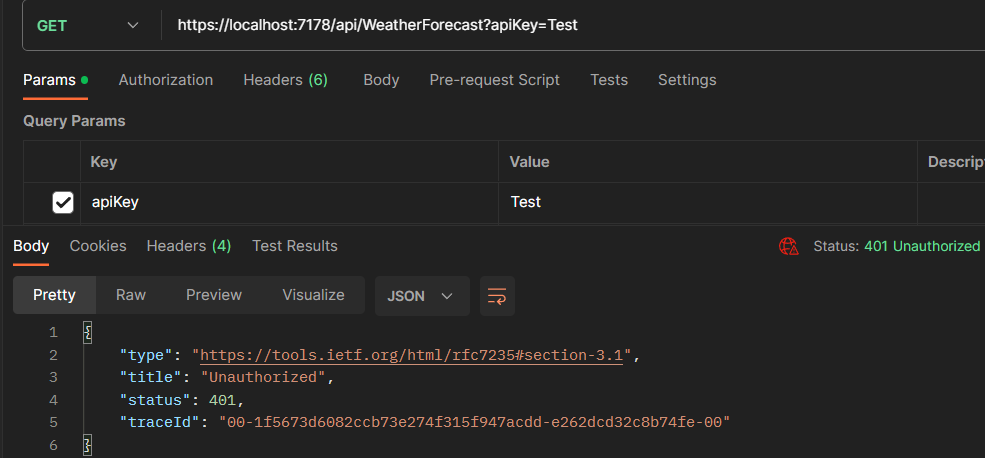
As expected, the endpoint returns the status 401 Unauthorized.
Request Body
Another method is to pass the API key as part of the request body. In this approach, we include the API key as a parameter in the request body. The API endpoint retrieves the API key from the request body for validation.
Let’s create a RequestModel class:
public class RequestModel
{
    public string? ApiKey { get; set; }
}
We add the ApiKey property to hold the value for the API key.
Subsequently, let’s define a POST method:
[HttpPost]
public IActionResult AuthenticateViaBody([FromBody] RequestModel model)
{
    if (string.IsNullOrWhiteSpace(model.ApiKey))
        return BadRequest();

    string apiKey = model.ApiKey;

    bool isValid = _apiKeyValidation.IsValidApiKey(apiKey);

    if (!isValid)
        return Unauthorized();

    return Ok();
}
We validate the ApiKey property inside the RequestModel class.
Finally, let’s test the endpoint:
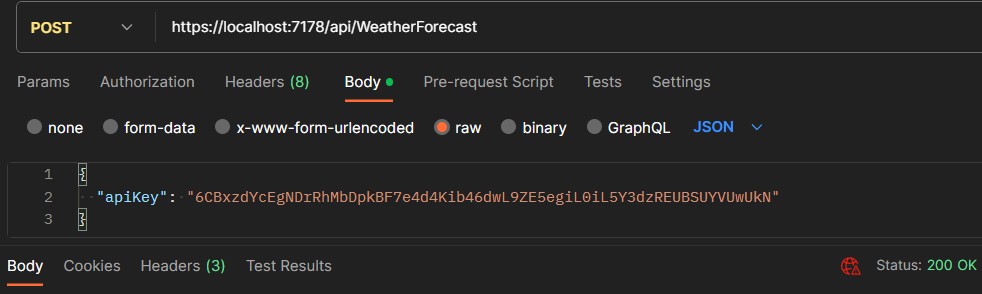
API returns the status 200 OK based on validating the API key passed in the request body.
Request Header
The third method involves passing the API key as a custom header in the request. We include the API key in the header, such as X-API-Key. We can then retrieve the API key from the request headers for authentication and authorization.
Now, let’s create a GET method to validate the API key passed via the header:
[HttpGet("header")]
public IActionResult AuthenticateViaHeader()
{
    string? apiKey = Request.Headers[Constants.ApiKeyHeaderName];

    if (string.IsNullOrWhiteSpace(apiKey))
        return BadRequest();

    bool isValid = _apiKeyValidation.IsValidApiKey(apiKey);

    if (!isValid)
        return Unauthorized();

    return Ok();
}
Inside the method, we retrieve the API key value using the Request.Headers["X-API-Key"].
Let’s send a request to the endpoint:
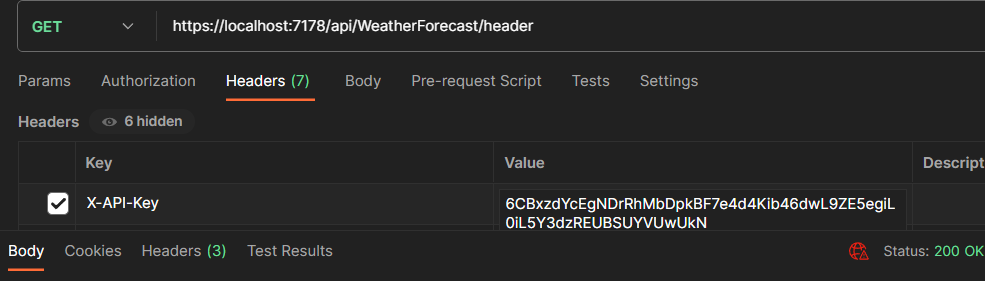
We are passing the API key in the header with the name X-API-Key.
Different Ways to Implement API Key Authentication
Now that we understand how to pass the API key, we will explore different approaches to implementing API key authentication in ASP.NET Core:
- Custom Attribute
- Custom Middleware
- Endpoint filters
- Policy-based Authorization
Let’s take a closer look at each approach to gain a better understanding.
API Key Authentication via Custom Attributes
The custom attribute allows us to apply API key authentication logic at the controller or action level by adding the attribute to the desired controller or action method.
In addition, action filters in ASP.NET Core play a crucial role in securing API endpoints. These filters intercept and modify the request or response during the execution of an action, allowing us to implement custom authorization logic. To gain more knowledge, we recommend reading our guide to implementing Action Filters in ASP.NET Core.
Firstly, let’s start by creating an ApiKeyAttribute class:
public class ApiKeyAttribute : ServiceFilterAttribute
{
    public ApiKeyAttribute()
        : base(typeof(ApiKeyAuthFilter))
    {
    }
}
We define an ApiKeyAttribute class that derives from the ServiceFilterAttribute class that allows us to apply a filter to controller actions or controller classes. ServiceFilterAttribute allows us to specify a type for the filter that will create for that attribute. We will implement our authentication logic in a class derived from IAuthorizationFilter. And using the ServiceFilterAttribute allows us to inject the class as a dependency.
In the constructor of the ApiKeyAttribute, we call the base constructor of ServiceFilterAttribute and pass the ApiKeyAuthFilter type as an argument. This ensures that whenever the ApiKeyAttribute is applied, the associated ApiKeyAuthFilter will invoke to perform the necessary authentication logic.
Then, let’s create an ApiKeyAuthFilter class:
public class ApiKeyAuthFilter : IAuthorizationFilter
{
    private readonly IApiKeyValidation _apiKeyValidation;

    public ApiKeyAuthFilter(IApiKeyValidation apiKeyValidation)
    {
        _apiKeyValidation = apiKeyValidation;
    }

    public void OnAuthorization(AuthorizationFilterContext context)
    {
        string userApiKey = context.HttpContext.Request.Headers[Constants.ApiKeyHeaderName].ToString();

        if (string.IsNullOrWhiteSpace(userApiKey))
        {
            context.Result = new BadRequestResult();
            return;
        }

        if(!_apiKeyValidation.IsValidApiKey(userApiKey))
            context.Result = new UnauthorizedResult();
    }
}
We define an ApiKeyAuthFilter class that implements IAuthorizationFilter interface. Then we inject the IApiKeyValidation instance in the class constructor. The OnAuthorization method represents the implementation of the IAuthorizationFilter interface and gets called during the authorization process for a given request.
Inside the OnAuthorization method, we first retrieve the API key from the request header using the constant ApiKeyHeaderName. Then we validate it using the IsValidApiKey method, and if validation fails, we set the result in the AuthorizationFilterContext to UnauthorizedResult.
In addition, we register the ApiKeyAuthFilter as a scoped service in the DI container:
builder.Services.AddScoped<ApiKeyAuthFilter>();
We register the ApiKeyAuthFilter as a scoped service in the ASP.NET Core dependency injection container.
Also, we should register the IHttpContextAccessor service in the Program class to be able to access the HttpContext:
builder.Services.AddHttpContextAccessor();
Finally, we apply the custom attribute to our action method:
[Route("api/[controller]")]
[ApiController]
public class EmployeeController : ControllerBase
{
    [HttpGet]
    [ApiKey]
    public IActionResult Get()
    {
        return Ok();
    }
}
We decorate our Action method Get() with the [ApiKey] attribute. The API key authentication logic in the custom attribute’s OnAuthorization method will execute before the action is invoked.
Let’s proceed by sending a request to the endpoint:
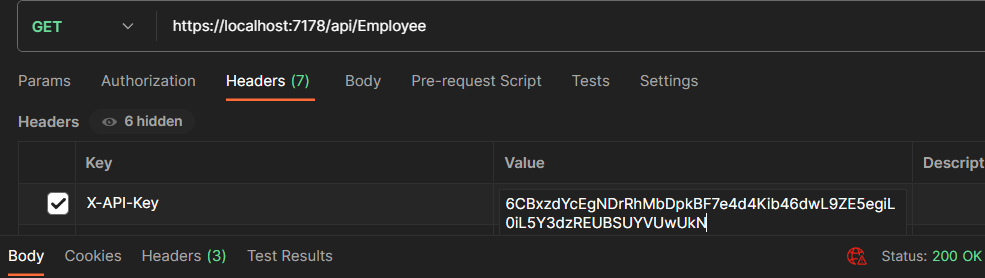
We pass the valid API key in the request header, and we get a 200 OK response.
Implementing API Key Authentication via Middleware
In ASP.NET Core, middleware is vital in handling HTTP requests and responses. It provides a pipeline through which requests flow, allowing us to intercept, process, and modify requests and response objects. By implementing custom middleware, we can incorporate API key authentication into our ASP.NET Core applications with flexibility and control.
Custom middleware allows us to intercept incoming requests and perform authentication and authorization checks before the request reaches the endpoint.
Let’s create a custom middleware class:
public class ApiKeyMiddleware
{
    private readonly RequestDelegate _next;
    private readonly IApiKeyValidation _apiKeyValidation;

    public ApiKeyMiddleware(RequestDelegate next, IApiKeyValidation apiKeyValidation)
    {
        _next = next;
        _apiKeyValidation = apiKeyValidation;
    }

    public async Task InvokeAsync(HttpContext context)
    {
        if (string.IsNullOrWhiteSpace(context.Request.Headers[Constants.ApiKeyHeaderName]))
        {
            context.Response.StatusCode = (int)HttpStatusCode.BadRequest;
            return;
        }

        string? userApiKey = context.Request.Headers[Constants.ApiKeyHeaderName];

        if (!_apiKeyValidation.IsValidApiKey(userApiKey!))
        {
            context.Response.StatusCode = (int)HttpStatusCode.Unauthorized;
            return;
        }

        await _next(context);
    }
}
Inside the ApiKeyMiddleware class, we have a parameterized constructor that accepts a RequestDelegate parameter named next and IApiKeyValidation instance. The RequestDelegate represents the next middleware component in the pipeline.
Subsequently, we define an InvokeAsync method, which is the entry point for the middleware. We call this method for each HTTP request that passes through the middleware pipeline.
Inside the InvokeAsync method, we retrieve the API key from the request headers using context.Request.Headers["X-API-Key"]. Then we validate the API key by passing the userApikey to the IsValidApiKey method. In the event that the API key is invalid, we set the HTTP response status code to 401 Unauthorized and we return from the middleware pipeline, bypassing the subsequent middleware components.
If the API key is valid, we call the await _next(context) method to invoke the next middleware component in the pipeline.
Now, let’s register the custom middleware just above the app.UseHttpsRedirection() middleware in the Program class:
app.UseMiddleware<ApiKeyMiddleware>();
The custom middleware will execute for each incoming request, allowing us to perform the API key authentication logic.
Note: After implementing and exploring this section, comment on the middleware registration line of the code so that we can test the other implementations.
API Key Authentication Using Endpoint Filters
Endpoint filters provide a way to apply authentication and authorization logic at the endpoint level in ASP.NET Core. With endpoint filters, we can intercept requests before they reach the action methods and perform API key authentication checks.
Let’s proceed to implement the Endpoint filters by creating a class ApiKeyEndpointFilter:
public class ApiKeyEndpointFilter : IEndpointFilter
{
    private readonly IApiKeyValidation _apiKeyValidation;

    public ApiKeyEndpointFilter(IApiKeyValidation apiKeyValidation)
    {
        _apiKeyValidation = apiKeyValidation;
    }

    public async ValueTask<object?> InvokeAsync(EndpointFilterInvocationContext context, EndpointFilterDelegate next)
    {
        if (string.IsNullOrWhiteSpace(context.HttpContext.Request.Headers[Constants.ApiKeyHeaderName].ToString()))
            return Results.BadRequest();

        string? apiKey = context.HttpContext.Request.Headers[Constants.ApiKeyHeaderName];

        if (!_apiKeyValidation.IsValidApiKey(apiKey!))
        {
            return Results.Unauthorized();
        }

        return await next(context);
    }
}
The ApiKeyEndpointFilter class implements the IEndpointFilter interface, which allows us to modify the behavior of an endpoint during the request pipeline. Then we implement the InvokeAsync method. The InvokeAsync method is the main entry point for the endpoint filter. The associated endpoint calls this method during its execution.
Then we validate the apiKey. If the apiKey is invalid, we return the UnauthorizedResult using Results.Unauthorized() method. If the apiKey is valid, we call the next delegate to proceed with the execution of the next step in the request pipeline.
Now, we create the minimal API in the Program.cs class:
app.MapGet("api/product", () =>
{
    return Results.Ok();

}).AddEndpointFilter<ApiKeyEndpointFilter>();
We add the ApiKeyEndpointFilter to the endpoint. The AddEndpointFilter extension method allows us to apply an endpoint filter to the specific endpoint. During the request pipeline for that particular endpoint, the filter executes.
Let’s test the endpoint:
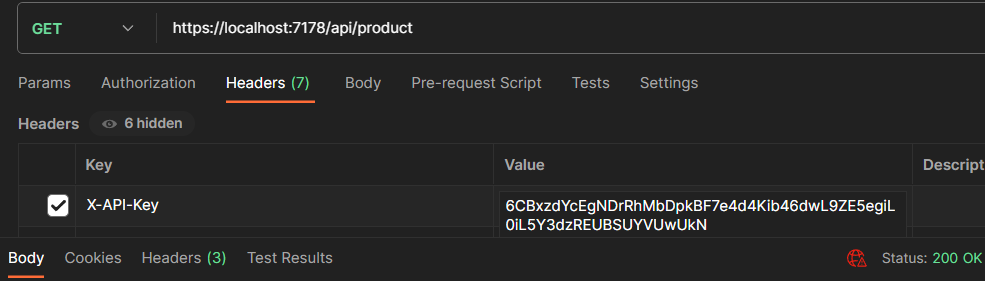
As we can see, when we pass the valid API key, we get the 200 OK as response.
Policy-based Authorization With API Key Authentication
Policy-based authorization allows us to define fine-grained access control rules based on specific policies. With policy-based authorization, we can enforce API key authentication by defining a custom policy that checks for the presence and validity of the API key.
Let’s define a custom requirement class that implements the IAuthorizationRequirement interface:
public class ApiKeyRequirement : IAuthorizationRequirement
{
}
The ASP.NET Core authorization framework includes the IAuthorizationRequirement interface, which represents a requirement that an authorization policy must satisfy to succeed.
We define an empty class ApiKeyRequirement that serves as a marker class for the specific requirement of API key authentication. By implementing the IAuthorizationRequirement interface, we indicate that this class is a requirement for authorization policies.
Next, let’s proceed to create the custom handler class:
public class ApiKeyHandler : AuthorizationHandler<ApiKeyRequirement>
{
    private readonly IHttpContextAccessor _httpContextAccessor;
    private readonly IApiKeyValidation _apiKeyValidation;

    public ApiKeyHandler(IHttpContextAccessor httpContextAccessor, IApiKeyValidation apiKeyValidation)
    {
        _httpContextAccessor = httpContextAccessor;
        _apiKeyValidation = apiKeyValidation;
    }

    protected override Task HandleRequirementAsync(
        AuthorizationHandlerContext context, ApiKeyRequirement requirement)
    {

        string apiKey = _httpContextAccessor?.HttpContext?.Request.Headers[Constants.ApiKeyHeaderName].ToString();

        if (string.IsNullOrWhiteSpace(apiKey))
        {
            context.Fail();
            return Task.CompletedTask;
        }


        if (!_apiKeyValidation.IsValidApiKey(apiKey))
        {
            context.Fail();
            return Task.CompletedTask;
        }

        context.Succeed(requirement);

        return Task.CompletedTask;
    }
}
We derive the ApiKeyHandler class from the AuthorizationHandler<ApiKeyRequirement> class which is responsible for handling the API key authentication requirement. Then, we inject the IHttpContextAccessor into the ApiKeyHandler class via its constructor. The IHttpContextAccessor provides access to the current HTTP context.
Within the HandleRequirementAsync method, we retrieve the API key from the request headers using _httpContextAccessor. Then we pass the apiKey to the IsValidApiKey method of the ApiKeyValidation class for validation. If the API key is not valid, we call the context.Fail() method to indicate that the authorization is failed.
If the API key is valid, we set the context.Succeed(requirement) to indicate that the authorization requirement is met. Finally, we return Task.CompletedTask to signify the completion of the authorization handling.
Finally, let’s register the ApiKeyRequirement and ApiKeyHandler in the Program.cs class:
builder.Services.AddAuthentication(options =>
{
    options.DefaultAuthenticateScheme = JwtBearerDefaults.AuthenticationScheme;
}).AddJwtBearer();

builder.Services.AddAuthorization(options =>
{
    options.AddPolicy("ApiKeyPolicy", policy =>
    {
        policy.AddAuthenticationSchemes(new[] { JwtBearerDefaults.AuthenticationScheme });
        policy.Requirements.Add(new ApiKeyRequirement());
    });
});

builder.Services.AddScoped<IAuthorizationHandler, ApiKeyHandler>();
First, let’s install the Microsoft.AspNetCore.Authentication.JwtBearer package via the NuGet package manager.
Next, we set the default authentication scheme to JwtBearerDefaults.AuthenticationScheme, indicating that JWT Bearer authentication will be used for user authentication. Next, we add the AddJwtBearer() authentication handler to the service.
We use the AddAuthorization method of the IServiceCollection to define and configure authorization policies. We use the AddPolicy method to add a policy named ‘ApiKeyPolicy.’ Then we add the authentication scheme required by the ‘ApiKeyPolicy’. Next, we add the instance of ApiKeyRequirement to the requirements of the ‘ApiKeyPolicy.’ By adding this requirement, the policy will require API key authentication.
Finally, we register the ApiKeyHandler class as a scoped service and associate it with the IAuthorizationHandler interface. By doing so, we ensure that ApiKeyHandler is used to handle the API key authentication requirement when the policy is applied.
As a final step, let’s create a GET method and apply the authorization policy:
[HttpGet("all")]
[Authorize(Policy = "ApiKeyPolicy")]
public IActionResult GetEmployees()
{
    return Ok();
}
We add the [Authorize(Policy = "ApiKeyPolicy")] attribute to the GetEmployees action method.
The [Authorize] attribute with Policy = "ApiKeyPolicy" ensures that only requests with a valid API key will be authorized to access the GetEmployees endpoint.
First, let’s test the endpoint by passing the invalid API key:
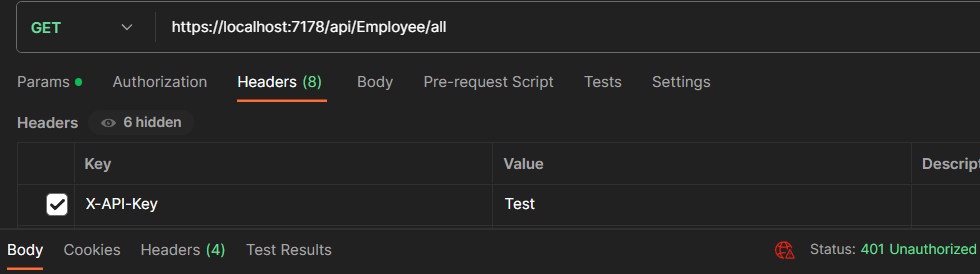
As we can see, API returns 401 Unauthorized.
Now, let’s pass the valid API key to the endpoint:

When we pass the valid API key, API returns the 200 OK response.
Best Practices for API Key Authentication
API Key Authentication using the custom attributes offers us a straightforward and centralized way to handle API key authentication within the application codebase. We can use this approach for small to medium-sized projects with a limited number of endpoints that require API key protection.
Using the middleware approach allows us to keep the authentication logic separate from the application code, providing better separation of concerns and reusability. Middleware-based API key authentication is suitable for larger projects with multiple endpoints and complex authentication requirements.
Endpoint filters authentication efficiently handles the authentication for specific sets of endpoints and is suitable for applications that require different levels of API key protection based on endpoint groups.
Policy-based Authorization is ideal for applications with intricate security requirements and roles that go beyond simple API key validation. It enables fine-grained control over who can access which resources based on their assigned roles and permissions.
Choosing the appropriate approach based on our project’s requirements and security needs is essential. Consider factors such as flexibility, customization, and ease of implementation when deciding which approach to use.
Conclusion
API key authentication is a simple and effective method for securing API endpoints in specific scenarios. It has its strengths, and we can prefer it over other authentication approaches.
It’s easy to implement with minimal overhead for servers and clients, making it ideal for applications needing basic security without complex interactions or third-party integrations.
When user-specific authorization is unnecessary, API key authentication provides straightforward access solely based on the API key’s validity. Additionally, it efficiently manages limited access scenarios, making it adequate for private or internal APIs with a restricted number of authenticated clients
In this article, we have explored various approaches for implementing API key authentication in ASP.NET Core and its best practices. We discussed how API key authentication adds a layer of security to our APIs by requiring a valid API key for authorization.

Nice article, so Endpoint Filter is only valable for Minimal apis ? and It is like a middleware but for a specific endpoint ? also you forgot to add
builder.Services.AddHttpContextAccessor();in the article.Thanks for the feedback, Anas.
Yes, endpoint filters are specific to Minimal APIs in ASP.NET Core. They provide a way to add custom logic to a specific endpoint in the request processing pipeline. While they are similar to middleware, allowing you to add behavior to the pipeline, endpoint filters are specifically tied to a particular endpoint.
We’ll update the article by adding the line builder.Services.AddHttpContextAccessor();