

In this article, we are going to learn about creating the Blazor WebAssembly Authentication mechanism and how to implement it on both the server-side and the client-side. In one of the previous articles, we have implemented the test AuthenticationStateProvider class with all the required functionalities for the authentication mechanism to work. That article is strongly related to this one, so we recommend reading it if you haven’t already.
Of course, we don’t want the test class for the authentication functionality. So, we are going to replace it with the real AuthenticationStateProvider implementation.
Since we already learned about the Registration Functionality in Blazor WebAssembly, this article is going to be a logical continuation with the Login and Logout functionalities. With both of these articles, you will have great knowledge about the Blazor WebAssembly Authentication mechanism and how it should be implemented.
For the complete navigation for this series, you can visit the Blazor Series page.
So, let’s start.
Implementing JWT in the Web API Project
The first thing, we are going to do, is to add a JWT configuration section in the appsettings.json file:
{
  "Logging": {
    "LogLevel": {
      "Default": "Information",
      "Microsoft": "Warning",
      "Microsoft.Hosting.Lifetime": "Information",
      "Microsoft.EntityFrameworkCore": "Information"
    }
  },
  "ConnectionStrings": {
    "sqlConnection": "server=.; database=CodeMazeBlazor; Integrated Security=true"
  },
  "JWTSettings": {
    "securityKey": "CodeMazeSecretKey",
    "validIssuer": "CodeMazeAPI",
    "validAudience": "https://localhost:5011",
    "expiryInMinutes": 5
  },
  "AllowedHosts": "*"
}
Then, we have to install the Microsoft.AspNetCore.Authentication.JwtBearer library in our application:
![]()
After the installation, let’s show how we can register JWT in .NET 5 and .NET 6 and above projects.
In .NET 5, we have to modify the ConfigureServices method:
services.AddIdentity<IdentityUser, IdentityRole>()
    .AddEntityFrameworkStores<ProductContext>();

var jwtSettings = Configuration.GetSection("JWTSettings");
services.AddAuthentication(opt =>
{
    opt.DefaultAuthenticateScheme = JwtBearerDefaults.AuthenticationScheme;
    opt.DefaultChallengeScheme = JwtBearerDefaults.AuthenticationScheme;
}).AddJwtBearer(options =>
{
    options.TokenValidationParameters = new TokenValidationParameters
    {
        ValidateIssuer = true,
        ValidateAudience = true,
        ValidateLifetime = true,
        ValidateIssuerSigningKey = true,

        ValidIssuer = jwtSettings["validIssuer"],
        ValidAudience = jwtSettings["validAudience"],
        IssuerSigningKey = new SymmetricSecurityKey(Encoding.UTF8.GetBytes(jwtSettings["securityKey"]))
    };
});

services.AddControllers();
We have to mention that in the Configure method, we already have registered Authentication and Authorization:
app.UseAuthentication();
app.UseAuthorization();
In .NET 6 and above, we don’t have ConfigureServices and Configure methods, so, we have to do all the configuration in the Program class:
builder.Services.AddIdentity<IdentityUser, IdentityRole>()
    .AddEntityFrameworkStores<ProductContext>();

var jwtSettings = builder.Configuration.GetSection("JWTSettings");
builder.Services.AddAuthentication(opt =>
{
    opt.DefaultAuthenticateScheme = JwtBearerDefaults.AuthenticationScheme;
    opt.DefaultChallengeScheme = JwtBearerDefaults.AuthenticationScheme;
}).AddJwtBearer(options =>
{
    options.TokenValidationParameters = new TokenValidationParameters
    {
        ValidateIssuer = true,
        ValidateAudience = true,
        ValidateLifetime = true,
        ValidateIssuerSigningKey = true,

        ValidIssuer = jwtSettings["validIssuer"],
        ValidAudience = jwtSettings["validAudience"],
        IssuerSigningKey = new SymmetricSecurityKey(Encoding.UTF8.GetBytes(jwtSettings["securityKey"]))
    };
});

builder.Services.AddControllers();

var app = builder.Build();

//the rest of code

app.UseAuthentication();
app.UseAuthorization();
The last thing we have to do is to protect our endpoints. To do that, let’s open the ProductsController and add the [Authorize] attribute on top of it to protect all the actions inside:
[Route("api/products")]
[ApiController]
[Authorize]
public class ProductsController : ControllerBase
That’s it. We can move on to the authentication logic part.
Adding the Login Functionality in the Web API Project
Before we start with the Login implementation, we have to create two DTO classes to support the authentication process. So, let’s create the UserForAuthenticationDto and AuthResponseDto classes in the Entities/DTO folder:
public class UserForAuthenticationDto
{
    [Required(ErrorMessage = "Email is required.")]
    public string Email { get; set; }
    [Required(ErrorMessage = "Password is required.")]
    public string Password { get; set; }
}

public class AuthResponseDto
{
    public bool IsAuthSuccessful { get; set; }
    public string ErrorMessage { get; set; }
    public string Token { get; set; }
}
Now, in the AccountController, we have to implement the Login action:
[HttpPost("Login")]
public async Task<IActionResult> Login([FromBody] UserForAuthenticationDto userForAuthentication)
{
    var user = await _userManager.FindByNameAsync(userForAuthentication.Email);

    if (user == null || !await _userManager.CheckPasswordAsync(user, userForAuthentication.Password))
    return Unauthorized(new AuthResponseDto { ErrorMessage = "Invalid Authentication" });

    var signingCredentials = GetSigningCredentials();
    var claims = GetClaims(user);
    var tokenOptions = GenerateTokenOptions(signingCredentials, claims);
    var token = new JwtSecurityTokenHandler().WriteToken(tokenOptions);

    return Ok(new AuthResponseDto { IsAuthSuccessful = true, Token = token });
}
Here we use the FindByNameAsync method to extract the user and if the user exists, we check the password with the CheckPasswordAsync method. The UserManager class provides these methods for us and to learn more about the authentication process with ASP.NET Core Identity, feel free to read our Authentication with ASP.NET Core Identity article.
If the check passes, we generate signing credentials, add claims, create token options, and create a token. As you can see, for each of these actions we have a separate method. For the sake of simplicity, we are going to implement them in the same controller, but you can always move the logic to a separate class:
private SigningCredentials GetSigningCredentials()
{
    var key = Encoding.UTF8.GetBytes(_jwtSettings["securityKey"]);
    var secret = new SymmetricSecurityKey(key);

    return new SigningCredentials(secret, SecurityAlgorithms.HmacSha256);
}

private List<Claim> GetClaims(IdentityUser user)
{
    var claims = new List<Claim>
    {
        new Claim(ClaimTypes.Name, user.Email)
    };

    return claims;
}

private JwtSecurityToken GenerateTokenOptions(SigningCredentials signingCredentials, List<Claim> claims)
{
    var tokenOptions = new JwtSecurityToken(
        issuer: _jwtSettings["validIssuer"],
        audience: _jwtSettings["validAudience"],
        claims: claims,
        expires: DateTime.Now.AddMinutes(Convert.ToDouble(_jwtSettings["expiryInMinutes"])),
        signingCredentials: signingCredentials);

    return tokenOptions;
}
Of course, we have to modify the constructor of the controller:
private readonly UserManager<IdentityUser> _userManager;
private readonly IConfiguration _configuration;
private readonly IConfigurationSection _jwtSettings;

public AccountsController(UserManager<IdentityUser> userManager, IConfiguration configuration)
{
    _userManager = userManager;
    _configuration = configuration;
    _jwtSettings = _configuration.GetSection("JwtSettings");
}
That’s all it takes. If we test this with a Postman, we are going to get our response with the generated token:

It’s time to move on to the client part.
Blazor WebAssembly Authentication – AuthenticationStateProvider
We have already seen how we can use the test AuthenticationStateProvider to enable the auth mechanism in the Blazor WebAssembly application. In that article, you can learn what library you need to install and how to implement the AuthorizeRouteView component, Authorizing, NotAuthorizing components as well as the CascadingAuthenticationState component. These components are crucial for the Blazor WebAssembly Authentication process and if you are not familiar with them, we strongly suggest reading the mentioned article.
Since we have all these components in place, we can start replacing the test AuthenticationStateProvider with the real one.
That said, let’s start with a new JwtParser class in the Features folder. We are going to use this class to extract the claims from the token:
public static class JwtParser
{
    public static IEnumerable<Claim> ParseClaimsFromJwt(string jwt)
    {
        var claims = new List<Claim>();
        var payload = jwt.Split('.')[1];

        var jsonBytes = ParseBase64WithoutPadding(payload);

        var keyValuePairs = JsonSerializer.Deserialize<Dictionary<string, object>>(jsonBytes);

        claims.AddRange(keyValuePairs.Select(kvp => new Claim(kvp.Key, kvp.Value.ToString())));

        return claims;
    }

    private static byte[] ParseBase64WithoutPadding(string base64)
    {
        switch (base64.Length % 4)
        {
            case 2: base64 += "=="; break;
            case 3: base64 += "="; break;
        }
        return Convert.FromBase64String(base64);
    }
}
You can find this code originally in the Steve Sanderson’s Mission Control project.
As you can see, we accept the token in the ParseClaimsFromJwt method and then extract the claims from that token. We are not extracting the roles yet since that’s something we are going to do in the next article of this series.
After this, we can create a new AuthStateProvider class in the AuthProviders folder:
public class AuthStateProvider : AuthenticationStateProvider
{
    private readonly HttpClient _httpClient;
    private readonly ILocalStorageService _localStorage;

    public AuthStateProvider(HttpClient httpClient, ILocalStorageService localStorage)
    {
        _httpClient = httpClient;
        _localStorage = localStorage;
    }

    public override async Task<AuthenticationState> GetAuthenticationStateAsync()
    {
        throw new NotImplementedException();
    }
}
This class must inherit from the AuthenticationStateProvider abstract class and we inject HttpClient and ILocalStorageService through the constructor injection. Of course, we have to install the Blazored.LocalStorage library to be able to use ILocalStorageService in our application:

Now, we can implement the GetAuthenticationStateAsync method and add new methods to this class:
public class AuthStateProvider : AuthenticationStateProvider
{
    private readonly HttpClient _httpClient;
    private readonly ILocalStorageService _localStorage;
    private readonly AuthenticationState _anonymous;

    public AuthStateProvider(HttpClient httpClient, ILocalStorageService localStorage)
    {
        _httpClient = httpClient;
        _localStorage = localStorage;
        _anonymous = new AuthenticationState(new ClaimsPrincipal(new ClaimsIdentity()));
    }

    public override async Task<AuthenticationState> GetAuthenticationStateAsync()
    {
        var token = await _localStorage.GetItemAsync<string>("authToken");
        if (string.IsNullOrWhiteSpace(token))
            return _anonymous;

        _httpClient.DefaultRequestHeaders.Authorization = new AuthenticationHeaderValue("bearer", token);

        return new AuthenticationState(new ClaimsPrincipal(new ClaimsIdentity(JwtParser.ParseClaimsFromJwt(token), "jwtAuthType")));
    }

    public void NotifyUserAuthentication(string email)
    {
        var authenticatedUser = new ClaimsPrincipal(new ClaimsIdentity(new[] { new Claim(ClaimTypes.Name, email) }, "jwtAuthType"));
        var authState = Task.FromResult(new AuthenticationState(authenticatedUser));
        NotifyAuthenticationStateChanged(authState);
    }

    public void NotifyUserLogout()
    {
        var authState = Task.FromResult(_anonymous);
        NotifyAuthenticationStateChanged(authState);
    }
}
AuthProvider Code Explanation
First, we just create an anonymous user since we are going to use it throughout this class. Then, in the GetAuthenticationStateAsync method, we extract the token from the local storage. If it doesn’t exist, we return an anonymous user (the user is not authenticated). Otherwise, we set the default authorization header for the HttpClient and return authenticated user – the ClaimsIdentity constructor is populated with the parsed claims and the authentication type parameters.
The CascadingAuthenticationState component uses this method to determine whether the current user is authenticated or not.
There are two more helper methods in this class. In the NotifyUserAuthentication method, we create an authenticated user and call the NotifyAuthenticationStateChanged method that raises the AuthenticationStateChanged event for the AuthenticationStateProvider. We are going to use this method as soon as the user logs in.
The second method does the same thing but it notifies the AuthenticationStateProvider as soon as the user logs out.
After this implementation, we have to register the LocalStorage service and to modify AuthenticationStateProvider registration by replacing the TestAuthStateProvider class with the AuthStateProvider class:
builder.Services.AddBlazoredLocalStorage();
builder.Services.AddAuthorizationCore();
builder.Services.AddScoped<AuthenticationStateProvider, AuthStateProvider>();
That’s it. We can now modify the AuthenticationService class by adding Login and Logout actions.
Blazor WebAssembly Authentication Actions with AuthenticationService
Let’s start by modifying the IAuthenticationService interface:
public interface IAuthenticationService
{
    Task<RegistrationResponseDto> RegisterUser(UserForRegistrationDto userForRegistration);
    Task<AuthResponseDto> Login(UserForAuthenticationDto userForAuthentication);
    Task Logout();
}
Now, we can modify the AuthenticationService class. Let’s start with the constructor modification:
private readonly HttpClient _client;
private readonly JsonSerializerOptions _options;
private readonly AuthenticationStateProvider _authStateProvider;
private readonly ILocalStorageService _localStorage;

public AuthenticationService(HttpClient client, AuthenticationStateProvider authStateProvider, ILocalStorageService localStorage)
{
    _client = client;
    _options = new JsonSerializerOptions { PropertyNameCaseInsensitive = true };
    _authStateProvider = authStateProvider;
    _localStorage = localStorage;
}
After that, we can implement Login and Logout methods:
public async Task<AuthResponseDto> Login(UserForAuthenticationDto userForAuthentication)
{
    var content = JsonSerializer.Serialize(userForAuthentication);
    var bodyContent = new StringContent(content, Encoding.UTF8, "application/json");

    var authResult = await _client.PostAsync("accounts/login", bodyContent);
    var authContent = await authResult.Content.ReadAsStringAsync();
    var result = JsonSerializer.Deserialize<AuthResponseDto>(authContent, _options);

    if (!authResult.IsSuccessStatusCode)
        return result;

    await _localStorage.SetItemAsync("authToken", result.Token);
    ((AuthStateProvider)_authStateProvider).NotifyUserAuthentication(userForAuthentication.Email);
    _client.DefaultRequestHeaders.Authorization = new AuthenticationHeaderValue("bearer", result.Token);

    return new AuthResponseDto { IsAuthSuccessful = true };
}

public async Task Logout()
{
    await _localStorage.RemoveItemAsync("authToken");
    ((AuthStateProvider)_authStateProvider).NotifyUserLogout();
    _client.DefaultRequestHeaders.Authorization = null;
}
In the Login method, we send the request to the login endpoint and deserialize the response. If it is not successful, we just return that response containing the error message. Otherwise, we set the token in the local storage, call the NotifyUserAuthentication method from the AuthStateProvider class, add the token as a default authorization header for the HttpClient and return the successful result.
In the Logout method, we remove the token from the local storage, call the NotifyUserLogout method from the AuthStateProvider class, and remove a default authorization header.
Excellent, we can move on.
Creating Login and Logout Components
In the Pages folder, we are going to create two new files – Login.razor and Login.razor.cs:
public partial class Login
{
    private UserForAuthenticationDto _userForAuthentication = new UserForAuthenticationDto();

    [Inject]
    public IAuthenticationService AuthenticationService { get; set; }
    [Inject]
    public NavigationManager NavigationManager { get; set; }
    public bool ShowAuthError { get; set; }
    public string Error { get; set; }

    public async Task ExecuteLogin()
    {
        ShowAuthError = false;

        var result = await AuthenticationService.Login(_userForAuthentication);
        if (!result.IsAuthSuccessful)
        {
            Error = result.ErrorMessage;
            ShowAuthError = true;
        }
        else
        {
            NavigationManager.NavigateTo("/");
        }
    }
}
This is almost the same implementation as the Registration.razor.cs file. We call the Login method from the AuthenticationService class and if the result is not successful, we show an error message. Otherwise, we navigate to the Home page.
Now, let’s implement the component file:
@page "/login"
<h3>Login</h3>

@if (ShowAuthError)
{
    <div class="alert alert-danger" role="alert">
        <p>@Error</p>
    </div>
}

<EditForm Model="_userForAuthentication" OnValidSubmit="ExecuteLogin" class="card card-body bg-light mt-5">
    <DataAnnotationsValidator />
    <div class="form-group row">
        <label for="email" class="col-md-2 col-form-label">Email:</label>
        <div class="col-md-10">
            <InputText id="email" class="form-control" @bind-Value="_userForAuthentication.Email" />
            <ValidationMessage For="@(() => _userForAuthentication.Email)" />
        </div>
    </div>

    <div class="form-group row">
        <label for="password" class="col-md-2 col-form-label">Password:</label>
        <div class="col-md-10">
            <InputText type="password" id="password" class="form-control" @bind-Value="_userForAuthentication.Password" />
            <ValidationMessage For="@(() => _userForAuthentication.Password)" />
        </div>
    </div>

    <div class="row">
        <div class="col-md-12 text-right">
            <button type="submit" class="btn btn-success">Login</button>
        </div>
    </div>
</EditForm>
There is nothing new here, simple input fields with the EditForm component and validation messages.
Let’s continue by creating the Logout files in the Pages folder.
The Logout.razor file will have only the @page directive:
@page "/logout"
We need nothing more in the component file. But we need some implementation in the class file:
public partial class Logout
{
     [Inject]
     public IAuthenticationService AuthenticationService { get; set; }
     [Inject]
     public NavigationManager NavigationManager { get; set; }

     protected override async Task OnInitializedAsync()
     {
         await AuthenticationService.Logout();
         NavigationManager.NavigateTo("/");
     }
}
And that’s all it takes. As soon as this component initializes, it will call the Logout method from the AuthenticationService class and navigate the user to the Home page.
Testing the Blazor WebAssembly Authentication Functionality
Before we start, let’s just open the Counter.razor file, and remove the Roles part inside the AuthorizeView component. We have to do that because we are not using the TestAuthProvider class anymore and we are going to implement the Role-Based Authorization in the next article.
After that, let’s start both the server and the client applications.
We can see the Home page, without the Products menu since it is only available for the authenticated users (already implemented in the AuthenticationStateProvider article). Now, let’s click the Login link and try to log in without credentials:
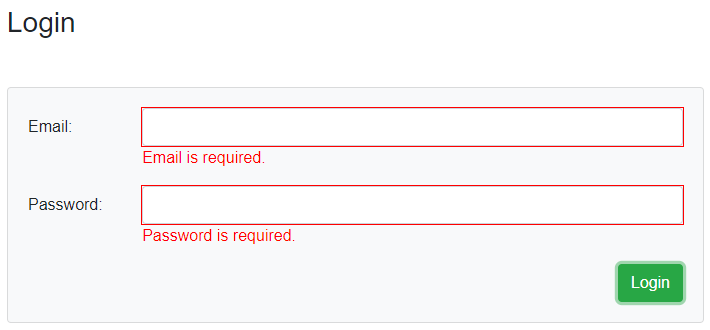
We can see the validation is working as expected.
Let’s add invalid credentials and click the Login button:
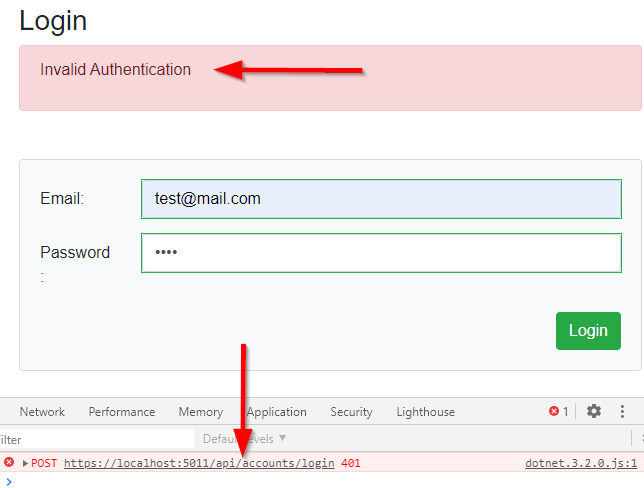
We can see the server responds with 401 and our error message is displayed on the screen.
As soon as we enter the valid credentials, we are going to be navigated to the Home page and the Products menu will be available:
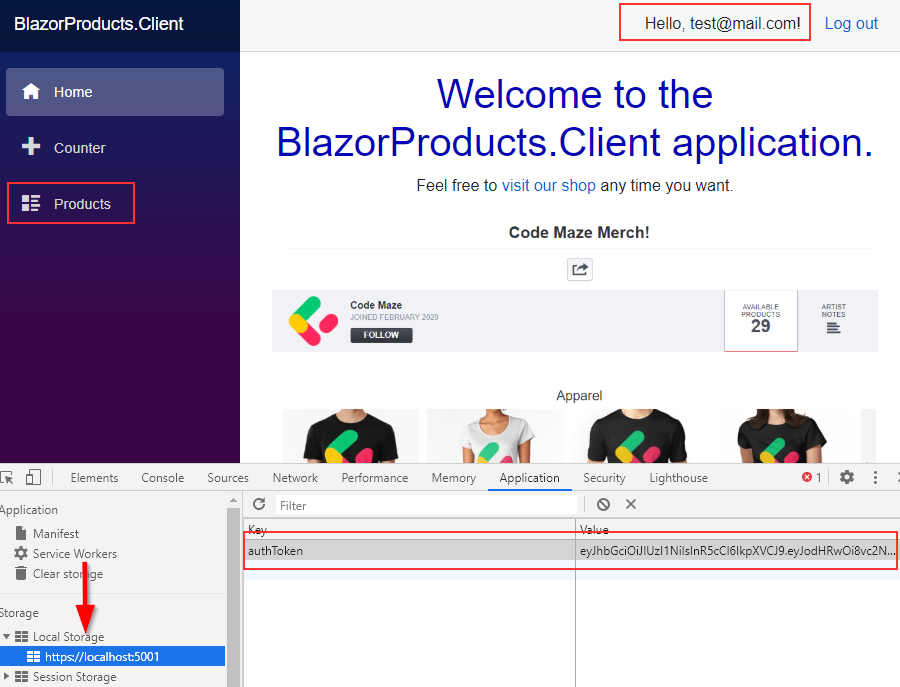
Additionally, we can find the token stored in the Local Storage.
Since we are storing this token in the HttpClient’s authorization header, we can click the Products link and fetch all the products from the protected endpoint.
If we click the Logout link, we are going to be navigated to the Home page (or stay on it if we were already there), the Products link will disappear, and the token will be removed from the Local Storage:
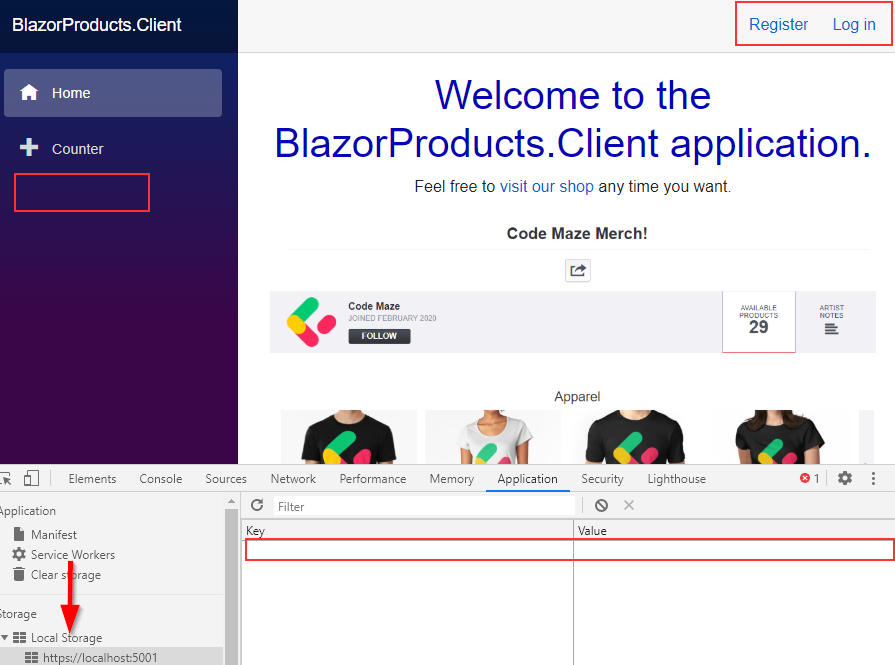
Excellent.
You can check the Counter page as well to see that the counter increases for the authenticated user and vice versa.
Conclusion
Right now, we have working authentication in our Blazor WebAssembly application. We can register a new user, and that user can log in and log out from our application. Also, we have provided a way to protect some resources that are not allowed for unauthorized users.
But, we are missing roles here.
Well, that’s exactly what we are going to cover in the next article about Blazor WebAssembly Role-Based Authorization.

