


Updated on
The repository pattern puts one layer between the code that needs data and the code that talks to the database. Controllers call IOwnerRepository; only the repository knows that EF Core is underneath.
In this part we build that layer for our ASP.NET Core Web API: the Entities models and the RepositoryContext, a generic RepositoryBase<T> with the operations every entity shares, one repository class per entity, and a wrapper that hands a controller all of them at once.
VIDEO: Repository Pattern in ASP.NET Core Web API video.
The embedded video builds the repository synchronously. The code below is the current, asynchronous version, the structure is identical, and the save method the video creates has an Async counterpart here.
If you want to see all the basic instructions and complete navigation for this series, please follow the following link: Introduction page for this tutorial.
For the previous part check out: NLog in ASP.NET Core Web API: Logging to a File
What Is the Repository Pattern in .NET Core?
The repository pattern puts a layer between the code that asks for data and the code that talks to the database. Controllers and services call repository methods, and only the repository knows about EF Core, connection strings, and LINQ over a DbSet.
Two pieces carry it. A generic base class holds the operations every entity needs: find all, find by condition, create, update, delete. One class per entity inherits from that base and adds the queries only that entity needs.
The payoff is reuse and substitution. A query written once serves every caller that needs it, and a test can hand a controller a fake repository instead of a database.
The cost is a layer. EF Core’s DbContext is already a repository and a unit of work rolled together, so what this pattern buys is isolation from EF Core, not isolation from the database. That distinction decides whether it is worth building.
| Piece | Type | What it does | Project |
|---|---|---|---|
RepositoryContext | DbContext | Holds the DbSet properties and the database connection | Entities |
IRepositoryBase<T> | interface | Declares the operations every entity shares | Contracts |
RepositoryBase<T> | abstract class | Implements them against DbSet<T> via Set<T>() | Repository |
IOwnerRepository | interface | Declares the queries only Owner needs; empty here, filled in part 5 | Contracts |
OwnerRepository | class | Inherits RepositoryBase<Owner> and implements them | Repository |
IRepositoryWrapper | interface | Exposes every repository plus one save method | Contracts |
RepositoryWrapper | class | Shares one RepositoryContext across all repositories | Repository |
The whole point of the next four sections is one rule: each layer knows only the one below it.
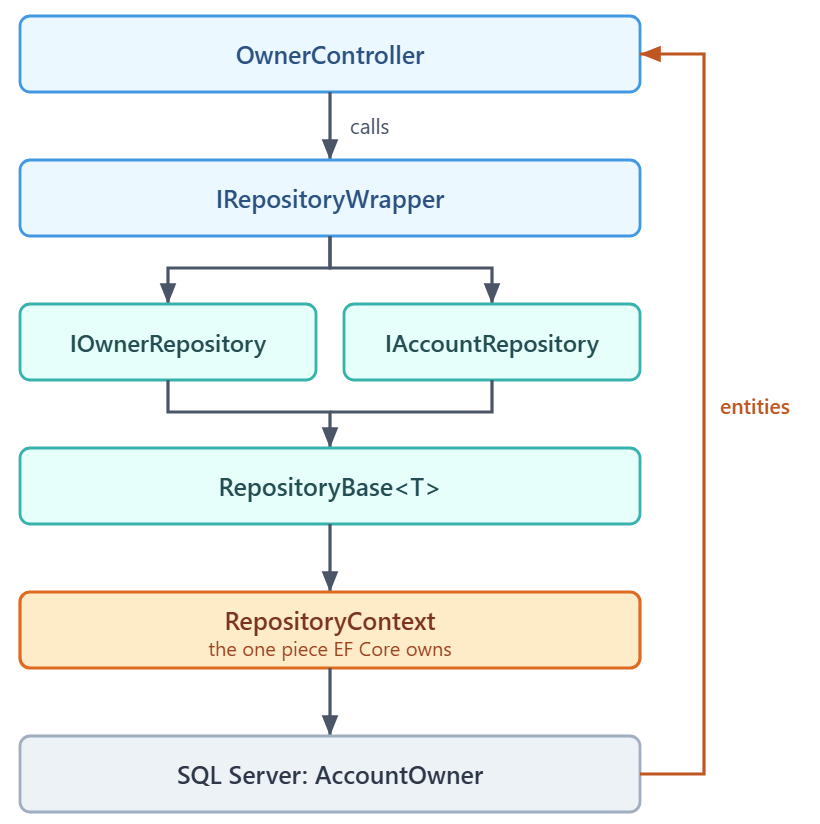
Each of those pieces promotes a more loosely coupled way to reach our data. The data access logic lives in one class, or one set of classes, whose responsibility is persisting the application’s business model, and the rest of the project stops caring how that happens. This part has a strong relationship with EF Core, so we also recommend reading our EF Core tutorial for a better understanding of that topic.
Creating Models
Let’s begin by creating a new Class Library project named Entities and inside it a new folder with the name Models, which will contain all the model classes. Model classes represent the tables inside the database and serve us to map the data from the database to C# objects. After that, we should reference this project from the main project.
In the Models folder, we are going to create two classes and modify them:
using System.ComponentModel.DataAnnotations;
using System.ComponentModel.DataAnnotations.Schema;

namespace Entities.Models
{
    [Table("Owner")]
    public class Owner
    {
        public Guid OwnerId { get; set; }

        [Required(ErrorMessage = "Name is required")]
        [StringLength(60, ErrorMessage = "Name can't be longer than 60 characters")]
        public string? Name { get; set; }

        [Required(ErrorMessage = "Date of birth is required")]
        public DateTime DateOfBirth { get; set; }

        [Required(ErrorMessage = "Address is required")]
        [StringLength(100, ErrorMessage = "Address cannot be longer than 100 characters")]
        public string? Address { get; set; }

        public ICollection<Account>? Accounts { get; set; }
    }
}
using System.ComponentModel.DataAnnotations;
using System.ComponentModel.DataAnnotations.Schema;

namespace Entities.Models
{
    [Table("Account")]
    public class Account
    {
        public Guid AccountId { get; set; }

        [Required(ErrorMessage = "Date created is required")]
        public DateTime DateCreated { get; set; }

        [Required(ErrorMessage = "Account type is required")]
        public string? AccountType { get; set; }

        [ForeignKey(nameof(Owner))]
        public Guid OwnerId { get; set; }
        public Owner? Owner { get; set; }
    }
}
Both models are decorated with the [Table("tableName")] attribute, which names the table each one maps to. The mandatory fields carry [Required], and where we want to constrain a string we use [StringLength], with the same lengths the database script declares. In the Owner class, the Accounts property says that one Owner is related to multiple Accounts. On the other side, OwnerId and Owner are decorated with [ForeignKey] to state that one Account belongs to exactly one Owner. Our articles on how EF Core maps relationships between entities and on configuring nonrelational properties in EF Core cover both sides of that configuration in depth.
Context Class and the Database Connection
Now, let us create the context class, which is the component our code talks to instead of the database. It exposes DbSet properties that stand for the tables, and everything EF Core does in this project goes through it.
At the root of the Entities project, we are going to create the RepositoryContext class and modify it:
using Entities.Models;
using Microsoft.EntityFrameworkCore;

namespace Entities
{
    public class RepositoryContext : DbContext
    {
        public RepositoryContext(DbContextOptions<RepositoryContext> options)
            : base(options)
        {
        }

        public DbSet<Owner> Owners => Set<Owner>();
        public DbSet<Account> Accounts => Set<Account>();
    }
}
Two details in that class are deliberate. The constructor takes DbContextOptions<RepositoryContext> rather than the non-generic DbContextOptions, because the generic form is what AddDbContext<RepositoryContext> supplies. The non-generic form works while there is one context and fails the moment a second one is registered, with an error message that names the fix: “The DbContextOptions passed to the LegacyCtx constructor must be a DbContextOptions<LegacyCtx>.” And the two sets are expression-bodied properties over Set<T>() rather than nullable DbSet<Owner>? properties, which is what keeps them non-nullable without a ! at every use site.
Pay attention that you have to install the Microsoft.EntityFrameworkCore package in the Entities project.
To let the Web API talk to SQL Server, we install Microsoft.EntityFrameworkCore.SqlServer in the main project, with the NuGet package manager or the Package Manager Console. It ships on the same version line as EF Core itself, so there is no provider version to match by hand.
The AccountOwner database and its two tables come from SQL Server With ASP.NET Core: Creating the Database, which creates them by running one script against LocalDB or a SQL Server container. The connection string below points at that database, so if we have skipped straight to this part, that script is the thing to run first.
After the installation, let’s open the appsettings.json file and add the connection settings inside:
{
  "Logging": {
    "LogLevel": {
      "Default": "Information",
      "Microsoft.AspNetCore": "Warning"
    }
  },
  "ConnectionStrings": {
    "SqlConnection": "Server=(localdb)\\MSSQLLocalDB;Database=AccountOwner;Trusted_Connection=True;TrustServerCertificate=True;"
  },
  "AllowedHosts": "*"
}
In the ServiceExtensions class, we are going to write the code that configures the SQL Server context.
First, let’s add the using directives and then the ConfigureSqlContext method:
using Microsoft.EntityFrameworkCore;
using Entities;

public static void ConfigureSqlContext(this IServiceCollection services, IConfiguration config)
{
    var connectionString = config.GetConnectionString("SqlConnection");

    services.AddDbContext<RepositoryContext>(o => o.UseSqlServer(connectionString));
}
With the help of the IConfiguration config parameter we reach the appsettings.json file and take the connection string from it. UseSqlServer takes no server-version argument of any kind, so the registration really is one line.
Afterward, in the Program class, let’s add the context service to the IOC container above builder.Services.AddControllers():
builder.Services.ConfigureSqlContext(builder.Configuration);
How Do We Implement a Generic Repository in .NET Core?
A generic repository is one abstract class parameterised by entity type, so every entity gets the same operations without a copy of the code per entity.
The interface declares them. FindAll() and FindByCondition() return IQueryable<T>, so a caller can still add Where, OrderBy or Include before anything reaches the database. Create(), Update() and Delete() only stage a change on the change tracker.
The abstract class implements them against DbSet<T>, reached through RepositoryContext.Set<T>() rather than a named property. That indirection is exactly what lets one implementation serve every entity.
Nothing here saves. Staging and saving are separate on purpose, so several changes across several entities can commit in one transaction.
AsNoTracking() on the two read methods turns change tracking off. Reads get faster, and an entity fetched this way arrives detached, which matters when we update it later.
The distinction between a composed query and an executed one is worth being precise about, and our article on IEnumerable, IQueryable and when each one executes works through it.
First, let’s create an interface for the repository inside the Contracts project:
using System.Linq.Expressions;

namespace Contracts
{
    public interface IRepositoryBase<T>
    {
        IQueryable<T> FindAll();
        IQueryable<T> FindByCondition(Expression<Func<T, bool>> expression);
        void Create(T entity);
        void Update(T entity);
        void Delete(T entity);
    }
}
Right after the interface creation, we create a new Class Library project named Repository, add references to the Contracts and Entities projects, and inside it create the abstract class RepositoryBase that implements IRepositoryBase. Add a reference to this project from the main project too.
Let’s add the following code to the RepositoryBase class:
using Contracts;
using Entities;
using Microsoft.EntityFrameworkCore;
using System.Linq.Expressions;

namespace Repository
{
    public abstract class RepositoryBase<T> : IRepositoryBase<T> where T : class
    {
        protected RepositoryContext RepositoryContext { get; set; }

        public RepositoryBase(RepositoryContext repositoryContext)
        {
            RepositoryContext = repositoryContext;
        }

        public IQueryable<T> FindAll() => RepositoryContext.Set<T>().AsNoTracking();

        public IQueryable<T> FindByCondition(Expression<Func<T, bool>> expression) =>
            RepositoryContext.Set<T>().Where(expression).AsNoTracking();

        public void Create(T entity) => RepositoryContext.Set<T>().Add(entity);

        public void Update(T entity) => RepositoryContext.Set<T>().Update(entity);

        public void Delete(T entity) => RepositoryContext.Set<T>().Remove(entity);
    }
}
The abstract class and the IRepositoryBase interface both work with the generic type T, and that is what makes RepositoryBase reusable. We do not name the model it works with here; the classes in the next section do that.
Repository User Classes
Now that we have the RepositoryBase class, let’s create the user classes that inherit it. Every user class gets its own interface for model-specific methods, and by inheriting from RepositoryBase it already has every shared method. This way we separate the logic that is common to all repositories from the logic specific to one of them.
Let’s create interfaces in the Contracts project for our Owner and Account classes.
Don’t forget to add a reference from the Entities project to the Contracts project. As soon as we do, we can delete the Entities reference from the main project, because it now arrives through the Repository project, which references Contracts, which references Entities.
using Entities.Models;

namespace Contracts
{
    public interface IOwnerRepository : IRepositoryBase<Owner>
    {
    }
}
using Entities.Models;

namespace Contracts
{
    public interface IAccountRepository : IRepositoryBase<Account>
    {
    }
}
Now, let’s create the repository user classes in the Repository project:
using Contracts;
using Entities;
using Entities.Models;

namespace Repository
{
    public class OwnerRepository : RepositoryBase<Owner>, IOwnerRepository
    {
        public OwnerRepository(RepositoryContext repositoryContext)
            : base(repositoryContext)
        {
        }
    }
}
using Contracts;
using Entities;
using Entities.Models;

namespace Repository
{
    public class AccountRepository : RepositoryBase<Account>, IAccountRepository
    {
        public AccountRepository(RepositoryContext repositoryContext)
            : base(repositoryContext)
        {
        }
    }
}
After these steps we are finished with the repository and the repository user classes. There is one more piece to build.
How Do We Wrap Repository Classes Behind One Service?
A wrapper exposes every repository as a property on a single object, so a controller injects one service instead of one per entity.
The interface lists the repositories and a save method. The class creates each repository the first time it is asked for and returns the same instance afterwards, and every one of them shares the single RepositoryContext that dependency injection handed the wrapper.
Sharing that context is the whole point. Because all repositories stage their changes on the same change tracker, one call to save commits them together, and if the save fails none of them are applied.
Register the wrapper as scoped. A scoped registration gives every HTTP request its own wrapper and its own context, which is the lifetime DbContext is built for.
This is the unit of work idea wearing a different name, and the save method is where the two meet.
If we want that idea on its own terms, our article on the unit of work pattern this wrapper implements builds it as a first-class abstraction rather than as a side effect of a shared context.
Let’s start by creating a new interface in the Contracts project:
namespace Contracts
{
    public interface IRepositoryWrapper
    {
        IOwnerRepository Owner { get; }
        IAccountRepository Account { get; }
        Task SaveAsync();
    }
}
After that, we are going to add a new class to the Repository project:
using Contracts;
using Entities;

namespace Repository
{
    public class RepositoryWrapper(RepositoryContext repositoryContext) : IRepositoryWrapper
    {
        private readonly RepositoryContext _repoContext = repositoryContext;
        private IOwnerRepository? _owner;
        private IAccountRepository? _account;

        public IOwnerRepository Owner => _owner ??= new OwnerRepository(_repoContext);

        public IAccountRepository Account => _account ??= new AccountRepository(_repoContext);

        public async Task SaveAsync() => await _repoContext.SaveChangesAsync();
    }
}
The properties expose the concrete repositories, and SaveAsync() is what we call once every modification on a given object is finished. The class uses a primary constructor, and each property uses ??= to create its repository on first use and hand back the same instance afterwards.
This is a good practice, because now we can add two owners, modify two accounts and delete one owner in a single method, and then call save once. All the changes are applied together, or if something fails, none of them are:
_repository.Owner.Create(owner);
_repository.Owner.Create(anotherOwner);
_repository.Account.Update(account);
_repository.Account.Update(anotherAccount);
_repository.Owner.Delete(oldOwner);

await _repository.SaveAsync();
In the ServiceExtensions class, we are going to add this code:
public static void ConfigureRepositoryWrapper(this IServiceCollection services)
{
    services.AddScoped<IRepositoryWrapper, RepositoryWrapper>();
}
And in the Program class, above the builder.Services.AddControllers() line, add this code:
builder.Services.ConfigureRepositoryWrapper();
Testing
All we have to do is test this code the same way we did with our custom logger in part 3 of this series.
Inject the RepositoryWrapper service into the WeatherForecast controller and call a method on each repository:
[ApiController]
[Route("[controller]")]
public class WeatherForecastController : ControllerBase
{
    private readonly IRepositoryWrapper _repository;

    public WeatherForecastController(IRepositoryWrapper repository)
    {
        _repository = repository;
    }

    [HttpGet]
    public IActionResult Get()
    {
        var domesticAccounts = _repository.Account
            .FindByCondition(a => a.AccountType == "Domestic")
            .Count();
        var owners = _repository.Owner.FindAll().Count();

        return Ok(new { owners, domesticAccounts });
    }
}
Against the sample data from part 1, that endpoint returns {"owners":4,"domesticAccounts":4}. It is not a real endpoint and part 5 replaces it, but it proves the thing this section is about: one injected wrapper reached both repositories, and both of them reached the database through the same context.
Note that we compare AccountType with == rather than calling Equals on it. The property is a string?, so calling a method on it warns under nullable reference types, and the comparison translates to the same SQL either way.
In the next part, we are going to show you how to restrict access to the RepositoryBase methods from the controller, if you don’t want them exposed there.
Should We Use the Repository Pattern With EF Core?
EF Core’s DbContext is already a repository and a unit of work, so this pattern does not buy database independence that EF Core lacks. What it buys is a boundary around EF Core itself.
Use it when the boundary earns its keep. Query logic repeated across controllers belongs in one named method. Tests that must not touch a database need something to substitute. A team that wants EF Core types out of its controllers gets exactly that.
Skip it when every method forwards a call. A repository whose methods are one-line pass-throughs to DbSet is indirection with no content, and a service layer or CQRS usually fits that codebase better.
Watch what leaks. Returning IQueryable lets callers compose queries the repository never anticipated, which is convenient and also means EF Core has not really been hidden. That trade is fine as long as it is a decision.
Where the boundary does earn its keep, the next question is what sits on the other side of it. Our guides on putting a service layer between controllers and repositories and on EF Core best practices take the two halves of that decision further.
This series builds the repository as far as one article can take it. The Ultimate ASP.NET Core Web API course takes the same project through a service layer, DTO validation, global error handling, and the tests that make the abstraction pay for itself.
Conclusion
The repository pattern raises the level of abstraction in our data access, and that costs something: a developer meeting the code for the first time has one more layer to read. Once the layer is understood, it removes the duplicated query code that would otherwise spread across controllers.
In this post we have learned:
- What the repository pattern is, and when it is worth building over EF Core
- How to create the models and their attributes
- How to create the context class and connect it to the database from part 1
- How to write a generic repository and the per-entity classes on top of it
- How to wrap those classes behind one service with a single async save
Next up is ASP.NET Core Web API GET Requests With a Repository, where we use this repository to serve real HTTP requests. The series introduction page lists every part if you would rather jump around.
Tested with .NET 10 (SDK 10.0.302) and Microsoft.EntityFrameworkCore.SqlServer 10.0.11 against SQL Server Express LocalDB.