


Updated on
The .NET CLI is the dotnet command, and seven of its subcommands do almost everything: new creates, build compiles, run compiles and starts, watch reruns on save, publish packages for a server, test runs tests, and add edits the project file.
dotnet build is the one most people arrive looking for. It compiles a project or a whole solution and stops. It never starts the application. dotnet run does the build and then starts it.
Whether taking our first steps in cross-platform development based on the .NET common language runtime (CLR), or brushing up on some basics to explore a different way to work, we are in the right place. For an overview of the basics of C# and .NET, be sure to check out our C# Back to Basics series and Intro to .NET and C#.
How Do We Create a Project With the .NET CLI?
Before we can run the command line interface (CLI), we need to make sure we have all the required files. The CLI is included in the .NET SDK. To verify that we can run the CLI, we can open the command line terminal and run the dotnet command. If it works, we should see the output:
Usage: dotnet [path-to-application]
Usage: dotnet [commands]

path-to-application:
  The path to an application .dll file to execute.

commands:
  -h|--help                         Display help.
  --info                            Display .NET information.
  --list-runtimes [--arch <arch>]   Display the installed runtimes matching the host or specified architecture. Example architectures: arm64, x64, x86.
  --list-sdks [--arch <arch>]       Display the installed SDKs matching the host or specified architecture. Example architectures: arm64, x64, x86.
For more installation information, refer to Install .NET SDK. To check whether the SDK is already installed, and which versions we have, we can run dotnet --list-sdks, and with more than one SDK on the machine we can pin a project to a particular SDK version with global.json.
Create the Project
Those who have used Visual Studio to develop C# applications may remember that it offers many file and project templates that save us significant time and effort when creating new projects and files. The same project templates are available for .NET cross-platform development with the dotnet new command. The basic structure of the command is:
dotnet new <template> -o <output directory> -n <name>
If we omit the name argument it will default to using the last part of the output directory, which is usually a reasonable default. Let’s use this command to create a console application:
dotnet new console -o HelloWorld
This produces output like the following:
The template "Console App" was created successfully.

Processing post-creation actions...
Restoring C:\Workspace\CodeMaze\HelloWorld\HelloWorld.csproj:
  Determining projects to restore...
  Restored C:\Workspace\CodeMaze\HelloWorld\HelloWorld.csproj (in 74 ms).
Restore succeeded.
As we can see, it created a new folder HelloWorld and inside it a C# project named HelloWorld.csproj. If we look inside the folder we will find a familiar project structure.
For more details about the dotnet new command and its argument please refer to the dotnet new command documentation.
Explore the Templates
For information about the installed templates we use the list subcommand:
dotnet new list
Which produces an output similar to the following:
These templates matched your input:

Template Name                                 Short Name                    Language    Tags
--------------------------------------------  ----------------------------  ----------  -------------------------------------
...
ASP.NET Core Empty                            web                           [C#],F#     Web/Empty
...
Class Library                                 classlib                      [C#],F#,VB  Common/Library
Console App                                   console                       [C#],F#,VB  Common/Console
...
dotnet gitignore file                         gitignore,.gitignore                      Config
Dotnet local tool manifest file               tool-manifest                             Config
...
MSBuild Directory.Packages.props file         packagesprops                             MSBuild/packages/props/CPM
...
MSTest Test Project                           mstest                        [C#],F#,VB  Test/MSTest/Desktop/Web
...
NuGet Config                                  nugetconfig,nuget.config                  Config
...
NUnit Test Item                               nunit-test                    [C#],F#,VB  Test/NUnit
NUnit Test Project                            nunit                         [C#],F#,VB  Test/NUnit/Desktop/Web
Protocol Buffer File                          proto                                     Web/gRPC
...
Solution File                                 sln,solution                              Solution
...
Web Config                                    webconfig                                 Config
...
xUnit Test Project                            xunit                         [C#],F#,VB  Test/xUnit/Desktop/Web
We can see that even though C# is the default language, we can also use F# and VB (--language argument). This list can also be expanded by installing new templates with the install subcommand.
How Do We Run a .NET Application From the CLI?
dotnet run builds the project and then starts it, in one command. The build always runs unless we pass --no-build. Run it twice without touching a file and the second run still evaluates the project before the application starts.
So dotnet run also builds, and running dotnet build first changes nothing except that the compiling has already happened.
From outside the project folder, --project takes either the project file or the folder holding it, so dotnet run --project HelloWorld works from one level up.
The command needs the source files and the NuGet cache, which is why it belongs in an editing loop and not on a server. A server runs a published folder instead.
dotnet watch goes one step further. It watches the files the project compiles and, when one changes, hot reloads the running application, or asks before restarting it when hot reload cannot apply the change, so saving the file is usually all we have to do.
The chain below is why running dotnet build before dotnet run changes nothing.
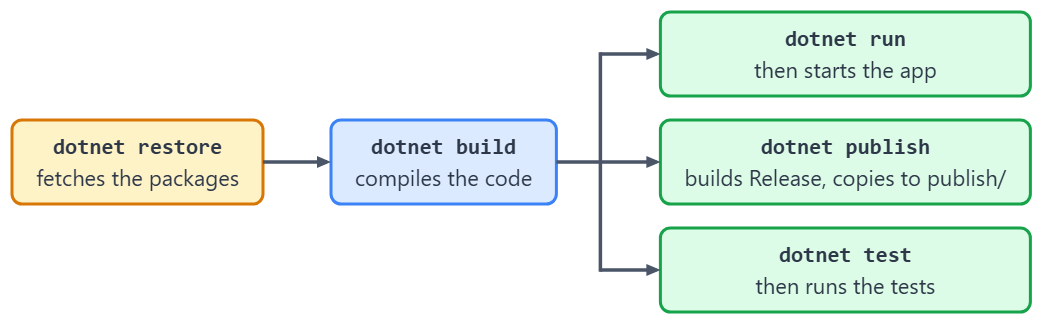
Now that we have created the project, we can use the .NET CLI to run it. We will first position ourselves in the project folder:
cd HelloWorld
And then run the project:
dotnet run
We should see the output:
Hello, World!
If we inspect the project folder now, we will see that dotnet compiled the project into an executable file, and then executed it from the output directory.
Additional arguments allow us to specify a different architecture or configuration, or even pass arguments to the console application that we want to execute. For more details, refer to the dotnet run command documentation.
The options dotnet watch takes are in the watch command documentation, and we cover hot reload for ASP.NET Core web apps separately.
The run command needs the source files and NuGet package cache, which will be compiled and restored by the build command that is implicitly executed. That’s why this is not a recommended way to run applications in a production environment. Instead, we generally use the publish command to create a deployment. More about that in a minute.
What Does the dotnet build Command Do?
dotnet build compiles a project and everything it references into assemblies, and then stops. It never starts the application.
Given no argument, it looks in the current folder for a project or a solution file, so the same command works in a project folder and in a solution folder. Given a path to a project or solution file, or to a folder holding one, it builds that instead.
Before the compiler runs, a restore reads the package references and fills the local NuGet cache, and every project the target depends on is built first, in order. --no-restore skips the first, --no-dependencies skips the second.
The result lands in bin/Debug/net10.0/ under each project, because dotnet build builds Debug unless -c Release says otherwise.
That default is worth holding on to, because dotnet publish does not share it. Since the .NET 8 SDK, publish builds Release for projects that target .NET 8 or later.
In case we need the explicit build step, we can do it like this:
dotnet build
We can expect output similar to this:
  Determining projects to restore...
  All projects are up-to-date for restore.
  HelloWorld -> C:\Workspace\CodeMaze\HelloWorld\bin\Debug\net10.0\HelloWorld.dll

Build succeeded.
    0 Warning(s)
    0 Error(s)

Time Elapsed 00:00:00.99
In this example, we see the output path for the project, the outcome, and the total time it took to build this project. Also, there were no packages to restore. We’ll fix that in the next section.
In an interactive terminal, dotnet build prints a condensed summary instead. This is the same build:
Restore complete (0.3s)
  HelloWorld net10.0 succeeded (0.2s) → bin\Debug\net10.0\HelloWorld.dll

Build succeeded in 1.0s
--tl:off brings back the older output, and it comes back on its own when the build is scripted or its output is redirected.
There are more options for building a project than we can cover in the scope of this article. For more details, see the dotnet build command documentation.
How Do We Add a NuGet Package From the CLI?
Suppose our project needs to talk to a web resource, and we have found a library that makes the job easier. We can add a reference to this library with the following command:
dotnet add package Flurl
The .NET 10 SDK added a second spelling for this command, dotnet package add Flurl, and kept the original working. We use the original form throughout this article.
The output will look similar to this:
info : X.509 certificate chain validation will use the default trust store selected by .NET for code signing.
info : X.509 certificate chain validation will use the default trust store selected by .NET for timestamping.
info : Adding PackageReference for package 'Flurl' into project 'C:\Workspace\CodeMaze\HelloWorld\HelloWorld.csproj'.
info :   GET https://api.nuget.org/v3/registration5-gz-semver2/flurl/index.json
info :   OK https://api.nuget.org/v3/registration5-gz-semver2/flurl/index.json 553ms
info : Restoring packages for C:\Workspace\CodeMaze\HelloWorld\HelloWorld.csproj...
info :   GET https://api.nuget.org/v3-flatcontainer/flurl/index.json
info :   OK https://api.nuget.org/v3-flatcontainer/flurl/index.json 234ms
info :   GET https://api.nuget.org/v3-flatcontainer/flurl/4.0.0/flurl.4.0.0.nupkg
info :   OK https://api.nuget.org/v3-flatcontainer/flurl/4.0.0/flurl.4.0.0.nupkg 87ms
info : Installed Flurl 4.0.0 from https://api.nuget.org/v3/index.json to ...
...
info : Package 'Flurl' is compatible with all the specified frameworks in project 'C:\Workspace\CodeMaze\HelloWorld\HelloWorld.csproj'.
info : PackageReference for package 'Flurl' version '4.0.0' added to file 'C:\Workspace\CodeMaze\HelloWorld\HelloWorld.csproj'.
info : Writing assets file to disk. Path: C:\Workspace\CodeMaze\HelloWorld\obj\project.assets.json
log  : Restored C:\Workspace\CodeMaze\HelloWorld\HelloWorld.csproj (in 792 ms).
As we can see, dotnet checked the version compatibility, added the reference to the .csproj file, and downloaded the required package files (in a slightly different order). We can inspect the project file:
<Project Sdk="Microsoft.NET.Sdk">

  <PropertyGroup>
    <OutputType>Exe</OutputType>
    <TargetFramework>net10.0</TargetFramework>
    <ImplicitUsings>enable</ImplicitUsings>
    <Nullable>enable</Nullable>
  </PropertyGroup>

  <ItemGroup>
    <PackageReference Include="Flurl" Version="4.0.0" />
  </ItemGroup>

</Project>
Note the highlighted line that references the Flurl library, along with a specific version. With several projects in a solution, we can also keep package versions in one file with Central Package Management.
If we inspect the project folder we won’t find Flurl.dll or Flurl.nupkg. The reason is that referenced packages will be downloaded to the package cache which, on a development computer, is located in the user folder under .nuget.
We can now use the features offered by the library that we added. Let’s edit the Program.cs file:
using Flurl;

Console.WriteLine("Hello, World!");
Console.WriteLine("https://api.site.com".AppendPathSegments("area", "class"));
If we now run the run command:
dotnet run
We will see the output:
Hello, World!
https://api.site.com/area/class
As expected, the Flurl library correctly appended two path segments to the base URL.
How Do We Publish a .NET Application From the CLI?
We have already covered how to build and run .NET applications using CLI. However, whether we are scripting the continuous integration/deployment (CI/CD) pipeline or we want to publish the project manually, we will need to make sure that we package all the required artifacts so that our project can execute properly in the target environment.
Let’s run the publish command:
dotnet publish
The output shows us the most important information:
  Determining projects to restore...
  All projects are up-to-date for restore.
  HelloWorld -> C:\Workspace\CodeMaze\HelloWorld\bin\Release\net10.0\HelloWorld.dll
  HelloWorld -> C:\Workspace\CodeMaze\HelloWorld\bin\Release\net10.0\publish\
Unlike build and run, publish builds Release: the .NET 8 SDK made that the default for projects that target .NET 8 or later, so the output is under bin\Release, not bin\Debug. Pass -c Debug to override it. We cover the difference between build and publish in a separate article.
The dotnet publish reference on Microsoft Learn states the rule: with the .NET 8 SDK or later, “the command uses the Release configuration by default for projects whose TargetFramework is set to net8.0 or a later version.”
The publish command implicitly executed the build command and packaged all files needed to run the HelloWorld program in the publish folder mentioned in the last line. Let’s inspect the contents of that folder:
C:\Workspace\CodeMaze\HelloWorld>dir bin\Release\net10.0\publish /B
Flurl.dll
HelloWorld.deps.json
HelloWorld.dll
HelloWorld.exe
HelloWorld.pdb
HelloWorld.runtimeconfig.json
Apart from the expected binary and symbol files, we also see HelloWorld.deps.json and HelloWorld.runtimeconfig.json. As their extensions suggest, we use them for further automated dependency processing (optional) and runtime configuration, such as garbage collection mode. Note the Flurl.dll in the publish folder. The publish command will copy all dependencies into the output folder. This way, we don’t have to install the dependencies separately on the target machine.
We can use several arguments for the publish command to fine-tune the output for the specific environment to which we want to publish. For example, we might want to have different configurations for testing and for the production environment, or we might want to prepare deployments for multiple frameworks or architectures. For more information check out the dotnet publish command documentation.
How Do We Create and Build a Solution From the CLI?
The CLI allows us to create solution files that group multiple projects. First, let’s go back to the parent folder with cd .. and add one more project:
dotnet new classlib -o HelloWorldCore
Now we can create a new solution:
dotnet new sln -n HelloWorldSolution
The output is not very verbose, but it informs us that the solution file is created successfully:
The template "Solution File" was created successfully.
The .NET 10 SDK creates HelloWorldSolution.slnx, an XML solution file, where earlier SDKs created HelloWorldSolution.sln. Pass --format sln for the older format, and run dotnet sln migrate to convert an existing .sln.
We don’t have much use for an empty solution so we should add the projects we created earlier:
C:\Workspace\CodeMaze>dotnet sln add .\HelloWorld\HelloWorld.csproj
Project `HelloWorld\HelloWorld.csproj` added to the solution.

C:\Workspace\CodeMaze>dotnet sln add .\HelloWorldCore\HelloWorldCore.csproj
Project `HelloWorldCore\HelloWorldCore.csproj` added to the solution.
The solution file now lists both projects:
<Solution>
  <Project Path="HelloWorld/HelloWorld.csproj" />
  <Project Path="HelloWorldCore/HelloWorldCore.csproj" />
</Solution>
Now, when we run the build command in the same directory:
dotnet build
We get some different output than we did with just one project:
  Determining projects to restore...
  All projects are up-to-date for restore.
  HelloWorldCore -> C:\Workspace\CodeMaze\HelloWorldCore\bin\Debug\net10.0\HelloWorldCore.dll
  HelloWorld -> C:\Workspace\CodeMaze\HelloWorld\bin\Debug\net10.0\HelloWorld.dll

Build succeeded.
    0 Warning(s)
    0 Error(s)

Time Elapsed 00:00:01.14
Note that it now builds both projects, each in its respective output directory.
How Do We Add a Project Reference From the CLI?
Most of the time, projects in a solution tend to have interdependencies. Let’s see how we can reference one project from another in the same solution.
First, we need to position ourselves in the referencing project folder. Then we can use the add reference command to add the dependency project:
C:\Workspace\CodeMaze>cd HelloWorld

C:\Workspace\CodeMaze\HelloWorld>dotnet add reference ..\HelloWorldCore\HelloWorldCore.csproj
When the command completes, we will see the output:
Reference `..\HelloWorldCore\HelloWorldCore.csproj` added to the project.
We can now use any public classes defined in the HelloWorldCore project from the HelloWorld console application.
If we now run the publish command in the solution folder:
dotnet publish
We can see that MSBuild built the projects from the solution and copied the publish output folder:
  Determining projects to restore...
  Restored C:\Workspace\CodeMaze\HelloWorld\HelloWorld.csproj (in 278 ms).
  1 of 2 projects are up-to-date for restore.
  HelloWorldCore -> C:\Workspace\CodeMaze\HelloWorldCore\bin\Release\net10.0\HelloWorldCore.dll
  HelloWorldCore -> C:\Workspace\CodeMaze\HelloWorldCore\bin\Release\net10.0\publish\
  HelloWorld -> C:\Workspace\CodeMaze\HelloWorld\bin\Release\net10.0\HelloWorld.dll
  HelloWorld -> C:\Workspace\CodeMaze\HelloWorld\bin\Release\net10.0\publish\
Let’s inspect the publish output folder for the HelloWorld console application:
C:\Workspace\CodeMaze>dir HelloWorld\bin\Release\net10.0\publish /B
Flurl.dll
HelloWorld.deps.json
HelloWorld.dll
HelloWorld.exe
HelloWorld.pdb
HelloWorld.runtimeconfig.json
HelloWorldCore.dll
HelloWorldCore.pdb
It contains all the dependencies needed to run the application, including the one we added.
How Do We Run Tests From the CLI?
The last (but not least) command that we will cover in our walkthrough is the test command. To test the solution we will first need to add a test project. We can use the new command to create one:
C:\Workspace\CodeMaze>dotnet new nunit -o HelloWorldTests
The template "NUnit Test Project" was created successfully.

Processing post-creation actions...
Restoring C:\Workspace\CodeMaze\HelloWorldTests\HelloWorldTests.csproj:
  Determining projects to restore...
  Restored C:\Workspace\CodeMaze\HelloWorldTests\HelloWorldTests.csproj (in 10.24 sec).
Restore succeeded.
Then we will add it to the solution:
C:\Workspace\CodeMaze>dotnet sln add HelloWorldTests\HelloWorldTests.csproj
Project `HelloWorldTests\HelloWorldTests.csproj` added to the solution.
Because tests typically reference the library they are testing, let’s add the reference to HelloWorldCore project:
C:\Workspace\CodeMaze>CD HelloWorldTests

C:\Workspace\CodeMaze\HelloWorldTests>dotnet add reference ..\HelloWorldCore\HelloWorldCore.csproj
Reference `..\HelloWorldCore\HelloWorldCore.csproj` added to the project.
Now (from the solution directory) we are ready to test the solution:
dotnet test
We can expect an output similar to this:
Restore complete (0.6s)
  HelloWorldCore net10.0 succeeded (0.1s) → HelloWorldCore\bin\Debug\net10.0\HelloWorldCore.dll
  HelloWorldTests net10.0 succeeded (0.1s) → HelloWorldTests\bin\Debug\net10.0\HelloWorldTests.dll
NUnit Adapter 5.0.0.0: Test execution started
Running all tests in C:\Workspace\CodeMaze\HelloWorldTests\bin\Debug\net10.0\HelloWorldTests.dll
   NUnit3TestExecutor discovered 1 of 1 NUnit test cases using Current Discovery mode, Non-Explicit run
NUnit Adapter 5.0.0.0: Test execution complete
  HelloWorldTests test net10.0 succeeded (0.8s)

Test summary: total: 1, failed: 0, succeeded: 1, skipped: 0, duration: 0.8s
Build succeeded in 1.7s
The first part builds the test project along with all the references. The second part informs us of the directory from which the tests run, along with their outcomes. As we can see, the default test project template comes with one passing test. This can be very useful to verify that we have set up the environment correctly before we start writing actual unit tests.
In this example, we used an NUnit test project. We could also use the xUnit or MSTest template and we would see very similar output. We compare how NUnit, xUnit and MSTest differ in a separate article.
The .NET 10 SDK can run tests on either VSTest or Microsoft Testing Platform. VSTest is still the default, and a global.json with "test": { "runner": "Microsoft.Testing.Platform" } switches it.
Similar to its sibling commands, the test command can also take a wide variety of arguments to further configure its execution, from test filtering to crash dump creation. For more details be sure to visit the dotnet test command documentation.
How Do We Run a C# File Without a Project?
The .NET 10 SDK builds and runs a single .cs file with no project file anywhere.
dotnet run greet.cs compiles the file into a temporary folder, caches the result, and executes it. Run it again without editing the file and nothing rebuilds.
The file is ordinary C#: top-level statements or a Main method, classes, records, several namespaces if we want them. One file holds the entry point, and from SDK 10.0.300 a #:include directive adds more source files.
Packages arrive through a directive instead of a project file. A line reading #:package [email protected] at the top of the file does what dotnet add package does for a project, and #:sdk picks a different SDK.
Other commands take the file too. dotnet watch greet.cs reruns it on save, and dotnet publish greet.cs produces a native executable, because a file-based app sets PublishAot to true. That needs a native linker, which on Windows comes with Visual Studio’s C++ desktop workload, and #:property PublishAot=false turns native AOT off.
When one file stops being enough, dotnet project convert greet.cs writes a project file and a copy of the code into a folder beside it.
Here is the whole of greet.cs:
Console.WriteLine("Hello from a single file!");
We run it by its file name:
dotnet run greet.cs
And it prints:
Hello from a single file!
With a package directive, in a file named util.cs:
#:package [email protected]

using Humanizer;

Console.WriteLine(TimeSpan.FromMinutes(95).Humanize());
dotnet run util.cs restores Humanizer, builds the file and prints:
1 hour
Which .NET CLI Command Should We Reach For?
The commands split into two groups by where they belong.
dotnet new, dotnet run and dotnet watch live in the editing loop. They assume the source is on this machine. run and watch build Debug and optimise for the seconds between saving a file and seeing the result.
dotnet build, dotnet test and dotnet publish are the ones a build server calls. A script runs them with the same arguments every time and reads success from the exit code, and dotnet publish is the one that builds Release.
Most of them run each other. Every command that builds restores first, run and publish both build, and test builds the test project and everything it references before a single test executes.
So the choice follows the task. To try a change, we reach for dotnet run, or dotnet watch when we will make many. To check that the whole solution still compiles, dotnet build. To prove nothing broke, dotnet test, and to produce the folder a server runs, dotnet publish.
Here is every main command from this article in one place, with the configuration it builds and where its output lands:
| Task | Command | Configuration it builds | Where the output lands |
|---|---|---|---|
| Create a project | dotnet new console -o HelloWorld | does not build | HelloWorld/ |
| Compile only | dotnet build | Debug | bin/Debug/net10.0/ |
| Compile and start | dotnet run | Debug | bin/Debug/net10.0/ |
| Start from another folder | dotnet run --project HelloWorld | Debug | bin/Debug/net10.0/ |
| Rerun on every save | dotnet watch | Debug | bin/Debug/net10.0/ |
| Package for deployment | dotnet publish | Release | bin/Release/net10.0/publish/ |
| Run tests | dotnet test | Debug | bin/Debug/net10.0/ |
| Add a NuGet package | dotnet add package Flurl | does not build | writes a <PackageReference> |
| Add a project reference | dotnet add reference ../HelloWorldCore | does not build | writes a <ProjectReference> |
| Create a solution | dotnet new sln -n HelloWorldSolution | does not build | HelloWorldSolution.slnx |
| Add a project to a solution | dotnet sln add HelloWorld | does not build | edits the solution file |
| Build the whole solution | dotnet build from the solution folder | Debug | one bin/ per project |
| Run a single .cs file | dotnet run greet.cs | Debug | a temporary folder |
The bin paths in the last column are relative to the project folder. The configuration column is the default each command uses, and -c overrides it for build, run, test and publish.
Conclusion
We’ve covered some basics about the main commands used to build and run .NET applications using only the CLI. Some of them, like new, run, sln, and add, are used in development loops, while creating the solution structure and writing the code. Others, like build, test, and publish, can be used in development loops, but also in scripts on the build server to automate publishing cycles or continuous integration. They can be very useful regardless of the IDE being used.
The same commands work on Windows, Linux and macOS, and a build server runs the same ones we type.
Tested with .NET 10.0.10 (SDK 10.0.302) and Flurl 4.0.0.