


Updated on
The select tag helper renders a <select> element from a model property. Two attributes do the work: asp-for names the property, and asp-items supplies the options.
asp-for carries more weight than it looks. It sets the element’s id and name, it decides which option starts out selected, and it is the property that receives the value when the form posts back. Everything else in this article is a variation on where the asp-items list comes from.
Let’s begin.
Tag Helpers in ASP.NET Core
Tag helpers enable server-side code to participate in creating and rendering HTML elements in Razor files.
In simpler terms, a tag helper is a server-side component that helps create and render HTML elements in Razor files.
ASP.NET Core provides a variety of built-in tag helpers that are very helpful in creating Razor views and pages.
Because they live in Razor files, it helps to be comfortable with how Razor views, partial views and layouts fit together before we start adding tag helpers to them.
But before we tackle select tag helper let’s clear one more thing up.
Tag Helpers vs HTML Helpers
Both tag helpers and HTML helpers render HTML elements in Razor files, however, they have their syntactical differences.
Let’s first generate a strongly typed input element using an HTML helper:
<div class="form-group">
    <label for="city">City with HTML Helper</label>
    @Html.TextBoxFor(m => m.City, new {@class="form-control"})
    @Html.ValidationMessageFor(m => m.City, message:"City can't be empty", new {@class="text-danger font-weight-bold"})
</div>
Now, we use an input tag helper to generate the same markup:
<div class="form-group">
    <label for="city">City with Tag Helper</label>
    <input type="text" class="form-control" asp-for="City">
    <span asp-validation-for="City" class="text-danger font-weight-bold"></span>
</div>
Tag helpers provide a more native HTML kind of feel while creating web pages whereas HTML helpers are invoked similarly to methods that are mixed with HTML inside Razor views.
The result is the same, but the syntax is different.
Now that we are aware of tag helpers, let’s learn about the select tag helper in detail.
What Does the Select Tag Helper Do?
The select tag helper turns a model property into a rendered <select> element, and two attributes do the whole job.
asp-for names the model property. It sets the element’s id and name, it decides which option starts out selected, and it is the property that receives the posted value when the form comes back.
asp-items supplies the options. It takes an IEnumerable<SelectListItem>, so anything we can turn into that list works: a hand-built list, a SelectList wrapped around a collection of our own objects, or Html.GetEnumSelectList<T>() for an enum.
The two attributes are independent of each other. asp-for without asp-items renders a bound but empty element that we fill with our own <option> markup, and asp-items without asp-for renders a list that displays fine and posts nothing back.
The HTML helper equivalent is Html.DropDownListFor(). The tag helper produces the same markup and leaves the Razor file looking like HTML.
Use a List<SelectListItem> to Render a Select Element
Let’s create a ProductViewModel with a string and a List<SelectListItem> properties:
public class ProductViewModel
{
    public string? Product { get; set; }
    public List<SelectListItem> Products { get; set; } = [];
}
After that, we create an MVC action method to return a view with an instance of the ProductViewModel:
public IActionResult Index()
{
    var model = new ProductViewModel
    {
        Products = new List<SelectListItem>
        {
            new SelectListItem
            {
                Text = "Motherboards",
                Value = "MB"
            },
            new SelectListItem
            {
                Text = "Graphic Cards",
                Value = "GC"
            },
            new SelectListItem
            {
                Text = "Liquid Coolants",
                Value = "LC"
            }
        },
        Product = "GC"
    };

    return View(model);
}
We spell every SelectListItem out here so the shape is visible; the sample project builds the same list with a collection expression. Our guide on passing a model from a controller to a view covers what View(model) hands to the Razor file.
Finally, we work on the Index view and render a dropdown list with the help of a select tag helper:
@model ProductViewModel
@{
    ViewData["Title"] = "Home Page";
}

<h3>Products Dropdown List</h3>
<form method="post">
    <select class="form-select form-select-sm" asp-for="Product" asp-items="@Model.Products"></select>
    <div class="mt-4">
        <input class="btn btn-primary" type="submit" value="Submit"/>
    </div>
</form>
The asp-for attribute is bound to the string Product property while the asp-items attribute is bound to the list of SelectListItems.
The asymmetry in that markup is deliberate. Microsoft’s Tag Helpers in forms documentation explains it: “The asp-for attribute value is a special case and doesn’t require a Model prefix.” Every other tag helper attribute does need it, which is why asp-for="Product" names the property bare while asp-items="@Model.Products" carries the prefix.
SelectListItem is a class that resides in Microsoft.AspNetCore.Mvc.Rendering namespace.
Let’s debug the project and browse the Index view:
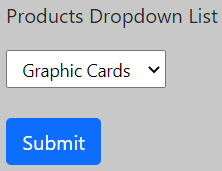
Graphic Cards is by default selected in the dropdown because we have set Product = "GC" in the code.
We can inspect the dropdown element to find further details:

asp-for="Product" renders both the id and name attributes as Product, the name attribute helps in sending the selected dropdown value to the POST action method when we submit the form.
Now, we can create a post-action method:
[HttpPost]
public IActionResult Index(ProductViewModel model)
{
    var selectedProduct = model.Product;

    return Content("The selected value: " + selectedProduct);
}
The selected value of the products dropdown transfers from the view to the controller via the Product property.
Now that we have seen the usage of SelectListItem, let’s explore how we can render a select tag helper using different mechanisms.
Use a List<ComplexViewModel> to Render a Select Element
Let’s create an EmployeeViewModel with an Id and EmployeeName properties:
public class EmployeeViewModel
{
    public int Id { get; set; }
    public string EmployeeName { get; set; } = string.Empty;
}
The next four sections all bind to a single view model, so let’s declare it once:
public class SelectViewModel
{
    public List<SelectListItem> Genders { get; set; } = [];
    public string? SelectedGender { get; set; }
    public List<EmployeeViewModel> Employees { get; set; } = [];
    public int? SelectedEmployeeId { get; set; }
    public SelectList? Countries { get; set; }
    public string? SelectedCountry { get; set; }
    public Department Department { get; set; }
    public int? SelectedDepartment { get; set; }
}
Each Selected... property is the one an asp-for attribute names, and the property beside it holds the options.
We can create a static method to return a few dummy entries:
public static List<EmployeeViewModel> GetEmployees() =>
[
    new() { Id = 101, EmployeeName = "Mark" },
    new() { Id = 102, EmployeeName = "Dave" },
    new() { Id = 103, EmployeeName = "Rosy" }
];
Now, we create an action method to return a view with these dummy employees:
public IActionResult SelectTagHelperWithComplexViewModel()
{
    var model = new SelectViewModel
    {
        Employees = StaticRepository.GetEmployees()
    };

    return View(model);
}
And a dropdown list using the select tag helper:
@model SelectViewModel
@{
    ViewData["Title"] = "Employee Dropdown";
}

<h3 class="mt-2">Employees Dropdown - Using a List of Complex Models</h3>

<select class="form-select form-select-sm" asp-for="SelectedEmployeeId"
        asp-items="new SelectList(@Model.Employees, nameof(EmployeeViewModel.Id),
                   nameof(EmployeeViewModel.EmployeeName))">
    <option>Please Select</option>
</select>
In this case, we can’t directly use the @Model.Employees property with the asp-items attribute, because we are using a complex class EmployeeViewModel.
We need to tweak the approach and create a SelectList object on the fly:
public SelectList(IEnumerable items, string dataValueField, string dataTextField, object selectedValue);
Use a Static List to Render a Select Element
Let’s create a list of countries:
public static List<string> GetCountries() =>
[
    "India", "USA", "UK", "France", "Germany"
];
After that, we create an action method to return a view with the countries list:
public IActionResult SelectTagHelperWithListOfStrings()
{
    var model = new SelectViewModel
    {
        Countries = new SelectList(StaticRepository.GetCountries())
    };

    return View(model);
}
And render a countries dropdown with the help of a select tag helper:
@model SelectViewModel
@{
    ViewData["Title"] = "Countries dropdown";
}

<h3 class="mt-2">Countries Dropdown - Using a List of static strings</h3>

<select class="form-select form-select-sm" asp-for="SelectedCountry" asp-items="@Model.Countries">
    <option>Please Select</option>
</select>
We are able to equate the asp-items directly to @Model.Countries because the Countries property is a SelectList.
Use an Enum to Render a Select Element
Let’s create a Department enum:
public enum Department
{
    IT,
    HR,
    Finance,
    Admin
}
Now, we can create an enum type property in a view model:
public class SampleViewModel
{
    public Department Department { get; set; }
}
After that, we can create an action method to return a view with the SampleViewModel:
public IActionResult SelectTagHelperWithEnum()
{
    var model = new SampleViewModel();
    return View(model);
}
Finally, we create the view and render the select element using the enum:
@model SampleViewModel
@{
    ViewData["Title"] = "Department dropdown";
}

<h3 class="mt-2">Department Dropdown - Using an enum</h3>

<select class="form-select form-select-sm" asp-for="Department" asp-items="@Html.GetEnumSelectList<Department>()">
    <option>Please Select</option>
</select>
We are using @Html.GetEnumSelectList<T>() method to tie the asp-items when using enums.
The values in that list are the enum’s underlying numbers, not its member names, so the POST action receives an int. Our article on converting the posted string or int back into an enum covers the trip back.
Get the Selected Value of the Select Element in the Post Action Method
The model property tied to the asp-for attribute is responsible for getting the selected value of the select element:
public IActionResult Details()
{
    var model = new SelectViewModel
    {
        Genders = StaticRepository.GetGenders(),
        Employees = StaticRepository.GetEmployees(),
        Countries = new SelectList(StaticRepository.GetCountries())
    };
    return View(model);
}

[HttpPost]
public IActionResult Details(SelectViewModel model)
{
    var selectedGender = model.SelectedGender;
    var selectedEmployee = model.SelectedEmployeeId;
    var selectedCountry = model.SelectedCountry;
    var selectedDepartment = model.SelectedDepartment;

    return RedirectToAction("Details");
}
GetGenders() returns another List<SelectListItem>, built exactly like the Products list in the first example, which is why the Details view has four dropdowns rather than three.
Let’s debug the application and submit the Details form:
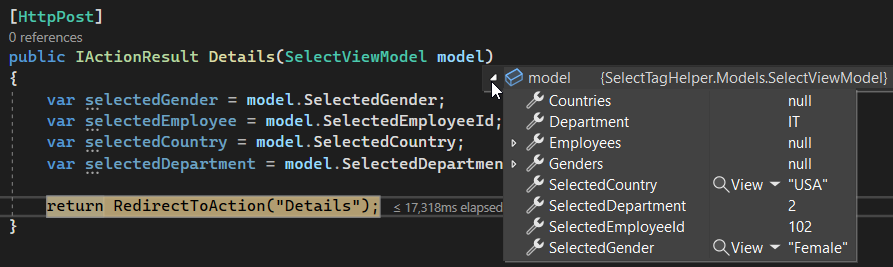
All the selected properties get populated correctly.
Once the model reaches the POST action it is an ordinary model like any other, so validating the posted model with FluentValidation works here the same way it does on a form of text boxes.
How Do We Mark an Option as Selected?
The option that renders selected is decided by the value of the property named in asp-for, not by anything written on the <option> elements.
Set that property in the GET action before returning the view. If the model’s SelectedCountry is "USA", the tag helper finds the SelectListItem whose Value is "USA" and marks that one selected.
The value has to match the option’s Value, not its Text. For a list built by Html.GetEnumSelectList<T>() the values are the enum’s underlying numbers, which is why SelectedDepartment = 2 picks the third member.
Two other routes exist for cases where the model property is not the right place. A SelectListItem can carry Selected = true directly, and the four-argument SelectList constructor takes the selected value as its last parameter.
What does not work is writing selected="@(condition)" on an <option>. Razor rejects C# in a tag helper’s attribute declaration area and the compiler says so by name.
Do not do this. A conditional selected attribute on an <option> inside a tag-helper-enabled view does not compile:
<select asp-for="SelectedCountry" asp-items="@Model.Countries">
    <option selected="@(Model.SelectedCountry == "USA")">USA</option>
</select>
The build fails with error RZ1031: The tag helper 'option' must not have C# in the element's attribute declaration area. Set SelectedCountry on the model instead, and let asp-for do it.
We can tweak the GET action and explicitly set the individual properties:
public IActionResult Details()
{
    var model = new SelectViewModel
    {
        Genders = StaticRepository.GetGenders(),
        Employees = StaticRepository.GetEmployees(),
        Countries = new SelectList(StaticRepository.GetCountries()),
        SelectedGender = "Female",
        SelectedEmployeeId = 102,
        SelectedCountry = "USA",
        SelectedDepartment = 2
    };
    return View(model);
}
Now, we can run the project and browse the view:
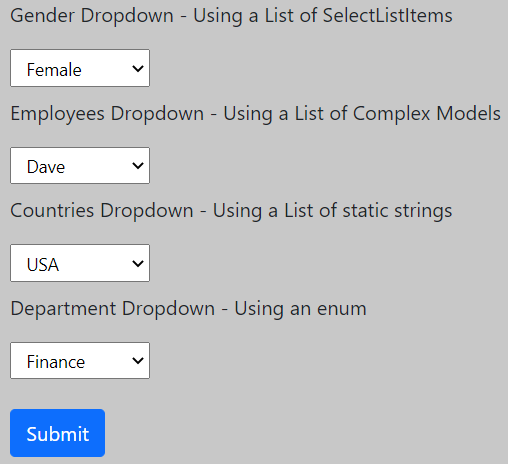
We see that all 4 dropdowns have a default option selected.
Render a Multi-Select Dropdown
We will be using the multiple attribute of the select tag helper to achieve this functionality.
Let’s create a separate view model and house the required properties:
public class MultiSelectViewModel
{
    public List<EmployeeViewModel> Employees { get; set; } = [];
    public int[] SelectedEmployeeIds { get; set; } = [];
}
The Employees property populates the option elements, while the SelectedEmployeeIds property that is an integer array will help to send multiple selected values to the post-action method when we submit the form.
Now, we can create the view:
@model MultiSelectViewModel
@{
    ViewData["Title"] = "Multi Select Dropdown";
}

<h3>Multi Select Dropdown</h3>
<form method="post">
    <div>
        <select class="form-select multi-select-dropdown" asp-for="SelectedEmployeeIds" multiple
                asp-items="new SelectList(@Model.Employees,
                                  nameof(EmployeeViewModel.Id),
                                  nameof(EmployeeViewModel.EmployeeName))">
        </select>
    </div>
    <div class="mt-4">
        <input type="submit" value="Submit" class="btn btn-primary" />
    </div>
</form>
After that, we run the application and browse the view:
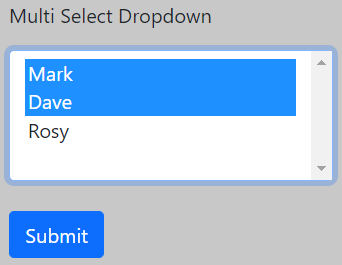
Finally, we can create a POST action method and submit the form to get multiple selected values from the dropdown:
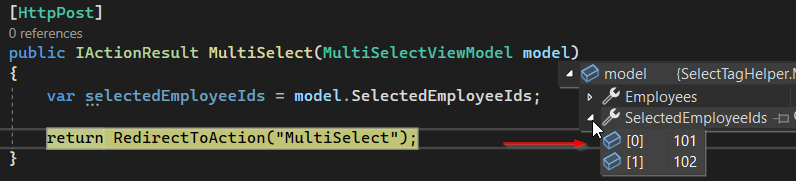
We get Mark’s and Dave’s employee ids in the SelectedEmployeeIds array when we submit the form.
Grouping Items in a Select Element
At times, we get the requirement to group option elements under some common classification in a dropdown.
SelectListItem class has a Group property that helps to group multiple options with the same group names under one classification.
We can create a method that will use the Group property and return a list of SelectListItem:
public static List<SelectListItem> GetCourses(SelectListGroup science, SelectListGroup humanities) =>
[
    new() { Text = "Physics", Value = "PH101", Group = science },
    new() { Text = "Chemistry", Value = "CH101", Group = science },
    new() { Text = "Mathematics", Value = "MT101", Group = science },
    new() { Text = "English", Value = "EN101", Group = humanities },
    new() { Text = "Environmental Studies", Value = "EN101", Group = humanities },
    new() { Text = "Economics", Value = "EC101", Group = humanities }
];
We have two groups – science and humanities. These groups have been assigned to the separate SelectListItem instances.
Now, we can create the action method:
public IActionResult Grouped()
{
    var sciences = new SelectListGroup { Name = "Science" };
    var humanities = new SelectListGroup { Name = "Humanities" };
    var model = new GroupViewModel
    {
        Courses = StaticRepository.GetCourses(sciences, humanities)
    };
    return View(model);
}
We create two SelectListGroup, assign the names “Science” and “Humanities” and call the StaticRepository.GetCourses() method.
Let’s create the select tag helper that demonstrates the grouped functionality:
@model GroupViewModel
@{
    ViewData["Title"] = "Grouped Dropdown";
}

<h3>Grouped dropdown list</h3>
<select class="form-select form-select-sm" asp-items="@Model.Courses">
    <option>Please Select</option>
</select>
Finally, we run the application and browse the view:
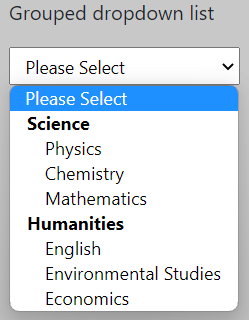
The option elements are divided into Science and Humanities groups respectively.
Can We Use asp-items Without asp-for?
Yes, and the grouped example above already does it.
Without asp-for, the tag helper renders the <option> elements and stops there. The <select> gets no id and no name, so the browser leaves it out when the form posts and no model property receives a value.
That is fine for a list the reader only looks at. It is a bug when we expect the selection to come back, and it is the usual reason a property arrives null in the POST action.
The reverse combination also works. asp-for without asp-items renders a bound but empty <select> whose id and name come from the property, and we write the <option> elements by hand underneath it.
If a list genuinely has to post without a bound model property, give the element a name attribute ourselves. Model binding works off the posted name, so a hand-written name reaches an action parameter of the same name without asp-for being involved at all.
Which Attributes and Members Control a Select Tag Helper?
Two attributes belong to the select tag helper itself, and everything else is a property on the SelectListItem objects we hand to asp-items.
asp-for binds the element to a model property and asp-items supplies the options. The plain HTML multiple attribute turns the element into a multi-select, and the bound property then has to be a collection rather than a single value.
SelectListItem carries five members worth knowing. Text is what the reader sees, Value is what posts back, Selected marks an option chosen, Disabled renders it greyed out, and Group places it inside an <optgroup>.
Disabled is the one this article has never covered, and it is how a placeholder row is built: a first item with an empty Value and Disabled set to true shows a prompt the reader sees but cannot choose. Selected on it sticks only when the bound property is already empty, because asp-for lets the model value decide.
The table below is the whole surface in one place.
| Where it lives | Name | What it does |
|---|---|---|
<select> attribute | asp-for | Binds the element to a model property: sets id and name, decides the selected option, and receives the posted value |
<select> attribute | asp-items | Supplies the options from an IEnumerable<SelectListItem> |
<select> attribute | multiple | Plain HTML, not a tag helper attribute. Renders a multi-select; the bound property must be a collection |
SelectListItem | Text | The label the reader sees |
SelectListItem | Value | The value posted back |
SelectListItem | Selected | Marks this option selected, but only when the <select> has no asp-for: with asp-for, the model value decides and this flag is ignored |
SelectListItem | Disabled | Renders the option greyed out and unselectable |
SelectListItem | Group | Takes a SelectListGroup; renders the option inside an <optgroup> |
All of this is MVC and Razor Pages territory. For the Blazor equivalent, which uses InputSelect and @onchange instead, the attributes are different and the binding model is not the same.
Conclusion
In this article, we have learned about tag helpers, and how are they different from HTML helpers. We have learned in detail about the select tag helper, and the various ways we can render the select element.
Tested with .NET 10.