

Updated on
While sending requests to our web API server, we can get an error in response. Therefore, using Angular error handling to handle those errors while sending HTTP requests is a must. That’s exactly what we are going to do in this post. If we get the 404 or the 500 error, we are going to redirect the user to a specific page. For other errors, we are going to show an error message in a modal form. The page that handles the 404 error is already created, so, let’s continue on by creating a 500 (Internal server error) component.
For the complete navigation and all the basic instructions of the Angular series, check out: Introduction of the Angular series.
Let’s start.
Creating the Internal Server Error Component
In the error-pages folder, we are going to create a new component by typing the AngularCLI command:
ng g component error-pages/internal-server --skip-tests
Then, let’s modify the internal-server.component.ts:
import { Component, OnInit } from '@angular/core';

@Component({
  selector: 'app-internal-server',
  templateUrl: './internal-server.component.html',
  styleUrls: ['./internal-server.component.css']
})
export class InternalServerComponent implements OnInit {
  errorMessage: string = "500 SERVER ERROR, CONTACT ADMINISTRATOR!!!!";

  constructor() { }

  ngOnInit(): void {
  }

}
Then, let’s modify the internal-server.component.html file:
<p> {{errorMessage}} </p>
Additionally, we are going to modify the internal-server.component.css file:
p{
  font-weight: bold;
  font-size: 50px;
  text-align: center;
  color: #c72d2d;
}
Finally, let’s modify the routes array in the app-routing.module.ts file:
const routes: Routes = [
  { path: 'home', component: HomeComponent },
  { path: 'owner', loadChildren: () => import('./owner/owner.module').then(m => m.OwnerModule) },
  { path: '404', component: NotFoundComponent },
  { path: '500', component: InternalServerComponent },
  { path: '', redirectTo: '/home', pathMatch: 'full' },
  { path: '**', redirectTo: '/404', pathMatch: 'full' }
];
That’s it.
We have created our component and it is time to create a service for error handling.
Creating a Service for Angular Error Handling
In the shared/services folder, we are going to create a new service and name it error-handler:
ng g service shared/services/error-handler --skip-tests
Next, let’s modify that error-handler.service.ts file:
import { HttpErrorResponse } from '@angular/common/http';
import { Injectable } from '@angular/core';
import { Router } from '@angular/router';

@Injectable({
  providedIn: 'root'
})
export class ErrorHandlerService {
  public errorMessage: string = '';

  constructor(private router: Router) { }

  public handleError = (error: HttpErrorResponse) => {
    if (error.status === 500) {
      this.handle500Error(error);
    }
    else if (error.status === 404) {
      this.handle404Error(error)
    }
    else {
      this.handleOtherError(error);
    }
  }

  private handle500Error = (error: HttpErrorResponse) => {
    this.createErrorMessage(error);
    this.router.navigate(['/500']);
  }

  private handle404Error = (error: HttpErrorResponse) => {
    this.createErrorMessage(error);
    this.router.navigate(['/404']);
  }
  private handleOtherError = (error: HttpErrorResponse) => {
    this.createErrorMessage(error); //TODO: this will be fixed later;
  }

  private createErrorMessage = (error: HttpErrorResponse) => {
    this.errorMessage = error.error ? error.error : error.statusText;
  }
}
First of all, we inject the Router, which we use to redirect the user to other pages from the code. In the handleError() function, we check for the error’s status code and based on that we call the right private method to handle that error. The handle404Error() and handle500Error() functions are responsible for populating the errorMessage property. We are going to use this property as a modal error message or an error page message. We are going to deal with the handleOtherError() function later on, thus the comment inside.
If you remember the owner-list.component.ts file, we are fetching all the owners from the server. But there is no error handling in that file. So let’s continue by modifying that owner-list.component.ts file to implement the Angular error handling functionality:
import { Component, OnInit } from '@angular/core';

import { Owner } from './../../_interfaces/owner.model';
import { OwnerRepositoryService } from './../../shared/services/owner-repository.service';
import { ErrorHandlerService } from './../../shared/services/error-handler.service';
import { HttpErrorResponse } from '@angular/common/http';

@Component({
  selector: 'app-owner-list',
  templateUrl: './owner-list.component.html',
  styleUrls: ['./owner-list.component.css']
})
export class OwnerListComponent implements OnInit {
  owners: Owner[];
  errorMessage: string = '';

  constructor(private repository: OwnerRepositoryService, private errorHandler: ErrorHandlerService) { }

  ngOnInit(): void {
    this.getAllOwners();
  }

  private getAllOwners = () => {
    const apiAddress: string = 'api/owner';
    this.repository.getOwners(apiAddress)
    .subscribe({
      next: (own: Owner[]) => this.owners = own,
      error: (err: HttpErrorResponse) => {
          this.errorHandler.handleError(err);
          this.errorMessage = this.errorHandler.errorMessage;
      }
    })
  }

}
That’s it. We have to pay attention that now, we are passing a JSON object inside the subscribe function. The next property will trigger if the response is successful, and the error property will handle the error response.
We can try it out by changing the code in the server’s GetAllOwners method. Just as a first code line, we can add return NotFound() or return StatusCode(500, “Some message”), and we are going to be redirected to the right error page for sure.
Preparation for the Owner-Details Component
Let’s continue by creating the owner-details component:
ng g component owner/owner-details --skip-tests
To enable routing to this component, we need to modify the owner-routing.module.ts file:
const routes: Routes = [
  { path: 'list', component: OwnerListComponent },
  { path: 'details/:id', component: OwnerDetailsComponent }
];
As you can see, the new path has the id parameter. So when we click on the Details button, we are going to pass this id to our route and fetch the owner with that exact id in the OwnerDetails component.
But, in order to be able to do that, we need to add a new interface to the _interfaces folder:
export interface Account{
    id: string;
    dateCreated: Date;
    accountType: string;
    ownerId?: string;
}
And modify the Owner interface:
import { Account } from './account.model';
export interface Owner{
  id: string;
  name: string;
  dateOfBirth: Date;
  address: string;

  accounts?: Account[];
}
By using a question mark, we are making our property optional.
To continue, let’s change the owner-list.component.html file:
<td><button type="button" id="details" class="btn btn-primary"
  (click)="getOwnerDetails(owner.id)">Details</button></td>
On a click event, we call the getOwnerDetails function and pass the owner’s id as a parameter. So we need to handle that click event in our owner-list.component.ts file.
First, let’s add an import statement:
import { Router } from '@angular/router';
Then, we are going to modify the constructor to add the router:
constructor(private repository: OwnerRepositoryService, private errorHandler: ErrorHandlerService,
  private router: Router) { }
And add the getOwnerDetails(id) function:
public getOwnerDetails = (id) => {
  const detailsUrl: string = `/owner/details/${id}`;
  this.router.navigate([detailsUrl]);
}
We create a URI for our details component with the id parameter and then call the navigate function to navigate to that component.
Finally, let’s just add one more function to fetch a single owner inside the owner-repository.service.ts file:
public getOwner = (route: string) => {
  return this.http.get<Owner>(this.createCompleteRoute(route, this.envUrl.urlAddress));
}
Implementation of the Owner-Details Component
We have all the code to support the owner-details component. Now it is time to implement business logic inside that component.
Firstly, let’s modify the owner-details.component.ts file:
import { HttpErrorResponse } from '@angular/common/http';
import { Component, OnInit } from '@angular/core';
import { Owner } from './../../_interfaces/owner.model';
import { Router, ActivatedRoute } from '@angular/router';
import { OwnerRepositoryService } from './../../shared/services/owner-repository.service';
import { ErrorHandlerService } from './../../shared/services/error-handler.service';

@Component({
  selector: 'app-owner-details',
  templateUrl: './owner-details.component.html',
  styleUrls: ['./owner-details.component.css']
})
export class OwnerDetailsComponent implements OnInit {
  owner: Owner;
  errorMessage: string = '';

  constructor(private repository: OwnerRepositoryService, private router: Router,
              private activeRoute: ActivatedRoute, private errorHandler: ErrorHandlerService) { }

  ngOnInit() {
    this.getOwnerDetails()
  }

  getOwnerDetails = () => {
    const id: string = this.activeRoute.snapshot.params['id'];
    const apiUrl: string = `api/owner/${id}/account`;

    this.repository.getOwner(apiUrl)
    .subscribe({
      next: (own: Owner) => this.owner = own,
      error: (err: HttpErrorResponse) => {
        this.errorHandler.handleError(err);
        this.errorMessage = this.errorHandler.errorMessage;
      }
    })
  }

}
It is pretty much the same logic as in the owner-list.component.ts file, except now we have the ActivatedRoute imported because we have to get our id from the route.
After we execute the getOwnerDetails function, we are going to store the owner object with all related accounts inside the owner property.
All we have to do is to modify the owner-details.component.html file:
<div class="card card-body bg-light mb-2 mt-2">
  <div class="row">
    <div class="col-md-3">
      <strong>Owner name:</strong>
    </div>
    <div class="col-md-3">
      {{owner?.name}}
    </div>
  </div>
  <div class="row">
    <div class="col-md-3">
      <strong>Date of birth:</strong>
    </div>
    <div class="col-md-3">
      {{owner?.dateOfBirth | date: 'dd/MM/yyyy'}}
    </div>
  </div>
  <div class="row" *ngIf='owner?.accounts.length <= 2; else advancedUser'>
    <div class="col-md-3">
      <strong>Type of user:</strong>
    </div>
    <div class="col-md-3">
      <span class="text-success">Beginner user.</span>
    </div>
  </div>
  <ng-template #advancedUser>
    <div class="row">
      <div class="col-md-3">
        <strong>Type of user:</strong>
      </div>
      <div class="col-md-3">
        <span class="text-info">Advanced user.</span>
      </div>
    </div>
  </ng-template>
</div>

<div class="row">
  <div class="col-md-12">
    <div class="table-responsive">
      <table class="table table-striped">
        <thead>
          <tr>
            <th>Account type</th>
            <th>Date created</th>
          </tr>
        </thead>
        <tbody>
          <tr *ngFor="let account of owner?.accounts">
            <td>{{account?.accountType}}</td>
            <td>{{account?.dateCreated | date: 'dd/MM/yyyy'}}</td>
          </tr>
        </tbody>
      </table>
    </div>
  </div>
</div>
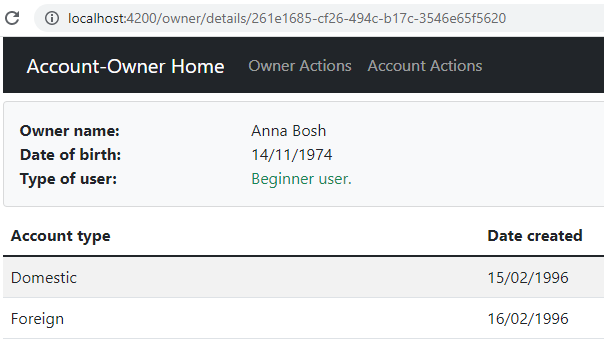
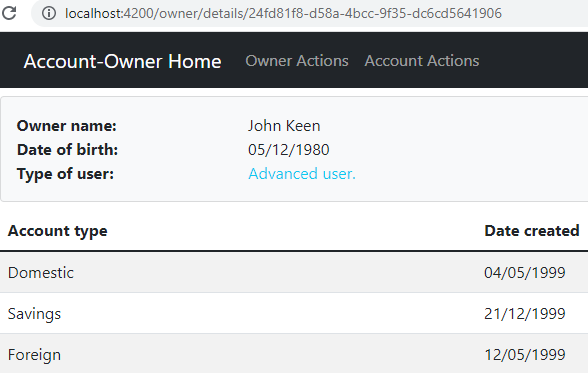
Here, we display the owner entity with all the required data. Also, if the owner has more than two accounts we conditionally show a different template (#advancedUser) for that field. Finally, we display all the accounts related to this owner:
We can also take a look at the advanced user:
Conclusion
By reading this post we’ve learned how to handle errors in a separate service by using Angular Error Handling. Also, we used conditional HTML rendering to show different data on the page with all the required details.
In the next part of the series, I am going to show you how to create child components and how to use @Input, @Output, and EventEmmiters in Angular. By doing so, we are going to learn to split our components into smaller parts (parent-child relation).

thank you. Worked well
Hi, In the owner-details.component.ts file at
I was getting the error “No overload matches this call.”
I changed
to match the git repo…
Yeah. Somehow that stayed unsaved, I fixed that once before. Very strange. Now, I’ve fixed it again, you can just clear the cache and you will find the changed code in the article. As you can I’ve even added that new function inside the repo file to fetch a single owner, and for some reason, the result of the owner array stayed in the snippet for the owner-details.ts file. Thank you very much for this suggestion.
No worries. I think it’s time for me to “shut it down” for the eve. as me ‘ole pops would say.
Hi,
I am using latest version on angular and trying to run the downloaded code but it shows following error:
core.js:6185 ERROR TypeError: Cannot read property ‘length’ of undefined
at OwnerDetailsComponent_Template (owner-details.component.html:18)
at executeTemplate (core.js:11949)
at refreshView (core.js:11796)
at refreshComponent (core.js:13229)
at refreshChildComponents (core.js:11527)
at refreshView (core.js:11848)
at refreshDynamicEmbeddedViews (core.js:13154)
at refreshView (core.js:11819)
at refreshComponent (core.js:13229)
at refreshChildComponents (core.js:11527)
The owner listing is working fine but no data is displayed on details page. Can you please guide me on this?
I do not want to bypass this error. When I check using console.warn() it shows the values:
(2) [{…}, {…}]
0:
AccountType: “Domestic”
DateCreated: “1996-02-15T00:00:00”
Id: “356a5a9b-64bf-4de0-bc84-5395a1fdc9c4”
OwnerId: “261e1685-cf26-494c-b17c-3546e65f5620”
__proto__: Object
1:
AccountType: “Foreign”
DateCreated: “1996-02-16T00:00:00”
Id: “c6066eb0-53ca-43e1-97aa-3c2169eec659”
OwnerId: “261e1685-cf26-494c-b17c-3546e65f5620”
__proto__: Object
length: 2
Hello, could you please look at the Dele Udma’s comment, maybe it can help you.
Hi Marinko,
Thanks for the response.
I am able to get rid of the error by doing a workaround as suggested by few users but not able to identify why it is shown as undefined.
Eventually, it doesn’t display any data on details page but the data is returned by the service and in the owner object (as mentioned above). I am trying these for couple of days without any success. Let me know if details are required.
https://github.com/rajeevjain1981/AccountOwnerExample
I will try it with Angular 12. But, even if you use these workarounds, you should see the data on the details page. These just help not to get an error until the accounts array gets populated. I am not sure why you cand see any data displayed, but as I said, I will check that out.
I’ve just treid it and with this statement:
it works normally, I can see the details of the user (their accounts). Also, I would like to ask you, how did you fix the JqueryUI problem, it seems that Angular 12 has an issue with it during the installation.
I followed the instructions given step by step and it all seems to be working fine. As data was shown correctly on List page and there was no error.
Is there anything I can do to check and ensure that Jqueryui is working fine.
No no, if it is working, then ok. I was just trying to do it as fastest as possible, to try to test your error, so maybe I meesed something up. Thanks.
Thanks Marinko.
You have been very cooperating and helpful. I have learnt .net Core WebAPI using your book and it worked well. Now I am learning how to consume the APIs in Angular.
I have a doubt that it has something to do with my local environmental settings only but not able to figure out the issue.
Let me know if there is a way to figure out the issue at my end.
Hi, I need help, I am using angular 11, I have been stock on part11 for the past week. I have error on this line after compilation.
Error: src/app/owner/owner-details/owner-details.component.html:18:45 – error TS2532: Object is possibly ‘undefined’.
Please compare your source code to ours. This is the best way to find what is different in your code.
I found out I could proceed without any errors when this setting “strictTemplates”: in the tsconfig.json is set to false. This sets typescript into a non-strict mode. I am progressing to the next part while I am still trying to find if there is an alternative code line to avoid the error in the strict mode. Thank you for your prompt response, I really appreciate it.
Thank you for your prompt response, I really appreciate it. I found out I could proceed without any errors when this setting “strictTemplates”: in the tsconfig.json is set to false. This sets typescript into a non-strict mode. I am progressing to the next part while I am still trying to find if there is an alternative code line to avoid the error in the strict mode.
I faced the same issue. I replaced the code with the below line and it worked
<div class="row" *ngIf='owner !== undefined && owner.accounts !== undefined &&owner.accounts.length
I faced the same issue. I replaced the code with the below line and it worked
Marinko I have no words to say you …. a big thanks … Very helpful resource you are sharing ….
Thank you very much for your feedback. Best regards.
Hi! Is there any tutorial to learn how to deal with many to many relationship with core & angular? (like User-Role) The way Core structure this relationships (with UserRole intermediate class) on Model it’s giving me so many problems when traying to show data on browser.
Hello Marinko,
is there backend tutorial capatible with that angular tutorial?
Regards,
Maciej
Hello Maciek. Yes there is. Please visit http://34.65.74.140/net-core-series/ . This is complete ASP.NET Core Web API series which we used as a server side for this tutorial. You can find that link even on the starting page for this tutorial as well: http://34.65.74.140/angular-series/ . Best regards.
thank you
Marinko Hi, I have a question.
When the API throws an error, in owner-list.component.ts (line 28 and 29) “this” object is not a OwnerListComponent anymore. (It’s a SafeSubscriber.)
Because of that this.errorHandle is undefined and error message from server never shows in the internal-server.component.html. What is the solution for this problem?
Hello Gkcn. Thank you very much for reading our post. Well if I understood you correctly, you have thrown an exception from the server (in GetAllOwners method) but in the client side, you have a problem. If that is the problem, I would really like more info from you because I have tried all (right now) to break the app and I couldn’t do it.
So this is the server part: https://uploads.disquscdn.com/images/a6ba003f991032192882cf42a2beba881c994fb87dde2a82fb9149a1ad3dc1d3.png
and this is the error object in line 28: https://uploads.disquscdn.com/images/e55ebcc284ba52e1636c1f8984a7c07434f47974beeb3ea376db9b2399fb2482.png
and this is the “this” object in line 29: https://uploads.disquscdn.com/images/fc15650ca03bd7e067b671a2d73b6877b183b36fb84f5be450658354cc82452f.png
As you can see, all is working as it supposed to do. You can share the code with me or to download our source code and to check for differences, because I can’t help you more right now, but I would like for sure. So if you can share some additional data, it would be great.
All the best.
Thank you for the fast response. 🙂
I figured out the problem. We shoul https://uploads.disquscdn.com/images/6c84244ff022642ca4e9806be5cd406fc162d3b4d1b9f51fa4e142be57dc1a1e.png d inject the ErrorHandleService to InternalServerComponent. And after that, on ngOnInit we should set the message to InternalServerComponent.ErrorMessage.
After doing these steps we will see the exception message in the 500 page. It’s strange that I still see the “this” as SafeSubscriber. But HandleError method still works. I can’t figured out.
I changed the error handling mechanism by returning json object when the exception occurs. This is why 500 page is little bit different.
Thank you for the fast response. 🙂 I figured out the problem. We should inject the ErrorHandleService to InternalServerComponent. And after that, on ngOnInit we should set the message to InternalServerComponent.ErrorMessage.
After doing these steps we will see the exception message in the 500 page. It’s strange that I still see the “this” as SafeSubscriber. But HandleError method still works. I can’t figured out.
I changed the error handling mechanism by returning json object when the exception occurs. This is why 500 page is little bit different.
These are the steps.
https://uploads.disquscdn.com/images/6c84244ff022642ca4e9806be5cd406fc162d3b4d1b9f51fa4e142be57dc1a1e.png
Hi mate. I am really glad that you solved it out, but I really don’t know why you had your problem at all. I believe that the problem is not related to the ErrorHandlerService but to the OwnerList component. But why, I am not sure at all. Either way, well done, your comments can help someone for sure if they find the same problem. Thank you for that.
These are the steps.