

In this article, we are going to learn about handling HTTP errors in the Blazor WebAssembly application. We are going to start with a simple example, and then improve the solution until we implement global HTTP error handling with the Blazor WebAssembly interceptor. With this, we are going to create a centralized place to handle our HTTP errors sent from the Web API server application.
Let’s get started.
Projects Introduction
As we said, in our source-code repository, you are going to find two folders with two projects inside each of them. We took these projects from our Blazor WebAssembly series. If you want to gain additional knowledge on Blazor WebAssembly project development, feel free to visit the linked page, which contains all the articles from the series and more.
One project is the ASP.NET Core Web API. We have enabled automatic migration for that project, so all you have to do is to modify the connection string in the appsettings.json file and run the application. It will create a new database for you with the required data. For this article, we will focus only on the ProductsController class under the Controllers folder:
[Route("api/products")]
[ApiController]
public class ProductsController : ControllerBase
{
    private readonly IProductRepository _repo;

    public ProductsController(IProductRepository repo)
    {
        _repo = repo;
    }

    [HttpGet]
    public async Task<IActionResult> Get()
    {
        var products = await _repo.GetProducts();
        return Ok(products);
    }
}
This is a simple logic where we fetch all the products from the database. We are going to modify the return statement in order to send different error responses to the client application.
The second project is the Blazor WebAssembly project:
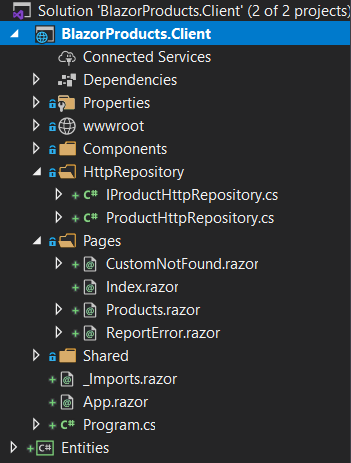
As you can see, we have the HttpRepository folder and the Products.razor page inside the Pages folder. We are mentioning the Products page and the HttpRepository files because these files will be the main focus of this article.
If we open the ProductHttpRepository.cs file, we are going to see the code that sends an HTTP request to the API and parses the response into the list of products:
public class ProductHttpRepository : IProductHttpRepository
{
    private readonly HttpClient _client;

    public ProductHttpRepository(HttpClient client)
    {
        _client = client;
    }

    public async Task<List<Product>> GetProducts()
    {
        var response = await _client.GetAsync("products");
        var content = await response.Content.ReadAsStringAsync();

        var products = JsonSerializer.Deserialize<List<Product>>(content, new JsonSerializerOptions { PropertyNameCaseInsensitive = true });

        return products;
    }
}
Now, if we start both applications and navigate to the Products menu item, we are going to see all the products listed on the page:
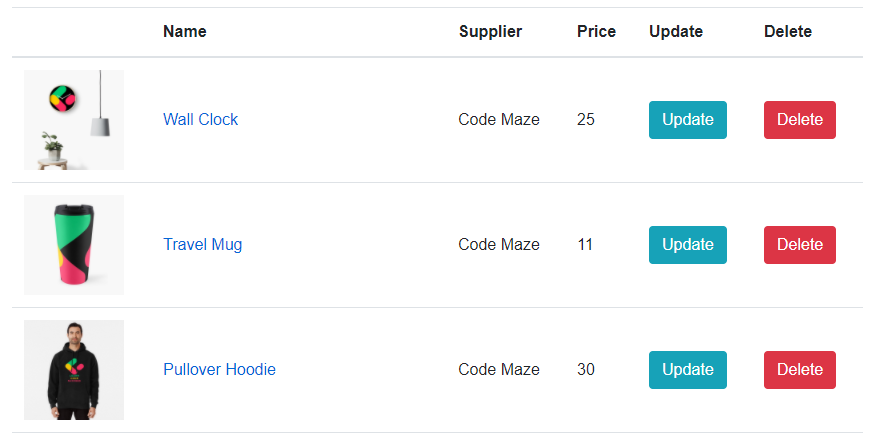
If you see this, then everything is prepared for further logic.
Handling HTTP Errors Inside the Repository File
Now, let’s slightly modify the ProductsController to return an error response:
[HttpGet]
public async Task<IActionResult> Get()
{
    var products = await _repo.GetProducts();
    return StatusCode(500, "Something went wrong.");
}
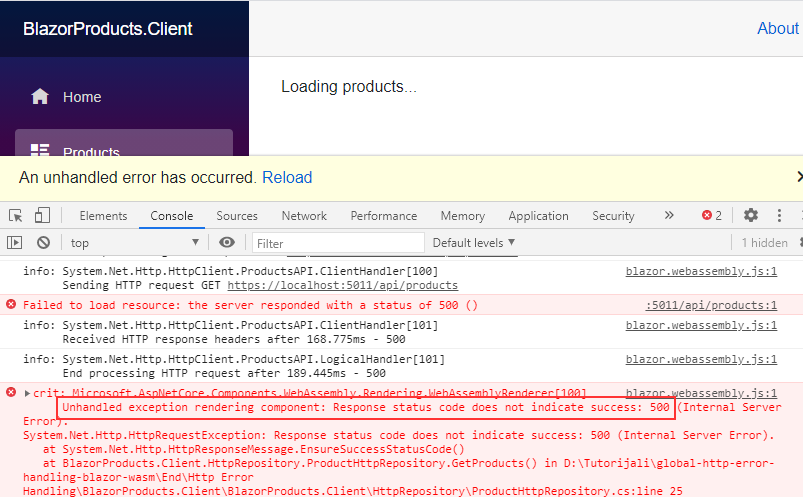
We can start our applications again, and navigate to the Products menu item:

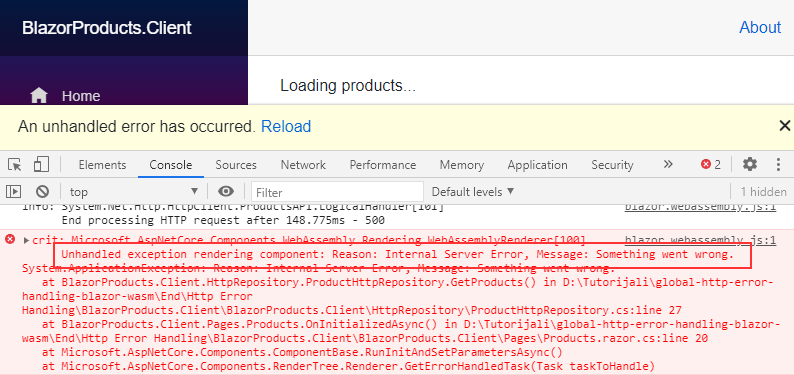
As we can see, we have the yellow box with the message, which is the Blazor’s default way of handling errors. We see two error messages in the console window. The first one suggesting that an error has happened with a certain status code, and the second one suggesting that our deserialization failed with an unhandled exception as a result. We should avoid unhandled exceptions at all costs.
So, let’s see what we can do about it.
The first thing we can do is using the HttpResponseMessage mechanism to verify that the response contains a successful status code:
public async Task<List<Product>> GetProducts()
{
    var response = await _client.GetAsync("products");

    response.EnsureSuccessStatusCode();

    var content = await response.Content.ReadAsStringAsync();

    var products = JsonSerializer.Deserialize<List<Product>>(content, new JsonSerializerOptions { PropertyNameCaseInsensitive = true });

    return products;
}
With the EnsureSuccessStatusCode method, we prevent any further code execution if our response is not successful:
From these messages, we can see that we have prevented the JsonSerializer error because as soon as we notice that our response is not successful, we stop the code execution and throw an exception. This is an okay solution if you don’t want to do any specific actions with the error response or don’t want to use the message sent from the server inside the response.
Using the IsSuccessStatusCode Property to Check HTTP Responses
Now, let’s modify our this solution a bit:
public async Task<List<Product>> GetProducts()
{
    var response = await _client.GetAsync("products");

    if (!response.IsSuccessStatusCode)
        throw new ApplicationException($"The response from the server was not successfull, reason: {response.ReasonPhrase}");

    var content = await response.Content.ReadAsStringAsync();

    var products = JsonSerializer.Deserialize<List<Product>>(content, new JsonSerializerOptions { PropertyNameCaseInsensitive = true });

    return products;
}
Here we use the IsSuccessStatusCode property to check whether the response is successful or not. If it’s not, we throw an ApplicationException with our custom message and provide the reason as well:
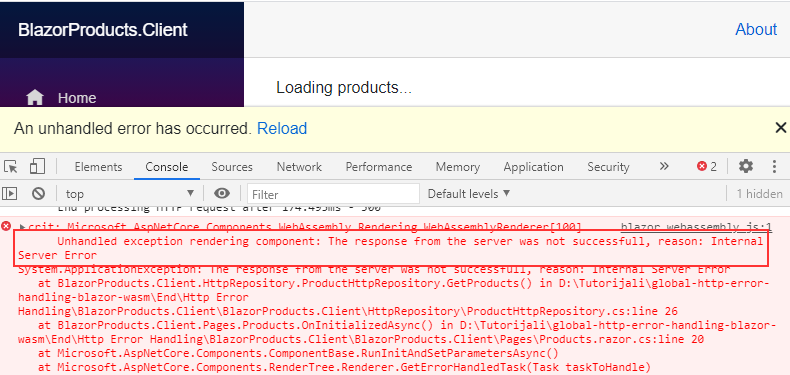
This time, we can see our custom message and we can see the reason why the HTTP response is not successful. But we still can’t see the message sent from the server. If we want to see it, we can pass the content variable as a parameter to the exception:
public async Task<List<Product>> GetProducts()
{
    var response = await _client.GetAsync("products");
    var content = await response.Content.ReadAsStringAsync();

    if (!response.IsSuccessStatusCode)
        throw new ApplicationException($"Reason: {response.ReasonPhrase}, Message: {content}");

    var products = JsonSerializer.Deserialize<List<Product>>(content, new JsonSerializerOptions { PropertyNameCaseInsensitive = true });

    return products;
}
If we check our result now:
We can see the reason and the message sent from the server.
Providing a Better User Experience with HTTP Error Handling
With all the previous techniques, we can handle the HTTP errors but they are not user-friendly at all. Forcing users to inspect console logs is not good practice. What we want is to enable a good UI for the users to make them aware of what is going on and why the action failed.
If you inspect the Pages folder, you are going to find the CustomNotFound page. This is our page that handles errors with the 404 status code. That said, let’s create two new Razor components in the same folder.
The CustomUnauthorized.razor page:
@page "/unauthorized"

<h3>You are not authorized.</h3>
And the CustomInternalServerError.razor page:
@page "/500"

<h3>Something went really wrong. Please contact administrator.</h3>
As you can see, these are pretty simple pages, but you can provide parameters to them and make them even more user-friendly. If you want to learn more about the Blazor components and how to pass parameters to them, you can visit our Blazor WebAssembly series of articles.
Now, we can modify the ProductHttpRepository.cs file:
public class ProductHttpRepository : IProductHttpRepository
{
    private readonly HttpClient _client;
    private NavigationManager _navManager;

    public ProductHttpRepository(HttpClient client, NavigationManager navManager)
    {
        _client = client;
        _navManager = navManager;
    }

    public async Task<List<Product>> GetProducts()
    {
        var response = await _client.GetAsync("products");
        var content = await response.Content.ReadAsStringAsync();

        if (!response.IsSuccessStatusCode)
        {
            var statusCode = response.StatusCode;

            switch (statusCode)
            {
                case HttpStatusCode.NotFound: _navManager.NavigateTo("/404");
                    break;
                case HttpStatusCode.Unauthorized: _navManager.NavigateTo("/unauthorized");
                    break;
                default: _navManager.NavigateTo("/500");
                    break;
            }

            throw new ApplicationException($"Reasong: {response.ReasonPhrase}"); //or add a custom logic here
        }

        var products = JsonSerializer.Deserialize<List<Product>>(content,
                           new JsonSerializerOptions { PropertyNameCaseInsensitive = true });

        return products;
    }
}
Here, we inject the NavigationManager service and use it to navigate the user to the appropriate page. We use the StatusCode property to extract the status code from the response and based on it redirect the user. Also, we throw an application exception to stop the execution flow. If you don’t want to throw this exception, you can always add your custom logic. For example, in this case, we could just return an empty product list return new List<Product>();.
Finally, if you don’t want that yellow box to appear every time you throw an exception, you can open the wwwroot/index.html file and comment out the code responsible for it:
<div id="blazor-error-ui">
    An unhandled error has occurred.
    <a href="" class="reload">Reload</a>
    <a class="dismiss">🗙</a>
</div>
Now, we can test this solution:
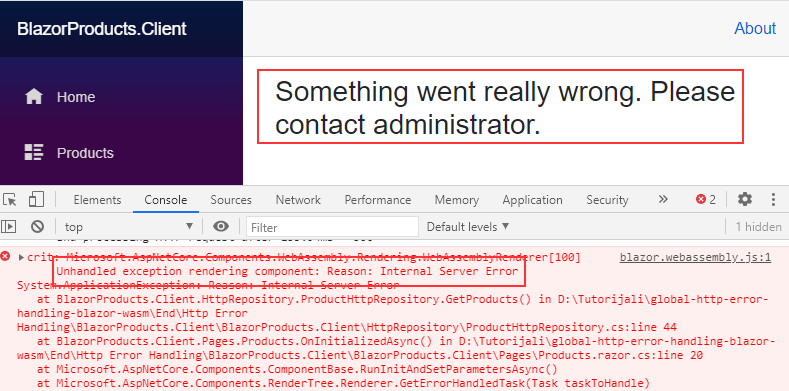
As you can see, we are redirected to the right page, without the yellow box to interrupt the user, and we can see the message if we open the console window.
We can test this more by modifying the Get action to return NotFound response:
[HttpGet]
public async Task<IActionResult> Get()
{
    var products = await _repo.GetProducts();
    return NotFound();
}
And if we start both applications and navigate to Products:
We can see a different page with a different message.
But the fun part is yet to come.
Global HTTP Error Handling using Interceptor
We can use the interceptor in the Blazor WebAssembly application to centralize the error handling logic. Without it, we would have to repeat the previous HTTP error handling logic in all the methods we are using HttpClient from. Of course, we don’t want to do that.
So, let’s see how to improve our solution.
First, let’s install the required library:
PM> Install-Package Toolbelt.Blazor.HttpClientInterceptor -Version 9.2.0-preview.1
After the installation, we want to modify the Program.cs class, to register this interceptor and to attach it for the specific HttpClient:
public static async Task Main(string[] args)
{
    var builder = WebAssemblyHostBuilder.CreateDefault(args);
    builder.RootComponents.Add<App>("#app");

    builder.Services.AddHttpClient("ProductsAPI", (sp, cl) =>
    {
        cl.BaseAddress = new Uri("https://localhost:5011/api/");
        cl.EnableIntercept(sp);
    });

    builder.Services.AddScoped(
        sp => sp.GetService<IHttpClientFactory>().CreateClient("ProductsAPI"));

    builder.Services.AddHttpClientInterceptor();

    builder.Services.AddScoped<IProductHttpRepository, ProductHttpRepository>();

    await builder.Build().RunAsync();
}
Here, we use the AddHttpClient method overload that uses the action delegate as a second parameter that accepts both the ServiceProvider (sp) and HttpClient (cl) as parameters. Inside that action, we use the EnableIntercept method to enable the interceptor for this specific HttpClient, and we provide the ServiceProvider as an argument.
Also, with the AddHttpClientInterceptor method, we register the interceptor in the service collection. For this to work properly, we have to use the Toolbelt.Blazor.Extensions.DependencyInjection namespace.
Creating the custom HttpInterceptorService
Now, let’s create a new HttpInterceptorService.cs class:
public class HttpInterceptorService
{
private readonly HttpClientInterceptor _interceptor;
private readonly NavigationManager _navManager;
public HttpInterceptorService(HttpClientInterceptor interceptor, NavigationManager navManager)
{
_interceptor = interceptor;
_navManager = navManager;
}
public void RegisterEvent() => _interceptor.AfterSend += InterceptResponse;
privatevoid InterceptResponse(object sender, HttpClientInterceptorEventArgs e)
{
string message = string.Empty;
if (!e.Response.IsSuccessStatusCode)
{
var statusCode = e.Response.StatusCode;
switch (statusCode)
{
case HttpStatusCode.NotFound:
_navManager.NavigateTo("/404");
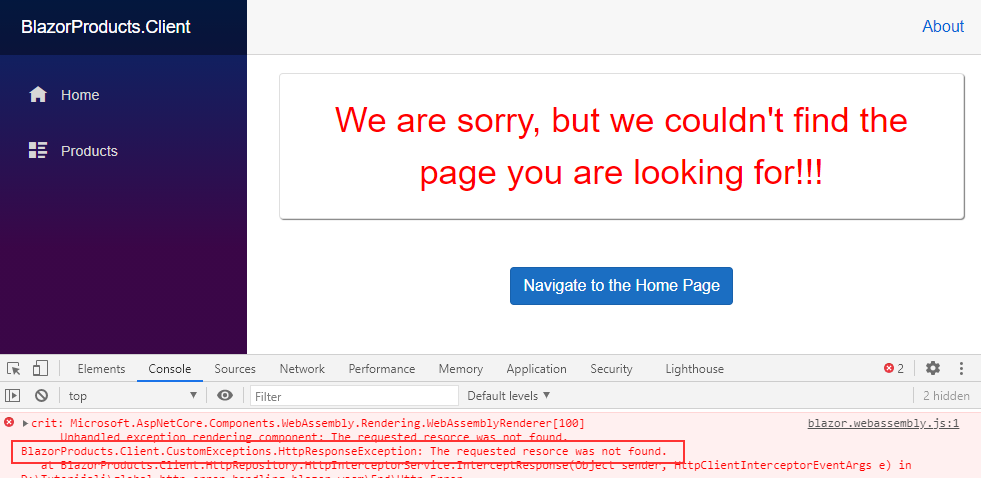
message = "The requested resorce was not found.";
break;
case HttpStatusCode.Unauthorized:
_navManager.NavigateTo("/unauthorized");
message = "User is not authorized";
break;
default:
_navManager.NavigateTo("/500");
message = "Something went wrong, please contact Administrator";
break;
}
throw new HttpResponseException(message);
}
}
public void DisposeEvent() => _interceptor.AfterSend -= InterceptResponse;
}
First, we inject two services – NavigationManager and HttpClientInterceptor. Then, we can see three methods. The first method adds the event to the AfterSend event handler. The last method removes it from the same event handler. The AfterSend event handler will trigger the event as soon as our application receives the HTTP response from the API. This interceptor also has the BeforeSend event handler which we can use before we send a request. To see this in action you can read our Refresh Token with Blazor WebAssembly article.
The second method – InterceptResponse – is the main logic (event) of our interceptor service. In this method, we use the HttpClientInterceptorEventArgs e parameter to access the intercepted response. Once we access the response, the logic is almost the same as we had in the ProductHttpRepository class. Just in this case, after each navigation, we populate the message and use it with the custom exception.
Of course, the HttpResponseException is our custom one, and we need to create it:
[Serializable]
internal class HttpResponseException : Exception
{
    public HttpResponseException()
    {
    }

    public HttpResponseException(string message)
        : base(message)
    {
    }

    public HttpResponseException(string message, Exception innerException)
        : base(message, innerException)
    {
    }

    protected HttpResponseException(SerializationInfo info, StreamingContext context)
        : base(info, context)
    {
    }
}
Nice.
Let us mention again, that this is just one example, you can always use your custom logic here instead of throwing a custom exception. But if your custom logic doesn’t stop the flow and it reaches the GetProducts method, you have to handle it there as well due to the possible deserialization problem.
Now, let’s register this service in the Program.cs class:
builder.Services.AddScoped<HttpInterceptorService>();
And just like that, our service is prepared.
Using Interceptor
Before we start using our global HTTP error handler in our application, we want to remove the code from the GetProducts method inside the ProductHttpRepository class:
public async Task<List<Product>> GetProducts()
{
    var response = await _client.GetAsync("products");
    var content = await response.Content.ReadAsStringAsync();

    var products = JsonSerializer.Deserialize<List<Product>>(content, new JsonSerializerOptions { PropertyNameCaseInsensitive = true });

    return products;
}
This is the original state of this method.
Now, let’s modify the Products.razor.cs class. This is the partial component’s class where we use the ProductHttpRepository:
public partial class Products : IDisposable
{
    public List<Product> ProductList { get; set; } = new List<Product>();

    [Inject]
    public IProductHttpRepository ProductRepo { get; set; }

    [Inject]
    public HttpInterceptorService Interceptor { get; set; }

    protected async override Task OnInitializedAsync()
    {
        Interceptor.RegisterEvent();

        ProductList = await ProductRepo.GetProducts();
    }

    public void Dispose() => Interceptor.DisposeEvent();
}
As you can see this class implements the IDisposable interface. We also inject the custom HttpInterceptorService, register the event in the OnInitializedAsync lifecycle method, and dispose of the event in the Dispose method.
If we start both applications and navigate to the Products menu item, we are going to see that the application redirects us to the CustomNotFound page. So, it works as before, but this time with a centralized solution and better implementation because we don’t have to duplicate our code:
Excellent.
If you want, you can return the Unauthorized response from the API, and you will see the appropriate page for that HTTP response.
Conclusion
We did a great job here.
Now we know how to implement a global HTTP error handling mechanism using the HTTP interceptor in the Blazor WebAssembly application. This implementation centralizes the place for handling HTTP errors and prevents code duplication in each method.
Of course, you can always add your custom logic to this interceptor service, but the base logic is here, everything else should be an easy job.
Until the next article…
All the best.

