

Until now, we have talked about the EF Core integration into the ASP.NET Core app, how to configure nonrelational properties and how to create relationships in EF Core. Additionally, we talked about migrations and the way to use queries to fetch the data from the database.
So now, to wrap up this series, we are going to learn about actions that modify the database content (Create, Update, Delete).
You can download the source code for this article on our GitHub repository.
To see all the basic instructions and complete navigation for this series, visit Entity Framework Core with ASP.NET Core Tutorial.
ChangeTracker and State of the Entity in Entity Framework Core
Before we start modifying data with Entity Framework Core, we have to be familiar with some additional EF Core features.
As we learned, in the first part of the series, DbContext consists of only three properties: ChangeTracker, Database, and Model. We have seen the Model and Database properties in action in previous articles, so in this article, we are going to talk about the ChangeTracker and State properties.
The ChangeTracker property provides access to change tracking information and operations about the currently loaded entity. This ability is very important when we want to execute any of the database modification operations. EF Core has this kind of information(about tracking and operations) whether we create, modify it or delete an entity.
Furthermore, EF Core won’t execute any operation until we call the SaveChanges method. So knowing what operation we want to execute is crucial to EF Core prior to calling the SaveChanges method.
Every tracked entity has the State property attached to it. When we use the context object to load an entity without the AsNoTracking method or we change its state via the Update, Remove or Add methods, that entity will be the tracked entity. The value of the State property can be obtained with the _context.Entry(our_entity).State command.
Here are the possible states of tracked entities:
- Detached – The entity isn’t tracked and calling the SaveChanges method won’t have any effect
- Unchanged – The entity is loaded from the database but has no changes. The SaveChanges method ignores it
- Added – The entity doesn’t exist in the database and calling the SaveChanges method will add it to the database
- Modified – The entity exists in the database and has been modified, therefore, calling the SaveChanges method will modify it in the database
- Deleted – The entity exists in the database and as soon as we call the SaveChanges method it will be removed from the database
Now, when we know all this stuff, we can continue towards the Create, Update and Delete operations.
Creating Rows – Modifying Data with Add and AddRange methods
We can create new rows in the database by using the Add and AddRange methods. The Add method will modify the State of the single entity where the AddRange can do the same but for the multiple entities. Let’s see the Add method in action after we send the student object from Postman:
[HttpPost]
public IActionResult Post([FromBody] Student student)
{
if (student == null)
return BadRequest();
if (!ModelState.IsValid)
return BadRequest();
_context.Add(student);
_context.SaveChanges();
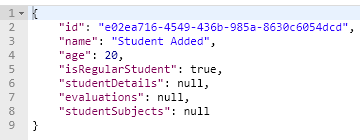
return Created("URI of the created entity", student);
}
In this action, we use the HttpPost attribute to mark it as a POST action. Additionally, we load the student entity with the FromBody attribute and add two validation checks in our code.
All of these are ASP.NET Core related, so if you are not familiar with these concepts we strongly suggest visiting the ASP.NET Core Web API – Post, Put, Delete article. This article will also help you if you are not familiar with the process of sending the POST requests from Postman.
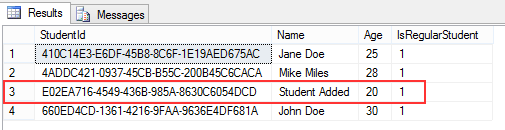
After these checks, we call the Add method to change the state of the entity to Added and call the SaveChanges method to create a new row in the database. The last line of code will return the created entity (with its id) to the client:
This is the result in the database:
Tracking Changes when Adding an Entity
If we modify our code slightly, we can inspect the way that the entity’s state is changed during this action. Of course, the additional code is not required to save the entity to the database, it is here just for learning purposes:
[HttpPost]
public IActionResult Post([FromBody] Student student)
{
    if (student == null)
        return BadRequest();

    if (!ModelState.IsValid)
        return BadRequest();

    var stateBeforeAdd = _context.Entry(student).State;

    _context.Add(student);

    var stateAfterAdd = _context.Entry(student).State;

    _context.SaveChanges();

    var stateAfterSaveChanges = _context.Entry(student).State;

    return Created("URI of the created entity", student);
}

As we can see, before we add our entity to the db it has the Detached state. As soon as we use the Add method, it has the Added state. Finally, after the SaveChanges method, it has the Unchanged state.
Using the AddRange Method
When we want to add multiple rows in the database, we use the AddRange method. It is the same procedure just a different method:
[HttpPost("postrange")]
public IActionResult PostRange([FromBody] IEnumerable<Student> students)
{
    //additional checks

    _context.AddRange(students);
    _context.SaveChanges();

    return Created("URI is going here", students);
}
Another important thing to mention here is that the SaveChanges method executes the required operation but it also returns the number of affected rows. So if we need to check how many rows are affected by our operation, we can always return the result of the SaveChanges method:
var result = _context.SaveChanges();
Adding Related Entities to the Database
Now we are going to learn how to include relationships while adding the main entity to the database. To demonstrate that, we are going to modify our first example a bit:
[HttpPost]
public IActionResult Post([FromBody] Student student)
{
    //validation code goes here

    student.StudentDetails = new StudentDetails
    {
        Address = "Added Address",
        AdditionalInformation = "Additional information added"
    };

    _context.Add(student);
    _context.SaveChanges();

    return Created("URI of the created entity", student);
}
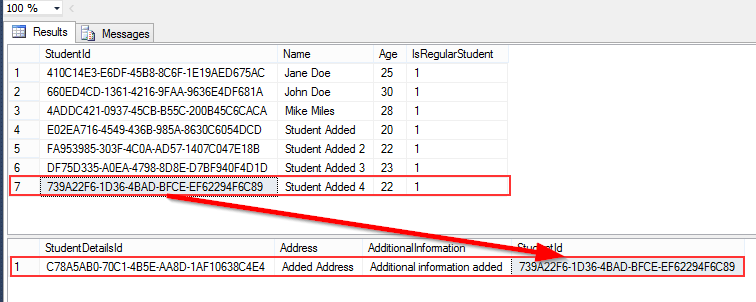
As we can see from the code above, we are only adding the student object to the application’s context object but the studentDetails object is also added to the database:
And we can check the response from the application:
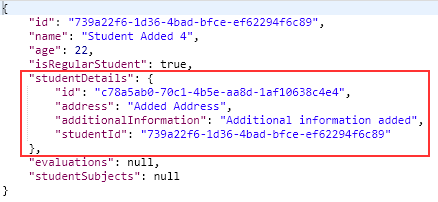
It is important to notice that we are not adding Id value manually for any entity, EF Core is in charge of that. You can see in the database that the GUID values have been generated.
Excellent. We can do the same thing with one-to-many or many-to-many relationships.
Updating Rows in the Database
There are two ways to update rows in the database. With Connected Update and with Disconnected Update. The difference is that with the connected update we use the same context object to load and modify entity. With the disconnected update, this is not the case. Either we use different context objects or we receive an object from a client that has all the properties as the entity in db, so we can update it without loading action first.
While working with the connected update there are three main steps to execute:
- Read data from the database (with or without its relationships)
- Change one or more properties
- Call the SaveChanges method
In the following examples, we are going to leave out the additional validations checks (for the sake of simplicity) because the validation is related to ASP.NET Core and you can read more about that in the ASP.NET Core Web API – Post, Put, Delete article.
So, let’s see the connected update in action when we send the student object from a client with the Name property updated:
[HttpPut("{id}")]
public IActionResult PUT (Guid id, [FromBody] Student student)
{
    var dbStudent = _context.Students
        .FirstOrDefault(s => s.Id.Equals(id));

    dbStudent.Age = student.Age;
    dbStudent.Name = student.Name;
    dbStudent.IsRegularStudent = student.IsRegularStudent;

    _context.SaveChanges();

    return NoContent();
}
We can see all three steps in the code above. We load the student object based on its id, then map the properties from the client’s updated student, which sets the state of the entity to the Modified and finally, we call SaveChanges. Even though we have changed only the Name property, we have to map all the properties because we don’t know what has been modified on the client-side exactly.
EF Core, on the other hand, has the information on what exactly has been modified.
When we load our entity, EF Core starts tracking it and at that point the State is Unchanged. Once we modify any property from a loaded entity it changes the State to Modified. Finally, after the SaveChanges method, the State is reverted to Unchanged.
Once we send a request to this PUT action, the student’s name is going to be updated:

We can see that only the Name property has been updated. If you can’t see both commands in the console window, you can find them in the Output window inside Visual Studio for sure.
IsModified Property
When we have an entity that is already in the Modified state, EF Core uses another property that provides information about what really changed. This is the IsModified property and we can examine how it works by slightly modifying our code:
[HttpPut("{id}")]
public IActionResult PUT (Guid id, [FromBody] Student student)
{
    var dbStudent = _context.Students
        .FirstOrDefault(s => s.Id.Equals(id));

    dbStudent.Age = student.Age;
    dbStudent.Name = student.Name;
    dbStudent.IsRegularStudent = student.IsRegularStudent;

    var isAgeModified = _context.Entry(dbStudent).Property("Age").IsModified;
    var isNameModified = _context.Entry(dbStudent).Property("Name").IsModified;
    var isIsRegularStudentModified = _context.Entry(dbStudent).Property("IsRegularStudent").IsModified;

    _context.SaveChanges();

    return NoContent()
}

The result is pretty self-explanatory here.
Updating Relationships in EF Core
Adding relationships to the update operations in EF Core is pretty easy. We can attach a relational entity to the main entity, modify it and EF Core will do the rest for us as soon as we call the SaveChanges method. The procedure is the same as we did it for the create actions.
Let’s see how to update the relationship in EF Core:
[HttpPut("{id}/relationship")]
public IActionResult UpdateRelationship(Guid id, [FromBody] Student student)
{
    var dbStudent = _context.Students
        .Include(s => s.StudentDetails)
        .FirstOrDefault(s => s.Id.Equals(id));

    dbStudent.Age = student.Age;
    dbStudent.Name = student.Name;
    dbStudent.IsRegularStudent = student.IsRegularStudent;
    dbStudent.StudentDetails.AdditionalInformation = "Additional information updated";

    _context.SaveChanges();

    return NoContent();
}
When we send our request form Postman we are going to update the student entity and the studentDetails entity:
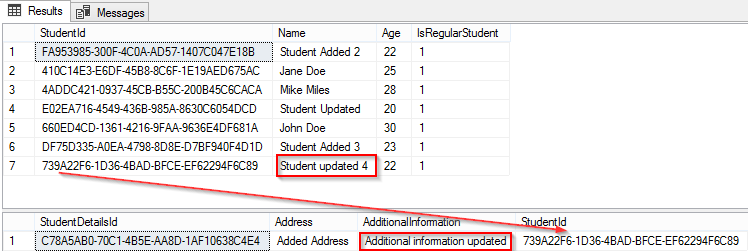
The same process applies to other relationship types.
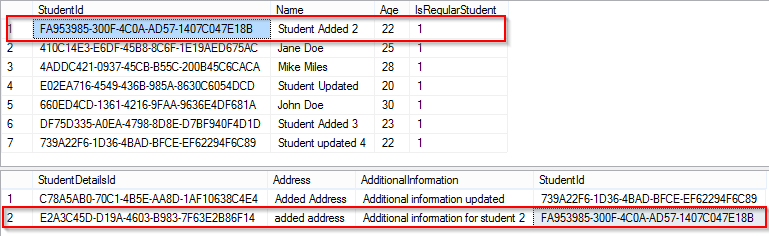
The important thing to know is when we update our main entity by adding a new relationship entity, EF Core is going to create a new row in the relationship table and connects it to the main entity with a foreign key:
[HttpPut("{id}/relationship")]
public IActionResult UpdateRelationhip(Guid id, [FromBody] Student student)
{
    var dbStudent = _context.Students
        .FirstOrDefault(s => s.Id.Equals(id));

    dbStudent.StudentDetails = new StudentDetails
    {
        Id = new Guid("e2a3c45d-d19a-4603-b983-7f63e2b86f14"),
        Address = "added address",
        AdditionalInformation = "Additional information for student 2"
    };

    _context.SaveChanges();

    return NoContent();
}
Since now we know how to update relationships in EF Core, we can continue on to the disconnected update.
Disconnected Update in EF Core
There are several ways to execute a disconnected update, and we are going to show you two ways of doing that. In the first example, we are going to attach the object sent from a client, modify its state and then save it to the database:
[HttpPut("disconnected")]
public IActionResult UpdateDisconnected([FromBody] Student student)
{
    _context.Students.Attach(student);
    _context.Entry(student).State = EntityState.Modified;

    _context.SaveChanges();

    return NoContent();
}
The student object sent from the client has a Detached state at a beginning. After we use the Attach method the object is going to change state to Unchanged.
This also means that as of this moment, EF Core starts tracking the entity. Now, we are going to change the state to Modified and save it to the database.
This is the object sent from the client:
{
    "id": "DF75D335-A0EA-4798-8D8E-D7BF940F4D1D",
    "name": "Student updated 3",
    "age": "22",
    "isRegularStudent": false
}
And as you can see it has the Id property as well. Additionally, we have changed the Name and IsRegularStudent properties, but EF Core will update the entire object in the database.
Another way of doing the same thing is by using the Update or UpdateRange method if we have multiple objects ready for an update. So let’s send the same object with only the IsRegularStudent property modified to true:
[HttpPut("disconnected")]
public IActionResult UpdateDisconnected([FromBody] Student student)
{
    _context.Update(student);

    _context.SaveChanges();

    return NoContent();
}
We can see the difference. The Update method will set the entity to tracked and also modify its state from Detached to Modified. So, we don’t have to attach the entity and to modify its state explicitly because the Update method does that for us. This approach is also going to update the entire object even though we changed just one property:

There we go.
Now we know how to execute a disconnected update and what is the difference from a connected update.
Delete Operations in EF Core
The last way to modify data is by using delete actions. We have two ways of deleting rows and we are going to cover them both.
So, let’s start with the Soft Delete approach.
Soft Delete in Entity Framework Core
With the Soft Delete approach, the entity is hidden rather than deleted. This is not an unusual way of doing delete actions because in many real-world projects we don’t want to really delete any row because they will be required for some statistics later on.
So basically, we are not deleting an entity we are updating it by modifying its property (we are going to name it Deleted) to true.
To show how soft delete works, we need to make some changes in our current database model. To start, let’s modify the Student model by adding additional property:
public bool Deleted { get; set; }
Now, let’s modify the StudentConfiguration class, by adding an additional method to filter out all the Deleted students from the queries:
builder.HasQueryFilter(s => !s.Deleted);
The HasQueryFilter method will include only those Student entities with the Deleted property set to false. Or in other words, it will ignore all the students with Deleted set to true.
To apply these changes to the database, we are going to create and apply migration:
PM> Add-Migration AddedDeletedPropertyToStudent
PM> Update-Database
After this migration, all the rows in the Student table will have the Deleted column set to zero (false).
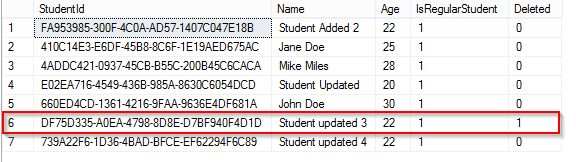
To continue on, let’s create additional Delete action in the controller and send the Delete request:
[HttpDelete("{id}")]
public IActionResult Delete(Guid id)
{
    var student = _context.Students
        .FirstOrDefault(s => s.Id.Equals(id));

    if (student == null)
        return BadRequest();

    student.Deleted = true;
    _context.SaveChanges();

    return NoContent();
}
The soft delete consists of three parts:
- Loading part
- Modifying part
- Saving part
This is the result in the database:
Loading Data with QueryFilter implemented and Ignoring QueryFilter
With the HasQueryFilter method we’ve made sure that “deleted” entities won’t be included in the query result. Let’s see if it works:
var studentsWithoudDeleted = _context.Students.ToList();
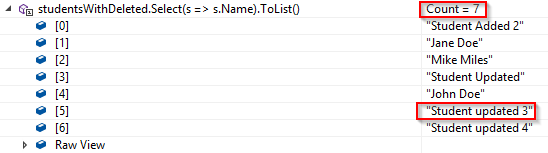
EF Core would usually return all the students from the Student table. But with the HasQueryFilter method implemented, the result is different:
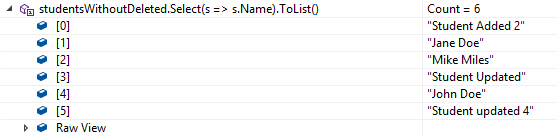
We can confirm that the “Student updated 3” is missing, which is the only one with the Deleted property set to true.
Of course, if we want to ignore our query filter we can do that by applying the IgnoreQueryFilter to the query:
var studentsWithDeleted = _context.Students
    .IgnoreQueryFilters()
    .ToList();
This query will include the “deleted” entity:
Great job. Let’s continue with the regular Delete.
Delete a Single Entity with EF Core
In the regular delete, we are not modifying our entity but actually removing it from the database by using the Remove method or RemoveRange method for multiple entities:
[HttpDelete("{id}")]
public IActionResult Delete(Guid id)
{
    var student = _context.Students
        .FirstOrDefault(s => s.Id.Equals(id));

    if (student == null)
        return BadRequest();

    _context.Remove(student);
    _context.SaveChanges();

    return NoContent();
}
There are three steps for this action as well:
- Loading the student entity and set its state to Unchanged
- Using the Remove method to set the state to Deleted
- Saving the changes in the database
We must be careful with Delete actions if our entity has relationships and we haven’t specified them in the delete action. Deleting the main entity could delete the relationships as well (cascade delete), depending on the entity configuration.
We have talked about configuring delete actions in the Entity Framework Core Relationships article.
This is the translated SQL command:

We can see that the first Select statement includes the query filter. Right after the filter there is our Delete query.
Delete Entity with Relationships
To delete an entity with its relationships, all we have to do is to include that relationship into the main entity:
[HttpDelete("{id}/relationship")]
public IActionResult DeleteRelationships(Guid id)
{
    var student = _context.Students
        .Include(s => s.StudentDetails)
        .FirstOrDefault(s => s.Id.Equals(id));

    if (student == null)
        return BadRequest();

    _context.Remove(student);
    _context.SaveChanges();

    return NoContent();
}
And that is all we have to do. EF Core will do the rest for us.
Conclusion
Excellent. We have covered a lot of topics related to Entity Framework Core and its usage in the ASP.NET Core.
In this series, we’ve learned how to integrate EF Core in the ASP.NET Core app and how to set up non-relational and relational configuration. Furthermore, we have learned to use Migrations, Queries, and Database modification operations.
We hope that you have enjoyed reading it and that you have found a lot of useful information.
Until the next series…

