
In this article, we are going to learn how to configure PostgreSQL, a popular and reliable open-source relational database, in our .NET Core application, and connect it to Entity Framework Core to utilize its full potential.
If you want to learn more about Entity Framework Core and how to configure it properly, check out our EF Core Series.
You can download the source code for this article on our GitHub repository.
Let’s get down to it.
Installing PostgreSQL Server and pgAdmin
First off, we need to install our PostgreSQL Server and client. Download the appropriate version of PostgreSQL for your OS and select the newest version available.
During the installation, you will be prompted to select pgAdmin (client). There are several good clients for PostgreSQL, but pgAdmin is the standard one, and a good one to begin with. Once you get used to it, you can try out other ones.
You will also be prompted for a superuser (postgresql) password. This password is the master password and you should make sure to remember it or write it down. You can leave the port on 5432 which is the default PostgreSQL port to avoid confusion. (You can choose another one if you already have a PostgreSQL server on your machine)
Finish the wizard and we’re ready to start.
Installing the Required Dependencies for PostgreSQL
To enable PostgreSQL support in our Web API application, we need to install the dependencies for PostgreSQL in our application first:
We can do that by using the Package Manager Console:
Install-Package Npgsql.EntityFrameworkCore.PostgreSQL -Version 2.2.4
Or by using the dotnet CLI:
dotnet add package Npgsql.EntityFrameworkCore.PostgreSQL --version 2.2.4
We are going to hardcode it to version 2.2.4 since that is the newest version right now.
Npgsql is the Entity Framework Core PostgreSQL provider. And that’s all we need in regards to external dependencies for this project. Everything else we’ve already got out of the box.
Let’s see how hard it is to configure PostgreSQL in our Web API app.
Configuring the PostgreSQL Provider and Connection String
To configure our application and play around a bit with PostgreSQL, we need to add some code to the Startup.cs first.
Let’s modify our ConfigureServices() method:
public void ConfigureServices(IServiceCollection services)
{
	services.AddMvc().SetCompatibilityVersion(CompatibilityVersion.Version_2_2);

	var connectionString = Configuration["PostgreSql:ConnectionString"];
	var dbPassword = Configuration["PostgreSql:DbPassword"];

	var builder = new NpgsqlConnectionStringBuilder(connectionString)
	{
		Password = dbPassword
	};

	services.AddDbContext<ApplicationContext>(options => options.UseNpgsql(builder.ConnectionString));
}
Aside from the AddMvc() method, everything else is what we need to configure our database.
We are populating the connection string and password from the configuration file.
Don’t do this for real-world projects, use secrets mechanism and environment variables instead.
Then, we’re using the NpgsqlConnectionStringBuilder to build our PostgreSQL connection string, and finally, connect ApplicationContext to the database using that connection string.
ApplicationContext is a simple DbContext class:
public class ApplicationContext : DbContext
{
	public ApplicationContext(DbContextOptions options)
			: base(options)
	{
	}

	public DbSet<Student> Students { get; set; }
}
And we have one DbSet defined of the type Student.
public class Student
{
	public Guid Id { get; set; }
	public string Name { get; set; }
	public int Age { get; set; }
}
That’s it for the configuration.
Now let’s simply add the Students table to our database. We are going to use the Code-First approach for this and create a migration to update our database with.
First, let add a migration in the Package Manager Console:
PM> Add-Migration InitialEntities
And then update our database:
PM> Update-Database
Our database should contain the table “Students” now and we’re all set to play around with some queries.
Writing a Simple Query to Insert Data in PostgreSQL
First, let’s prepare our Controller for the Actions we need. Let’s repurpose ValuesController we get out-of-the-box and rename it to something more appropriate like the StudentsController.
After that, let’s do some cleanup, and add the methods we need to try our database out.
[Route("api/[controller]")]
[ApiController]
public class StudentsController : ControllerBase
{
	private readonly ApplicationContext _context;

	public StudentsController(ApplicationContext context)
	{
		_context = context;
	}

	[HttpGet]
	public IActionResult Get()
	{
		return Ok();
	}

	[HttpGet("{id}, Name = "GetById")]
	public IActionResult Get(string id)
	{
		var student = _context.Find<Student>(Guid.Parse(id));

		return Ok(student);
	}

	[HttpPost]
	public IActionResult Post([FromBody] Student student)
	{
		_context.Add(student);

		_context.SaveChanges();

		return CreatedAtRoute(nameof(GetById), new { id = student.Id }, student);
	}
}
This is a simple controller, and all it has is three methods:
GET api/students
GET api/students/{id}
POST api/students
Let’s use our POST method to insert some data into the database. For this purpose, we like to use Postman, but feel free to use any client of your choice.
Let’s add Chris Pratt to our Students table (although he might not be interested in programming classes):
{
	"Name": "Chris Pratt",
	"Age": "40"
}
Here’s the Postman request:
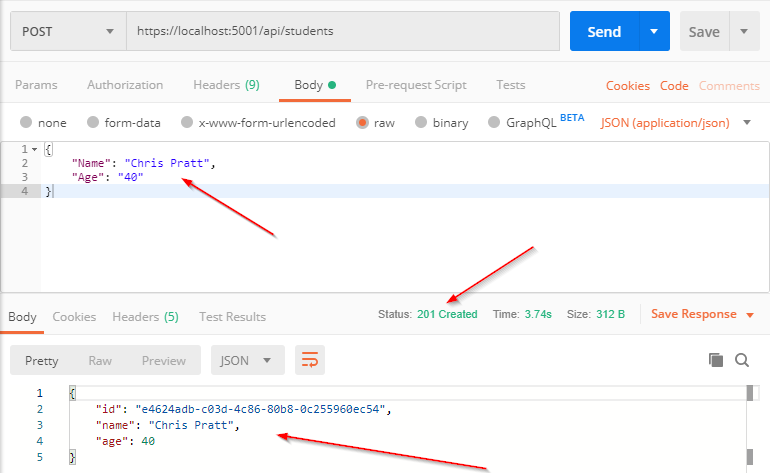
As you can see, we got the 201 Created response, which means we successfully created a new student.
And to be sure, let’s check the pgAdmin:
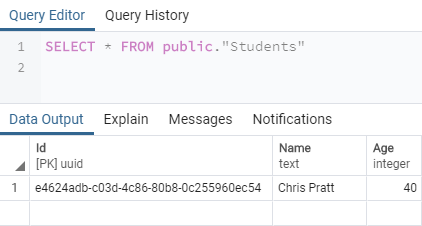
If you see this record, that means you’ve completed everything successfully until this point.
Great.
Let’s read some data.
Reading Data from PostgreSQL
Now to finish this example off, let’s use postman to read our new student from the database.
To do that, let’s request a student we’ve just created.
Since we know that we’ve added Chris Pratt recently and what his id is, our request should be (you’ll have a different id, which EF Core generates automatically):
https://localhost:5001/api/students/e4624adb-c03d-4c86-80b8-0c255960ec54
Here’s the Postman request:
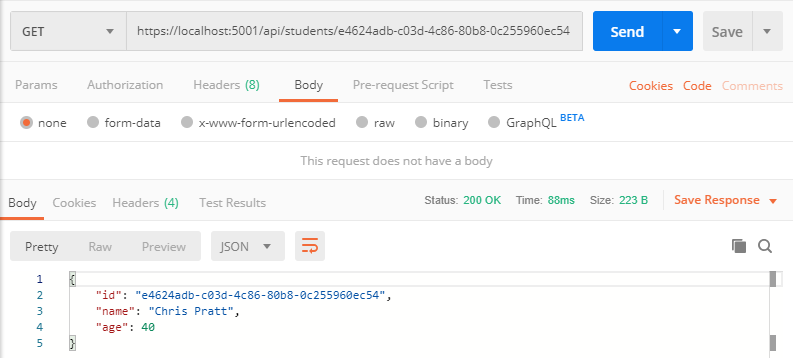
This time we get the 200 OK response, and Chris Pratt in the response.
That was everything we needed.
Conclusion
As you can see, working with PostgreSQL is not much different than working with MSSQL or MySQL that we’ve covered so far.
So to sum it up, in this article we’ve learned:
- How to install PostgreSQL server
- Configure the PostgreSQL provider and our application to use it
- How to make some simple requests to insert and read data from PostgreSQL

Great Article, FYI, please also install the following dependency:
I also found that the following connection string worked for me in the AppSettings:
"ConnectionStrings": {
    "PostgreConnectionString": "Host=myserver;Username=postgres;Database=CompanyEmployees"
  },
the password was inserted as per your example 🙂