

In this article, we will discuss the concept of Modular Monolith Applications, and how they compare with traditional Monoliths and Microservices. We will also explain the different communication patterns we can implement between our modules.
In the last decade, most enterprise businesses have switched from monolith applications to microservice applications because monolith applications have coupling and scalability issues. However, microservice applications have some downsides such as being expensive to maintain and complex to develop.
What Is a Modular Monolith?
A Modular Monolith is a monolith application where the different business modules are loosely coupled, and each module packs a different set of functionalities that serve this business module:
Modular monolith applications come as a middle ground between traditional monoliths and microservice applications, providing loosely coupled modules that interact with each other using various communication patterns, without all the expenses and complexity shipped with microservice applications.
Setting Up Our Modular Monolith
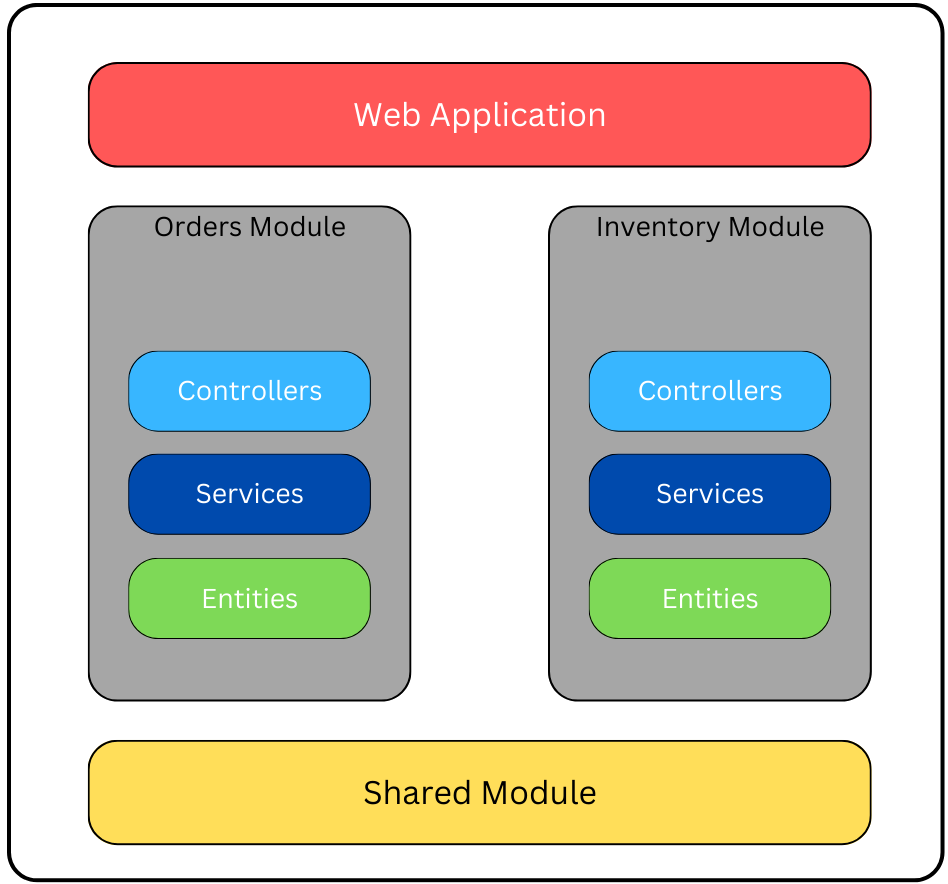
Let’s consider an e-commerce application that manages an inventory of items and the orders created. Since we are creating a modular monolith application, we should divide our applications into modules. In our case, we have an inventory module and an order module.
Inventory Module in Our Modular Monolith
Let’s start by implementing the inventory module. First, we introduce a class library project named Inventory.
In the Inventory class library, let’s add our entity:
internal class Item
{
    public Guid Id { get; set; } = Guid.NewGuid();
    public required string Name { get; set; }
    public int Quantity { get; set; }
    public double Price { get; set; }
}
The Item class has four properties: Id, Name, Quantity and Price. We set our entities as internal to prevent any coupling with other modules.
internal access modifier, check out our article C# Access Modifiers.Next, we create a DTO class:
public class ItemDto
{
    public Guid Id { get; set; }
    public required string Name { get; set; }
    public int Quantity { get; set; }
    public bool IsOutOfStock => Quantity == 0;
    public double Price { get; set; }
}
In addition to the Item class’s properties, our ItemDto also contains an IsOutOfStock property which checks if the Quantity property is equal to zero.
Now, we create an ItemService class that will hold the business logic related to the inventory module:
internal class ItemService(IItemRepository itemRepository) : IItemService
{
    public ItemDto? Get(Guid id)
    {
        return itemRepository.Get(id);
    }

    public List<ItemDto> GetAll()
    {
        return itemRepository.GetAll();
    }

    public bool UpdateQuantity(UpdateQuantityDto updateQuantityDto)
    {
        return itemRepository.UpdateQuantity(updateQuantityDto);
    }
}
Here, we implement the Get(), GetAll(), and UpdateQuantity() methods and use the IItemRepository interface to alter the database.
Finally, we create our ItemController class:
[Route("api/[controller]")]
[ApiController]
public class ItemController(IItemService itemService) : ControllerBase
{
    [HttpGet("{id:guid}")]
    public IActionResult Get(Guid id)
    {
        var item = itemService.Get(id);

        return item is null ?
            NotFound(id) :
            Ok(item);
    }

    [HttpGet]
    public IActionResult GetAll()
    {
        var items = itemService.GetAll();

        return Ok(items);
    }
}
Our ItemController contains two endpoints: Get(), which fetches a single item by its Id property, and GetAll(), which fetches all the items.
The Order Module
Now let’s implement the Order module. Similar to the Inventory module,we create a new class library project Order.
In the Order class library, let’s create our entities:
internal class Order
{
    public Guid Id { get; set; } = Guid.NewGuid();
    public List<OrderItem> Items { get; set; } = [];
}

internal class OrderItem
{
    public Guid Id { get; set; } = Guid.NewGuid();
    public Guid ItemId { get; set; }
    public int Quantity { get; set; }
    public double PricePerUnit { get; set; }
    public double Total { get; set; }
}
Our Order class consists of Id and Items properties and the OrderItem class consists of Id, ItemId, Quantity, PricePerUnit, and Total properties.
Then we create our DTO classes:
public class OrderDto
{
    public Guid Id { get; set; } = Guid.NewGuid();
    public double Total { get; set; }
    public List<OrderItemDto> Items { get; set; } = [];
}

public class OrderItemDto
{
    public Guid Id { get; set; } = Guid.NewGuid();
    public Guid ItemId { get; set; }
    public string ItemName { get; set; } = string.Empty;
    public int Quantity { get; set; }
    public double PricePerUnit { get; set; }
    public double Total { get; set; }
}
Similar to the Order class, our OrderDto class includes the same properties and an extra Total property. Our OrderItemDto class introduces an ItemName property in addition to the same properties as the OrderItem class.
Next, let’s create our OrderService class:
public class OrderService(IOrderRepository orderRepository) : IOrderService
{
    public void Add(OrderDto orderDto)
    {
        orderRepository.Add(orderDto);
    }

    public List<OrderDto> GetAll()
    {
        var orders = orderRepository.GetAll();

        return orders;
    }
}
Our OrderService class implements two methods, Add() and GetAll(), which add an order to the database and retrieves all orders respectively.
Finally, let’s implement our OrderController class:
[Route("api/[controller]")]
[ApiController]
public class OrderController(IOrderService orderService) : ControllerBase
{
    [HttpPost]
    public IActionResult Add(OrderViewModel viewModel)
    {
        try
        {
            orderService.Add(new OrderDto
            {
                Items = viewModel.Items.Select(i => new OrderItemDto
                {
                    ItemId = i.ItemId,
                    Quantity = i.Quantity
                }).ToList()
            });

            return Ok();
        }
        catch(Exception ex)
        {
            return BadRequest(ex.Message);
        }
    }

    [HttpGet]
    public IActionResult GetAll()
    {
        try
        {
            var orders = orderService.GetAll();

            return Ok(orders);
        }
        catch(Exception ex)
        {
            return BadRequest(ex.Message);
        }
    }
}
Our OrderController contains two endpoints, Add() and GetAll(), which makes calls to the matching OrderService methods.
As we can see in our solution, the Order and Inventory modules are completely separated without any coupling. This way, we ensure that we separate the modules in a loosely coupled manner, making it easier to switch to microservices if needed:
Traditional Monolith vs Modular Monolith
Traditional and Modular Monolith applications consist of a single deployment comprising different business modules. The key difference is that, unlike in a traditional monolith application where all the business modules are tightly coupled, in a modular monolith, the code base consists of separate modules that are loosely coupled and independent.
Traditional Monoliths are effective in small-scale applications that do not contain a lot of modules. On the other hand, Modular monoliths better serve mid to enterprise-level applications that contain several modules.
Let’s take a look at the differences between traditional and modular monoliths across different aspects such as architecture, codebase, resilience, and technology stack:
| Aspect | Traditional Monolith | Modular Monolith |
|---|---|---|
| Architecture | Follows a single-tier architecture where the modules are tightly coupled. | Follows a modular architecture where each component is organized to a separate modules that are loosely coupled. |
| Codebase | Consists of a single codebase that contains all the functionality. | Each module has its own codebase and functionality. |
| Maintenance | Updates can be risky since changes might has unintended consequences. | Easier to update and maintain due to modular design. |
| Resilience to Change | Changes may require extensive re-architecting and refactoring. | New modules can be easily introduced without re-architecting. |
Microservices vs Modular Monolith
Although microservice and modular monolith applications may seem similar, the two architectures have their set of differences. While we deploy the different modules in a microservice application separately, the modules in a modular monolith are packed in a single service.
We typically use Microservices where we favor scalability and isolation over simplicity and cost-effectiveness.
Let’s cover the differences between microservices and modular monoliths across different aspects such as simplicity, performance, deployment, and cost:
| Aspect | Microservices | Modular Monolith |
|---|---|---|
| Simplicity | Typically used for more complex projects. | Tends to be simpler in development and deployment |
| Performance | Might provide slower performance due to increased network overhead cause by inter-service communication. | Might provide better performance due to reduced network overhead. |
| Deployment | Requires a more complex deployment and orchestration tools to manage the different services. | Easier to deploy since the deployment consists of a single unit. |
| Cost | Usually costs more due to higher infrastructure costs for managing the deployments and network. | Requires lower initial cost as it involves a single deployment unit. However cost may increase when scaling the application. |
Communication Patterns in Modular Monoliths
Since the modules in a modular monolith are loosely coupled, we need different means of communication so that the modules can interact. We can achieve this either by using synchronous communication or asynchronous communication, each with its positives and negatives.
Synchronous Communication
Synchronous communication is when the client application waits for a response from the server after sending a request. We use synchronous communication when the response impacts our process. Examples of synchronous communication protocols include REST API, gRPC, and SOAP.
Let’s create an InventoryRestClient class that handles the REST API synchronous calls using the IHttpClientFactory interface. We should note that although we are using the async and await keywords, from the perspective of the client and server, this is still considered synchronous communication because the client has to wait for the server to reply to continue its work:
public class InventoryRestClient(
      IHttpClientFactory clientFactory,
      IConfiguration configuration) : IInventoryRestClient
{
    public async Task<ItemDto?> GetItem(Guid id)
    {
        var httpClient = clientFactory.CreateClient();
        httpClient.BaseAddress = new Uri(configuration["BaseAddress"]!);
        var result = await httpClient.GetAsync($"/api/Item/{id}");

        result.EnsureSuccessStatusCode();

        return await result.Content.ReadFromJsonAsync<ItemDto?>();
    }
}
Our GetItem() method creates a synchronous call to the Inventory module and retrieves a single item as JSON, and then deserializes it into our ItemDto class.
Now, let’s update our OrderService class to make use of the IInventoryRestClient interface:
public class OrderService(
    IOrderRepository orderRepository,
    IInventoryRestClient inventoryRestClient) : IOrderService
{
    public async Task AddAsync(OrderDto orderDto)
    {
        foreach(var itemModel in orderDto.Items)
        {
            var item = await inventoryRestClient.GetItem(itemModel.ItemId) ??
                throw new InvalidOperationException(
                    $"The requested item '{itemModel.ItemId} was not found.'");

            if (item.Quantity < itemModel.Quantity)
                throw new InvalidOperationException(
                    $"There isn't enough stock for item '{itemModel.ItemId}'.");

            itemModel.PricePerUnit = item.Price;
            itemModel.Total = itemModel.Quantity * item.Price;
        }

        orderDto.Total = orderDto.Items.Sum(i => i.Total);

        orderRepository.Add(orderDto);
    }

    public async Task<List<OrderDto>> GetAllAsync()
    {
        var orders = orderRepository.GetAll();

        foreach(var orderItem in orders.SelectMany(i => i.Items))
        {
            var item = await inventoryRestClient.GetItem(orderItem.ItemId) ??
                throw new InvalidOperationException(
                    $"The requested item '{orderItem.ItemId} was not found.'");
            orderItem.ItemName = item.Name;
        }

        return orders;
    }
}
In our AddAsync() method, we loop over the Items list, and for each item, we get its respective item from the Inventory module using the IInventoryRestClient service to calculate the total price. Also, in our GetAllAsync() method, we loop over the Items list to set the name of each item.
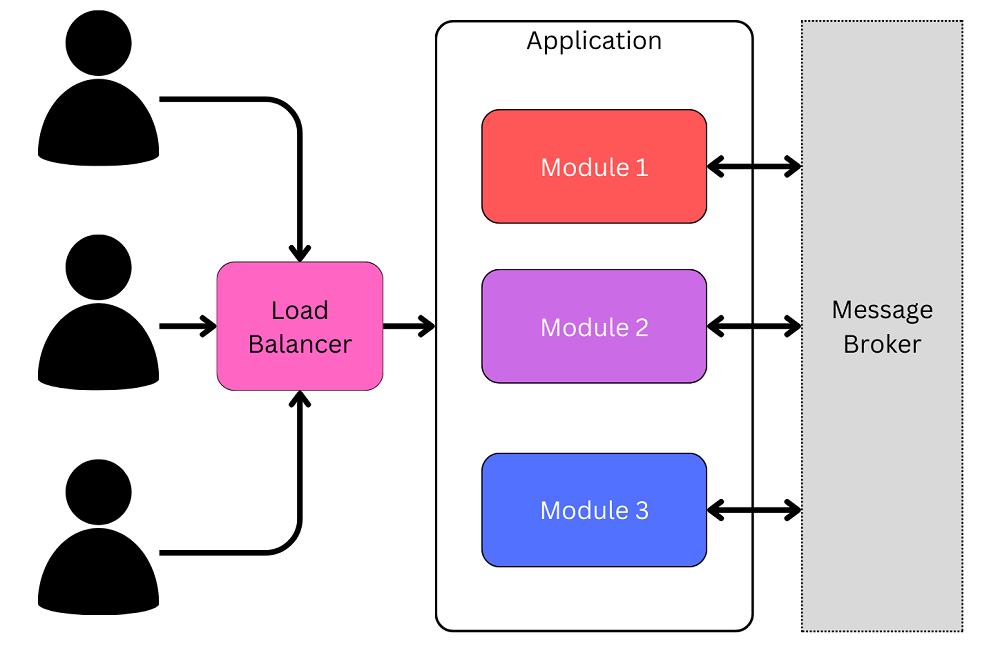
Asynchronous Communication
Asynchronous communication is when the client application sends a request to the server and continues executing regardless of whether the server successfully processed the message. This is helpful when the process does not depend on the success of the request. Examples of asynchronous communication protocols include AMQP and MQTT.
One of the most used tools for asynchronous communication is RabbitMQ which uses the Advanced Message Queuing Protocol (AMQP). RabbitMQ uses a Pub-Sub design pattern where the client (Publisher) passes a message through a queue to the server (Subscriber/Consumer).
The plan is to pass a message from the Order module to the Inventory module asynchronously to adjust the item stock after creating an order.
First, let’s define our RabbitMqConsumer class:
internal class RabbitMqConsumer(
    IServiceScopeFactory scopeFactory,
    IOptions<RabbitMqConfiguration> rabbitMqConfiguration,
    IRabbitMqConnectionManager rabbitMqConnectionManager) : IRabbitMqConsumer
{
    public void Consume()
    {
        var queueName = rabbitMqConfiguration.QueueName;
        rabbitMqConnectionManager.Channel.QueueDeclare(
            queue: queueName,
            durable: true,
            exclusive: true,
            autoDelete: false);

        var consumer = new EventingBasicConsumer(_rabbitMqConnectionManager.Channel);

        consumer.Received += HandleEventAsync;

        rabbitMqConnectionManager.Channel.BasicConsume(
            queue: queueName,
            autoAck: true,
            consumer: consumer);
    }
}
The Consume() method initializes our message queue, registers our callback function with the consumer.Received event, and starts consuming from the queue.
Next, we define our callback function inside our RabbitMqConsumer class:
private void HandleEventAsync(object? model, BasicDeliverEventArgs ea)
{
    var body = ea.Body.ToArray();
    var message = Encoding.UTF8.GetString(body);
    var updateQuantityDto = JsonSerializer.Deserialize<UpdateQuantityDto>(message);

    if (updateQuantityDto is null)
        return;

    UpdateItemQuantity(updateQuantityDto);
}

private void UpdateItemQuantity(UpdateQuantityDto updateQuantityDto)
{
    var scope = scopeFactory.CreateScope();
    var itemService = scope.ServiceProvider.GetRequiredService<IItemService>();

    itemService.UpdateQuantity(updateQuantityDto);
}
Our HandleEventAsync() method is the function we will invoke whenever we consume a message. It parses the event body and then calls the UpdateItemQuantity() method.
The next step is to produce a message from our Order module every time an order is created.
We can achieve this by calling the UpdateQuantity() method from the AddAsync() method in the OrderService class:
public async Task AddAsync(OrderDto orderDto)
{
    foreach(var itemModel in orderDto.Items)
    {
        var item = await inventoryRestClient.GetItem(itemModel.ItemId) ??
            throw new InvalidOperationException(
              $"The requested item '{itemModel.ItemId} was not found.'");

        if (item.Quantity < itemModel.Quantity)
            throw new InvalidOperationException(
              $"There isn't enough stock for item '{itemModel.ItemId}'.");

        itemModel.PricePerUnit = item.Price;
        itemModel.Total = itemModel.Quantity * item.Price;

        inventoryRabbitMqClient.UpdateQuantity(new Inventory.Models.UpdateQuantityDto
        {
            ItemId = itemModel.ItemId,
            Amount = itemModel.Quantity * -1
        });
    }

    orderDto.Total = orderDto.Items.Sum(i => i.Total);

    orderRepository.Add(orderDto);
}
The UpdateQuantity() method will publish our message to the queue to be processed by the Inventory module.
Using our RabbitMQ implementation, we pass a message asynchronously from the Order module to the Inventory module. After passing the message, the Order module will continue executing regardless of whether the Inventory module received it successfully.
Conclusion
Modular monolith applications are becoming widely used due to their simplicity and scalability. Although they can’t completely replace traditional monolith or microservice applications, they have a great use case that can be useful for different businesses.
