

When creating applications, authenticating users and ensuring the security of user data is paramount. To accomplish this, we can either create a custom authentication solution or leverage a third-party solution. In this article, we’ll learn about adding a user login to a .NET app with Auth0 and we’ll explore the powerful features that Auth0 offers to simplify the user login process.
Let’s dive in.
What is Auth0?
Auth0 is an authentication and authorization service with a set of tools that enable us to seamlessly add authentication and authorization to our applications. It offloads us the responsibility of having to handle the security of user data in our applications. This way, we can put our effort into developing business logic for the applications.
Auth0 Account Setup
Before using Auth0 in our application, we need to set up an account. If you don’t have an account, you can sign up for free to follow along.
With an account created, let’s now create an application on Auth0. On Auth0, an application is a service in which we’d like to incorporate authentication and authorization features provided by the Auth0 platform. This could be a native application, a web application, or even a Single Page Application.
On the Auth0 dashboard, let’s click Create Application. Then, we are going to select Regular Web Applications as the application type:
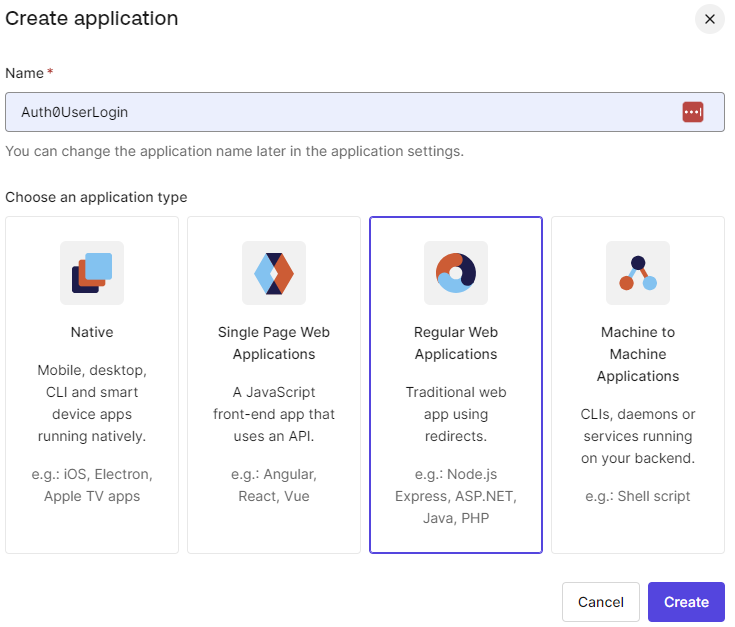
Finally, choose ASP.NET Core as the application technology.
Setting up Auth0 SDK in a .NET Project
Let’s scaffold a new ASP.NET MVC application either using Visual Studio or using the dotnet CLI:
dotnet new mvc
Having set up the application, there are additional configurations we have to add to our application before proceeding. For this, let’s navigate to the Application Settings section on the Auth0 portal. Here, we’re interested in:
- Domain
- Client Id
We can find them under the Basic Information section:
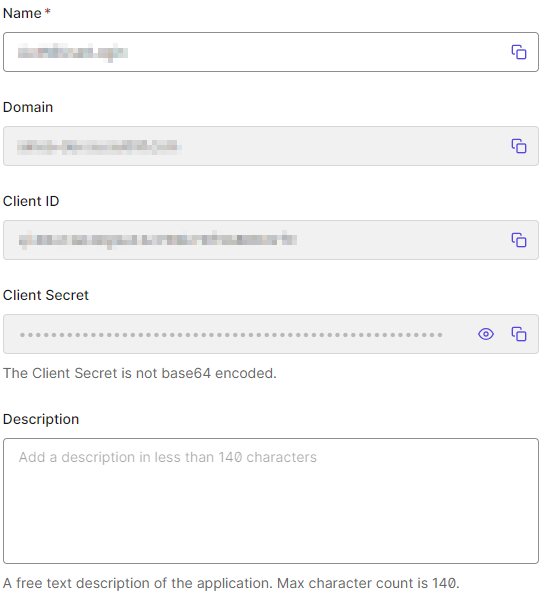
These values uniquely identify our application on Auth0, so let’s add them to the appsettings.json file:
"Auth0": {
  "Domain": "...",
  "ClientId": "..."
}
Please note that we’re storing these values in the appsettings.json file for testing purposes. In a production application, we could store this data in environment variables or a vault for security reasons.
For this configuration, enter the values from the Auth0 portal for the specific application.
Next, we have to set the callback URL and logout URL under the Settings tab. The callback URL is where Auth0 redirects users after successful login while the logout URL is where Auth0 redirects users after they log out of the application. In our case, the callback URL is https://localhost:7269/callback while the logout URL is https://localhost:7269:
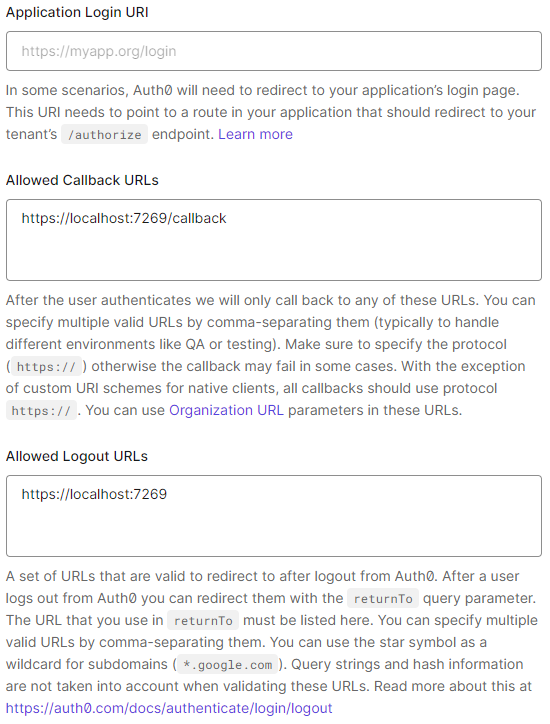
These settings are unique for every application, so ensure you pick the correct values for your application.
After setting up these configurations, let’s install the Auth0 SDK in our project:
dotnet add package Auth0.AspNetCore.Authentication
With the setup out of the way, let’s continue with the integration.
Adding User Login
The first step here is to add Auth0 to the application dependency container in Program.cs:
builder.Services.AddAuth0WebAppAuthentication(options =>
{
    options.Domain = builder.Configuration["Auth0:Domain"];
    options.ClientId = builder.Configuration["Auth0:ClientId"];
});
Here, we are adding Auth0 SDK to our application dependency container. The SDK requires us to pass the domain and clientId, which we read from the appsettings.json file.
Behind the scenes, this method registers OpenIdConnect and Cookies authentication schemas which set the auth0 token parameters as well as cookie authentication for our application.
Next, we enable authentication in our application by calling the UseAuthentication() method:
app.UseAuthentication();
We put the authentication middleware before any middleware that requires authentication, for instance, the authorization middleware.
With the middleware configured, let’s add an AuthController to handle user authentication. In the AuthController, let’s add a Login() action to handle user login:
public async Task Login(string returnUrl = "/")
{
    var authenticationProperties = new LoginAuthenticationPropertiesBuilder()
        .WithRedirectUri(returnUrl)
        .Build();

    await HttpContext.ChallengeAsync(
        Auth0Constants.AuthenticationScheme,
        authenticationProperties
    );
}
The HttpContext.ChallengeAsync() method takes the authentication scheme and authentication properties. Then, it triggers the authentication process. In this case, it invokes the Auth0 authentication middleware, prompting the user to log in.
Auth0 handles the rest of the login process. If the user successfully logs in, Auth0 redirects our application to the home page.
Having added the Login() action to the AuthController, let’s modify the layout to display either “Login” or “Logout” depending on whether the user is logged into the application or not.
Let’s add this to the _Layout.cshtml file:
<ul class="nav navbar-nav navbar-right">
    @if (User.Identity.IsAuthenticated)
    {
        <li><a id="qsLogoutBtn" asp-controller="Auth" asp-action="Logout">Logout</a></li>
    }
    else
    {
        <li><a id="qsLoginBtn" asp-controller="Auth" asp-action="Login">Login</a></li>
    }
</ul>
Now, if we run the application, the login button is displayed on the right side. If we click it, the application redirects us to Auth0 to log in. Successful log in redirects us to the home page.
Managing Auth0 Sessions
Since our application is a regular web app, once a user logs in, the application maintains the user’s session information inside a cookie.
The cookie maintains the user’s authentication state and it authenticates subsequent requests. In the event we clear the cookie, the session ends. The upside, however, is that we don’t have to keep logging in every time we visit the application.
Other than a session cookie, Auth0 also gives us a token with claims that identify the logged-in user. With this information, we can build a user profile and display it on a page.
Let’s add one more action to our controller:
[Authorize]
[Route("/user/profile")]
public IActionResult Profile()
{
    return View(new UserProfileViewModel
    {
        Name = User.Identity?.Name ?? string.Empty,
        EmailAddress = User.Claims.FirstOrDefault(c => c.Type == ClaimTypes.Email)?.Value ?? string.Empty,
        ProfileImage = User.Claims.FirstOrDefault(c => c.Type == "picture")?.Value ?? string.Empty
    });
}
This action reads the claims of the currently logged-in user and assigns the values to the UserProfileModel properties.
Let’s add a page to view the user profile details:
@model Auth0UserLogin.Models.UserProfileViewModel
@{
    ViewData["Title"] = "User Profile";
}

<div class="row">
    <div class="col-md-12">
        <div class="row">
            <h2>@ViewData["Title"]</h2>
            <div class="card" style="border-radius: 15px;">
                <div class="card-body p-4">
                    <div class="d-flex text-black">
                        <div class="flex-shrink-0">
                            <img src="@Model.ProfileImage"
                                 alt="" class="img-fluid rounded-circle"
                                 style="width: 180px; border-radius: 10px;">
                        </div>
                        <div class="flex-grow-1 ms-3">
                            <h5 class="mb-1">@Model.Name</h5>
                            <p class="mb-2 pb-1" style="color: #2b2a2a;">@Model.EmailAddress</p>
                        </div>
                    </div>
                </div>
            </div>
        </div>
    </div>
</div>
At this point, if we run our application and log in, we are able to see the user details.
Adding Logout
With login in place, let’s add logout to our application. For this, let’s add a Logout() action to the AuthController:
[Authorize]
public async Task Logout()
{
    await HttpContext.SignOutAsync(Auth0Constants.AuthenticationScheme, new AuthenticationProperties
    {
        RedirectUri = Url.Action("Index", "Home")
    });

    await HttpContext.SignOutAsync(CookieAuthenticationDefaults.AuthenticationScheme);
}
To log out, we call the HttpContext.SignOutAsync() method twice. The first call signs the user out of Auth0, while the second method call clears cookies from the browser storage. At this point, the user session is terminated and all user data is cleared from the browser. Auth0 handles the whole process so it requires little intervention from us.
Conclusion
In this article, we have learned about adding user login to an ASP.NET MVC application with Auth0. We have seen how powerful the service is in terms of ensuring the security of user data and out-of-the-box session management. We have only covered an introduction, but we can extend it to cover more use cases for applications.
