Traditionally, code generation in C# involved using external tools or templates to generate code before the compilation process, like the T4 template. However, with source generators, code generation becomes an integral part of the compilation itself.
In this article, we’ll explore the basics of C# source generators and how to use this powerful feature to enable dynamic code generation during compilation, automating repetitive tasks, and improving developer productivity.
Let’s start.
Background
Source generators are a feature introduced in C# 9 that allows dynamic code generation during the compilation process. They integrate directly with the C# compiler (Roslyn) and operate at compile time, analyzing source code and generating additional code based on analysis results.
Source generators provide a streamlined, automated approach to code generation, eliminating the need for external tools or separate pre-compilation steps.
By seamlessly integrating into the compilation process, source generators enhance productivity, reduce errors, and allow for more efficient development workflows.
How to Use It
First, we should create a C# project that targets netstandard2.0 and add some standard packages to get access to the source generator types.
We can start by creating a class library. Then, through the SDK, we can create a solution and a project in the current folder:
dotnet new sln -n SourceGeneratorInCSharp
dotnet new classlib --framework "netstandard2.0" -o ./Generator
dotnet sln add ./Generator
Afterward, we need to replace the content of Generator.csproj:
<Project Sdk="Microsoft.NET.Sdk">
    <PropertyGroup>
        <TargetFramework>netstandard2.0</TargetFramework>
        <IncludeBuildOutput>false</IncludeBuildOutput>
        <LangVersion>latest</LangVersion>
    </PropertyGroup>

    <ItemGroup>
        <PackageReference Include="Microsoft.CodeAnalysis.CSharp.Workspaces"
            Version="4.4.0"
            PrivateAssets="all" />
    </ItemGroup>
</Project>
As we know, source code generators work like an analyzer and provide an option to generate source code at development time even if the code cannot be compiled. For this, we need a separate project to reference our generator.
Let’s create a console application for this:
dotnet new console --framework "net7.0" -o SourceGeneratorInCSharp
dotnet sln add SourceGeneratorInCSharp
In the SourceGeneratorInCSharp.csproj we need to change the content:
<Project Sdk="Microsoft.NET.Sdk">
    <PropertyGroup>
        <OutputType>Exe</OutputType>
        <TargetFramework>net7.0</TargetFramework>
        <LangVersion>latest</LangVersion>
        <ImplicitUsings>enable</ImplicitUsings>
        <Nullable>enable</Nullable>
    </PropertyGroup>

    <ItemGroup>
        <ProjectReference Include="..\Generator\Generator.csproj"
            OutputItemType="Analyzer"
            ReferenceOutputAssembly="false"/>
    </ItemGroup>
</Project>
So far, everything we’ve done has been pretty much standard stuff, so let’s get into the code.
Implementing a Simple Generator
A source generator has two defining characteristics, implementing the IIncrementalGenerator interface and decorating with the [Generator] attribute, which makes a project consider a class as a source generator:
[Generator]
public sealed class ExampleGenerator : IIncrementalGenerator
{
    public void Initialize(IncrementalGeneratorInitializationContext context)
    {
    }
}
The generator only requires the implementation of a single method, Initialize. In this method, we can register our static source code as well as create a pipeline to identify the syntax of interest and transform this syntax into source code.
Also, we are using the IIncrementalGenerator interface instead of ISourceGenerator because it is way more performant, and with the ISourceGenerator interface, a new ISyntaxReceiver is created for every generation, which creates a lot of generation phases. With bigger projects, this can quickly lead to performance issues. The IIncrementalGenerator was optimized to provide better performance for our applications.
Now, let’s implement a generator that will output a simple source code:
[Generator]
public sealed class ExampleGenerator : IIncrementalGenerator
{
    public void Initialize(IncrementalGeneratorInitializationContext context)
    {
        context.RegisterPostInitializationOutput(ctx =>
        {
            var sourceText = $$"""
                namespace SourceGeneratorInCSharp
                {
                    public static class HelloWorld
                    {
                        public static void SayHello()
                        {
                            Console.WriteLine("Hello From Generator");
                        }
                    }
                }
                """;

            ctx.AddSource("ExampleGenerator.g", SourceText.From(sourceText, Encoding.UTF8));
        });
    }
}
In the example, we use a string literal to represent the code we want to emit.
The RegisterPostInitializationOutput only allows us to add fixed source code, as we don’t have any access to the user code at this point.
To emit the files, we utilize the AddSource() method, which requires two parameters. The first parameter serves as a distinct identifier for the emitted source, while the second parameter represents the actual source text. This text is obtained from our hard-coded string and includes the corresponding encoding information.
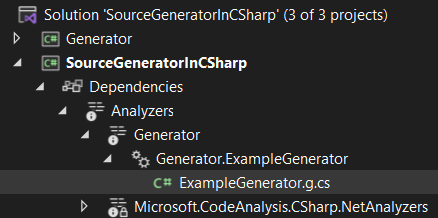
After we build, if everything is set up properly, we can see the generated code file under the analyzer in the Console project solution explorer:
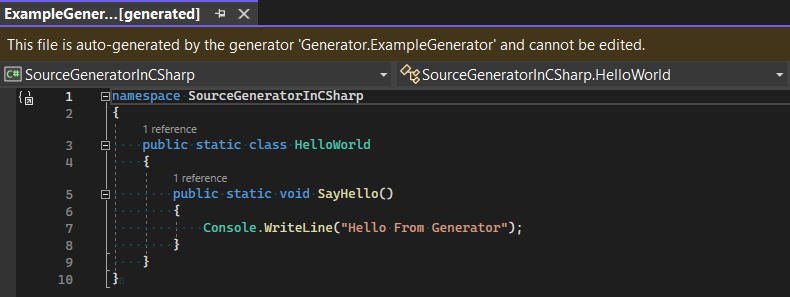
If we double-click the ExampleGenerator.g.cs we can see the output code, including warnings from Visual Studio that this file isn’t editable:
Implementing a More Complex Generator
Now that we’ve seen how a generator works through a simple example, let’s tackle something different. Before we build a more complex generator, let’s consider a scenario for our practice.
For many corporate applications, we have a series of architectural patterns that are followed, such as the use of entities, repositories, services, and controllers, most of which have the same implementation. This tends to be a very manual and time-consuming task. The code we need to write to create the entire structure tends to be repetitive and error-prone.
Using C# source code generators to generate some of these parts can save us a lot of time. So let’s implement the service class as an example.
Adding a Marker Attribute
We need to think about how we are going to choose which models we are going to generate service classes for. We can do this for all models in the project, but that would cause services to be generated even for the models we don’t need. For that, we can use a marker attribute. A marker attribute is a simple attribute that has no functionality and exists only to be located.
We’re going to create a simple marker attribute, but we’re not going to define this attribute directly in the code. Instead, we will create a string containing C# code for the [GenerateService] attribute. We will have the generator automatically add this to the build of the consuming project and the attribute will be available at runtime. It is necessary to do this because when referencing our Generator project we set the ReferenceOutputAssembly to false.
If ReferenceOutputAssembly is set to false, the output of the referenced project is not included as a Reference of this project, but it is still guaranteed that the other project builds before this one.
Let’s create the attribute:
public class SourceGenerationHelper
{
    public const string Attribute = """
        namespace Generator
        {
            [System.AttributeUsage(System.AttributeTargets.Class)]
            public class GenerateServiceAttribute : System.Attribute
            {
            }
        }
        """;
}
Creating the Source Generator
As mentioned earlier, our starting point is a class that implements the IIncrementalGenerator interface and is decorated with the [Generator] attribute:
[Generator]
public sealed class ServiceGenerator : IIncrementalGenerator
{
    public void Initialize(IncrementalGeneratorInitializationContext context)
    {
        context.RegisterPostInitializationOutput(ctx => ctx.AddSource(
            "GenerateServiceAttribute.g.cs",
            SourceText.From(SourceGenerationHelper.Attribute, Encoding.UTF8)));
    }
}
In the implementation, we used the RegisterPostInitializationOutput method, which allows us to register a callback that will be called once. It’s useful for efficiently adding “constant” fonts to the build, like our marker attribute. Now we have the attribute available for use in our SourceGeneratorInCSharp project.
Development of the Generator Pipeline
Now we need to create a pipeline for filtering and transforming, which by design memorizes the results in each layer to avoid redoing the work if there are no changes:
[Generator]
public sealed class ServiceGenerator : IIncrementalGenerator
{
    public void Initialize(IncrementalGeneratorInitializationContext context)
    {
        context.RegisterPostInitializationOutput(ctx => ctx.AddSource(
            "GenerateServiceAttribute.g.cs",
            SourceText.From(SourceGenerationHelper.Attribute, Encoding.UTF8)));

        IncrementalValuesProvider<ClassDeclarationSyntax> enumDeclarations = context.SyntaxProvider
            .CreateSyntaxProvider(
                predicate: static (s, _) => IsSyntaxTargetForGeneration(s),
                transform: static (ctx, _) => GetTargetForGeneration(ctx));

        IncrementalValueProvider<(Compilation, ImmutableArray<ClassDeclarationSyntax>)> compilationAndEnums
                = context.CompilationProvider.Combine(enumDeclarations.Collect());

        context.RegisterSourceOutput(compilationAndEnums,
            (spc, source) => Execute(source.Item1, source.Item2, spc));
        }
}
In the first stage of the pipeline, we use the CreateSyntaxProvider method to filter the input list. The predicate, IsSyntaxTargetForGeneration, provides a first layer of filtering. The transform, GetTargetForGeneration, is used just to transform the result of the first filtering.
The next pipeline stage simply combines our collection of ClassDeclarationSyntax issued in the first stage with the current compilation.
With that, we generate the source code using the custom Execute method.
Implementing the Stages
The IsSyntaxTargetForGeneration predicate is a method that will be called very often to check if the given SyntaxNode is relevant to our generator.
Syntax nodes are one of the main elements of syntax trees. These nodes represent declarations, statements, clauses, and expressions. Each category of syntax nodes is represented by a separate class derived from Microsoft.CodeAnalysis.SyntaxNode:
public static bool IsSyntaxTargetForGeneration(SyntaxNode syntaxNode)
{
    return syntaxNode is ClassDeclarationSyntax classDeclarationSyntax &&
        classDeclarationSyntax.AttributeLists.Count > 0 &&
        classDeclarationSyntax.AttributeLists
            .Any(al => al.Attributes
                .Any(a => a.Name.ToString() == "GenerateService"));
}
In our implementation, we check if the syntaxNode object is an instance of the ClassDeclarationSyntax class and that it has an attribute with the name "GenerateService".
In the transformation stage, we must extract and return a syntax node of type ClassDeclarationSyntax from the given context:
public static ClassDeclarationSyntax GetTargetForGeneration(GeneratorSyntaxContext context)
{
    var classDeclarationSyntax = (ClassDeclarationSyntax)context.Node;

    return classDeclarationSyntax;
}
Working With Templates
Before starting work on the Execute method, let’s create a template to use for code generation. A simple string builder would suffice, however, we can use a template engine. At this point, we can use the Scriban template engine.
Scriban, which is a swift, robust, secure, and lightweight scripting language and engine designed for .NET. By adopting this approach, we can store the templates in individual files, thereby maintaining a well-organized solution.
To use this template tool we need to install some packages. Let’s inspect the content of the Generator.csproj file:
<Project Sdk="Microsoft.NET.Sdk">
    <ItemGroup>
        <PackageReference Include="Microsoft.CodeAnalysis.CSharp.Workspaces"
            Version="4.6.0"
            PrivateAssets="all" />
        <PackageReference Include="Microsoft.CSharp" Version="4.7.0" />
        <PackageReference Include="Scriban" Version="5.7.0" IncludeAssets="Build"/>
        <PackageReference Include="System.Threading.Tasks.Extensions" Version="4.5.4" />
    </ItemGroup>
</Project>
Now, let’s create a file named Services.scriban inside the Templates folder, with the content:
using {{class_namespace}};

namespace {{class_assembly}}.Services
{
    public partial class {{class_name}}Service
    {
        private static readonly List<{{class_name}}> _list = new();

        public virtual List<{{class_name}}> All()
        {
            return _list;
        }

        public virtual void Add({{class_name}} item)
        {
            _list.Add(item);
        }

        public virtual void Update({{class_name}} item)
        {
            var existing = _list.Single(x => x.Id == item.Id);

            _list.Remove(existing);
            _list.Add(item);
        }

        public virtual void Delete(int id)
        {
            var existing = _list.Single(x => x.Id == id);

            _list.Remove(existing);
        }
    }
}
Now, we need to mark the file as an embedded resource in Generator.csproj file:
<ItemGroup>
    <None Remove="Templates\**\*.scriban" />
    <EmbeddedResource Include="Templates\**\*.scriban" />
</ItemGroup>
Development of Source Generators
After doing that, we can go back to our Execute method in ServiceGenerator and implement it:
public void Execute(Compilation compilation,
    ImmutableArray<ClassDeclarationSyntax> classes,
    SourceProductionContext context)
{
    foreach (var classSyntax in classes)
    {
        // Converting the class to a semantic model to access much more meaningful data.
        var model = compilation.GetSemanticModel(classSyntax.SyntaxTree);

        // Parse to declared symbol, so you can access each part of code separately,
        // such as interfaces, methods, members, contructor parameters etc.
        var symbol = model.GetDeclaredSymbol(classSyntax);

        var className = symbol.Name;

        if (!className.Contains("Model"))
        {
            var error = Diagnostic.Create(DiagnosticsDescriptors.ClassWithWrongNameMessage,
                classSyntax.Identifier.GetLocation(),
                className);

            context.ReportDiagnostic(error);

            return;
        }

        var classNamespace = symbol.ContainingNamespace?.ToDisplayString();

        var classAssembly = symbol.ContainingAssembly?.Name;

        // Get the template string
        var text = GetEmbededResource("Generator.Templates.Service.scriban");

        var template = Template.Parse(text);

        var sourceCode = template.Render(new {
            ClassName = className,
            ClassNamespace = classNamespace,
            ClassAssembly = classAssembly
        });

        context.AddSource(
            $"{className}{"Service"}.g.cs",
            SourceText.From(sourceCode, Encoding.UTF8)
        );
    }
}
Inside the loop, we convert the class syntax node to a semantic model using the Compilation.GetSemanticModel method. The semantic model provides more detailed information about the code, allowing access to meaningful data such as interfaces, methods, members, and constructor parameters.
After we use the model.GetDeclaredSymbol method to obtain the symbol for the class. A symbol represents a declared code element and provides information about its properties, including its name, containing namespace, and containing assembly.
The GetEmbededResource method was called to retrieve the template string from an embedded resource.
We use the Template.Parser method to prepare our template for rendering and through the Render method we get our generated source code.
Finally, the generated source code is added to the compilation using context.AddSource. The method takes a name for the generated file (constructed from the class name) and the source code is represented as SourceText.
Debugging Source Generators
When developing source generators, we often need to debug the generators themselves. Since these generators run during the build process, we can’t debug them like casual C# projects, so we have to debug them some other way. If we want to attach our debugger to the compiler, the generator will run so fast that we won’t have enough time for that. Then we can use another trick, we can just wait until the debugger is attached.
At the beginning of the methods, add code to launch the debugger:
public void Execute(Compilation compilation,
    ImmutableArray<ClassDeclarationSyntax> classes,
    SourceProductionContext context)
{
    Debugger.Launch();
    ...
}
Emitting Diagnostic Messages
Sometimes we may want to provide some diagnostic feedback to the developer to let them know when things aren’t going as expected. The context provided in the Execute method provides the context.ReportDiagnostic method, used to log diagnostic messages.
A diagnostic entity requires a message, message type, title, diagnostic code, and help link. The location is optional to identify the exact location of the problem in the source code, and we can pass optional arguments for the descriptor.
To keep things clean, we can store diagnostic descriptors in a separate static class:
public static class DiagnosticsDescriptors
{
    public static readonly DiagnosticDescriptor ClassWithWrongNameMessage
        = new("ERR001",                                        // id
            "Worng name",                                      // title
            "The class '{0}' must be contains 'Model' prefix", // message
            "Generator",                                       // category
            DiagnosticSeverity.Error,
            true);
}
To report a diagnostic message we just call ReportDiagnostic method:
public void Execute(Compilation compilation,
    ImmutableArray<ClassDeclarationSyntax> classes,
    SourceProductionContext context)
{
    ...
    if (!className.Contains("Model"))
    {
        var error = Diagnostic.Create(DiagnosticsDescriptors.ClassWithWrongNameMessage,
            classSyntax.Identifier.GetLocation(),
            className);

        context.ReportDiagnostic(error);

        return;
    }
}
Executing Source Generators
We’re done with the Generator project, so now let’s get it working.
There is still no content in our Analyzers because we don’t use the [GenerateService] attribute, so we can’t generate any code. Let’s start by creating a new model with our attribute, called PersonModel:
[GenerateService]
public class PersonModel
{
    public int Id { get; set; }

    public string? Name { get; set; }
}
The project needs to be built and upon completion, we will see the generated code in the Solution Explorer analyzer:
using SourceGeneratorInCSharp.Models;

namespace SourceGeneratorInCSharp.Services
{
    public partial class PersonModelService
    {
        private static readonly List<PersonModel> _list = new();

        public virtual List<PersonModel> All()
        {
            return _list;
        }

        public virtual void Add(PersonModel item)
        {
            _list.Add(item);
        }

        public virtual void Update(PersonModel item)
        {
            var existing = _list.Single(x => x.Id == item.Id);

            _list.Remove(existing);
            _list.Add(item);
        }

        public virtual void Delete(int id)
        {
            var existing = _list.Single(x => x.Id == id);

            _list.Remove(existing);
        }
    }
}
With the PersonModelService generated, let’s use:
namespace SourceGeneratorInCSharp
{
    using Services;

    public class Program
    {
        public static void Main(string[] args)
        {
            var personModelService = new PersonModelService();

            personModelService.Add(new() { Id = 1, Name = "Mathew" });
            personModelService.All().ForEach(x => Console.WriteLine(x.Name));
        }
    }
}
Testing Source Generators
Testing is a very important part of every developer process and as you might expect, writing code generators is no exception.
Let’s create a MsTest project and add it to the current solution:
dotnet new mstest -o Tests
dotnet sln add SourceGeneratorInCSharp
Before creating the test, we need to create a helper method that uses a Roslyn resource to perform the code compilation and return the generated output:
public static class Helper
{
    public static string GetGeneratedOutput(string sourceCode)
    {
        var syntaxTree = CSharpSyntaxTree.ParseText(sourceCode);

        var references = AppDomain.CurrentDomain.GetAssemblies()
            .Where(assembly => !assembly.IsDynamic)
            .Select(assembly => MetadataReference.CreateFromFile(assembly.Location))
            .Cast<MetadataReference>();

        var compilation = CSharpCompilation.Create("SourceGeneratorTests",
            new[] { syntaxTree },
            references,
            new CSharpCompilationOptions(OutputKind.DynamicallyLinkedLibrary));

        // Source Generator to test
        var generator = new ServiceGenerator();

        CSharpGeneratorDriver.Create(generator)
            .RunGeneratorsAndUpdateCompilation(compilation,
                out var outputCompilation,
                out var diagnostics
            );

        return outputCompilation.SyntaxTrees.Skip(1).LastOrDefault()?.ToString();
    }
}
After that, we can create the test:
[TestClass]
public class SourceGeneratorsUnitTest
{
    [TestMethod]
    public void WhenGeneratePersonModelService_ThenReturnCorrectOutput()
    {
        var input = """
            using Generator.Attributes;

            namespace SourceGeneratorInCSharp.Models
            {
                [GenerateService]
                public class PersonModel
                {
                    public int Id { get; set; }

                    public string? Name { get; set; }
                }
            }
            """;

        var expectedResult = """
            using SourceGeneratorInCSharp.Models;

            namespace SourceGeneratorTests.Services
            {
                public partial class PersonModelService
                {
                    private static readonly List<PersonModel> _list = new();

                    public virtual List<PersonModel> All()
                    {
                        return _list;
                    }

                    public virtual void Add(PersonModel item)
                    {
                        _list.Add(item);
                    }

                    public virtual void Update(PersonModel item)
                    {
                        var existing = _list.Single(x => x.Id == item.Id);

                        _list.Remove(existing);
                        _list.Add(item);
                    }

                    public virtual void Delete(int id)
                    {
                        var existing = _list.Single(x => x.Id == id);

                        _list.Remove(existing);
                    }
                }
            }
            """;

        var output = Helper.GetGeneratedOutput(input);

        Assert.AreEqual(expectedResult, output);
    }
}
After all of this, we can go ahead and explain some additional points.
Generating Using SyntaxFactory
Another approach to generating source code is using SyntaxFactory. It is located at Microsoft.CodeAnalysis.CSharp, and provides a comprehensive set of methods for creating syntax nodes and tokens, giving developers the means to programmatically generate C# code.
We can rewrite the first example:
[Generator]
public sealed class ExampleGeneratorSyntaxFactory : IIncrementalGenerator
{
    public void Initialize(IncrementalGeneratorInitializationContext context)
    {
        context.RegisterPostInitializationOutput(ctx =>
        {
            var classBlock = SyntaxFactory.NamespaceDeclaration(SyntaxFactory.ParseName("SourceGeneratorInCSharp"))
                .AddMembers(
                    SyntaxFactory.ClassDeclaration("SyntaxFactoryHelloWorld")
                    .AddModifiers(
                        SyntaxFactory.Token(SyntaxKind.PublicKeyword),
                        SyntaxFactory.Token(SyntaxKind.StaticKeyword)
                    )
                    .AddMembers(
                        SyntaxFactory.MethodDeclaration(
                            SyntaxFactory.ParseTypeName("void"),
                            "SayHello"
                        )
                        .AddModifiers(
                            SyntaxFactory.Token(SyntaxKind.PublicKeyword),
                            SyntaxFactory.Token(SyntaxKind.StaticKeyword)
                        )
                        .AddBodyStatements(
                            SyntaxFactory.ExpressionStatement(
                                SyntaxFactory.InvocationExpression(
                                    SyntaxFactory.MemberAccessExpression(
                                        SyntaxKind.SimpleMemberAccessExpression,
                                        SyntaxFactory.IdentifierName("Console"),
                                        SyntaxFactory.IdentifierName("WriteLine")
                                    ))
                                    .WithArgumentList(
                                        SyntaxFactory.ArgumentList()
                                            .AddArguments(
                                                SyntaxFactory.Argument(
                                                    SyntaxFactory.LiteralExpression(
                                                        SyntaxKind.StringLiteralExpression,
                                                        SyntaxFactory.Literal("Hello From Generator")
                                                    )
                                                )
                                            )
                                    )
                            )
                        )
                    )
                ).NormalizeWhitespace();

            ctx.AddSource("ExampleGeneratorSyntaxFactory.g",
                SourceText.From(classBlock.ToFullString(), Encoding.UTF8));
        });
    }
}
As we can see, a lot of methods need to be used to generate even a simple scenario and we can’t immediately see what the code will look like, without checking the results of the generation.
Emitting Compiler Generated files
By default, source generators do not produce artifacts directly. Instead, they generate additional source code during the compilation process, which is compiled along with the rest of the project source code, thus only being viewable through an IDE. This can be a problem, since for this type of file, we can’t do a code review.
To enable persisting source generator files to the file system, we can set the EmitCompilerGeneratedFiles property in our Console project file:
<PropertyGroup>
    <EmitCompilerGeneratedFiles>true</EmitCompilerGeneratedFiles>
</PropertyGroup>
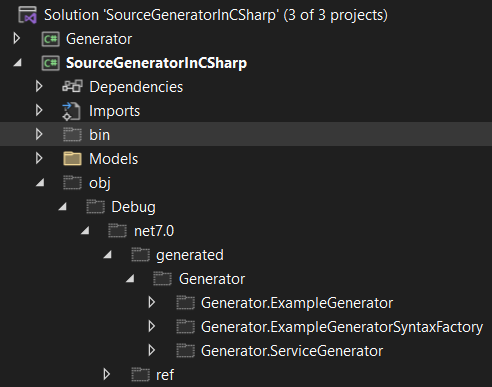
By setting the property alone, the compiler will save the generated files to the disk. And then, we can see that the source-generated files are written to the obj folder:
This can be a problem as the bin and obj folders are normally excluded from source control. We can specify the CompilerGeneratedFilesOutputPath property to determine the location of the compiler-emitted files. This property allows us to set a custom path relative to the project root folder:
<PropertyGroup>
    <EmitCompilerGeneratedFiles>true</EmitCompilerGeneratedFiles>
    <CompilerGeneratedFilesOutputPath>Generated</CompilerGeneratedFilesOutputPath>
</PropertyGroup>
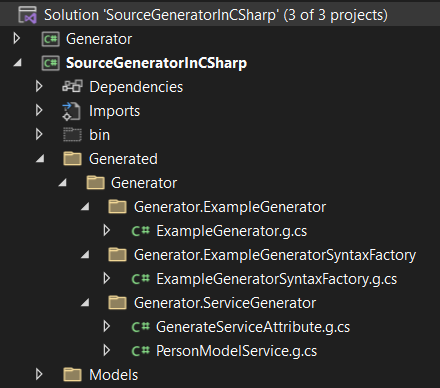
This will write the files to the Generated folder in the project:
Now, when we try to build for a second time after the files have already been written, we get an error:
Error CS0111 Type 'HelloWorld' already defines a member called 'SayHello' with the same parameter types
To resolve this issue, the solution is to remove the emitted files from the project compilation, by using a wildcard pattern to exclude all the .cs files in those folders:
<ItemGroup>
    <!-- Exclude the output of source generators from the compilation -->
    <Compile Remove="$(CompilerGeneratedFilesOutputPath)/**/*.cs" />
</ItemGroup>
With this modification, the output of the source generator is now stored on the disk. This ensures it can be included in source control for easy review during pull requests. Also, and most importantly, it no longer affects the compilation process.
Use Cases
Source generators can be used for some common use cases including:
- Dependency Injection: We can use source generators to automatically generate code for dependency injection containers, reducing the boilerplate code needed to set up dependencies. They can also suppress the use of IoC/DI containers.
- Data Access Layers: Source generators can help in generating data access, such as entity classes, and repositories based on models or database schema definitions.
- Builder pattern: Source generators can generate builder classes or fluent interfaces, allowing for more readable and expressive code when constructing complex objects.
- Code Analysis and Validation: Source generators can be used to analyze the code during compilation and enforce coding standards, ensuring that developers adhere to best practices and naming conventions.
- Automatic Tests Generation: Source generators can assist in automatically generating test cases or test data for unit testing. It saves time in writing repetitive test code.
- Code Annotations and Documentation: Source generators can create code annotations and inline documentation. This makes it easier for developers to understand and document the purpose and usage of various code elements.
We can access a list of implemented source generators in csharp-source-generators GitHub repository.
Conclusion
In this article, we describe the basic concepts regarding code generators. Furthermore, through a simple example, we implement an IIncrementalGenerator.
Using a more complex example, we can demonstrate how to filter objects by marker attributes, keeping performance in mind to ensure the generator’s consumers don’t suffer from IDE delays. It was also possible to implement feedback through diagnostic messages. Not least, we can see how it is possible to debug and test the generators.
Regarding the generation of artifacts, we can see that it is possible to add our source codes generated in the source control, thus enabling the code review.
Finally, we describe some use cases for code generators and provide a repository where we can find many of them.


