

In this article, we will take a look at ML.NET Model Builder for Visual Studio.
Following our introductory article on ML.NET, in this one, we will learn what it is and how to use it in our projects.
What Is ML.NET Model Builder?
ML.NET Model Builder tool is a graphical user interface (GUI) that enables us to build machine learning models without writing code.
Model Builder uses AutoML (a process that automates all the ML model development steps) and deep learning techniques to produce the optimal model from the provided data.
This allows us to focus on the data and the desired results while the Model Builder does all the heavy lifting required to develop the machine learning model.
Using ML.NET Model Builder in Our Projects
ML.NET Model Builder has been available since Visual Studio 2019.
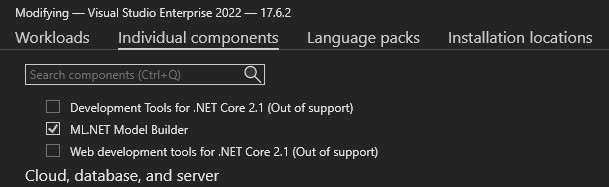
To verify Model Builder is installed, we need to open Visual Studio Installer, install or modify installation and make sure ML.NET Model Builder is selected under the Individual components tab:
Please note that we are using Visual Studio 2022, and all images and examples relate to Visual Studio 2022.
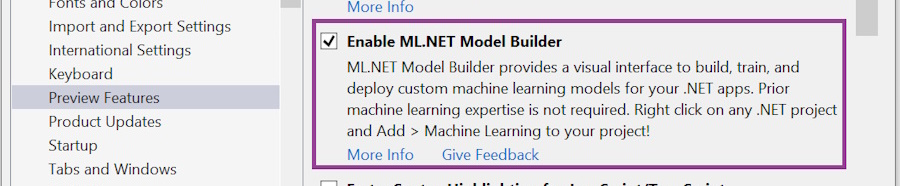
Some forms might differ from our examples if you are using Visual Studio 2019, in which ML.NET Model Builder was still in preview. As a result, it might need to be enabled in Visual Studio under Tools > Options > Preview Features:
Now that we have ML.NET Model Builder installed and enabled, we can use it in our project.
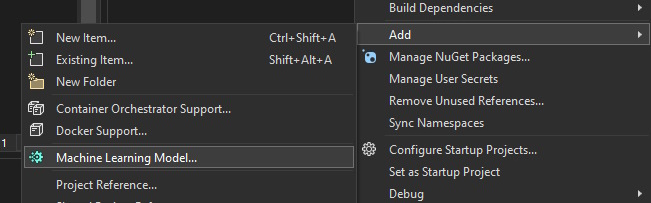
To add the ML model to the project, under Solution Explorer, right-click on the project name and select Add > Machine Learning Model:
ML.NET Model Builder steps
ML.NET Model Builder provides us with a simple wizard-like GUI with well-defined steps.
Scenario
The first step is the selection of the scenario that is best suited to our needs.
Currently, available scenario options are:
- Data classification – Predicts the category or class of a given input data point based on its characteristics or features
- Value prediction – Predicts a numeric value for a given input, such as predicting a house price based on its features or estimating sales revenue
- Recommendation – Generates personalized recommendations for users by predicting their preferences and suggesting items or content they may like
- Forecasting – Predicts future values or trends based on historical time-series data, allowing for predictions of stock prices, weather patterns, or sales trends
- Image classification – Classifies images into predefined categories or labels, enabling tasks like identifying objects, recognizing faces, or detecting image anomalies
- Object detection – Identifies and localizes multiple objects within an image, providing bounding boxes around each detected object
- Text classification – Assigns predefined categories or labels to text documents based on their content or context, enabling tasks like sentiment analysis, topic classification, or spam detection
- Sentence similarity – Measures the similarity or relatedness between two sentences or text fragments, allowing for tasks such as duplicate detection, semantic search, or question-answering systems
In our example, we want to categorize whether a credit submission is good or bad; therefore, we select the first scenario – Data Classification.
Environment
Depending on the selected scenario, there are different environment options:
- Local (CPU) – training a model on a local machine
- Local (GPU) – training a model on a local machine with GPU
- Azure – training a model in Azure ML workspace
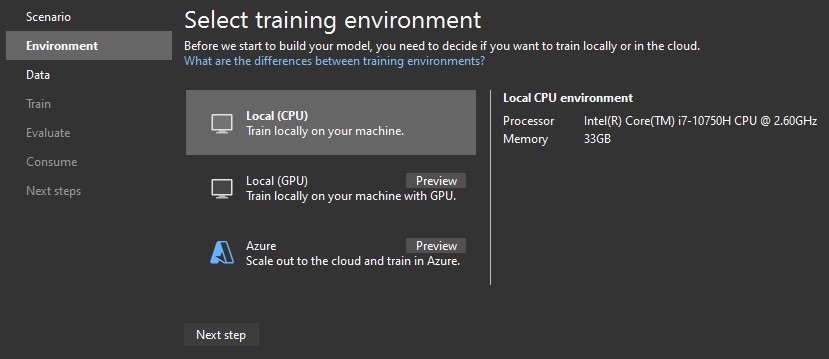
We have selected the Data classification task, so we proceed with the only available option – the Local (CPU).
Data
After that, we need to load our data. We will use the same Credit Risk Customers dataset available on Kaggle we used in our article on ML.NET.
At this point, it might be worth noticing that the quality of the data is essential for the quality of the model we will produce.
It is hard to find a better use for the term “garbage in – garbage out” than in this scenario. Therefore, we should apply data preprocessing techniques such as cleaning, normalization, and transformation to the data before loading the data to Model Builder.
So, to continue, let’s browse the local file system and load the CSV file. We will also select the column we want to predict. In our case, it is the class column:
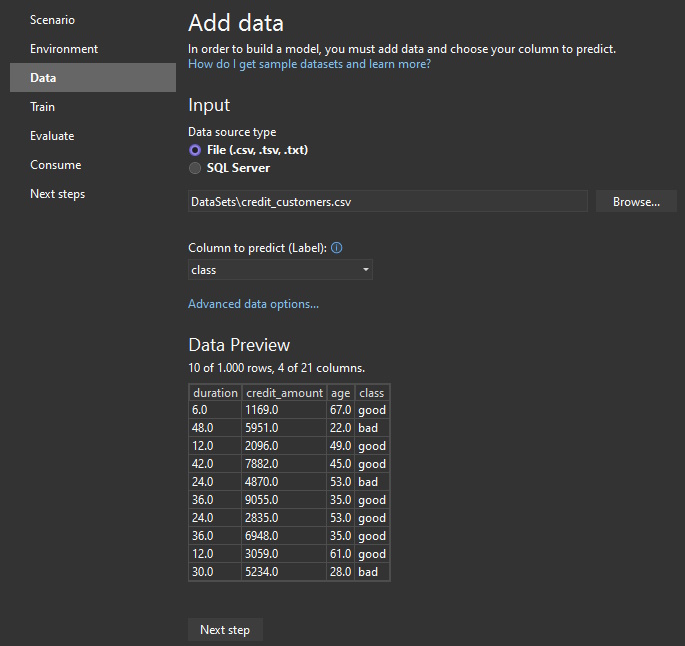
Next, let’s select Advanced data options and configure which columns we want to use.
To match the example from our previous article, we only select columns duration, credit_amount, and age. Others should be ignored:

Train
Now we need to train our model. Training the model is an automatic process in which Model Builder teaches our model how to respond to our scenario based on the provided data:
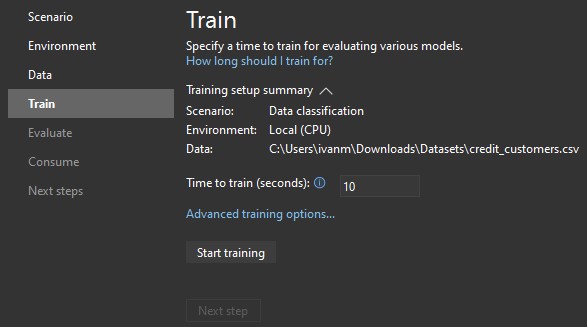
In the first place, we need to set the training period. A longer training period will allow AutoML to explore more models with more settings and consequently produce better results, but it might lead to model overfitting. Therefore we must be careful and find the optimal training period for our data.
As a rule of thumb, we can say:
- for dataset sizes up to 10 MB, the average training time is 10 seconds
- for dataset size 10 – 100 MB, the average training time is 10 minutes
- for dataset size 100 – 500 MB, the average training time is 30 minutes
- for dataset size 500 MB – 1 GB, the average training time is 60 minutes
- for dataset sizes greater than 1 GB, the average training time is 3+ hours
This parameter is also affected by:
- the number and type of features (columns)
- the ML task
- the test environment (CPU, disk, memory performance)
Additionally, we can set advanced options by clicking the Advanced training options option.
In the popup, under the Optimizing metric section, we select Log-Loss optimizing metric option.
And under the Trainers section, we select SDCA and L-BFGS trainers.
Now we can proceed with the training by clicking to Start training button.
When the training is done, we are presented with the Training results:
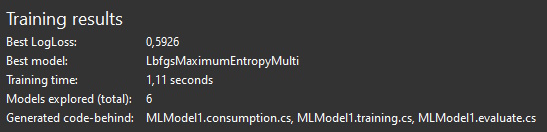
We can test different settings and algorithms, re-train our model if required, and once we are satisfied with the results, we can proceed to model evaluation.
Evaluate
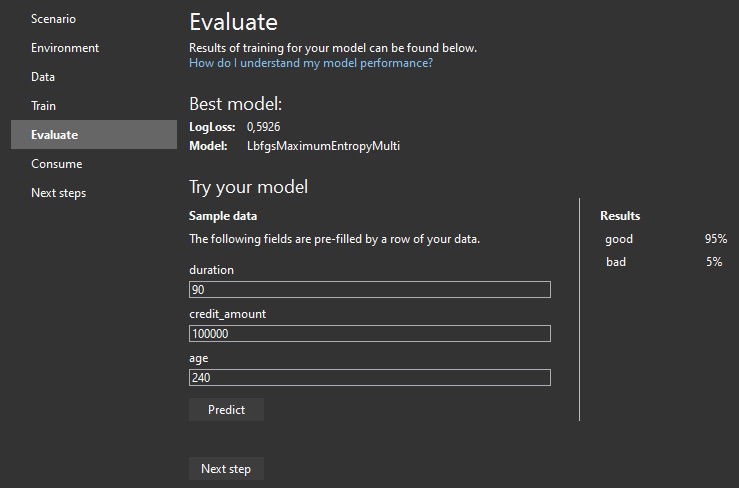
The evaluation process involves making predictions on new test data and assessing the results.
Model Builder provides us with a simple interface where we can enter input values (features) and see our model in action:
Depending on our ML task, we need to consider different evaluation metrics.
For value prediction tasks, the default metric is RSquared, with values ranging from 0 to 1. A higher RSquared value indicates better model performance. We can also use additional metrics like absolute loss, squared loss, and RMS loss for comparison.
In binary classification problems, the default metric is accuracy, representing the proportion of correct predictions. AUC (Area Under the Curve) is another important metric, with values above 0.50 indicating acceptable models. F1 score balances precision and recall.
In multi-class classification, the default metric is Micro Accuracy, which measures overall accuracy. Macro accuracy is also important, representing average team accuracy. Higher values indicate better performance.
Consume
Finally, we are ready to use our model in our applications.
In this step, Model Builder offers several easy ways to start using our model:
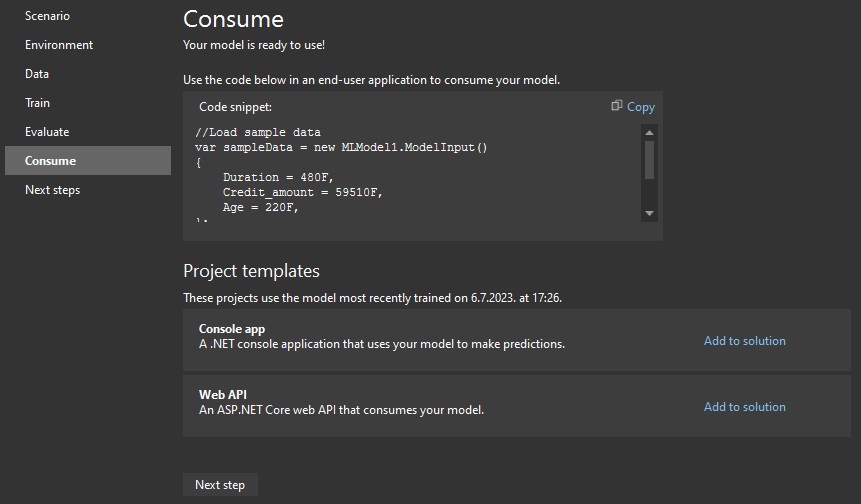
For example, let’s add a console application to our solution with a click on Add to solution in the Console app template suggestion:
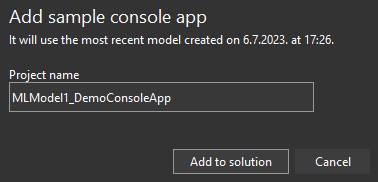
As a result, a new project is added to our solution with the sample code:
// This file was auto-generated by ML.NET Model Builder.
using MLModel1_DemoConsoleApp;

// Create single instance of sample data from first line of dataset for model input
var sampleData = new MLModel1.ModelInput()
{
    Duration = 480F,
    Credit_amount = 59510F,
    Age = 220F,
};

Console.WriteLine("Using model to make single prediction -- " +
    "Comparing actual Class with predicted Class from sample data...\n\n");
Console.WriteLine($"Duration: {480F}");
Console.WriteLine($"Credit_amount: {59510F}");
Console.WriteLine($"Age: {220F}");
Console.WriteLine($"Class: {@"bad"}");

var sortedScoresWithLabel = MLModel1.PredictAllLabels(sampleData);
Console.WriteLine($"{"Class",-40}{"Score",-20}");
Console.WriteLine($"{"-----",-40}{"-----",-20}");

foreach (var score in sortedScoresWithLabel)
    Console.WriteLine($"{score.Key,-40}{score.Value,-20}");

Console.WriteLine("=============== End of process, hit any key to finish ===============");
Console.ReadKey();
The provided code shows how easy it is to use our new ML model and gives us a good starting point for further development.
Conclusion
In this article, we explored ML.NET Model Builder for Visual Studio, a powerful tool for building machine learning models without writing a single line of manually written code.
Additionally, we learned about its capabilities, including scenario selection, training, evaluation, and model consumption.
The latest updates and plans for the ML.NET Model Builder can be found on the official GitHub page.
In conclusion, the ML.NET Model Builder is an invaluable tool for any developer looking to efficiently and effectively incorporate machine learning models into their applications.
