

In this article, we will explore how to create better-looking console applications with Spectre.Console. By default, console applications in .NET have a monochromatic user interface. However, with the Spectre.Console package, we can enhance their visual appeal by adding color and other exciting features.
Let’s dive in.
What Is Spectre.Console?
Spectre.Console is a .NET library created by Patrik Svensson, Phil Scott, and Nils Andresen. It is available as a NuGet package that allows us to build colorful and interactive console applications. With this library, we can render marked-up texts, tables, calendars, charts, progress bars, and FIGlets to the console. Additionally, we can prompt users for input and act on that input.
Preparation of Source Data
To begin our exploration of this library, let’s create a Student class:
public class Student
{
    public int Id { get; set; }
    public string? FirstName { get; set; }
    public string? LastName { get; set; }
    public int Age { get; set; }
    public string? Hostel { get; set; }
}
Next, let’s define a StudentsGenerator class:
public static class StudentsGenerator
{
    public static string[] Hostels { get; }
        = ["Lincoln", "Louisa", "Laurent", "George", "Kennedy"];

    public static List<Student> GenerateStudents() => new()
    {
        new Student{Id=1, FirstName="Julie", LastName="Matthew", Age=19, Hostel=Hostels[0]},
        new Student{Id=2, FirstName="Michael", LastName="Taylor", Age=23, Hostel=Hostels[3]},
        new Student{Id=3, FirstName="Joe", LastName="Hardy", Age=27, Hostel=Hostels[2]},
        new Student{Id=4, FirstName="Sabrina", LastName="Azulon", Age=18, Hostel=Hostels[3]},
        new Student{Id=5, FirstName="Hunter", LastName="Cyril", Age=19, Hostel=Hostels[4]},
    };
}
Here, we start by defining an array of student hostels. Then, we use this array in the GenerateStudents() method to create instances of our Student class.
This method returns a list of Student objects that we will use to showcase the various ways we can use the Spectre.Console library to enhance the appearance of our console outputs.
Spectre.Console Basic Usages
The Spectre.Console library offers functionalities that we can use to perform basic tasks such as modifying the color of our console output, formatting texts and JSON, editing text styles, and displaying a properly formatted calendar.
Styling Console Output
To display rich text on the console, we should use the Markup class, which has a specific syntax:
[Style Color]<OurText>[/]
Here, Style is the style we want the text to be in, italic or bold, etc and Color is the color of the text. And finally, we should replace <OurText> with the text we want to markup:
public static void SetTextColor()
{
    AnsiConsole.Markup($"[bold blue]Hello[/] [italic green]{_students[1].FirstName}[/]!");
    AnsiConsole.Write(new Markup($"[underline #800080]{_students[2].FirstName}[/]"));
    AnsiConsole.MarkupLine($"[rgb(128,0,0)]{_students[3].FirstName}[/]");
}
In the first line, we use the Markup() method to display the string on the console. This is the primary method for rendering a marked-up string in the Spectre.Console library. The markup includes a greeting to the second student in our list.
Here, we make the Hello text bold and blue and the first name green and in italics.
The second line uses the Write() method of the AnsiConsole class to render a new instance of the Markup class on the console. This method is used for displaying IRenderable objects. In this case, we specify that our text should be underlined, and we use hex color codes to specify its color.
Finally, in the last line, we use the MarkupLine() method to render our string on the console with the current line terminator. We set the color using the RGB color code.
Moreso, we can also change the background color of a text:
public static void SetBackgroundColor()
{
    AnsiConsole.MarkupLine($"[red on yellow] Hello, {_students[4].LastName}![/]");
}
In the square bracket, we specify that the console should display the student’s name as a red text on a yellow background.
Since the square brackets [] are part of Spectre.Console syntax, we should escape them if we want them to be treated as text instead:
public static void EscapeFormatCharacters()
{
    AnsiConsole.Markup($"[[{_students[3].FirstName}]]");
    AnsiConsole.MarkupLine($"[blue][[{_students[3].Hostel}]][/]");
    AnsiConsole.MarkupLine($"[{_students[3].Age}]".EscapeMarkup());
}
By using double square brackets [[{_students[3].Hostel}]], we instruct the console to escape the square brackets and prevent their interpretation as markup. In the second line, we set the third student’s hostel color to blue with a single set of square brackets.
In the last line, we make use of the EscapeMarkup() method to escape the square brackets.
This feature comes in handy when we have to display the syntax characters as part of the text on the console.
Rendering JSON in a Console Application
Moving on, let’s explore how we can display properly formatted JSON on our console.
To do this, we need to convert our Student instances to a JSON string.
First, in our StudentsGenerator class, let’s create a JsonSerializerOptions instance:
private static readonly JsonSerializerOptions _writeOptions = new()
{
    WriteIndented = true
};
With that, let’s define a ConvertStudentsToJson() method:
public static string ConvertStudentsToJson(List<Student> students)
{
    return JsonSerializer.Serialize(students, _writeOptions);
}
In this method, we use the System.Text.Json library to change our Student instances into a JSON string.
Next, let’s install the Spectre.Console.Json NuGet package:
dotnet add package Spectre.Console.Json
After that, let’s use this package to beautify our JSON:
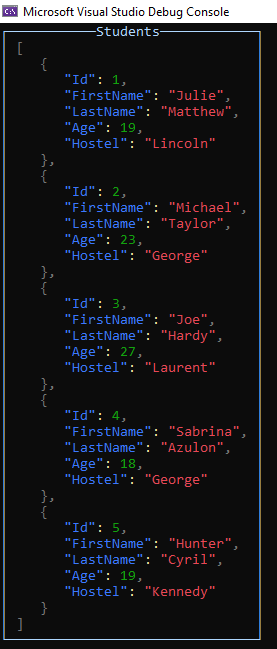
public static Panel BeautifyStudentsDataJson()
{
    var json = new JsonText(StudentsGenerator.ConvertStudentsToJson(_students));
    var panel = new Panel(json)
            .Header("Students")
            .HeaderAlignment(Justify.Center)
            .SquareBorder()
            .Collapse()
            .BorderColor(Color.LightSkyBlue1);

    AnsiConsole.Write(panel);

    return panel;
}
First, we initialize a new instance of the JsonText class. Then, we create a new panel with Students as the header.
We center-align the header, and we specify that our panel should have LightSkyBlue1 square borders. Additionally, we invoke the Collapse() method to ensure that the panel doesn’t expand to fill the available area but takes up as little space as possible.
Now, let’s call this method and inspect the result on the console:
Rendering Calendars to the Console
Next up, let’s see how we can nicely format calendars, and display them on the console:
public static Calendar PrettyPrintCalendar()
{
    var calendar = new Calendar(2023, 11)
        .AddCalendarEvent(2023, 11, 19)
        .HighlightStyle(Style.Parse("magenta bold"))
        .HeaderStyle(Style.Parse("purple"));

    AnsiConsole.Write(calendar);

    return calendar;
}
Here, we create a new Calendar object, specifying the year and the month.
Then, we add an event to the calendar. Next, we customize its appearance using the HighlightStyle() method with a Style instance.
To set the style for this event, we call the Style.Parse() method, which converts the string representation of a style into a Style object. Alternatively, we can specify the style directly by creating an instance of the Style class using the new keyword.
Next, we employ Style.Parse() again to set our calendar’s header style to purple. After that, we invoke the Write() method to display the calendar on the console, and finally, we return the calendar.
Other Features of Spectre.Console
Now that we’ve covered some basic formatting, JSON handling, and calendar pretty-printing, let’s explore other interesting applications of this library.
Creating and Rendering Spectre.Console Tables
Let’s explore how to create a table to display the details of students in our database with the Spectre.Console package:
public static Table CreateStudentTable()
{
    var table = new Table
    {
        Title = new TableTitle("STUDENTS", "bold green")
    };

    table.AddColumns("[yellow]Id[/]", $"[{Color.Olive}]FirstName[/]", "[Fuchsia]Age[/]");

    foreach (var student in _students)
    {
        table.AddRow(student.Id.ToString(), $"[red]{student.FirstName}[/]", $"[cyan]{student.Age}[/]");
    }

    AnsiConsole.Write(table);

    return table;
}
First, we initialize an instance of the Table class, where we specify that the title should be STUDENTS, and we set the style to bold green. Then, we add three columns: Id, FirstName, and Age, each with different styles.
Next, we iterate through our list of students, adding each student’s data to the table using the AddRow() method and providing their details as arguments.
With that, we call the Write() method to render this table on the console.
We should note that when we create a table with Spectre.Console, all the columns automatically adjust to fit the data within them.
Creating More Readable Exception Messages
Another feature of Spectre.Console is the ability to pretty-print exception messages for better readability:
public static void WriteReadableException()
{
    try
    {
        File.OpenRead("nofile.txt");
    }
    catch (FileNotFoundException ex)
    {
        AnsiConsole.WriteException(ex,
        ExceptionFormats.ShortenPaths |
        ExceptionFormats.ShortenMethods);

    }
}
To raise the FileNotFoundException, we attempt to open a non-existent file within the try block.
Then, inside the catch block, we call the WriteException() method to format and display the exception message on the console. We provide the ExceptionFormats.ShortenPaths | ExceptionFormats.ShortenMethods argument to this method, which shortens the paths and method names to enhance the message’s clarity.
It is important to note that in real-life scenarios, it is not advisable to use the AnsiConsole class for writing exception messages to the console. Instead, we should leverage the ILogger interface, which enables us to log exceptions to multiple destinations, and not just the console.
Prompting Users in a Console Application
Amazingly, we can also request user input from the console in an interactive way using Spectre.Console. First, let’s create a GetAgeTextPrompt() method:
public static TextPrompt<int> GetAgeTextPrompt()
{
    return new TextPrompt<int>("[green]How old are you[/]?")
            .PromptStyle("green")
            .ValidationErrorMessage("[red]That's not a valid age[/]")
            .Validate(age =>
            {
                return age switch
                {
                    <= 10 => ValidationResult.Error("[red]You must be above 10 years[/]"),
                    >= 123 => ValidationResult.Error("[red]You must be younger than that[/]"),
                    _ => ValidationResult.Success(),
                };

            });
}
In this method, we create a new TextPrompt instance and set its style to green. To ensure the age our user enters is valid and falls within an acceptable range, we implement validation logic using the Validate() method. Also, if the user enters an invalid value, we display a validation error message.
Next, let’s define a method to get a student’s hostel choice:
public static SelectionPrompt<string> GetHostelSelectionPrompt()
{
    var hostels = StudentsGenerator.Hostels;

    return new SelectionPrompt<string>()
             .Title("Choose a hostel")
             .AddChoices(hostels);
}
Here, we retrieve the names of all the available hostels. Then, we define a SelectionPrompt object and set its title. We then pass in our string array of hostels as choices that the student can select from using the AddChoices() method.
With that, let’s create our main method for prompting students:
public static Student PromptStudent()
{
    var student = new Student
    {
        FirstName = AnsiConsole.Ask<string>("[green]What's your First Name[/]?"),
        LastName = AnsiConsole.Ask<string>("[green]What's your Last Name[/]?"),

        Age = AnsiConsole.Prompt(GetAgeTextPrompt()),

        Hostel = AnsiConsole.Prompt(GetHostelSelectionPrompt())
    };

    AnsiConsole.MarkupLine($"Alright [yellow]{student.FirstName} {student.LastName}[/], welcome!");

    return student;
}
In this PromptStudent() method, we create a student object using the data obtained from interactive prompts.
In the first two lines, we collect the student’s first name and last name by invoking the Ask() method, which displays prompts to the user and captures their input.
Next, we obtain the student’s age by using the Prompt() method with the GetAgeTextPrompt(). For the hostel selection, we call the Prompt() method again, passing in the GetHostelSelectionPrompt() method as an argument.
After the student selects a hostel, we use the MarkupLine() method to display a registration confirmation message.
Visualizing Data With Spectre.Console BarChart
We can also create awesome charts on the console to visually represent our data:
public static BarChart CreateHostelBarChart()
{
    var barChart = new BarChart()
    .Width(60)
    .Label("[orange1 bold underline]Number of Students per Hostel[/]")
    .CenterLabel();

    var hostels = StudentsGenerator.Hostels;
    var colors = new List<Color> { Color.Red, Color.Fuchsia, Color.Blue, Color.Yellow, Color.Magenta1 };

    for (int i = 0; i < hostels.Length; i++)
    {
        var hostel = hostels[i];
        var color = colors[i];
        var count = _students.Count(s => s.Hostel == hostel);
        barChart.AddItem(hostel, count, color);
    }

    AnsiConsole.Write(barChart);

    return barChart;
}
Here, we start by defining a BarChart object. We use method chaining to set its width, label, and center the label.
Following that, we retrieve a list of all the hostel names from the StudentsGenerator.Hostels property. Subsequently, we define a list of colors that we will use for the bars in our bar chart.
Next, we use a for loop to iterate through the hostels array. During each iteration, we store the hostel’s name, assign a specific color, and count the number of students in that hostel. For each hostel, we use the AddItem() method to add the hostel’s details to our BarChart.
At the end, we render the bar chart on the console and return it.
Displaying Progress With Spectre.Console
With the Progress type of the AnsiConsole class, we can monitor the progress of a particular task.
To do this, first, let’s define a StreamStudentsFromDatabase() method in our StudentsGenerator class:
public static IEnumerable<Student> StreamStudentsFromDatabase()
{
    var students = GenerateStudents();

    for (int i = 0; i < students.Count; i++)
    {
        yield return students[i];
        Thread.Sleep(1000);
    }
}
This method simulates retrieving students from a database with a delay of 1 second after each student record.
Initially, we retrieve a list of all our students and store it in a variable representing our database. Then, in the for loop, we use the yield return statement to return a student at each iteration. We invoke the Thread.Sleep() method within the loop to simulate potential delays that may occur in the streaming process.
With that, let’s create our DisplayProgress() method:
public static void DisplayProgress()
{
    var incrementValue = 100 / _students.Count;

    AnsiConsole.Progress()
        .Start(ctx =>
        {
            var streamingTask = ctx.AddTask("Student Streaming");

            foreach (var _ in StudentsGenerator.StreamStudentsFromDatabase())
            {
                streamingTask.Increment(incrementValue);
            }
        });
}
In this method, we create a progress bar to monitor the process of retrieving students from a database.
We start by obtaining the count of all our students. Next, we set our bar increment value. By default, the initial value of progress bars is 0, and their final value is 100. Therefore, we set our increment value to be 100 divided by the total number of students in our database.
After that, we use the AnsiConsole.Progress() method to create a new Progress instance. Then, we invoke the Start() method, specifying an action of type Action<ProgressContext>, with ctx serving as the parameter for this action. ctx is a ProgressContext that enables us to create, interact with, and control progress bars.
Then, we invoke the AddTask() method to add a new task to this context, thereby creating a new progress bar. Each invocation of the AddTask() method creates a new progress bar on the console.
The main activity takes place in the foreach loop. In each iteration of the loop, we invoke the StreamStudentsFromDatabase() method. For every student returned, we increment our progress bar by the incrementValue. This process continues until we have fetched all the students and our progress bar reaches 100.
Rendering FIGlets on the Console
A FIGlet is an artistic large font text that consists of smaller ASCII characters. With the Spectre.Console library, we can render a FIGlet to the console:
public static FigletText DisplayFiglet()
{
    var text = new FigletText("Beautify")
        .LeftJustified()
        .Color(Color.Orchid);

    AnsiConsole.Write(text);

    return text;
}
In this method, we invoke the Write() method with a FigletText instance. We align the FigletText to the left and set its color to orchid.
Conclusion
In this article, we explored how to create more visually appealing console applications with the Spectre.Console library. We demonstrated how to format console outputs, pretty-print JSON data, handle exceptions, and work with calendars. Additionally, we discussed how to make the console interactive by prompting users for input and how to render tables, charts, task progress, and FIGlets.
