

Continuing our ML.NET series, we will take a closer look at the Machine Learning API With ML.NET.
Let’s dive in and learn how to use AutoML API in our ML projects.
What Is the Automated Machine Learning API?
In our previous articles, we learned about ML.NET Model Builder and ML.NET CLI tools. Both tools rely on the ML.NET Automated API , or AutoML API, for short.
Automated Machine Learning API is an integral part of the ML.NET framework. It provides us (the developers) with all the classes and methods required to build the best possible machine-learning models based on our data.
Installation
In order to use AutoML in our project, we need to install a NuGet package. For this, we can use NuGet Package Manager and search for “AutoML” or install it through the Package Manager Console:
PM> Install-Package Microsoft.ML.AutoML
The AutoML package has dependencies on the Microsoft.ML package (amongst the others), so that gets installed as well.
Using Automated Machine Learning (AutoML API) to Train the Model
As always, we start with the data. For this article, we will use the Heart Diseases Prediction dataset available on Kaggle:
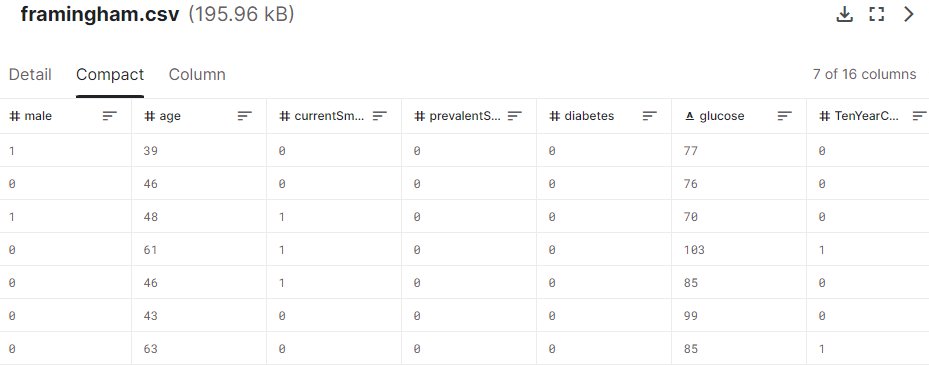
Let’s say we want to create an ML model to predict whether a patient has a risk of developing heart disease in the next ten years. That means we want to predict the value of column TenYearCHD based on the other data.
Loading the Data
As always, we start by initializing our MLContext object. Next, we will use the AutoML InferColumns() method to get our column information:
var dataPath = "DataSets/framingham.csv";
var columnInfo = mlContext.Auto().InferColumns(dataPath,
    labelColumnName: "TenYearCHD", groupColumns: false);

var data = mlContext.Data.LoadFromTextFile(dataPath, columnInfo.TextLoaderOptions);
The InferColumns() method loads part of the data from the dataset, analyzes the data, and tries to guess the data type of each column based on the content. The result is the ColumnInferenceResults object that contains the options required by the LoadFromTextFile() method and the ColumnInformation object.
Next, using the provided column information, we load the data and split it into train and validation sets using TrainTestSplit() method:
IDataView data = mlContext.Data.LoadFromTextFile(dataPath, columnInfo.TextLoaderOptions);
var splitData = mlContext.Data.TrainTestSplit(data, testFraction: 0.1);
We use 90% of the data for training and the remaining 10% for validation.
Defining the Pipeline
Our pipeline defines all the steps and procedures to process the data and train our model.
Model performance depends on the pipeline, so building a well-defined pipeline is crucial. For this, we use the Featurizer() method:
var pipeline = mlContext.Auto().Featurizer(data,
    columnInformation: columnInfo.ColumnInformation)
        .Append(mlContext.Auto()
        .BinaryClassification(
            labelColumnName: columnInfo.ColumnInformation.LabelColumnName));
Our pipeline is an instance of a SweepablePipeline class, which is a collection of SweepableEstimator type objects. A SweepableEstimator extends the ML.NET Estimator class with a SearchSpace property, which we can use to optimize our model.
The Featurizer() method returns a numerical feature vector representing every column’s transformed data.
Here, we forwarded the optional columnInformation parameter to the Featurizer() method.
AutoML provides a sweepable pipeline with default configurations for BinaryClassification, MultiClassification, and Regression.
Since we have a task to categorize the data into only two categories (a patient has or does not have a risk of developing heart disease), we appended the BinaryClassification trainer to our pipeline.
Experiment Configuration
Now, we are ready to define our AutoMLExperiment:
var experiment = mlContext.Auto().CreateExperiment();
experiment
    .SetPipeline(pipeline)
    .SetTrainingTimeInSeconds(10)
    .SetBinaryClassificationMetric(BinaryClassificationMetric.Accuracy,
    columnInfo.ColumnInformation.LabelColumnName)
    .SetDataset(splitData);
Here, we use the SetPipeline() method to set our SweepablePipeline. Using the SetTrainingTimeInSeconds() method, we set the maximum time to train our model to 10 seconds. Next, we set the metric used for model optimizations during training to Accuracy using the SetBinaryClassificationMetric() method. And finally, we set our train/validation split data using the SetDataset() method.
Running the Experiment
Now, when we have everything set, we can run the experiment:
var cts = new CancellationTokenSource();
var experimentResults = await experiment.RunAsync(cts.Token);
cts.Dispose();
var bestModel = experimentResults.Model;

Console.WriteLine($"Accuracy: {experimentResults.Metric}");
The result of the experiment, once it is finished (after the time to train expires), is the TrialResult object. It has a Model property that contains the best ML model based on the metric we chose.
At this point, we can save the model for later use:
mlContext.Model.Save(bestModel, data.Schema, "model.zip");
Or we can use it right away to make our predictions. For this, let’s define our InputModel class:
public class ModelInput
{
    [ColumnName(@"male")]
    public float Male { get; set; }

    [ColumnName(@"age")]
    public float Age { get; set; }

    [ColumnName(@"education")]
    public float Education { get; set; }

    [ColumnName(@"currentSmoker")]
    public float CurrentSmoker { get; set; }

    //removed the rest of the properties for the readability reason
}
To inspect the full class, you can always visit our GitHub repository.
And our ModelOutput class:
public class ModelOutput
{
    [ColumnName(@"PredictedLabel")]
    public bool PredictedLabel { get; set; }

    [ColumnName(@"Score")]
    public float Score { get; set; }
}
Now, we define the input data for which we want to make the prediction:
var input = new ModelInput()
{
    Male = 0F,
    Age = 18F,
    Education = 2F,
    CurrentSmoker = 0F,
    CigsPerDay = 0F,
    BPMeds = 0F,
    PrevalentStroke = 0F,
    PrevalentHyp = 1F,
    Diabetes = 1F,
    TotChol = 250F,
    SysBP = 221F,
    DiaBP = 91F,
    BMI = 3873F,
    HeartRate = 95F,
    Glucose = 86F
};
To use our best model directly, we use its Transform() method:
var directPrediction = bestModel.Transform(
    mlContext.Data.LoadFromEnumerable(new List() { input }));

Console.WriteLine("\nDirect prediction - Heart Disease Risk exists: {0}",
    directPrediction.GetColumn("PredictedLabel").FirstOrDefault());
The Transform() method takes a data view, performs the actions the model is trained for, and produces a data view containing the predicted values. It is designed for batch operations, meaning we can provide a list of inputs and get a list of predicted values. In our case, we want to make a prediction for only one input. Thus, we create a data view with only one record using the LoadFromEnumerable() method. Consequently, we need to parse the resulting data view to get the prediction we are looking for.
Let’s also see how we load and use the saved model:
var ctx = new MLContext();
ITransformer predictionPipeline = ctx.Model.Load("model.zip", out _);
var predictionEngine = ctx.Model.CreatePredictionEngine<ModelInput, ModelOutput>(predictionPipeline);
var prediction = predictionEngine.Predict(input);

Console.WriteLine("Saved model - Heart Disease Risk exists: {0}", prediction.PredictedLabel);
In this case, we load the save pipeline and use it with the CreatePredictionEngine() method to create a prediction engine. It provides us with a more direct way to perform the prediction using the Predict() method.
Model Optimizations With Automated Machine Learning API
Although AutoML covers a lot of potential use cases with the default configurations, to get the optimal model performance with reasonable resource costs, we often need to make adjustments to our ML training processes and components. Let’s look at available optimizations and when we want to use them.
Column Inference Results Modifications
As described earlier, the InferColumns() method uses a small subset of the whole dataset to guess the types of the columns in the dataset. Therefore, we might get an edge case when the supposed column type does not fit our dataset completely.
For example, we might need to change the type of the column. Although that is not the case with our dataset, let’s change the education column type to string by moving it from NumericColumnNames to TextColumnNames:
columnInfo.ColumnInformation.NumericColumnNames.Remove("education");
columnInfo.ColumnInformation.TextColumnNames.Add("education");
Another possible optimization might be to ignore the column upon further processing.
Although cholesterol is probably a big factor here, just for our example’s sake, let’s ignore column totChol by adding it to the IgnoredColumnNames collection:
columnInfo.ColumnInformation.IgnoredColumnNames.Add("totChol");
Excluding the Trainers
Process optimizations might also be aimed at saving resources. AutoML will go through multiple trainers to find the optimal trainer for our data. During that process, we might discover that certain trainers spend a lot of computing resources and do not produce good results. In these cases, we have the option to exclude these trainers.
For example, we can exclude FastTree and Lbfgs using the optional parameter in the BinaryClassification() method:
var pipeline = mlContext.Auto().Featurizer(data, columnInformation: columnInfo.ColumnInformation)
        .Append(mlContext.Auto()
        .BinaryClassification(labelColumnName: columnInfo.ColumnInformation.LabelColumnName,
        useFastTree: false, useLbfgs: false));
Custom Sweepable Estimator
When there is a requirement for more detailed customization, we can add a custom SweepableEstimator to our pipeline:
var lgbmSearchSpace = new SearchSpace();
var lgbmFactory = (MLContext ctx, LgbmOption param) =>
{
    var lgbmOptions = new LightGbmBinaryTrainer.Options()
    {
        LearningRate = 0.01F,
        NumberOfIterations = 50,
        NumberOfLeaves = 10,
        UseCategoricalSplit = true,
        MinimumExampleCountPerLeaf = 10,
        L2CategoricalRegularization = 0.02F,
        LabelColumnName = columnInfo.ColumnInformation.LabelColumnName,
    };
    return ctx.BinaryClassification.Trainers.LightGbm(lgbmOptions);
};
var lgbmCustomEstimator = mlContext.Auto().CreateSweepableEstimator(lgbmFactory, lgbmSearchSpace);

var pipeline = mlContext.Auto().Featurizer(data, columnInformation: columnInfo.ColumnInformation)
        .Append(mlContext.Auto()
        .BinaryClassification(labelColumnName: columnInfo.ColumnInformation.LabelColumnName,
        useFastTree: false, useLbfgs: false))
        .Append(lgbmCustomEstimator);
Here, we start by initializing the SearchSpace object that is then used to define a factory to create our custom LightGbmBinaryTrainer.
Next, we use our custom SearchSpace and our factory to create a new SweepableEstimator using the CreateSweepableEstimator() method.
And finally, we add our new SweepableEstimator to our pipeline.
Custom Search Space
We can continue with our optimizations and customize the SearchSpace range. For this, we access and modify SearchSpace properties using keys:
lgbmSearchSpace["L1Regularization"] = new UniformSingleOption(min: 0.01f, max: 1.0f, defaultValue: 0.1f);
When a model has a complex architecture or multiple stages (fx. a deep neural network), we might want to adjust hyperparameters for each stage. For this, we use nested search spaces:
var nestedSearchSpace = new SearchSpace();
nestedSearchSpace["IntOption"] = new UniformIntOption(min: -10, max: 10);
lgbmSearchSpace["Nest"] = nestedSearchSpace;
Here, our nested search space contains a single hyperparameter IntOption with a uniform integer distribution between -10 and 10.
Finally, we can extend our SearchSpace options with additional parameters. For that, we create a new class LgbmOptionExtended that inherits LgbmOption:
public class LgbmOptionExtended : LgbmOption
{
    public int BatchSize { get; set; }
}
We use our new LgbmOptionExtended class to be able to set the BatchSize property of the LightGbmBinaryTrainer object.
Choosing a Different Tuner
Tuning algorithms are used to iterate the search space and find the optimal hyperparameter values. AutoML supports these tuning algorithms:
- SMAC (Sequential Model-based Algorithm Configuration) – A Bayesian optimization-based tuner for complex search spaces that iteratively refines hyperparameters
- Grid Search – A systematic tuner that exhaustively tests predefined combinations of hyperparameters
- Random Search – A randomized tuner that efficiently explores hyperparameter combinations
- Cost Frugal – A tuner that optimizes hyperparameters while minimizing computational costs
- Eci Cost Frugal – An extension of the Cost Frugal tuner that considers cost constraints for hyperparameter optimization.
The default algorithm used is Eci Cost Frugal. We can change it with the appropriate experiment extension method. For example, we switch to the Grid Search algorithm using the SetGridSearchTuner() method:
experiment.SetGridSearchTuner();
Custom Trial Runner
Currently, AutoML supports regression, binary classification, and multiclass classification.
In case we need support for any of the other scenarios, we can create our trial runner and extend AutoML functionality to meet our needs.
Code examples and implementation for this are out of the scope of this article, but we encourage you to check the official documentation for additional information.
Experiment Monitoring
Experiment progress monitoring is crucial for model performance optimization, early issue detection, and efficient resource management.
The quick-and-dirty monitoring option is to define a Log event of our MLContext:
mlContext.Log += (_, e) => {
    if (e.Source.Equals("AutoMLExperiment"))
        Console.WriteLine(e.RawMessage);
};
However, this will give us only the raw log data.
To optimize experiment monitoring, let’s create a new class called CustomExperimentMonitor:
public class CustomExperimentMonitor : IMonitor
{
    private readonly SweepablePipeline _pipeline;
    private readonly List _completedTrials;
    public IEnumerable GetCompletedTrials() => _completedTrials;

    public CustomExperimentMonitor(SweepablePipeline pipeline)
    {
        _pipeline = pipeline;
        _completedTrials = new List();
    }

    public void ReportBestTrial(TrialResult result)
    {
        return;
    }

    public void ReportCompletedTrial(TrialResult result)
    {
        var timeToTrain = result.DurationInMilliseconds;
        var pipeline = _pipeline.ToString(result.TrialSettings.Parameter);
        _completedTrials.Add(result);

        Console.WriteLine($"\t- finished training in {timeToTrain}ms with pipeline {pipeline}");
    }

    public void ReportFailTrial(TrialSettings settings, Exception exception = null)
    {
        if (exception.Message.Contains("Operation was canceled."))
        {
            Console.WriteLine($"\t- cancelled. Time budget exceeded.");
        }

        Console.WriteLine($"\t- failed with exception {exception.Message}");
    }

    public void ReportRunningTrial(TrialSettings setting)
    {
        Console.WriteLine($"Running Trial Id {setting.TrialId}:");
    }
}
Here, we implemented custom handling of IMonitor events, ReportBestTrial, ReportCompletedTrial, ReportFailTrial, andReportRunningTrial.
Now we can set it to our experiment:
var monitor = new CustomExperimentMonitor(pipeline);
experiment.SetMonitor(monitor);
Trials Persistence
By default, only the best result is stored. However, keeping track of all the trials for any additional analysis might be useful.
We do this in our monitor by implementing a list of trial results _completedTrials and storing completed trials to the list in ReportCompletedTrial event:
private readonly List<TrialResult> _completedTrials;
public IEnumerable<TrialResult> GetCompletedTrials() => _completedTrials;

public CustomExperimentMonitor(SweepablePipeline pipeline)
{
    ...
    _completedTrials = new List<TrialResult>();
}
...
public void ReportCompletedTrial(TrialResult result)
{
    ...
    _completedTrials.Add(result);
    ...
}
We can access the list of completed trials using the GetCompletedTrials() method:
var completedTrials = monitor.GetCompletedTrials();
Checkpoints
In case of an error or early termination of the experiment, it is useful to save intermediary training outputs. For this, we use checkpoints.
To set a checkpoint, we use the SetCheckpoint() method:
var checkpointPath = Path.Join(Directory.GetCurrentDirectory(), "checkpoints");
experiment.SetCheckpoint(checkpointPath);
Here, we set the location for the intermediary outputs to the “checkpoints” sub-folder.
Experiment Cancellation
We run our experiment asynchronously, so it is important to set the CancellationToken:
var cts = new CancellationTokenSource();
var experimentResults = await experiment.RunAsync(cts.Token);
We therefore call the asynchronous method RunAsync() with the cancelation token as a parameter.
Feature Importance
It is important that we understand how our model makes its decisions. A technique that can help us do this is Permutation Feature Importance or PFI.
The idea is to determine how much each column (or feature) affects the predicted value. The algorithm randomly shuffles data for each feature and calculates the performance change. So, the bigger the change, the more important the feature is.
However, it is worth noting this operation is very time-consuming, and the time to complete it is proportional to the dataset size and the number of features.
For our example, let’s implement the CalculateFeatureImportance() method:
public static void CalculateFeatureImportance(MLContext mlContext,
    ITransformer model, IDataView dataset, string labelColumnName)
{
    var transformedData = model.Transform(dataset);
    var linearPredictor = (model as TransformerChain)?.LastTransformer;

    var pfiResults = mlContext.BinaryClassification
        .PermutationFeatureImportanceNonCalibrated(linearPredictor, transformedData, labelColumnName);

    var featureAUCs = pfiResults
            .Select(m => new { m.Key, m.Value.AreaUnderRocCurve })
            .OrderByDescending(m => Math.Abs(m.AreaUnderRocCurve.Mean))
            .Select(m => new
            {
                Feature = m.Key,
                AUC = m.AreaUnderRocCurve
            });

    Console.WriteLine("\nFeature Importance Calculations");
    foreach (var item in featureAUCs)
        Console.WriteLine($"{item.Feature, -20}{item.AUC.Mean}");
}
We use the AreaUnderRocCurve as a primary parameter to determine the importance of the feature.
Now we use it in our examples:
CalculateFeatureImportance(mlContext, bestModel, splitData.TrainSet,
    columnInfo.ColumnInformation.LabelColumnName);
Let’s take a look at the results:
Feature Importance Calculations
age                 -0.13295728852013555
sysBP               -0.05918308908557679
glucose             -0.007032840440921007
male                -0.0054933760711946
totChol             -0.002938777574054696
diabetes            0
currentSmoker       0
diaBP               0
prevalentStroke     0
heartRate           0
BMI                 0
education           0
cigsPerDay          0
prevalentHyp        0
BPMeds              0
Consequently, we can conclude that the age parameter has the most significant impact.
Conclusion
Completing our dive into Automated Machine Learning API With ML.NET, we’ve discovered that it brings a powerful toolset to .NET developers, adeptly balancing automation with customization.
It simplifies model building, enabling developers to quickly transition from data to deployment while offering the options needed for fine-tuning.
Whether you’re a novice or a seasoned pro, AutoML in ML.NET is a versatile package, enhancing productivity without compromising the sophistication required for high-quality machine learning solutions.
