

In this article, we will continue our journey using the iText library to create PDF documents.
In our previous article, ‘Introduction to PDF Manipulation With iText (Formerly iTextSharp)’ we discussed the basics of the iText7 library. We talked about licensing and the history and created a few PDF documents.
Here we use the iText library version 7, but recently a new version 8 was released. If you want to use it, you need to install the additional package:
dotnet add package itext.bouncy-castle-adapter
With this one, all the examples from our article will work without an issue. So, if you want, you can use the newest iText library.
This time around, we will discuss page headers and footers.
Let’s dive in.
Calculating Document Page Dimensions in the iText Library
As the article mentions, we can start adding text to the page. Even using the default values, everything will look clean and tidy. iText7 uses predefined margins and padding.
However, we haven’t discussed setting margins or padding and the unit of measurement yet.
User Units
The iText library handles all measurements in user units. It provides an option to set the value of this user unit, but it’s mainly for specific and advanced library users.
We can safely assume that 1 inch represents 72 user units for most documents. This is set by default, and we rarely need to change it.
For international users, converting between millimeters and inches is essential. One inch is 25.4 mm. To change a unit from inch to mm, multiply it by 25.4.
Page Size
Discussing millimeters and inches, page size is another distinction in the publishing world.
If we buy a white sheet of paper from the store, we will get A4 or Letter size paper. Though the difference is small, it is important. Printing a PDF document with different paper sizes can cause problems with certain printers. For instance, issues may arise when attempting to print an A4-sized PDF document on a printer that uses Letter-sized paper or vice versa.
To be complete, let’s display the correct measurements of an A4 paper and Letter paper:
- A4 paper is 8.3 inches wide and 11.7 inches tall, which equals 210 x 297 mm
- Letter paper is 8.5 inches wide and 11 inches tall, which equals 215.9 x 279.4 mm
The measurements show that regions with metric units (millimeters) use A4 paper, while regions with imperial units (inches) use Letter-sized paper.
Page Orientation
Now that we know how to measure elements on pages, we need to discuss the starting point of the measurement.
For example, where is the text on our page if we tell the iText library to display it at position P(108, 36)?
To begin, we can translate this unit to inches. Since we know that 72 user units equal one inch, 108 equals 1.5 inches, and 36 equals 0.5 inches. Now, we need to consider the anchor.
By default, all measurements are done from the lower-left corner of the page. So, in our example, the text would be displayed 1.5 inches to the left of the page and 0.5 inches from the bottom.
The advanced methods in the library allow users to choose a different starting position anywhere on the page. They can even use transformation matrices to wrap and rotate the text. However, these are primarily for experienced, heavy library users with specific edge cases.
Page Margins
Until now, we haven’t discussed page margins. Every page has margins that determine where the text will start and end.
Previously, we added text to the page and let the iText library handle everything else. But now, as we add text to headers and footers, we need to consider margins:
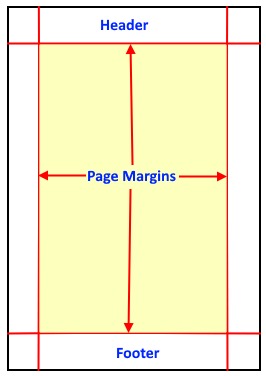
In the upper image, the sheet of paper is represented as a black box. The margins are depicted as red lines, and the yellow area shows where all the text will be placed. The iText library handles this automatically.
However, when we want to write text in the header or footer, we have to position the text outside the margins ourselves. Additionally, we may need to make the margins bigger if we want to write more text in the header/footer.
By default, the iText library places all the margins at 0.5 inches (~12.7 mm) from the edge of the paper. If we want to change that, we can use a method of the Document class called SetMargins(). We can set all four margins with this method. Alternatively, if we only want to change one margin, we can use methods like SetTopMargin(), SetRightMargin(), SetBottomMargin(), or SetLeftMargin().
Project Setup and Configuration
We will once again use a command-line project and the iText7 library. We can follow the same steps for preparing an empty project as described in our introductory article.
Helper Class for Converting Units
We’ll add a helper class to our project to translate measurements between different units. We need to convert user units to inches and millimeters or vice versa. Assuming 72 user units represent 1 inch for simplicity:
public static class UnitConverter
{
    public static float uu2inch(float uu) => uu / 72f;
    public static float inch2uu(float inch) => inch * 72f;

    public static float inch2mm(float inch) => inch * 25.4f;
    public static float mm2inch(float mm) => mm / 25.4f;

    public static float uu2mm(float uu) => inch2mm(uu2inch(uu));
    public static float mm2uu(float mm) => inch2uu(mm2inch(mm));
}
We will use A4 paper size; all measurements will be in millimeters. However, we could have chosen Letter size and inches based on preferences.
Content of a Document
In this article, our focus is on writing into headers and footers. The actual content of the document is unimportant. For this purpose, we will use the exact ‘Lorem ipsum’ text developed in a previous article, where we created a multi-page document as our last example.
To proceed, we will extract just the code for document content from our previous example. This way, we will be able to create different large documents for testing purposes quickly:
private static void AddContent(Document document, int numberOfRepetitions = 3)
{
    for (int i = 0; i < numberOfRepetitions; i++)
    {
        document.Add(CreateHeader1(LoremIpsum(3)));
        document.Add(CreateHeader2(LoremIpsum(7)));
        document.Add(CreateNormalParagraph(LoremIpsum(100)));

        document.Add(CreateHeader2(LoremIpsum(7)));
        document.Add(CreateNormalParagraph(LoremIpsum(55)));
        document.Add(CreateNormalParagraph(LoremIpsum(27)));

        document.Add(CreateHeader1(LoremIpsum(6)));
        document.Add(CreateHeader2(LoremIpsum(3)));
        document.Add(CreateNormalParagraph(LoremIpsum(50)));
        document.Add(CreateHeader2(LoremIpsum(3)));
        document.Add(CreateNormalParagraph(LoremIpsum(45)));
    }
}
Different Margins
Now that everything is prepared, we can create our first basic document. We will use predefined margins and the content we created earlier:
public static void CreateBasicDocument(string pdfFileName)
{
    using var writer = new PdfWriter(pdfFileName);
    using var pdfDocument = new PdfDocument(writer);
    using var document = new Document(pdfDocument, PageSize.A4);

    AddContent(document);
}
We set up all the necessary objects in this code to create a PDF document. PdfWriter is for writing data to disk, PdfDocument is for low-level PDF manipulation, and Document is for high-level document manipulation.
Unlike the last time, here we explicitly set the paper size to A4 in line 5 when creating a Document object. By running this example, we will get a 3-page long document.
Changing Margins in the iText Library
Now, let’s change the size of our margins. We will set the top margin to 50mm, the bottom margin to 70mm, the left margin to 100mm, and the right margin to 30mm:
public static void CreateBasicDocumentWithBigMargins(string pdfFileName)
{
    using var writer = new PdfWriter(pdfFileName);
    using var pdfDocument = new PdfDocument(writer);
    using var document = new Document(pdfDocument, PageSize.A4);

    document.SetMargins(
        topMargin: UnitConverter.mm2uu(50), bottomMargin: UnitConverter.mm2uu(70),
        rightMargin: UnitConverter.mm2uu(30), leftMargin: UnitConverter.mm2uu(100));

    AddContent(document);
}
By running this example, we will get an 8-page document. All the text will be 100mm from the left paper edge and 30mm from the right. Due to the increased margins, there will also be a lot of space on the top and bottom.
Adding Text After the Pages Are Generated
In prior versions of the iText library, we had to use special events to hook onto the end-of-page generation. However, in the latest edition of iText, we have a better and easier method.
We can change the text on the page even after the page is rendered by the iText library. This is particularly useful for writing headers and footers.
We can generate all the pages as we did before, and then after all the pages are generated, we can go through them again and add text:
public static void AddTextAfterPageWasGenerated(string pdfFileName)
{
    using var writer = new PdfWriter(pdfFileName);
    using var pdfDocument = new PdfDocument(writer);
    using var document = new Document(pdfDocument, PageSize.A4, immediateFlush: false);

    try
    {
        AddContent(document);

        var paragraph = new Paragraph("This text was added after page was generated");
        document.ShowTextAligned(p: paragraph,
            x: UnitConverter.mm2uu(50), y: UnitConverter.mm2uu(10), pageNumber: 1,
            textAlign: TextAlignment.LEFT, VerticalAlignment.BOTTOM, 0);
    }
    finally
    {
        document.Close();
    }
}
By running this example, the system prints the text ‘This text was added after the page was generated’ on the first page at the bottom. To achieve this, we did three things.
Firstly, we told the iText library we wanted to add text even after generating pages. We did this in line 5 by setting immediateFlush to false.
Secondly, we have explicitly called the Close() method in line 18 to flush the changes and finalize the document. This is because we indicated that we do not want immediate flushing of changes.
And thirdly, we outputted a paragraph on the first page (pageNumber) at position T(50mm, 10mm).
The parameters are explicitly named in the code, making it clear what they represent.
The iText Library ShowTextAligned() Method
The ShowTextAligned() method is used extensively to display headers and footers in our PDF documents. Let’s look closely at the parameters it accepts and how it works.
The method accepts seven parameters and can display text based on a point on the page. Here’s what each parameter represents.
p: The paragraph we want to print on a pagex, y: The position of the text on the page (horizontal and vertical coordinates, respectively)pageNumber: The page number where the text should be displayedtextAlign: The horizontal alignment of the text relative to the specified pointverticalAlign: The vertical alignment of the text relative to the specified pointrotation: The rotation of the text. This parameter allows us to rotate the text if needed
Horizontal alignment tells us the horizontal position of the text relative to a point, while vertical alignment tells us the vertical position of the text relative to a point.
Let’s see an example of using the ShowTextAligned() method:
public static void UsageOfShowTextAlignedMethod(string pdfFileName)
{
    using var writer = new PdfWriter(pdfFileName);
    using var pdfDocument = new PdfDocument(writer);
    using var document = new Document(pdfDocument, PageSize.A4);

    var textAlignments = new TextAlignment[] { TextAlignment.LEFT, TextAlignment.CENTER, TextAlignment.RIGHT };
    var verticalAlignments = new VerticalAlignment[] { VerticalAlignment.BOTTOM, VerticalAlignment.MIDDLE,
        VerticalAlignment.TOP };

    var page = pdfDocument.AddNewPage();
    var canvas = new PdfCanvas(page);

    float stepLeft = UnitConverter.mm2uu(70);
    float stepDown = UnitConverter.mm2uu(10);

    float left = UnitConverter.mm2uu(30);
    foreach (var textAlignment in textAlignments)
    {
        float top = UnitConverter.mm2uu(270);
        foreach (var verticalAlignment in verticalAlignments)
        {
            canvas.SetStrokeColor(ColorConstants.RED);
            canvas.Circle(x: left, y: top, r: UnitConverter.mm2uu(0.7f));
            canvas.Stroke();

            canvas.SetStrokeColor(ColorConstants.BLACK);

            var text = new Paragraph($"{textAlignment} / {verticalAlignment}");
            document.ShowTextAligned(text, left, top, 1, textAlignment, verticalAlignment, 0.3f);

            top -= stepDown;
        }

        left += stepLeft;
    }
}
In this code, we loop through all vertical and horizontal alignment options, resulting in nine possible combinations. For each combination, we draw a red circle around the point and then display the text on that point.
By running this method, we get a PDF file with text aligned in different ways as specified by the textAlign and verticalAlign parameters. The red circles help visualize the positions where the text is displayed:
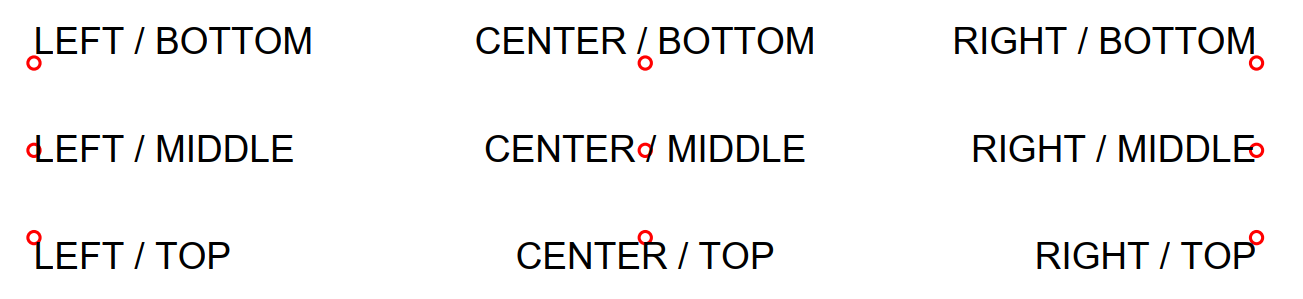
Indeed, the ShowTextAligned() method is very useful for printing headers and footers, as it eliminates the need to calculate text size and positions manually. It simplifies the process of aligning text in headers or footers, such as centering or aligning with margins.
Customizing Headers and Footers in iText Library
Now that we have all the necessary tools, we can start creating headers and footers.
Prepare the Template
Since all our documents will have the same structure with different text in the header and/or footer, we can create a generic method that accepts an Action to modify headers and footers:
public static void CreateBaseDocumentAndAddHeaderFooter(string pdfFileName,
    Action<PdfDocument, Document> headerFooter)
{
    using var writer = new PdfWriter(pdfFileName);
    using var pdfDocument = new PdfDocument(writer);
    using var document = new Document(pdfDocument, PageSize.A4, immediateFlush: false);

    try
    {
        AddContent(document);
        headerFooter(pdfDocument, document);
    }
    finally
    {
        document.Close();
    }
}
This method will create a document and then call an action where we can generate headers and footers. The Action delegate accepts two objects, PdfDocument and Document, which we need to be able to print text to the resulting document.
Using this generic method, we can now easily create documents with different headers and footers without duplicating code. We pass a custom action that sets the headers and footers according to our needs.
Classic ‘Page X of Y’ Footer
To create a classic footer with ‘Page X of Y’ text, we need to calculate the center of the page and then loop through the pages to print the current page number and the total number of pages:
private static void PageXofYFooter(PdfDocument pdfDocument, Document document)
{
    var numPages = pdfDocument.GetNumberOfPages();
    for (int pageId = 1; pageId <= numPages; pageId++)
    {
        var page = pdfDocument.GetPage(pageId);
        var centerPage = page.GetPageSize().GetWidth() / 2;

        var paragraph = new Paragraph($"Page {pageId} of {numPages}");
        document.ShowTextAligned(paragraph, centerPage, UnitConverter.mm2uu(10), pageId,
            TextAlignment.CENTER, VerticalAlignment.MIDDLE, 0);
    }
}
The beauty of this code is that we already know the number of pages. So we loop through them and construct the correct string containing the current page and number of pages.
Page Number in the Header, Print Date in the Footer
To print the page number in the header and the date of printing in the footer, we need to calculate the header and footer text positions:
private static void PageNumberInHeaderDateInFooter(PdfDocument pdfDocument, Document document)
{
    var numPages = pdfDocument.GetNumberOfPages();
    for (int pageId = 1; pageId <= numPages; pageId++)
    {
        var page = pdfDocument.GetPage(pageId);
        var rightMarginPosition = page.GetPageSize().GetWidth() - document.GetRightMargin();
        var headerPosition = page.GetPageSize().GetHeight() - UnitConverter.mm2uu(10);

        var header = new Paragraph($"Page {pageId} of {numPages}");
        document.ShowTextAligned(header, rightMarginPosition, headerPosition, pageId,
            TextAlignment.RIGHT, VerticalAlignment.MIDDLE, 0);

        var leftMarginPosition = document.GetLeftMargin();

        var footer = new Paragraph($"Printed on {DateTime.Today.ToLongDateString()}");
        document.ShowTextAligned(footer, leftMarginPosition, UnitConverter.mm2uu(10), pageId,
            TextAlignment.LEFT, VerticalAlignment.MIDDLE, 0);
    }
}
In the PageNumberInHeaderDateInFooter() method, we calculate the header position in line 8, which is 10mm below the top of the page. We also calculate the right margin position in line 7, extracting the right margin value from the page.
We also have to be careful when printing the header in line 11 where we want to align the right margin, so we use TextAlignment.RIGHT.
The opposite is true for the footer, where we want to position the date on the left margin, so we use TextAlignment.LEFT.
Adding a Line Between the Headers / Footers and the Text
In this example, we will look at how to add a line between the headers/footers and the main text. It is common in technical documents to have a line separating the header/footer from the rest of the text.
We just need to add some extra code to draw the line:
private static void DrawLine(PdfDocument pdfDocument, Document document)
{
    var numPages = pdfDocument.GetNumberOfPages();
    for (int pageId = 1; pageId <= numPages; pageId++)
    {
        var page = pdfDocument.GetPage(pageId);
        var rightMarginPosition = page.GetPageSize().GetWidth() - document.GetRightMargin();
        var topMarginPosition = page.GetPageSize().GetHeight() - document.GetTopMargin();
        var spaceGap = UnitConverter.mm2uu(2);

        var canvas = new PdfCanvas(page);
        canvas.SetStrokeColor(ColorConstants.BLACK);
        canvas.SetLineWidth(1);
        canvas.MoveTo(document.GetLeftMargin(), topMarginPosition);
        canvas.LineTo(rightMarginPosition, topMarginPosition);
        canvas.MoveTo(document.GetLeftMargin(), document.GetBottomMargin());
        canvas.LineTo(rightMarginPosition, document.GetBottomMargin());
        canvas.Stroke();

        var header = new Paragraph($"Page {pageId} of {numPages}");
        document.ShowTextAligned(header, rightMarginPosition, topMarginPosition + spaceGap, pageId,
            TextAlignment.RIGHT, VerticalAlignment.BOTTOM, 0);

        var leftMarginPosition = document.GetLeftMargin();

        var footer = new Paragraph($"Printed on {DateTime.Today.ToLongDateString()}");
        document.ShowTextAligned(footer, leftMarginPosition, document.GetBottomMargin() - spaceGap, pageId,
            TextAlignment.LEFT, VerticalAlignment.TOP, 0);
    }
}
We draw two lines on the PDF document in the code (lines 11-18). The code for drawing these lines is straightforward, but we will discuss drawing shapes in more depth in another article.
The spaceGap variable (line 9) creates a gap between the header/footer text and the line. This gives some spacing and makes the layout look more visually appealing.
An important difference from the previous code is in lines 22 and 28. Here, we use VerticalAlignment.BOTTOM and VerticalAlignment.TOP. If we had used VerticalAlignment.MIDDLE, the text and the line would be at the same position vertically.
Different Left and Right Pages
In some documents, it is common to have different layouts for the headers or footers on the left and right pages. For example, in books or two-sided documents, page numbers may appear on the left or right side of the page, depending on whether the page is odd or even:
private static void DifferentLeftAndRightPage(PdfDocument pdfDocument, Document document)
{
    var numPages = pdfDocument.GetNumberOfPages();
    for (int pageId = 1; pageId <= numPages; pageId++)
    {
        var page = pdfDocument.GetPage(pageId);
        var rightMarginPosition = page.GetPageSize().GetWidth() - document.GetRightMargin();

        var header = new Paragraph($"{pageId}");
        if (pageId % 2 == 0)
        {
            document.ShowTextAligned(header, document.GetLeftMargin(), document.GetBottomMargin(), pageId,
                TextAlignment.LEFT, VerticalAlignment.MIDDLE, 0);
        }
        else
        {
            document.ShowTextAligned(header, rightMarginPosition, document.GetBottomMargin(), pageId,
                TextAlignment.RIGHT, VerticalAlignment.MIDDLE, 0);
        }
    }
}
We loop through all the pages, and if the page number is even, we show the header on the left side using TextAlignment.LEFT. If the page number is odd, we show the header on the right side using TextAlignment.RIGHT.
Conclusion
To add text to the header or footer of a PDF document using the iText library, we need to calculate the position of the text. It is essential to ensure that the text is within the margin boundaries, as iText will not automatically adjust the positioning to fit within the margins.
By default, the page orientation in iText starts from the bottom left corner. This means that when specifying positions for the text, we need to take the coordinate system into account.
To output the text in the header or footer, we use the ShowTextAligned method provided by iText. This method allows us to specify the paragraph to be displayed, the position of the text, the page number, and the alignment and rotation of the text.
These techniques and methods allow us to create dynamic and customized headers and footers for our PDF documents, adding important information such as page numbers, dates, and other desired content.
