

In this article, we are going to learn how we can Copy to Clipboard in a Blazor WebAssembly Project.
Let’s start.
How to Copy to Clipboard in Blazor WebAssembly?
When building applications, we may want to provide the ability to automatically copy data to a user’s clipboard on a button click, such as copying a code snippet or other useful information that would otherwise require the user to highlight and select copy.

Unfortunately, Blazor doesn’t directly provide the functionality for copying data to the clipboard. However, we can incorporate some JavaScript using the JSInterop.
When working in a browser, we get access to the JavaScript Clipboard API, which allows us to easily write data to the clipboard.
Now that we understand what we need to create for our Copy to Clipboard functionality, let’s start by creating a project.
Create Blazor WebAssembly Project
We start by creating a Blazor WebAssembly project by using the template provided by Visual Studio or using the dotnet new blazorwasm command.
We can go ahead and remove any of the boilerplate code generated, ensuring we leave Index.razor in the Pages folder, along with the components in the Shared folder.
Create a Clipboard Service
We are going to create a couple of components to demonstrate different scenarios, so let’s create a service that can be injected into our components and reused as needed.
Let’s start by creating IClipboardService:
public interface IClipboardService
{
    Task CopyToClipboard(string text);
}
Next, we create an implementation for this interface:
public class ClipboardService : IClipboardService
{
    private readonly IJSRuntime _jsInterop;

    public ClipboardService(IJSRuntime jsInterop)
    {
        _jsInterop = jsInterop;
    }

    public async Task CopyToClipboard(string text)
    {
        await _jsInterop.InvokeVoidAsync("navigator.clipboard.writeText", text);
    }
}
First, we need to inject IJSRuntime. This allows us to interact with JavaScript in our C# code.
In CopyToClipboard() we call InvokeVoidAsync(), passing navigator.clipboard.writeText as our first parameter, which will call the JavaScript function.
Finally, we pass our text parameter as the text we want to write to the clipboard.
We also need to register this service as a scoped service in the Program class:
builder.Services.AddScoped<IClipboardService, ClipboardService>();
This covers the basic logic we need to copy data to the clipboard.
Create a Copy To Clipboard Component
We have a service that handles our Copy to Clipboard logic, so now we want to create a component that can be re-used in our application:
@inject IClipboardService ClipboardService

<button @onclick="OnClick" class="btn btn-primary">Copy to Clipboard</button>

@code {

    [Parameter]
    public string TextToCopy { get; set; }

    private async Task OnClick()
    {
        await ClipboardService.CopyToClipboard(TextToCopy);
    }
}
We start by injecting our IClipboardService.
Then we create a button element, adding an event handler for the onclick event. In our @code block, we create a TextToCopy parameter. We also add a class attribute, providing some Bootstrap classes.
Finally, we create an OnClick() method, that will call CopyToClipboard() and pass the TextToCopy parameter.
Next, let’s create a component that we can use later to verify if our Copy to Clipboard logic is working correctly.
Create a Component to Show the Copied Text
We can verify that our Copy to Clipboard logic works as expected by simply creating a textarea to paste our data into:
<p>Paste text here: </p>
<textarea rows="10" cols="50"></textarea>
We create a simple paragraph to show the user what to do, along with a textarea element to allow users to paste data from their clipboard to verify the logic is working.
With this created, we can now look at some of the scenarios we could come across that would require the use of this component.
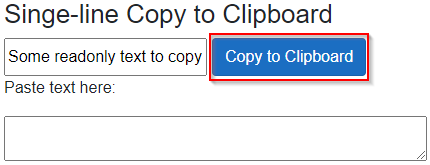
Single-line Copy to Clipboard
The first scenario in which we may wish to use our Copy to Clipboard component is when we have a single line of read-only text that the user would like to copy, such as a website or a repository URL.
Let’s create a component for this scenario:
@page "/singleline"

<h3>Singe-line Copy to Clipboard</h3>

<input type="text" readonly value="@text" />
<CopyToClipboard TextToCopy="@text" />

<TextArea />

@code {
    string text = "Some readonly text to copy";
}
Initially, we use the @page directive to mark this component as a routable component.
Then we create an input element, making sure to include the readonly attribute. We set the value to the text field that we define in our @code block.
Next, we include the CopyToClipboard component that we’ve created previously, passing the text field to the TextToCopy parameter.
Finally, we add the TextArea component defined previously to verify the Copy to Clipboard logic works as expected.
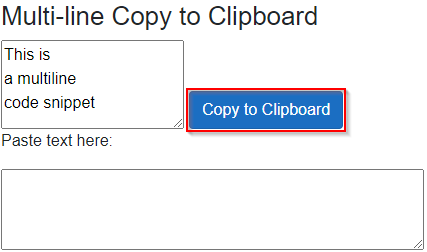
Multi-line Copy to Clipboard
Sometimes we may have a multi-line value that we would like to copy, such as a code snippet. We can use our CopyToClipboard component to provide this functionality:
@page "/multiline"

<h3>Multi-line Copy to Clipboard</h3>

<textarea readonly rows="3" cols="10">@text</textarea>
<CopyToClipboard TextToCopy="@text" />

<TextArea />

@code {
    string text = @"This is
a multiline
code snippet";
}
Once again, we start by defining the route for this component.
This time, we create a textarea element, which allows for multi-line text input. Again, we use the readonly attribute. Within the textarea element, we place the text field defined in our @code block. This time we use the verbatim string to create a multiline text.
The final steps are the same as before. We add our CopyToClipboard component, passing in the text field to the TextToCopy parameter. Finally, we add the TextArea component.
Copy User Input
A final scenario where we can provide a Copy to Clipboard button would be when we ask the user for input in the form of an input or textarea element.
Let’s create a component for that:
@page "/userinput"

<h3>User input Copy to Clipboard</h3>

<input @bind-value="text" />
<CopyToClipboard TextToCopy="@text" />

<TextArea />

@code {
    string text = "";
}
We start by creating this component routable with the @page directive.
Then, we define an input element, using the @bind-value attribute to bind to the text field we create in the @code block.
Finally, we add the CopyToClipboard and TextArea components.
Define the Navigation Links
Before we test the Copy to Clipboard functionality, let’s add our routable components to the NavMenu component:
<div class="nav-item px-3">
    <NavLink class="nav-link" href="singleline">
        <span class="oi oi-list-rich" aria-hidden="true"></span> Single-line
    </NavLink>
</div>
<div class="nav-item px-3">
    <NavLink class="nav-link" href="multiline">
        <span class="oi oi-list-rich" aria-hidden="true"></span> Multi-line
    </NavLink>
</div>
<div class="nav-item px-3">
    <NavLink class="nav-link" href="userinput">
        <span class="oi oi-list-rich" aria-hidden="true"></span> User Input
    </NavLink>
</div>
We add 3 NavLinks to the existing NavMenu, ensuring to set the href for each of the components we created.
Test Copy to Clipboard Functionality
We have everything we need to test our functionality, so let’s run our application and navigate to /singleline first and then click our Copy to Clipboard button:
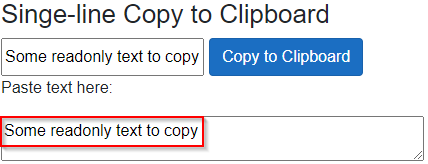
Placing our cursor in the textarea, we can verify our Copy to Clipboard functionality works by pressing Ctrl + V or right-clicking and selecting Paste:
Next, we’ll test a multi-line textarea, by navigating to /multiline and running the same test:
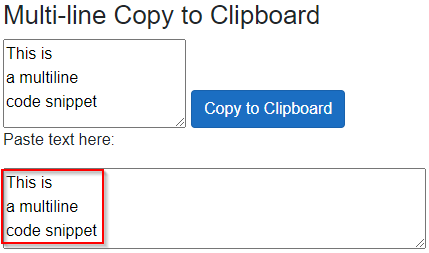
Once again, we can verify that our functionality works as expected:
Style the Copy to Clipboard Component
So far, the user has no way of confirming if the data has been copied to their clipboard, without attempting to paste it. So let’s provide some visual feedback to let the user know the data has been successfully copied to their clipboard.
Let’s revisit our CopyToClipboard component and add some extra logic:
@inject IClipboardService ClipboardService

<button @onclick="OnClick" class="@buttonClass">@buttonText</button>

@code {
    [Parameter]
    public string TextToCopy { get; set; }

    private const string _copyToClipboardText = "Copy to clipboard";
    private const string _copiedToClipboardText = "Copied to clipboard";

    private const string _defaultClass = "btn btn-primary";
    private const string _successClass = "btn btn-success";

    private string buttonText = _copyToClipboardText;
    private string buttonClass = _defaultClass;

    private async Task OnClick()
    {
        await ClipboardService.CopyToClipboard(TextToCopy);

        buttonText = _copiedToClipboardText;
        buttonClass = _successClass;

        StateHasChanged();
        await Task.Delay(TimeSpan.FromSeconds(2));

        buttonText = _copyToClipboardText;
        buttonClass = _defaultClass;
    }
}
First, we change the class attribute to our button element, binding it to the buttonClass field we define in the @code block. Also, we set the button text to the buttonText field.
Then, we define some string constants, for the different states we want to set the button class and text in. We must remember to set the initial state of our button text and class to the _copyToClipboardText and _defaultClass fields.
This time, in the OnClick() method, once the text has been copied to the clipboard, we set buttonText to _copiedToClipboard field, and buttonClass to _successClass. We need to remember to call the StateHasChanged method to re-render our button.
Finally, We put in a 2-second delay and reset our button to the normal state.
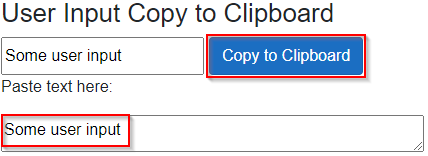
Let’s run the application and navigate to /userinput to see our changes in action:
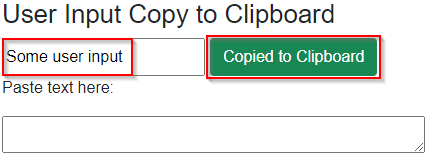
This time around, when we click the button, the text and color change as we specified. After 2 seconds, the text and color will revert to the original ones. We can also confirm our user input component works as expected:
Conclusion
Now we know how to implement Copy to Clipboard in Blazor WebAssembly applications. This feature is very useful for complex or very long areas of data, such as URLs or code snippets, where we want to provide the user with an easy way to copy this data to their clipboard.