
In the previous article, we have created an ASP.NET Core application to consume a GraphQL API. But we don’t have to use only the ASP.NET Core app to consume a GraphQL API, we can do the same thing with the Angular application. To accomplish that, we are going to use the Apollo library which will help us in the process.
We won’t dive deep into the Angular project development, for that, we have a great Angular Tutorial on that subject as well.

To download the source code, visit the Consuming a GraphQL API with Angular Source Code.
For the complete navigation of this tutorial visit GraphQL ASP.NET Core Tutorial.
Preparing the Angular Project
After we have finished with the ASP.NET Core client app, let’s create an Angular app as well.
We are going to start by creating a new Angular project without navigation module and with CSS as default styles. As soon as creation is over, we are going to install a set of libraries required for the Apollo Client to work with Angular:
npm install apollo-angular apollo-angular-link-http apollo-client apollo-cache-inmemory graphql-tag graphql -- save
The next step is to modify app.module.ts file:
import { BrowserModule } from '@angular/platform-browser';
import { NgModule } from '@angular/core';
import { ApolloModule } from 'apollo-angular';
import { HttpLinkModule } from 'apollo-angular-link-http';
import { HttpClientModule } from '@angular/common/http';

import { AppComponent } from './app.component';

@NgModule({
  declarations: [
    AppComponent
  ],
  imports: [
    BrowserModule,
    ApolloModule,
    HttpLinkModule,
    HttpClientModule
  ],
  providers: [],
  bootstrap: [AppComponent]
})
export class AppModule { }
We import the ApolloModule and HttpLinkModule files, required for the Appolo integration with Angular. But, we can see that HttpClientModule is included as well. That’s because in order to work properly, HttpLinkModule internally uses HttpClientModule.
Let’s move on.
In the same way that we created model files for the ASP.NET Core client application, we are going to create them here.
So, let’s create a new folder „types“ and inside several type files:
export type OwnerInputType = {
    name: string;
    address: string;
}
export type AccountType = {
    'id': string;
    'description': string;
    'ownerId' : string;
    'type': string;
}
import { AccountType } from './accountType';

export type OwnerType = {
    'id': string;
    'name': string;
    'address': string;
    'accounts': AccountType[];
}
Now, we can create a graphql.service.ts file and modify it as well:
import { Injectable } from '@angular/core';
import { Apollo } from 'apollo-angular';
import { HttpLink } from 'apollo-angular-link-http';
import { InMemoryCache } from 'apollo-cache-inmemory';
import gql from 'graphql-tag';
import { OwnerType } from './types/ownerType';
import { OwnerInputType } from './types/ownerInputType';

@Injectable({
  providedIn: 'root'
})
export class GraphqlService {
  public owners: OwnerType[];
  public owner: OwnerType;
  public createdOwner: OwnerType;
  public updatedOwner: OwnerType;

  constructor(private apollo: Apollo, httpLink: HttpLink) {
    apollo.create({
      link: httpLink.create({ uri: 'https://localhost:5001/graphql' }),
      cache: new InMemoryCache()
    })
  }
}
We have an instance of the Apollo service with all the required configuration (link and cache). Both properties are required and must be populated.
After these configuration actions, we are ready to create some queries.
Creating Queries and Mutations
Let’s modify the graphql.service.ts file, by adding our first query:
public getOwners = () => {
    this.apollo.query({
      query: gql`query getOwners{
      owners{
        id,
        name,
        address,
        accounts{
          id,
          description,
          type
        }
      }
    }`
    }).subscribe(result => {
      this.owners = result.data as OwnerType[];
	console.log(this.owners);
    })
  }
We are using the Apollo service with its query function to write the entire GraphQL query. We’re using the imported gql tag as well, in order to be able to write GraphQL code as a multi-line string.
Now, let’s modify the app.component.ts file in order to test this query:
import { Component, OnInit } from '@angular/core';
import { GraphqlService } from './graphql.service';

@Component({
  selector: 'app-root',
  templateUrl: './app.component.html',
  styleUrls: ['./app.component.css']
})
export class AppComponent  implements OnInit{

  constructor(private service: GraphqlService) {
  }

  ngOnInit(): void {
    this.service.getOwners();
  }
  title = 'angulargraphqlclient';
}
As soon as we start the Angular application, we can inspect the result:
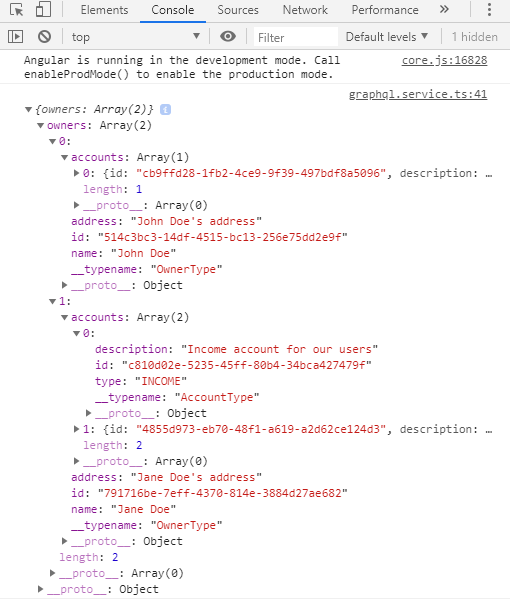
Excellent.
Here are all the other queries and mutations from the graphql.service.ts file:
public getOwner = (id) => {
    this.apollo.query({
      query: gql`query getOwner($ownerID: ID!){
      owner(ownerId: $ownerID){
        id,
        name,
        address,
        accounts{
          id,
          description,
          type
        }
      }
    }`,
      variables: { ownerID: id }
    }).subscribe(result => {
      this.owner = result.data as OwnerType;
    })
  }
public createOwner = (ownerToCreate: OwnerInputType) => {
    this.apollo.mutate({
      mutation: gql`mutation($owner: ownerInput!){
        createOwner(owner: $owner){
          id,
          name,
          address
        }
      }`,
      variables: {owner: ownerToCreate}
    }).subscribe(result => {
      this.createdOwner = result.data as OwnerType;
    })
  }
public updateOwner = (ownerToUpdate: OwnerInputType, id: string) => {
    this.apollo.mutate({
      mutation: gql`mutation($owner: ownerInput!, $ownerId: ID!){
        updateOwner(owner: $owner, ownerId: $ownerId){
          id,
          name,
          address
        }
      }`,
      variables: {owner: ownerToUpdate, ownerId: id}
    }).subscribe(result => {
      this.updatedOwner = result.data as OwnerType;
    })
  }
public deleteOwner = (id: string) => {
    this.apollo.mutate({
      mutation: gql`mutation($ownerId: ID!){
        deleteOwner(ownerId: $ownerId)
       }`,
      variables: { ownerId: id}
    }).subscribe(res => {
      console.log(res.data);
    })
  }
You can test them by modifying the app.component.ts file, or if you want to create a new component to consume all these results.
Conclusion
So, there we go. We have learned a lot of great stuff about GraphQL and its integration with ASP.NET Core. Of course, with these last two articles, we went even further, by creating two client applications to consume our GraphQL app.
We hope you have enjoyed this tutorial and if you have any suggestions or question, don’t hesitate to leave a comment in the comment section.