

Updated on
In this article, we are going to look at the basics of building an ASP.NET Core MVC web app.
We are going to start by creating a simple ASP.NET Core MVC app using the default template provided by Visual Studio. The default template itself will translate into a working app.
To the default template, we’re going to add a controller and a few action methods.
Afterward, we’re going to introduce the views using the razor syntax and return them from the controller methods.
Finally, we’re going to define some models and see how those can be passed into the views. We are also going to look at how the model data can be rendered on the web page.
We strongly recommend visiting the complete navigation of this series: ASP.NET Core MVC Series.
To download this article’s source code visit: Getting Started with ASP.NET Core MVC Source Code.
Creating an ASP.NET Core MVC project
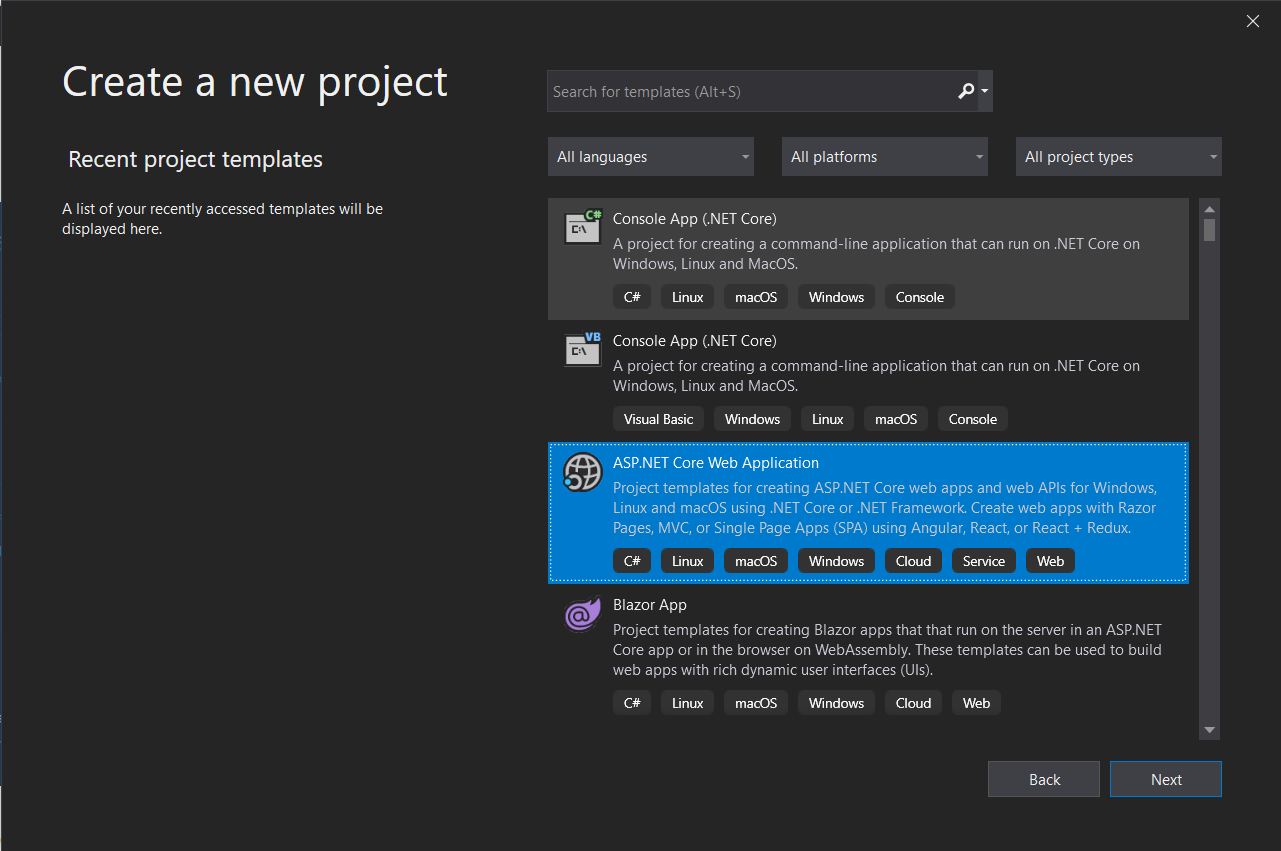
First, let’s create a new ASP.NET Core MVC project.
From Visual Studio 2019, Let’s create a new project using the ASP.NET Core Web Application template.
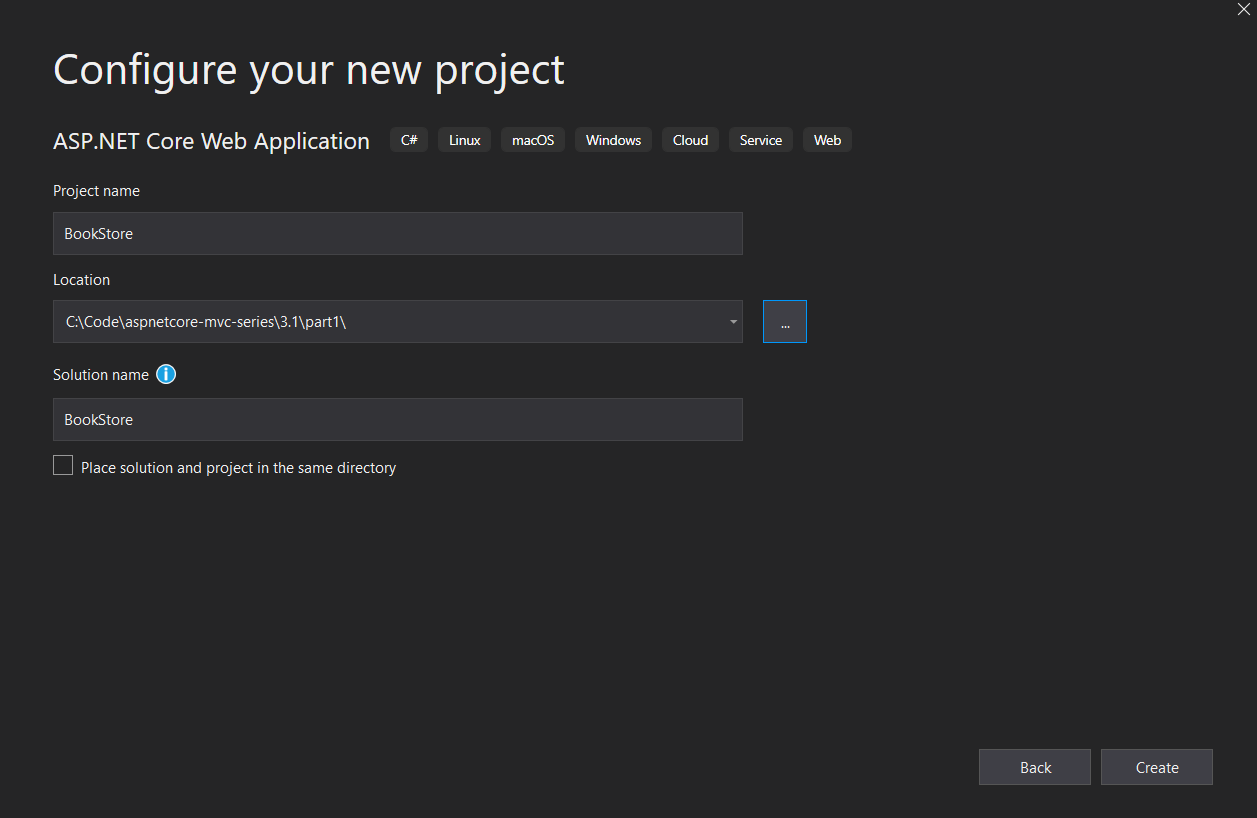
The next step is configuring the Project name, Location and Solution name.
In the final step, we need to choose the framework version and MVC project Template:
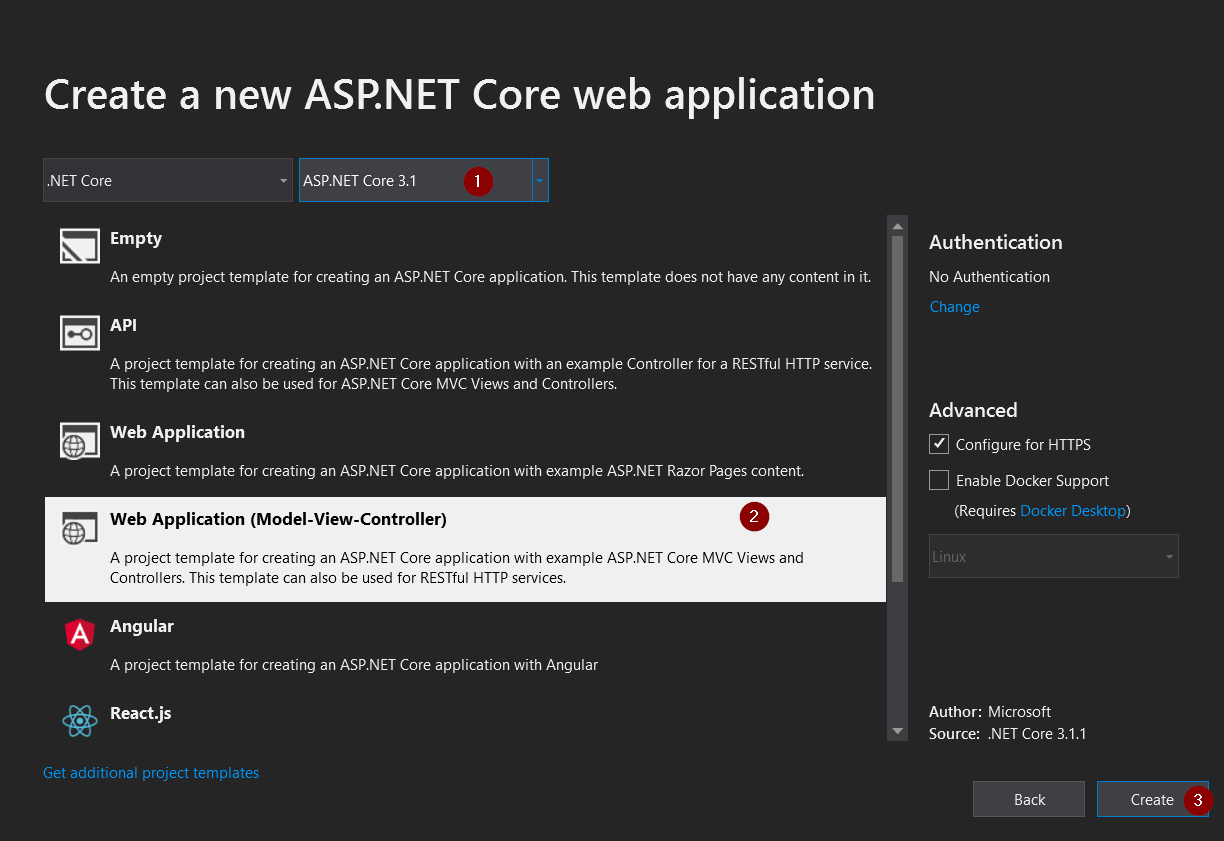
Once we complete these steps, Visual Studio creates an MVC project using the default template. The great thing is that we have a working app right now by entering a project name and selecting a few options. This is a basic starter project and a good place to start.
The Project Structure
Now, let’s examine the project structure and look at the files generated as part of the default MVC template:
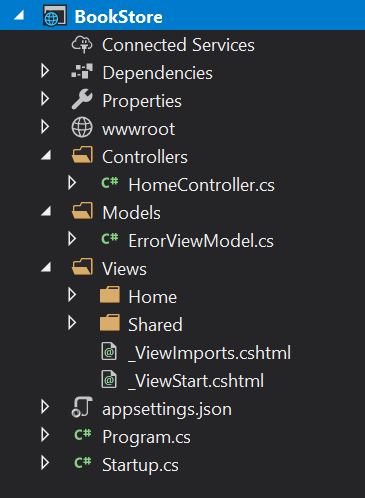
We can see that the project is well organized into separate folders for Models, Controllers, and Views. The Views are further organized into subfolders corresponding to each view. There are some default files generated in each of these folders as well. Then there are the usual configuration and startup files that come with the .NET Core project template.
Now let’s run the app with Ctrl+F5. We can see a website based on the default layout provided by ASP.NET Core MVC:
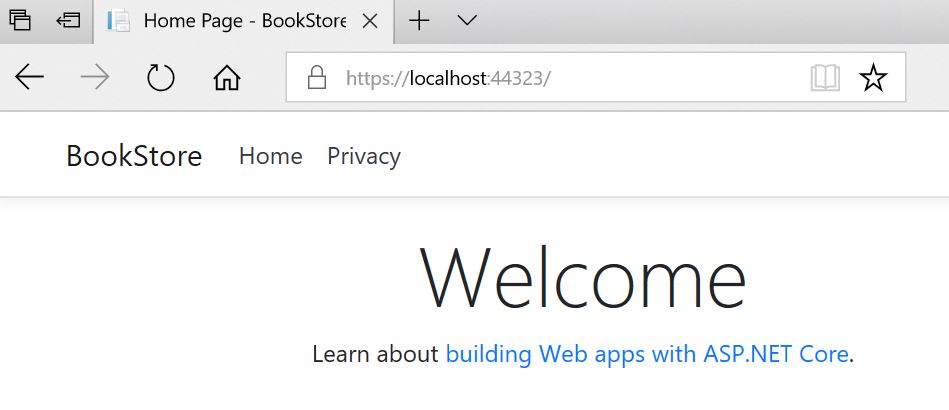
Congrats! We have just created a website using ASP.NET Core MVC.
Adding Controllers
Since we have a working ASP.NET Core MVC app, let’s start experimenting with it.
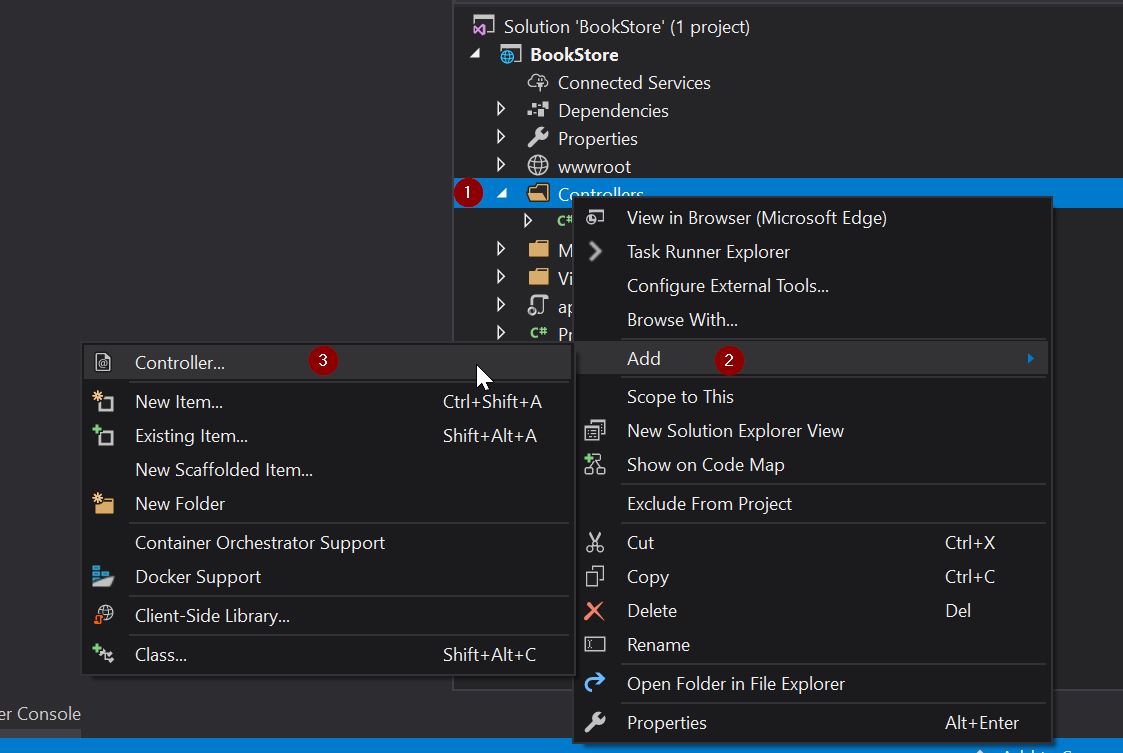
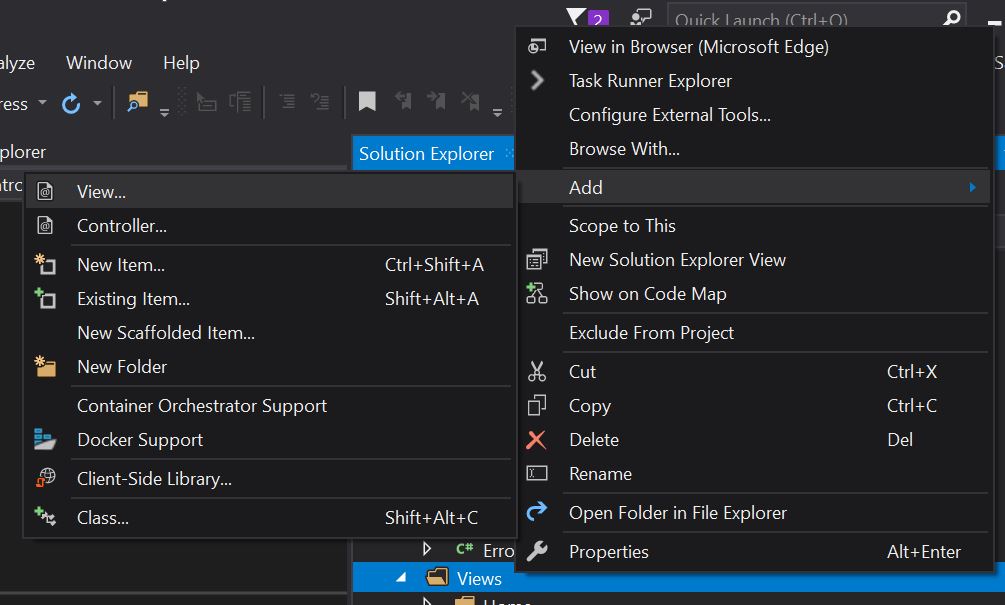
Let’s add an empty controller to the Controllers folder and name it BooksController. We can do it by right-clicking Controllers > Add > Controller
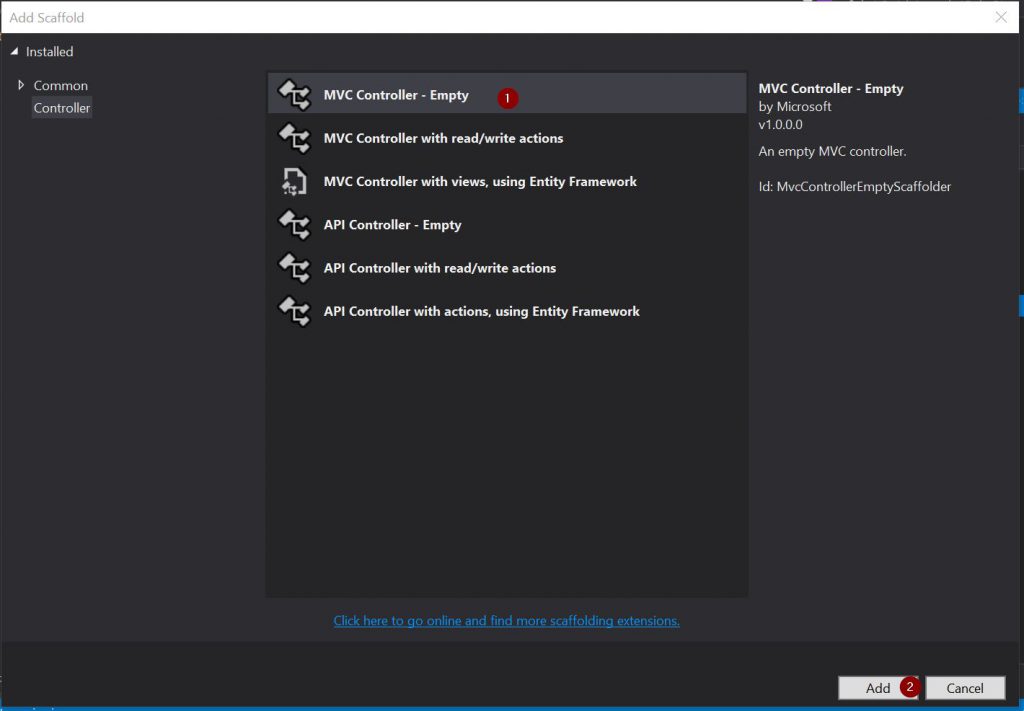
In the Add Scaffold dialog box, select MVC Controller - Empty
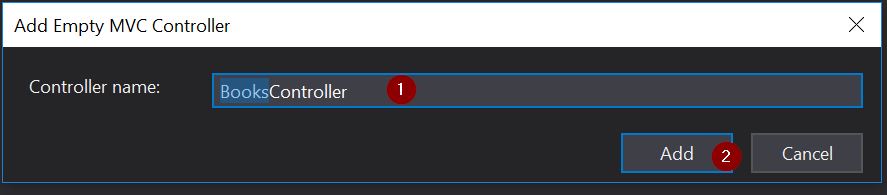
Then, in the Add Empty MVC Controller dialog box, give the controller name as BooksController and click Add:
This will create BooksController with a default action method. Let’s change the code and create two action methods in it:
public string Index()
{
    return "This is the book index.";
}

public string Details()
{
     return "This is the details of a book.";
}
Every public method in a controller is callable as an HTTP endpoint. In our controller, both methods return a string.
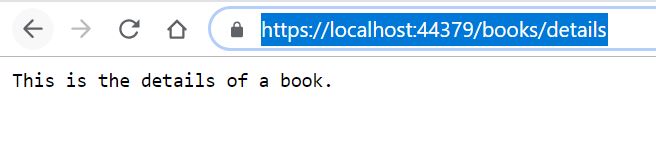
Let’s run the application and navigate to the BooksController by changing the URL to https://localhost:44323/books
*Please note that port number is randomly assigned by IIS Express and may vary in different systems.

We’ll cover routing in detail in an upcoming article, but for now, let’s just understand some basics. MVC invokes controller classes and the action methods within them depending on the incoming URL. The default URL routing logic used by MVC uses a format like this to determine what code to invoke:
/[Controller]/[ActionName]/[Parameters]
The ActionName defaults to Index when not supplied. Parameters are also optional.
So in this case when we hit the above URL, the application executes the Index method of the BooksController. This method returns a string and what we see is an HTML page generated with the supplied string.
Similarly, If we change the URL to https://localhost:44323/books/details, we can see the Details method of the BooksController executed:
We have created our own controller with two methods and executed them which is awesome.
Creating Views
Even though returning plain strings from the controller works, that is not a good practice. The controller action methods should ideally return a view. Then the view should be responsible for displaying the page output.
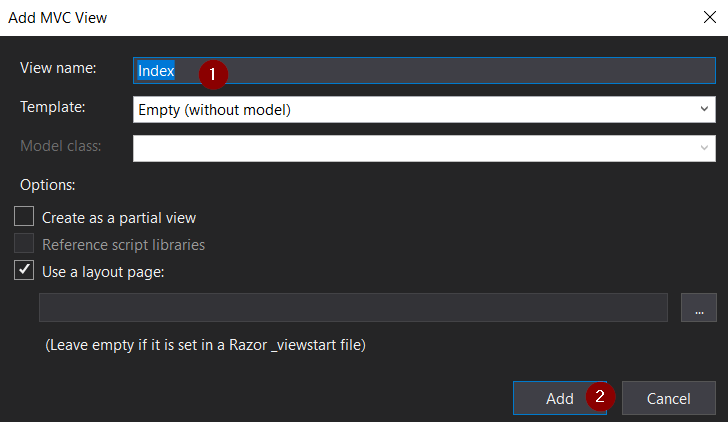
So let’s add a view file for the Index action method. Right-click on the Index action method and click Add View:
Give the view name as Index and click Add:
This will create a new folder Books under Views and a view file Index.cshtml inside it:

This is a razor view file. We’ll learn about creating views using the Razor syntax in detail in an upcoming article. For now, let’s just add some text inside the view file as below:
@{
    ViewData["Title"] = "Index";
}

<h1>This is the book index generated by the view.</h1>
Let ’s change the Index method of the BooksController as well, to return the view instead of a string:
public IActionResult Index()
{
   return View();
}
Now let’s run the application again.
https://localhost:44323/books

We can see that a new page is displayed based on the view file we just created. Also, we can see that a default layout template is applied, which we’ll revisit when we look at the layout files in a later article.
So we have created a view file, returned it from the controller action method and verified that it is displayed when we ran the application.
Defining Models
So far we have seen the controllers and views in action. Now, let’s introduce the models into the equation.
Let’s add a new class Book into the Models folder with some properties:
public class Book
{
    public int Id { get; set; }

    public string Title { get; set; }

    public string Genre { get; set; }

    public List<string> Authors { get; set; }

    public decimal Price { get; set; }

    public DateTime PublishDate { get; set; }
}
We’ll return this model in the Details action method of the BooksController. But before that, we need to create a view for displaying the book details.
To do that, we are going to add a new view called Details as we did for the Index above.
Let’s also modify the Details action method to return this view. We’ll pass the model into the view and display the book details on the page.
Ideally, we would fetch the model data from a database. We will learn how to do that in an upcoming article. For now, we’ll just generate some mock data to return:
public IActionResult Details()
{
     Book book = new Book()
     {
         Id = 1,
         Title = "Learning ASP.NET Core 2.0",
         Genre = "Programming & Software Development",
         Price = 45,
         PublishDate = new System.DateTime(2012, 04, 23),
         Authors = new List<string> { "Jason De Oliveira", "Michel Bruchet" }
     };

     return View(book);
}
Let’s also modify the view to display the model data:
@model BookStore.Models.Book

@{
    ViewData["Title"] = "Details";
}

<h1>Details</h1>

<div>
    <h4>Book</h4>
    <hr />
    <dl class="row">
        <dt class="col-sm-2">
            @Html.DisplayNameFor(model => model.Title)
        </dt>
        <dd class="col-sm-10">
            @Html.DisplayFor(model => model.Title)
        </dd>
        <dt class="col-sm-2">
            @Html.DisplayNameFor(model => model.Genre)
        </dt>
        <dd class="col-sm-10">
            @Html.DisplayFor(model => model.Genre)
        </dd>
        <dt class="col-sm-2">
            @Html.DisplayNameFor(model => model.Price)
        </dt>
        <dd class="col-sm-10">
            @Html.DisplayFor(model => model.Price)
        </dd>
        <dt class="col-sm-2">
            @Html.DisplayNameFor(model => model.PublishDate)
        </dt>
        <dd class="col-sm-10">
            @Html.DisplayFor(model => model.PublishDate)
        </dd>
    </dl>
    <table>
        <thead>
            <tr>
                <th>
                    Authors
                </th>
            </tr>
        </thead>
        <tbody>
            @foreach (var item in Model.Authors)
            {
                <tr>
                    <td>
                        @Html.DisplayFor(modelItem => item)
                    </td>
                </tr>
            }
        </tbody>
    </table>
</div>
<hr />
<div>
    <a asp-action="Edit" asp-route-id="@Model.Id">Edit</a> |
    <a asp-action="Index">Back to List</a>
</div>
Here we use the approach of strongly typed models. By including a @model statement at the top of the view file, we specify the type of object that the view expects. So here our view expects a model of type Book. We can access any property of the class Book via IntelliSense available in the Visual Studio.
Next, we define an HTML template for displaying the view data. DisplayNameFor() and DisplayFor() are HTML Helper methods which show the name and value of the properties in the model.
Model.Authors is a collection and we use the @foreach syntax to iterate through it and display the values.
Now let’s run the app and navigate to the details page once again:
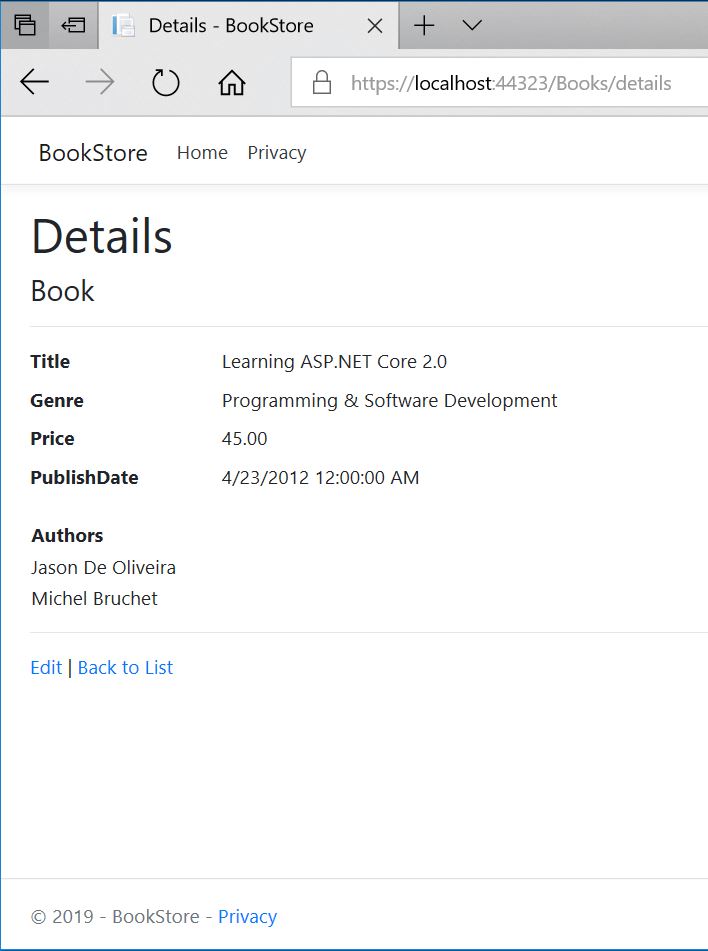
Voila! We have now created an MVC app with Models, Views and Controllers.
Next, let’s look into validating the model using data annotations.
Data Annotations
Data annotations provide a built-in set of validation attributes that we apply declaratively to any class or property. It also contains attributes that help with formatting the data:
    public class Book
    {
        public int Id { get; set; }

        [Display(Name = "Book Title")]
        [Required]
        [StringLength(maximumLength: 20, ErrorMessage = "The Title length should be between 2 and 20.", MinimumLength = 2)]
        public string Title { get; set; }

        public string Genre { get; set; }

        public List<string> Authors { get; set; }

        [DataType(DataType.Currency)]
        [Range(1, 100)]
        public decimal Price { get; set; }

        [Display(Name = "Publish Date")]
        [DataType(DataType.Date)]
        public DateTime PublishDate { get; set; }
    }
In the above code, we have applied some annotations to the Book model class.
The validation attributes specify behavior that you want to enforce on the model properties they’re applied to:
The Required attribute indicates that a property must have a value.
Using a MinimumLength attribute indicates that the property should have a minimum length which also means it cannot be empty.
The RegularExpression attribute is used to limit what characters can be input.
By using the Range attribute, we can constrain the value of a property within a specified range.
The StringLength attribute lets us set the maximum length of a string property, and optionally its minimum length.
DataTypes are used to specify the data type of the fields and are inherently required and don’t need the Required attribute.
Now let’s run the app once again and navigate to the book details page:
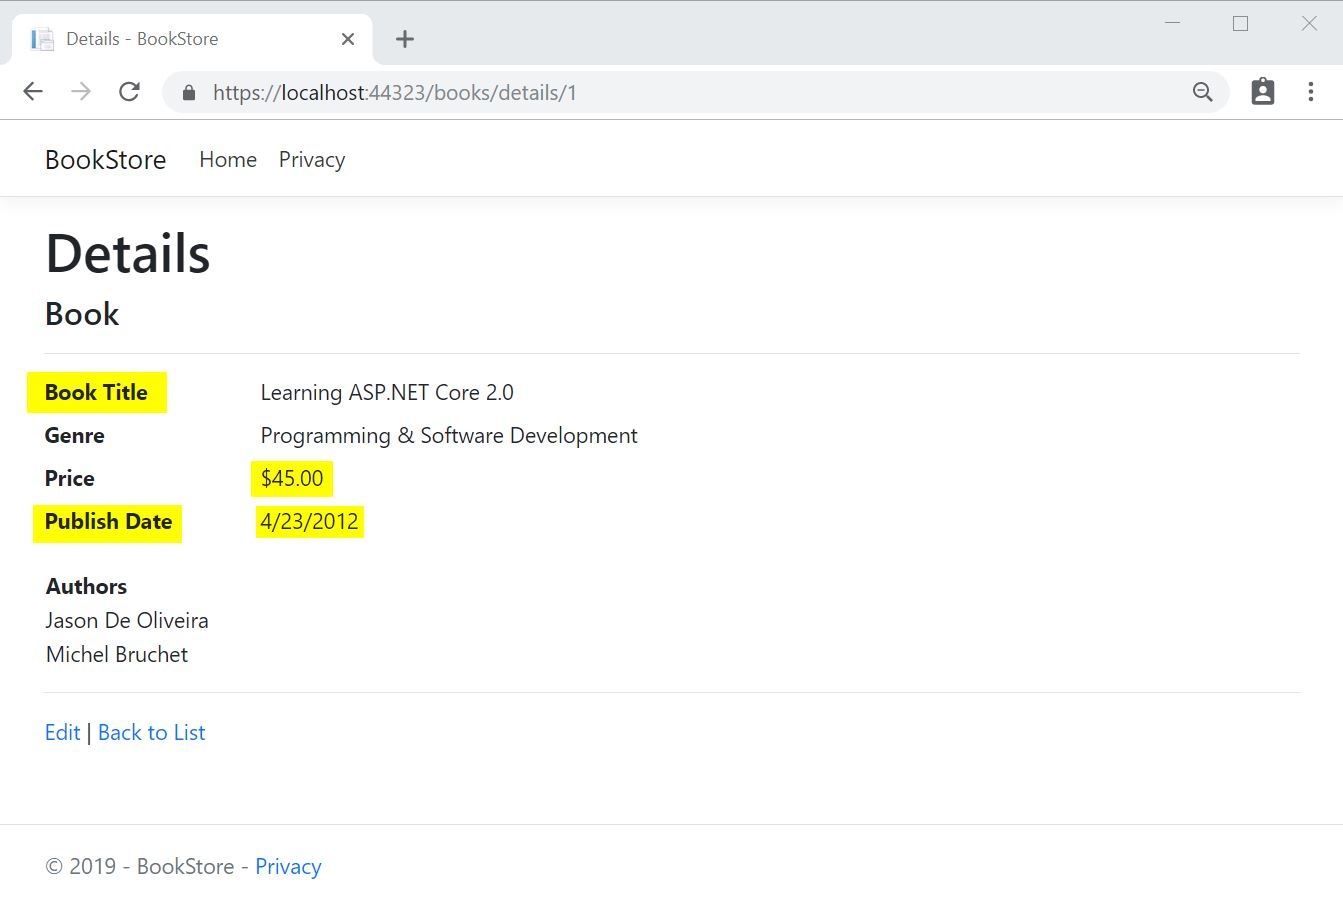
Notice that the Title has now changed to Book Title and PublishDate to Publish Date as we have applied the Display attribute. Also, note that the Price and Publish Date is formatted as currency and date for the specific locale.
Now let’s create a page for adding a new book and see the validations in action.
In the controller, we’ll add two Create methods:
 public IActionResult Create()
 {
     return View();
 }

 [HttpPost]
 [ValidateAntiForgeryToken]
 public IActionResult Create(Book book)
 {
     if (ModelState.IsValid)
     {
         // Logic to add the book to DB
         return RedirectToAction("Index");
     }
     return View(book);
 }
Create View
The first Create action method displays the initial create form.
Let’s create a view for this action. To do that we are going to right-click on the first Create action and choose the Add View option (as we did for the Index and Details actions).
In the next window, we are going to give a name to the view, to select a template for the view and to select a model class to connect this view with:
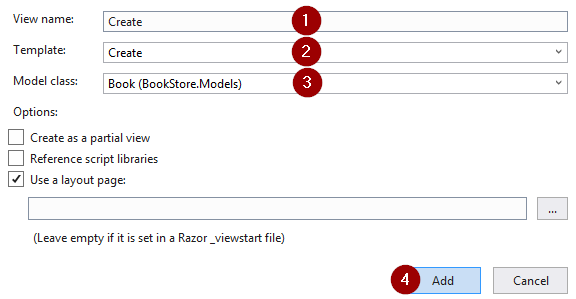
After the view is created, just remove the div part which generates the Id control, because we don’t need that for the Create view.
Second Create method has a [HttpPost] attribute which signals that only POST requests can be handled by it.
Since this is a post request and we’re submitting a form, we can use ModelState.IsValid to check whether the Book has any validation errors. Calling this method evaluates any validation attributes that have been applied to the object. If the object does not satisfy our validation criteria, the Create method re-displays the form.
If there are no errors, the method should ideally save the new book in the database. (Not implemented now)
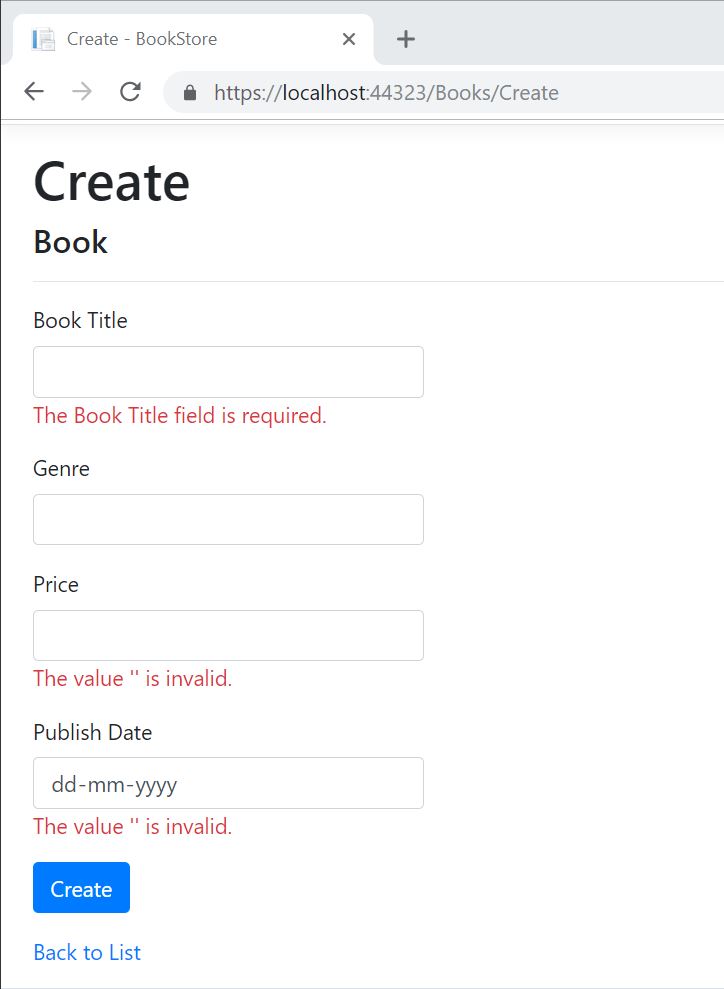
By clicking the Create button without entering valid data, we’ll see the validation messages:
So we have successfully implemented model validations and data formatting using data annotations.
Conclusion
In this article, we looked at the following topics:
- How to create an ASP.NET MVC Core project
- Examining the project structure
- Adding controllers, views, and models
- Validating and formatting data using annotations
In the next part of this series, we’re going to learn how to handle data in an ASP.NET Core MVC.

Hello! Just in the beginning stages but thought I would mention I believe you may have missed describing how to create the view for the Create method. Would be a great place to explain how to use a Create template and select the Book model class to auto scaffold that view!
Hello Lagrango. It is a good point. We are going to do that for sure. Thank you for suggestion. Best regards.
Good article. Excellent refresher.
I would add a line to update the using statements in the Book models Data annotations section.
(using System.ComponentModel.DataAnnotations;) since the blank class template does not include it by default.
Also the Create.cshtml file is not included in the article. (It is included in the source code though)
Hello Ray. Thank you for these suggestions. And thank you for reading this article. Best regards.