

In this article, we are going to learn more about the Blazor WebAssembly Role-Based Security and how IdentityServer4 fits into the whole story. Also, we are going to include our API application in this process and protect our endpoints with the required role.
It is very important that you are familiar with the IdentityServer4, OAuth2, and OIDC concepts. If you are not, we strongly suggest you read our IdentityServer4, OAuth2, and OIDC series. There, you can find complete navigation for this series as well.
So, let’s start.
Showing Claims in the Blazor WebAssembly Application
Before we start with the Blazor WebAssembly role-based security implementation, we are going to list all the claims from the authenticated user. To do that, let’s create a new Privacy component under the Pages folder:
@page "/privacy"
@using Microsoft.AspNetCore.Authorization
@attribute [Authorize]

<h3>Privacy</h3>

<AuthorizeView>
    <h2>
        Hello @context.User.Identity.Name,
        here's the list of your claims:
    </h2>
    <ul>
        @foreach (var claim in context.User.Claims)
        {
            <li><b>@claim.Type</b>: @claim.Value</li>
        }
    </ul>
</AuthorizeView>
The route for this page is /privacy and it is protected with the [Authorize] attribute against unauthorized users. Inside the AuthorizeView component, we use the context object to show the name of the user and to iterate through all the claims.
After the Privacy page creation, we can modify the NavMenu.razor component and add a new link:
<div class="@NavMenuCssClass" @onclick="ToggleNavMenu">
    <ul class="nav flex-column">
        <li class="nav-item px-3">
            <NavLink class="nav-link" href="" Match="NavLinkMatch.All">
                <span class="oi oi-home" aria-hidden="true"></span> Home
            </NavLink>
        </li>
        <li class="nav-item px-3">
            <NavLink class="nav-link" href="counter">
                <span class="oi oi-plus" aria-hidden="true"></span> Counter
            </NavLink>
        </li>
        <li class="nav-item px-3">
            <NavLink class="nav-link" href="fetchdata">
                <span class="oi oi-list-rich" aria-hidden="true"></span> Fetch data
            </NavLink>
        </li>
        <li class="nav-item px-3">
            <NavLink class="nav-link" href="privacy">
                <span class="oi oi-list-rich" aria-hidden="true"></span> Privacy
            </NavLink>
        </li>
    </ul>
</div>
Now, we can start all three applications, log in with Mick’s credentials, and navigate to the Privacy page:
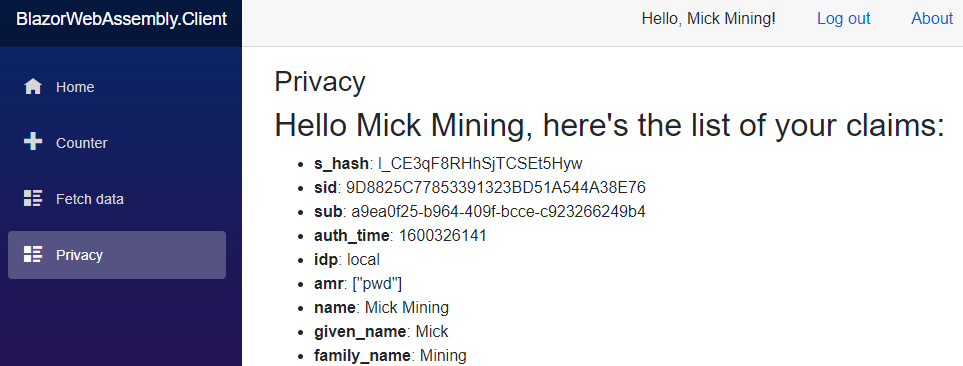
As we can see, here are all the claims but, we can’t see roles.
Let’s deal with it.
IdentityServer4 Roles Configuration
Since we are using an already prepared IS4 project for this series, the roles are included and supported. If we open the InMemoryConfig class and inspect the GetIdentityResources method, we are going to find support for the roles:
public static IEnumerable<IdentityResource> GetIdentityResources() =>
    new List<IdentityResource>
    {
        new IdentityResources.OpenId(),
        new IdentityResources.Profile(),
        new IdentityResources.Address(),
        new IdentityResource("roles", "User role(s)", new List<string> { "role" }),
        new IdentityResource("position", "Your position", new List<string> { "position" }),
        new IdentityResource("country", "Your country", new List<string> { "country" })
    };
Here, we support the identity resource with the name roles, display name, and the role claim.
Also, if we take a look at our users in the same class, we are going to find roles attached to both of them:
public static List<TestUser> GetUsers() =>
    new List<TestUser>
    {
        new TestUser
        {
            ...
            Claims = new List<Claim>
            {
                ...
                new Claim("role", "Admin"),
                new Claim("position", "Administrator"),
                new Claim("country", "USA")
            }
        },
        new TestUser
        {
            ...
            Claims = new List<Claim>
            {
                ...
                new Claim("role", "Visitor"),
                new Claim("position", "Viewer"),
                new Claim("country", "USA")
            }
        }
    };
But, as we saw, this is not enough. We have to provide a way to send our role and other claims to the client application.
Creating CustomProfileService to Send Claims to the Client App
Let’s start by creating a new CustomProfileService class at the root of the IS4 application.
After the creation, we can modify it:
public class CustomProfileService : IProfileService
{
    public Task GetProfileDataAsync(ProfileDataRequestContext context)
    {
        var sub = context.Subject.GetSubjectId();
        var user = InMemoryConfig.GetUsers()
            .Find(u => u.SubjectId.Equals(sub));

        context.IssuedClaims.AddRange(user.Claims);
        return Task.CompletedTask;
    }

    public Task IsActiveAsync(IsActiveContext context)
    {
        var sub = context.Subject.GetSubjectId();
        var user = InMemoryConfig.GetUsers()
            .Find(u => u.SubjectId.Equals(sub));

        context.IsActive = user != null;
        return Task.CompletedTask;
    }
}
The CustomProfileService class must inherit from the IProfileService interface and implement both GetProfileDataAsync and IsActiveAsync methods. In the first method, we include the required claims for a user using the context object. There, we fetch the SubjectId and use it to find a user from our InMemoryConfig class. After that, we just add all the claims to the IssuedClaims list and complete the Task.
In the second method, we determine if a user is currently allowed to obtain tokens. So, if we find a user based on the SubjectId, we return true, otherwise false.
We have one more thing to do.
Let’s register this new class as a profile service for the IdentityServer4 application:
services.AddIdentityServer()
    .AddTestUsers(InMemoryConfig.GetUsers())
    .AddDeveloperSigningCredential() //not something we want to use in a production environment;
    .AddProfileService<CustomProfileService>()
    .AddConfigurationStore(opt =>
        ...
Of course, in .NET 6 and above we should use the builder variable to access the Services property:
builder.Services.AddIdentityServer()
 .AddTestUsers(InMemoryConfig.GetUsers())
 .AddDeveloperSigningCredential() //not something we want to use in a production environment;
 .AddProfileService<CustomProfileService>()
 .AddConfigurationStore(opt => ...
Excellent.
Now, let’s start again all applications, successfully authenticate, and visit the Privacy page:
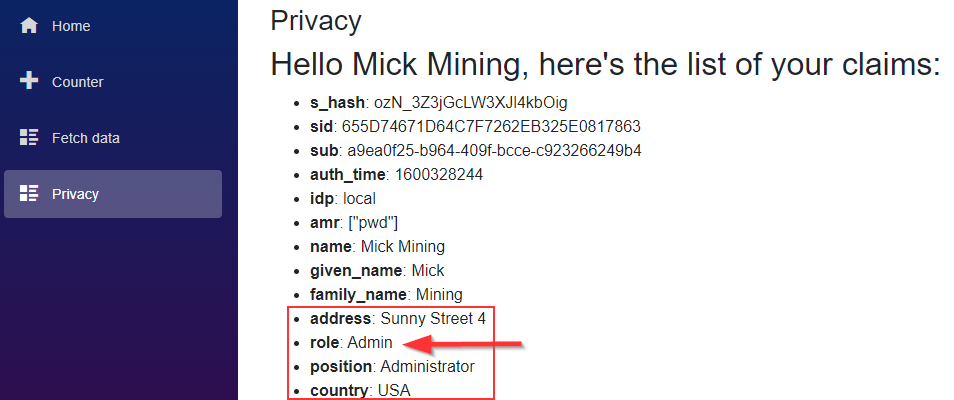
And there we go. The role claim is here alongside other user’s claims.
Blazor WebAssembly Role-Based Security Implementation
It’s the right time to use this role claim to protect our Privacy page. To accomplish that, all we have to do is to slightly modify the Privacy page:
@page "/privacy"
@using Microsoft.AspNetCore.Authorization
@attribute [Authorize(Roles = "Admin")]

<h3>Privacy</h3>

<AuthorizeView>
    <h2>
        Hello @context.User.Identity.Name,
        here's the list of your claims:
    </h2>
    <ul>
        @foreach (var claim in context.User.Claims)
        {
            <li><b>@claim.Type</b>: @claim.Value</li>
        }
    </ul>
</AuthorizeView>
With this change, we allow only authorized users with the Admin role to access this page.
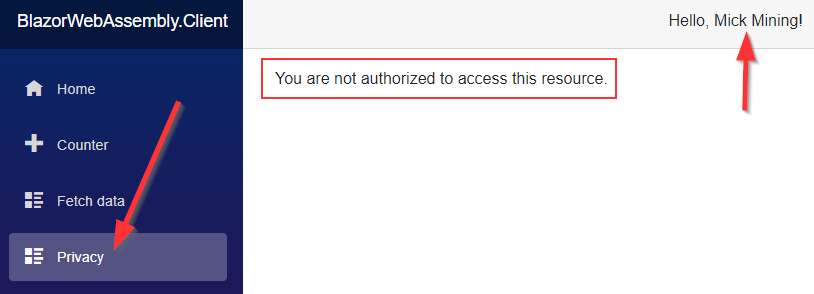
Now, if we use Mick’s credentials to authenticate (since Mick has the Admin role), and try to navigate to the Privacy page, we are going to see a message that we are not authorized to access this resource.
That’s because the Blazor app is not using the role claim for authorization actions. At least, not yet. To change that, we have to modify the Program.cs class:
builder.Services.AddOidcAuthentication(options =>
{
    builder.Configuration.Bind("oidc", options.ProviderOptions);
    options.UserOptions.RoleClaim = "role";
});
Now, if we log in again as Mick, we will be able to access the Privacy page. Also, if we do the same with Jane’s credentials, we are not going to be able to visit this page.
Protecting API Endpoint
Our Privacy page is not communicating with any endpoint on the API’s side, but let’s change that.
First, let’s add a new Privacy.razor.cs file and modify it:
public partial class Privacy
{
    [Inject]
    public HttpClient HttpClient { get; set; }

    private List<string> _claims = new List<string>();

    protected override async Task OnInitializedAsync()
    {
        _claims = await HttpClient.GetFromJsonAsync<List<string>>("companies/privacy");
    }
}
We use our registered HttpClient from the previous article, and send a request to the Web API’s endpoint, which returns the claims from the access token.
Then, let’s modify the razor file, just to show these claims as well:
@page "/privacy"
@using Microsoft.AspNetCore.Authorization
@attribute [Authorize(Roles = "Admin")]

<h3>Privacy</h3>

<AuthorizeView>
    <h2>
        Hello @context.User.Identity.Name,
        here's the list of your claims:
    </h2>
    <ul>
        @foreach (var claim in context.User.Claims)
        {
            <li><b>@claim.Type</b>: @claim.Value</li>
        }
    </ul>
</AuthorizeView>

<h3>Claims from the API</h3>
<ul>
    @foreach (var claim in _claims)
    {
        <li>@claim</li>
    }
</ul>
Finally, we have to add a new endpoint to the CompaniesController in the Web API project:
[HttpGet("Privacy")]
[Authorize(Roles = "Admin")]
public IEnumerable<string> Privacy()
{
    var claims = User.Claims.Select(c => $"{c.Type}: {c.Value}").ToList();

    return claims;
}
As you can see the [Authorize] attribute has the Roles property, where we state only users with the Admin role can access the resources from this endpoint.
Now, we can start all three apps, log in as Mick, and navigate to the Privacy page:
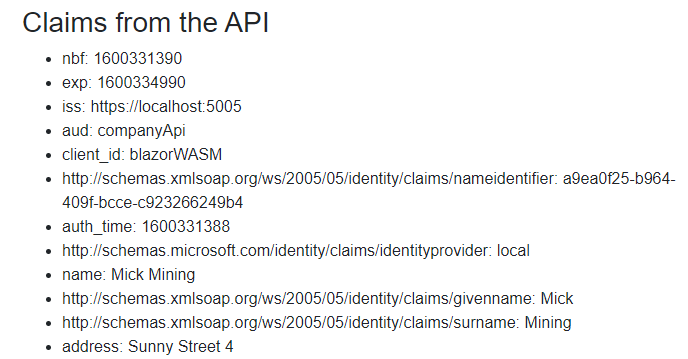
We can see these (and many other) claims right below the claims from the client application.
So, this means our API’s endpoint is also protected with a Role-Based authorization.
Blazor WebAssembly Role-Based Security with Multiple Roles
We have to mention this specific case because it brings an additional level of complexity to our code. Let us show you what we mean.
Let’s first add one more role to Mick in the InMemoryConfig class on the IDP level:
new TestUser
{
      SubjectId = "a9ea0f25-b964-409f-bcce-c923266249b4",
      Username = "Mick",
      Password = "MickPassword",
      Claims = new List<Claim>
      {
          new Claim(JwtClaimTypes.Name, "Mick Mining"),
          new Claim("given_name", "Mick"),
          new Claim("family_name", "Mining"),
          new Claim("address", "Sunny Street 4"),
          new Claim("role", "Admin"),
          new Claim("role", "Manager"),
          new Claim("position", "Administrator"),
          new Claim("country", "USA")
      }
},
Now, let’s just remove the CompanyEmployeeOAuth database, so that as soon as we start our IDP app, it creates a new database with all the data from this class.
After we do that, we can start all the apps, log in as Mick, and inspect the Privacy page:
We see the problem. We are logged in, but we don’t have an access to the Privacy page.
For now, let’s just comment out the [Authorize] attribute on the Privacy page and do the same steps again:
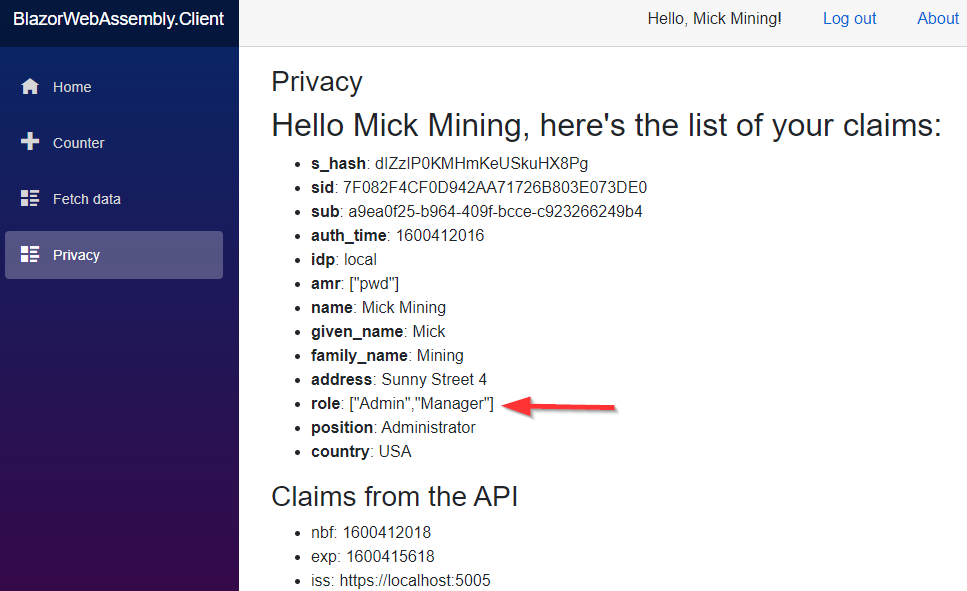
As we can see, we have the access to the API’s resources, which means the Role-Based authorization works. So, the problem is on the Blazor’s side with the way the multiple roles are displayed. Clearly, we have to split every single role into its own role claim.
First, let’s uncomment the [Authorize] attribute on the API level.
Then, let’s create a new ClaimsPrincipalFactory folder and a new MultipleRoleClaimsPrincipalFactory class under it:
public class MultipleRoleClaimsPrincipalFactory<TAccount> : AccountClaimsPrincipalFactory<TAccount>
    where TAccount : RemoteUserAccount
{
    public MultipleRoleClaimsPrincipalFactory(IAccessTokenProviderAccessor accessor)
        : base(accessor)
    {
    }

    public async override ValueTask<ClaimsPrincipal> CreateUserAsync(TAccount account, RemoteAuthenticationUserOptions options)
    {
        var user = await base.CreateUserAsync(account, options);

        var claimsIdentity = (ClaimsIdentity)user.Identity;

        if (account != null)
        {
            MapArrayClaimsToMultipleSeparateClaims(account, claimsIdentity);
        }

        return user;
    }

    private static void MapArrayClaimsToMultipleSeparateClaims(TAccount account, ClaimsIdentity claimsIdentity)
    {
        foreach (var prop in account.AdditionalProperties)
        {
            var key = prop.Key;
            var value = prop.Value;
            if (value != null &&
                (value is JsonElement element && element.ValueKind == JsonValueKind.Array))
            {
                claimsIdentity.RemoveClaim(claimsIdentity.FindFirst(prop.Key));

                var claims = element.EnumerateArray()
                    .Select(x => new Claim(prop.Key, x.ToString()));

                claimsIdentity.AddClaims(claims);
            }
        }
    }
}
Our class inherits from the AccountClaimsPrincipalFactory class and overrides the CreateUserAsync method. The AccountClaimsPrincipalFactory class provides a default implementation for converting a RemoteUserAccount into a ClaimsPrincipal. By overriding the CreateUserAsync method, we extract the ClaimsIdentity from the created user and call the MapArrayClaimsToMultipleSeparateClaims method. This method does exactly what the name states – it maps claims from an array to the multiply single claims.
We have one more thing to do. Let’s open the Program.cs class and replace the existing AccountClaimsPrincipalFactory with our custom one:
builder.Services.AddOidcAuthentication(options =>
{
    builder.Configuration.Bind("oidc", options.ProviderOptions);
    options.UserOptions.RoleClaim = "role";
})
.AddAccountClaimsPrincipalFactory<MultipleRoleClaimsPrincipalFactory<RemoteUserAccount>>();
Good.
Now, let’s start the client app, log in, and inspect the Privacy page:
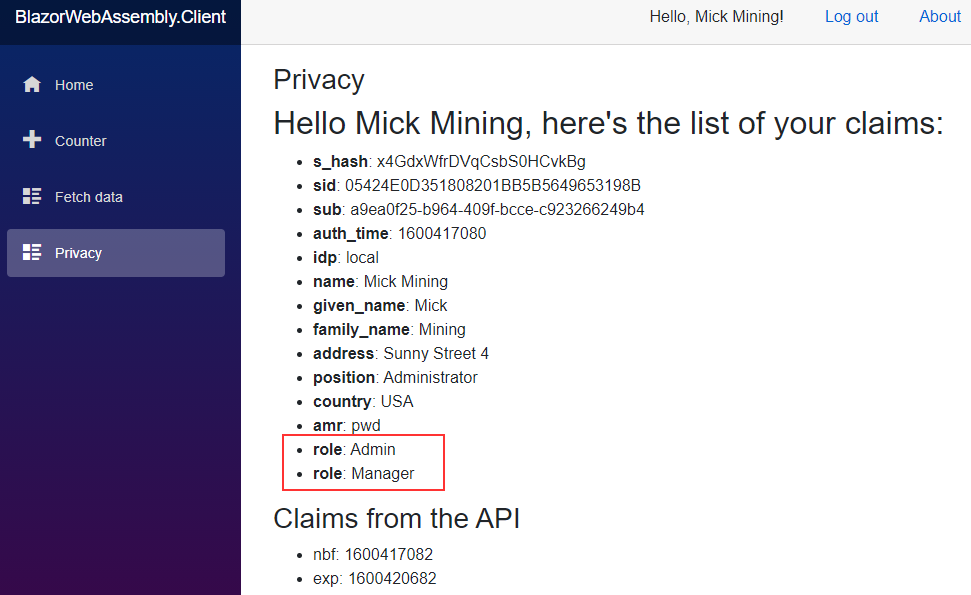
We can see the role claim split into multiple claims, and that our role-based authorization works with multiple roles for a single user.
Hiding UI Elements in Our Blazor WebAssembly Application
At this point, if we log in as Jane, we won’t be able to see the content of the Privacy page, but we still see the link in the menu bar. If we want to hide it, we can modify the NavMenu.razror file:
<div class="@NavMenuCssClass" @onclick="ToggleNavMenu">
    <ul class="nav flex-column">
        <li class="nav-item px-3">
            <NavLink class="nav-link" href="" Match="NavLinkMatch.All">
                <span class="oi oi-home" aria-hidden="true"></span> Home
            </NavLink>
        </li>
        <li class="nav-item px-3">
            <NavLink class="nav-link" href="counter">
                <span class="oi oi-plus" aria-hidden="true"></span> Counter
            </NavLink>
        </li>
        <li class="nav-item px-3">
            <NavLink class="nav-link" href="fetchdata">
                <span class="oi oi-list-rich" aria-hidden="true"></span> Fetch data
            </NavLink>
        </li>
        <AuthorizeView Roles="Admin">
            <Authorized>
                <li class="nav-item px-3">
                    <NavLink class="nav-link" href="privacy">
                        <span class="oi oi-list-rich" aria-hidden="true"></span> Privacy
                    </NavLink>
                </li>
            </Authorized>
        </AuthorizeView>
    </ul>
</div>
Now, if we log in as Mick, we will be able to see this menu. But if we do the same as Jane, the Privacy link will disappear.
Conclusion
So, we have learned a lot of things:
- How to provide claims from IS4 to the Blazor WebAssembly application,
- The way to use the role claim to improve the authorization process
- How to handle multiple roles for a single user
- The way to use roles to hide UI elements in our client application
In the next article, we are going to learn about Attribute-Based Access Control in Blazor WebAssembly application.
See you there.

